A web server (also known as a HTTP server) is a service that handles content (most commonly web pages, but other types of documents as well) over to a client in a network.
A FTP server is one of the oldest and most commonly used resources (even to this day) to make files available to clients on a network in cases where no authentication is necessary since FTP uses username and password without encryption.
The web server available in RHEL 7 is version 2.4 of the Apache HTTP Server. As for the FTP server, we will use the Very Secure Ftp Daemon (aka vsftpd) to establish connections secured by TLS.

In this article we will explain how to install, configure, and secure a web server and a FTP server in RHEL 7.
Installing Apache and FTP Server
In this guide we will use a RHEL 7 server with a static IP address of 192.168.0.18/24. To install Apache and VSFTPD, run the following command:
# yum update && yum install httpd vsftpd
When the installation completes, both services will be disabled initially, so we need to start them manually for the time being and enable them to start automatically beginning with the next boot:
# systemctl start httpd
# systemctl enable httpd
# systemctl start vsftpd
# systemctl enable vsftpd
In addition, we have to open ports 80 and 21, where the web and ftp daemons are listening, respectively, in order to allow access to those services from the outside:
# firewall-cmd --zone=public --add-port=80/tcp --permanent
# firewall-cmd --zone=public --add-service=ftp --permanent
# firewall-cmd --reload
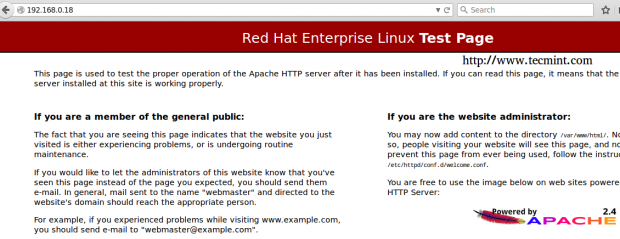
To confirm that the web server is working properly, fire up your browser and enter the IP of the server. You should see the test page:
As for the ftp server, we will have to configure it further, which we will do in a minute, before confirming that it’s working as expected.
Configuring and Securing Apache Web Server
The main configuration file for Apache is located in /etc/httpd/conf/httpd.conf, but it may rely on other files present inside /etc/httpd/conf.d.
Although the default configuration should be sufficient for most cases, it’s a good idea to become familiar with all the available options as described in the official documentation.
As always, make a backup copy of the main configuration file before editing it:
# cp /etc/httpd/conf/httpd.conf /etc/httpd/conf/httpd.conf.$(date +%Y%m%d)
Then open it with your preferred text editor and look for the following variables:
- ServerRoot: the directory where the server’s configuration, error, and log files are kept.
- Listen: instructs Apache to listen on specific IP address and / or ports.
- Include: allows the inclusion of other configuration files, which must exist. Otherwise, the server will fail, as opposed to the IncludeOptional directive, which is silently ignored if the specified configuration files do not exist.
- User and Group: the name of the user/group to run the httpd service as.
- DocumentRoot: The directory out of which Apache will serve your documents. By default, all requests are taken from this directory, but symbolic links and aliases may be used to point to other locations.
- ServerName: this directive sets the hostname (or IP address) and port that the server uses to identify itself.
The first security measure will consist of creating a dedicated user and group (i.e. tecmint/tecmint) to run the web server as and changing the default port to a higher one (9000 in this case):
ServerRoot "/etc/httpd"
Listen 192.168.0.18:9000
User tecmint
Group tecmint
DocumentRoot "/var/www/html"
ServerName 192.168.0.18:9000
You can test the configuration file with.
# apachectl configtest
and if everything is OK, then restart the web server.
# systemctl restart httpd
and don’t forget to enable the new port (and disable the old one) in the firewall:
# firewall-cmd --zone=public --remove-port=80/tcp --permanent
# firewall-cmd --zone=public --add-port=9000/tcp --permanent
# firewall-cmd --reload
Note that, due to SELinux policies, you can only use the ports returned by
# semanage port -l | grep -w '^http_port_t'
for the web server.
If you want to use another port (i.e. TCP port 8100), you will have to add it to SELinux port context for the httpd service:
# semanage port -a -t http_port_t -p tcp 8100

To further secure your Apache installation, follow these steps:
1. The user Apache is running as should not have access to a shell:
# usermod -s /sbin/nologin tecmint
2. Disable directory listing in order to prevent the browser from displaying the contents of a directory if there is no index.html present in that directory.
Edit /etc/httpd/conf/httpd.conf (and the configuration files for virtual hosts, if any) and make sure that the Options directive, both at the top and at Directory block levels, is set to None:
Options None
3. Hide information about the web server and the operating system in HTTP responses. Edit /etc/httpd/conf/httpd.conf as follows:
ServerTokens Prod
ServerSignature Off
Now you are ready to start serving content from your /var/www/html directory.
Configuring and Securing FTP Server
As in the case of Apache, the main configuration file for Vsftpd (/etc/vsftpd/vsftpd.conf) is well commented and while the default configuration should suffice for most applications, you should become acquainted with the documentation and the man page (man vsftpd.conf) in order to operate the ftp server more efficiently (I can’t emphasize that enough!).
In our case, these are the directives used:
anonymous_enable=NO
local_enable=YES
write_enable=YES
local_umask=022
dirmessage_enable=YES
xferlog_enable=YES
connect_from_port_20=YES
xferlog_std_format=YES
chroot_local_user=YES
allow_writeable_chroot=YES
listen=NO
listen_ipv6=YES
pam_service_name=vsftpd
userlist_enable=YES
tcp_wrappers=YES
By using chroot_local_user=YES, local users will be (by default) placed in a chroot’ed jail in their home directory right after login. This means that local users will not be able to access any files outside their corresponding home directories.
Finally, to allow ftp to read files in the user’s home directory, set the following SELinux boolean:
# setsebool -P ftp_home_dir on
You can now connect to the ftp server using a client such as Filezilla:

Note that the /var/log/xferlog log records downloads and uploads, which concur with the above directory listing:

Read Also: Limit FTP Network Bandwidth Used by Applications in a Linux System with Trickle
Summary
In this tutorial we have explained how to set up a web and a ftp server. Due to the vastness of the subject, it is not possible to cover all the aspects of these topics (i.e. virtual web hosts). Thus, I recommend you also check other excellent articles in this website about Apache.