Over time, the traditional username and password authentication has proven inadequate in providing robust security to applications and systems. Usernames and passwords can easily be cracked using a plethora of hacking tools, leaving your system vulnerable to breaches. For this reason, any company or entity that takes security seriously needs to implement 2-Factor authentication.
Colloquially known as MFA (Multi-Factor Authentication), 2-Factor authentication provides an extra layer of security that requires users to provides certain details such as codes, or OTP (One Time Password) before or after authenticating with the usual username and password.
Nowadays multiple companies such as Google, Facebook, Twitter, and AWS, to mention a few provide users the choice of setting up MFA to further protect their accounts.
In this guide, we demonstrate how you can use Two-Factor Authentication with Ubuntu.
Step 1: Install Google’s PAM Package
First off, install the Google PAM package. PAM, an abbreviation for Pluggable Authentication Module, is a mechanism that provides an extra layer of authentication on the Linux platform.
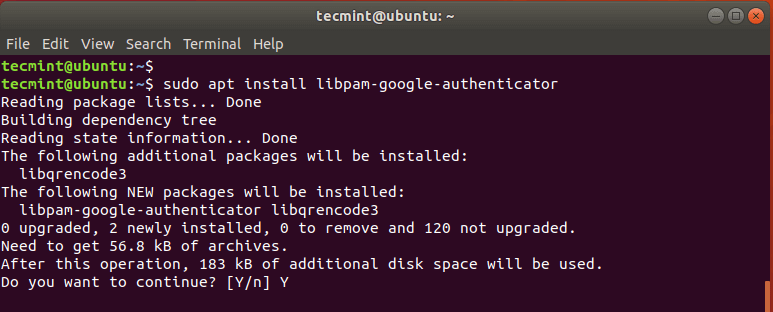
The package is hosted on the Ubuntu repository, so proceed and use the apt command to install it as follows:
$ sudo apt install libpam-google-authenticator
When prompted, hit 'Y' and press ENTER to continue with the installation.
Step 2: Install Google Authenticator App on Your Smartphone
Additionally, you need to install the Google Authenticator application on your tablet or smartphone. The app will present you with a 6 digit OTP code that auto-renews every 30 seconds.

Step 3: Configure Google PAM in Ubuntu
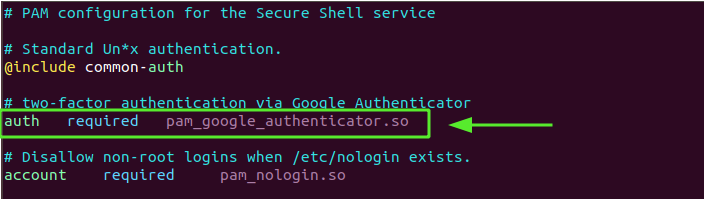
With the Google Authenticator app in place, we will proceed and configure the Google PAM package on Ubuntu by modifying the /etc/pam.d/common-auth file as shown.
$ sudo vim /etc/pam.d/common-auth
Append the line below to the file as indicated.
auth required pam_google_authenticator.so
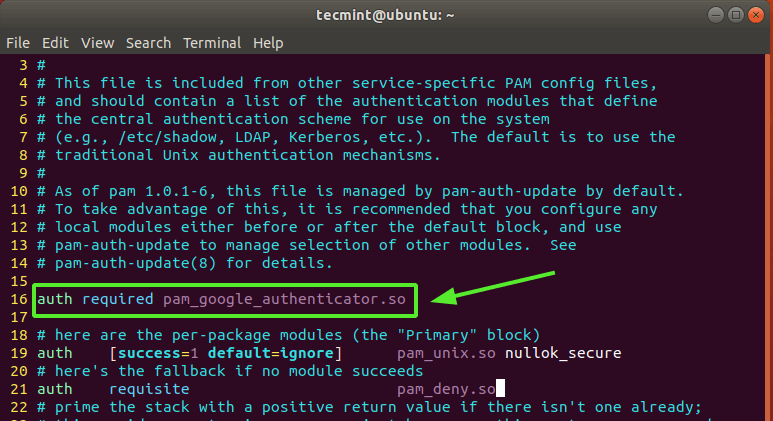
Save the file and exit.
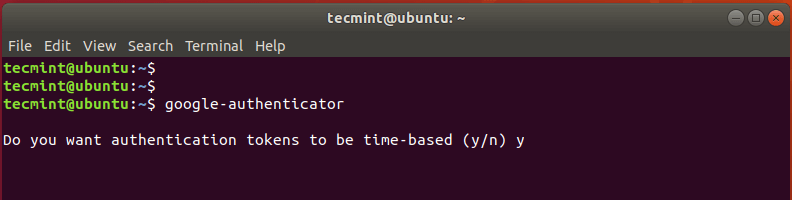
Now, run the command below to initialize PAM.
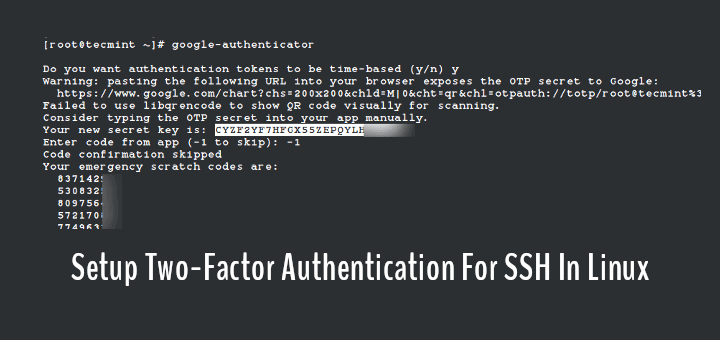
$ google-authenticator
This will evoke a couple of questions on your terminal screen. First, you will be asked if you want authentication tokens to be time-based.
Time-based authentication tokens expire after a certain time. By default, this is after 30 secs, upon which a new set of tokens is generated. These tokens are considered more secure than non-time-based tokens, and therefore, type 'y' for yes and hit ENTER.
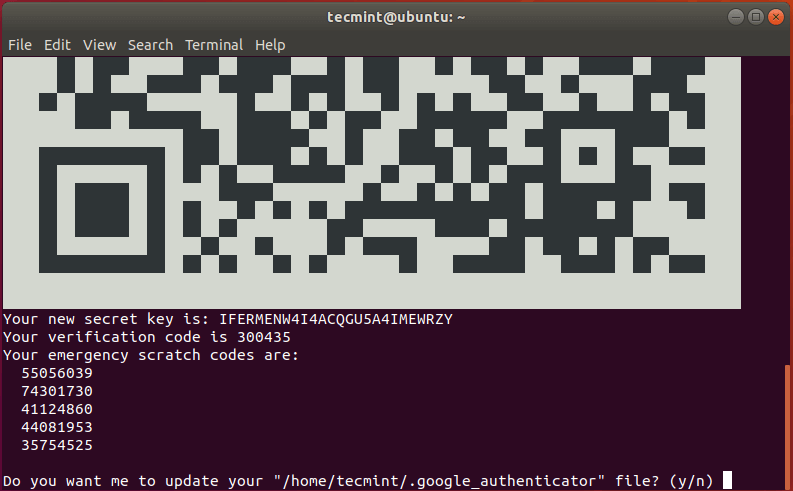
Next, a QR code will be displayed on the terminal as shown below and right below it, some information will be displayed. The information displayed includes:
- Secret key
- Verification code
- Emergency scratch codes
You need to save this information to a vault for future reference. The emergency scratch codes are extremely useful in the event you lose your authenticator device. Should anything happen to your authentication device, use the codes.
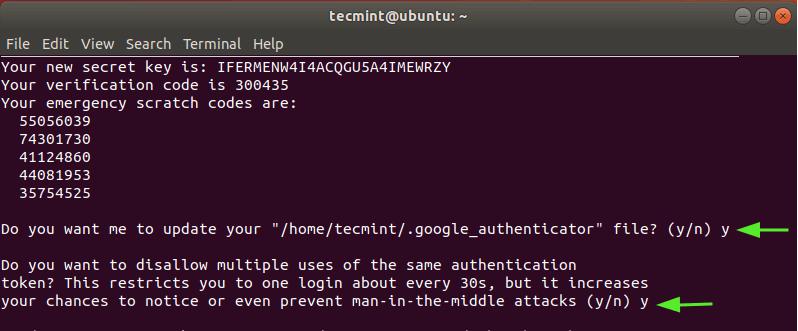
Launch the Google Authenticator App on your smart device and select ‘Scan QR code’ to scan the QR code presented.
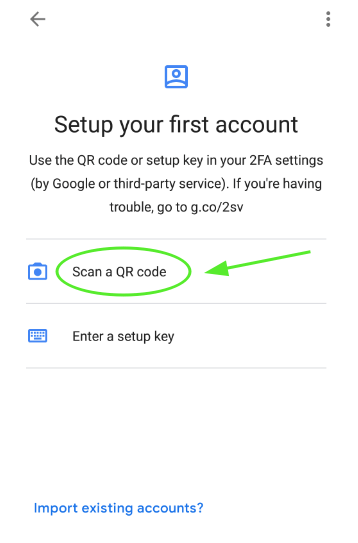
NOTE: You need to maximize the terminal window in order to scan the entire QR code. Once the QR code is scanned, a six-digit OTP that changes every 30 seconds will be displayed on the App.
Thereafter, Select 'y' to update the Google authenticator file in your home folder.
In the next prompt, restrict login to just one log in every 30 seconds in order to prevent attacks that might arise due to man-in-the-middle attacks. So select 'y'
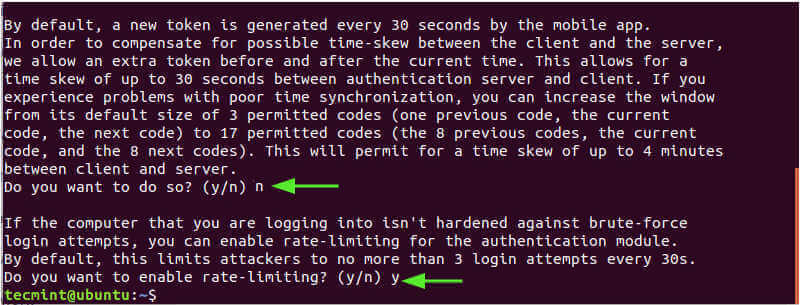
In the next prompt, Select 'n' to disallow the extension of the time duration which addresses time-skew between server and client. This is the more secure option unless you are experiencing challenges with poor time synchronization.
And finally, enable rate-limiting to only 3 login attempts.
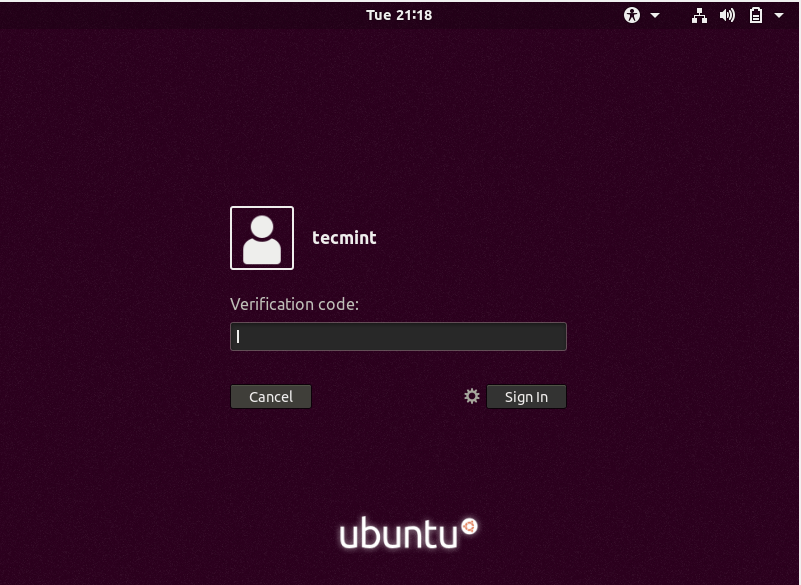
At this point, we have finished implementing the 2-factor authentication feature. In fact, if you run any sudo command, you will be prompted for a verification code which you can obtain from the Google Authenticator app.
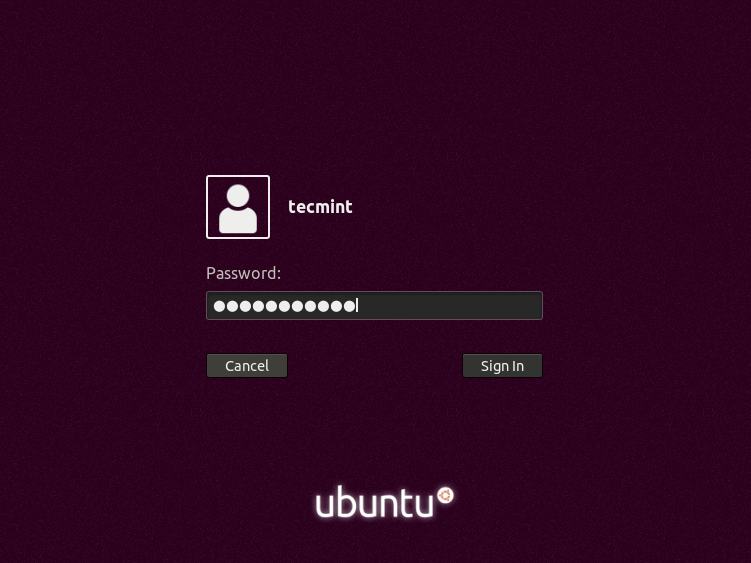
You can further verify this by rebooting and once you get to the login screen, you will be requested to provide your verification code.
After you have provided your code from the Google Authenticator app, just provide your password to access your system.
Step 4: Integrate SSH with Google Authenticator
If you intend to use SSH with the Google PAM module, you need to integrate the two. There are two ways you can achieve this.
For SSH password Authentication
To enable SSH password authentication for a regular user, first, open the default SSH configuration file.
$ sudo vim /etc/ssh/sshd_config
And set the following attributes to ‘yes’ as shown

For the root user, set the ‘PermitRootLogin‘ attribute to 'yes'.
PermitRootLogin yes
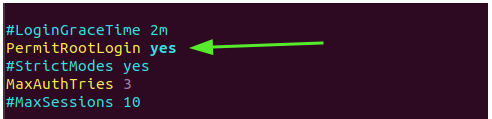
Save the file and exit.
Next, modify the PAM rule for SSH
$ sudo vim /etc/pam.d/sshd
Then append the following line
auth required pam_google_authenticator.so

Lastly, restart the SSH service for the changes to come into effect.
$ sudo systemctl restart ssh
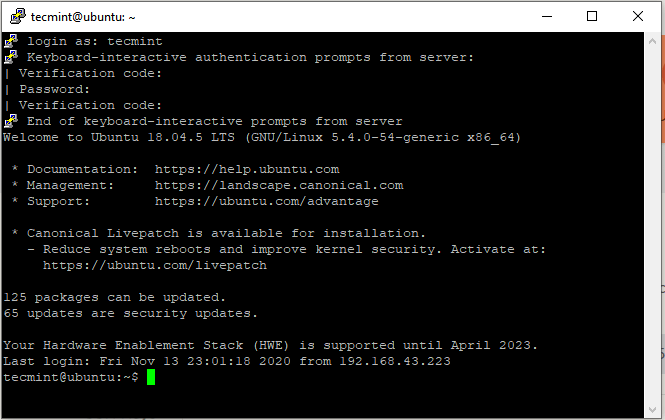
In the example below, we are logging in to the Ubuntu system from the Putty client.
For SSH Public-Key Authentication
If you are using public-key authentication, repeat the above steps and add the line shown at the bottom of the /etc/ssh/sshd_config file.
AuthenticationMethods publickey,keyboard-interactive
Once again, edit the PAM rule for the SSH daemon.
$ sudo vim /etc/pam.d/sshd
Then add the following line.
auth required pam_google_authenticator.so
Save the file and restart the SSH service as we saw earlier.
$ sudo systemctl restart ssh
Disable Two-Factor Authentication in Ubuntu
In case you lose your authenticating device or your secret key, don’t go nuts. You can easily disable the 2FA authentication layer and go back to your simple username/password login method.
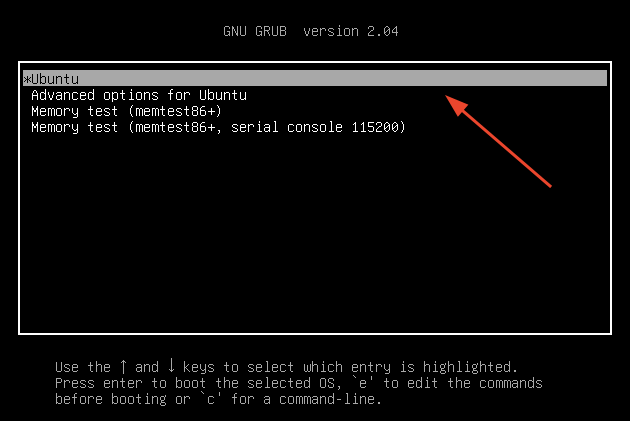
First, restart your system and press 'e' on the first GRUB entry.
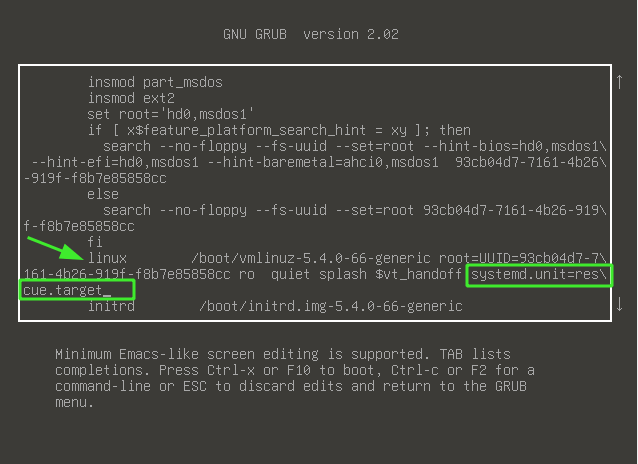
Scroll and locate the line that starts with linux and ends with quiet splash $vt_handoff. Append the line systemd.unit=rescue.target and press ctrl + x to enter into rescue mode
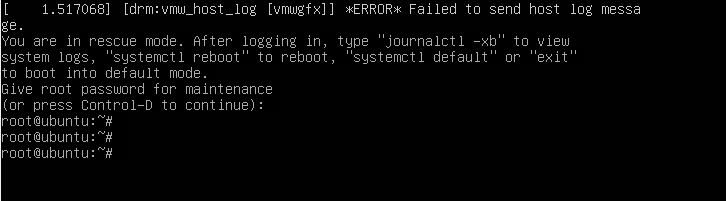
Once you gain the shell, provide the root password and press ENTER.
Next, proceed and delete the .google-authenticator file in your home directory as follows. Be sure to replace the username with your own username.
# rm /home/username/.google_authenticator
Then edit the /etc/pam.d/common-auth file.
# $ vim /etc/pam.d/common-auth
Comment or delete the following line:
auth required pam_google_authenticator.so
Save the file and reboot your system. On the login screen, you will only be required to provide your username and password to authenticate.
And this brings us to the end of this article. We will be glad to hear how it went.


Are any additional settings needed to get this to work over an RDP connection?
In the latest Ubuntu 22.04 ChallengeResponseAuthentication was replaced with KbdInteractiveAuthentication which was set to
noin my default install.Change it to
yesand these steps work.Thanks for this article! It has been getting a bit cumbersome for me, however, and since my laptop rarely leaves the house, it is probably not necessary. Can this be deleted, or must we just “disable” using the “Disable Two-Factor Authentication in Ubuntu” section? I used dpkg –list to search for google-authenticator from the terminal in order to try to delete, but the search did not come up with anything (I did see libpam-google-authenticator, however).
@Aaron,
Yes, you can disable Two-Factor authentication as explained in the section “Disable Two-Factor Authentication in Ubuntu”.
Is there a way to skip ‘verification code‘ on every sudo command? It’s quite annoying to check the phone every time. For me, it is enough to ask for the verification code only when logging in to Linux.
Hey dark, sadly you would have to disable the multi-factor authentication altogether to achieve this.
Ubuntu isn’t the most common operating system, but it’s still used by a fair number of people. Having two-factor authentication in place will ensure that any and all logins, transactions, and the like will be treated with the utmost security.
Any suggestions on how to handle what breaks when implementing this, like other automated logins over ssh and sftp? For instance, I turned this on for my fileserver but then Filezilla won’t work nor will access the server for time machine backups.
Hey Michael, we will add a small section on how you can disable the 2FA in case you are encountering difficulities.
Hi,
This is great and while I am not arguing that this is a step up from nothing, why use an outdated technology that is also cumbersome. Why not use a yubikey?
What if you don’t have a usb port to plug in a yubikey?