Fedora 41, the latest version of the Fedora operating system, was released on October 29, 2024, which is a community-supported Linux distribution that is known for its innovative features, leading-edge technology, and active community support.
In this guide, we’ll walk you through the step-by-step process of installing Fedora 41 Server, ensuring a smooth setup for your server environment.
Fedora 41 Server Requirements
The minimum system requirements for Fedora 41 Server are as follows:
- 2 GHz or faster 64-bit x86-64 processor.
- 2 GB of RAM
- 50 GB of disk space
- Ethernet or wireless network connection
Downloading Fedora 41 Server
To get started, head to the official Fedora website and download the installation image for the Fedora 41 Server. Choose the appropriate architecture, and consider using a reliable download manager for a seamless experience.
Alternatively, open a terminal window and navigate to the directory where you want to store the files. Assuming your home directory, issue the following wget command as demonstrated.
wget https://download.fedoraproject.org/pub/fedora/linux/releases/41/Server/x86_64/iso/Fedora-Server-dvd-x86_64-41-1.4.iso
Creating a Bootable Fedora USB
Once the Fedora 41 installation image is downloaded, the next step involves creating a bootable USB using a tool like Rufus on Windows or the ‘dd’ command on Linux to transfer the installation image to a USB drive.
As someone aspiring to be a hardcore server sysadmin, you might favor a fast and efficient command-line utility like dd. While in a terminal window, connect the USB stick and execute the following command to retrieve a list of attached devices.
lsblk
Once you determine the USB device, create a bootable drive by transferring the downloaded Fedora installation image to the device in one go.
dd if=Fedora-Server-dvd-x86_64-41-1.4.iso of=/dev/sdc bs=8M status=progress
Installation of Fedora 41 Server
After the successful creation of the bootable media, insert the bootable USB into the server and reboot. Make sure that the system is set to boot from the USB drive, once the system is booted you will see a Fedora installer screen with various options to configure your server as shown.
1. There are two options, one you can install Fedora 41 straight away or test the installation media for any errors before starting the installation process.

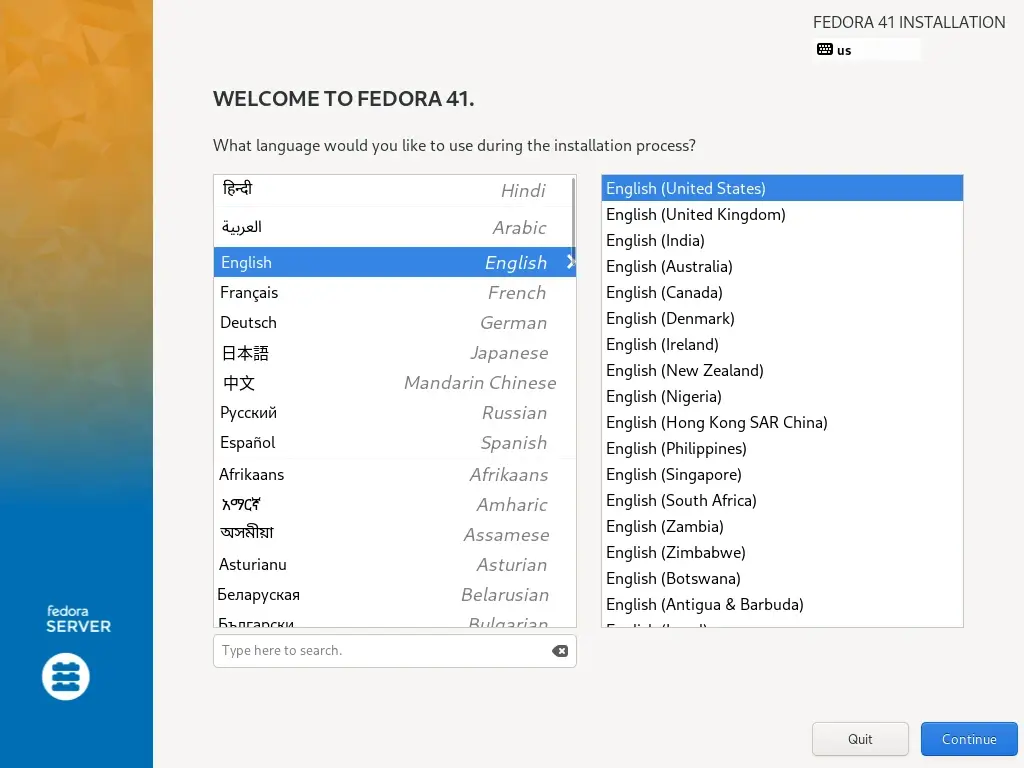
2. Choose the installation language you wish to use and click on Continue.
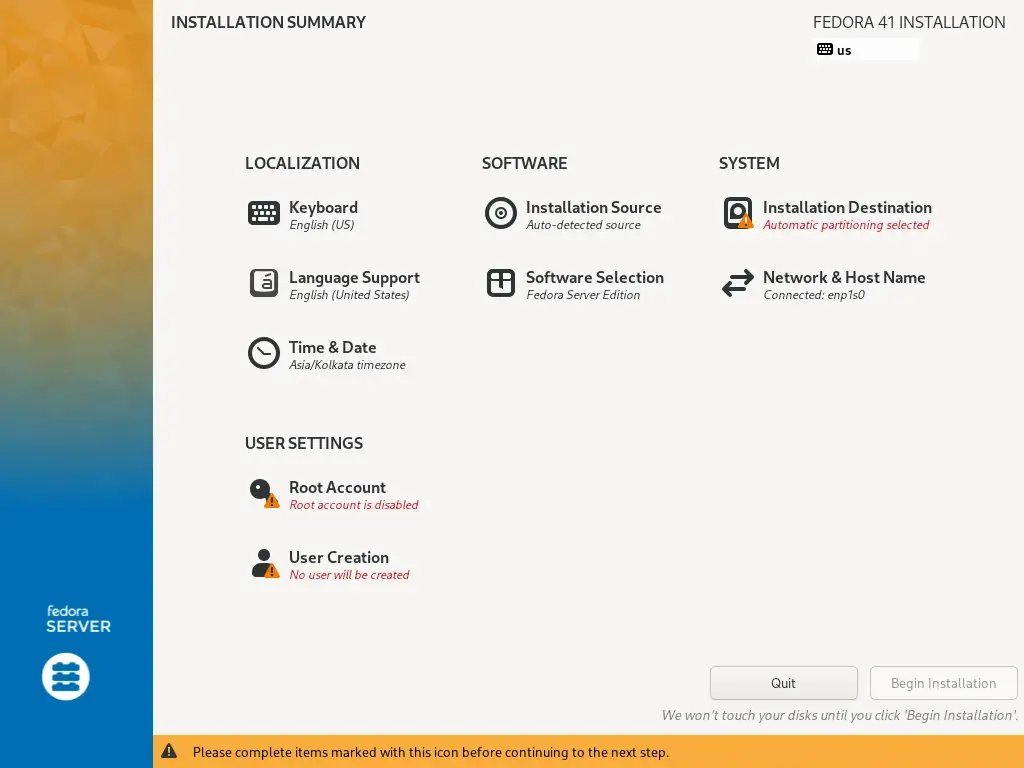
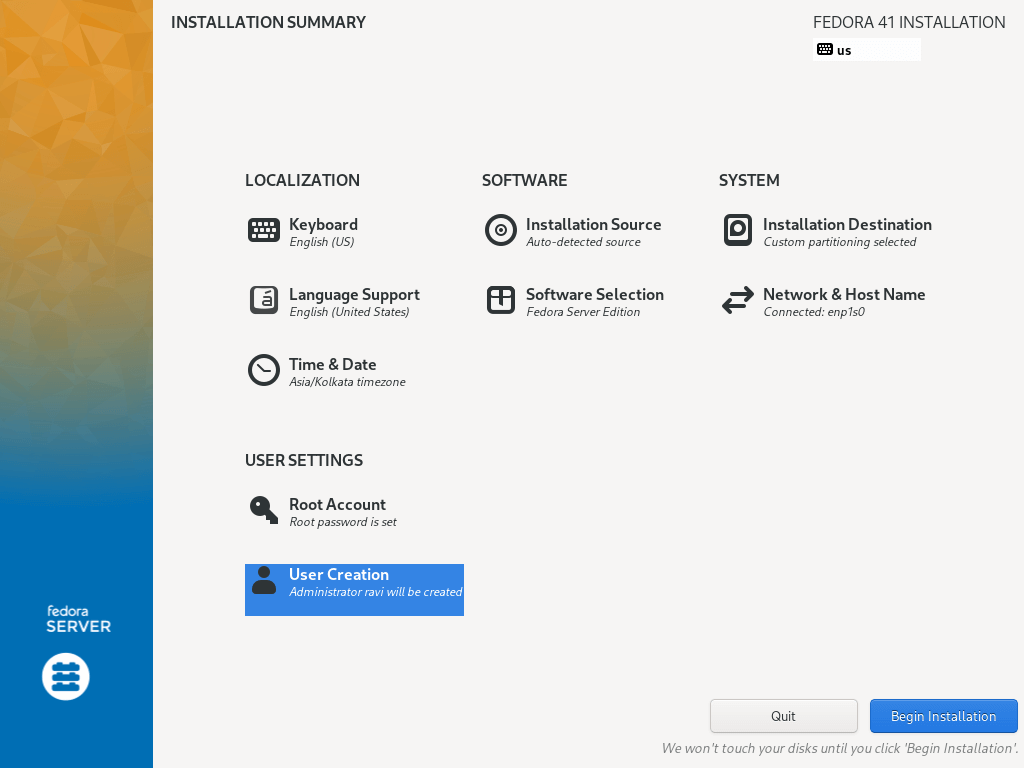
3. Next, you will see the screen below which contains the Installation Summary, here, you will configure various system settings including Keyboard layout, Language support, System Time and Date, Installation Source, Software to install, Network, and Hostname, Installation Destination (disk).
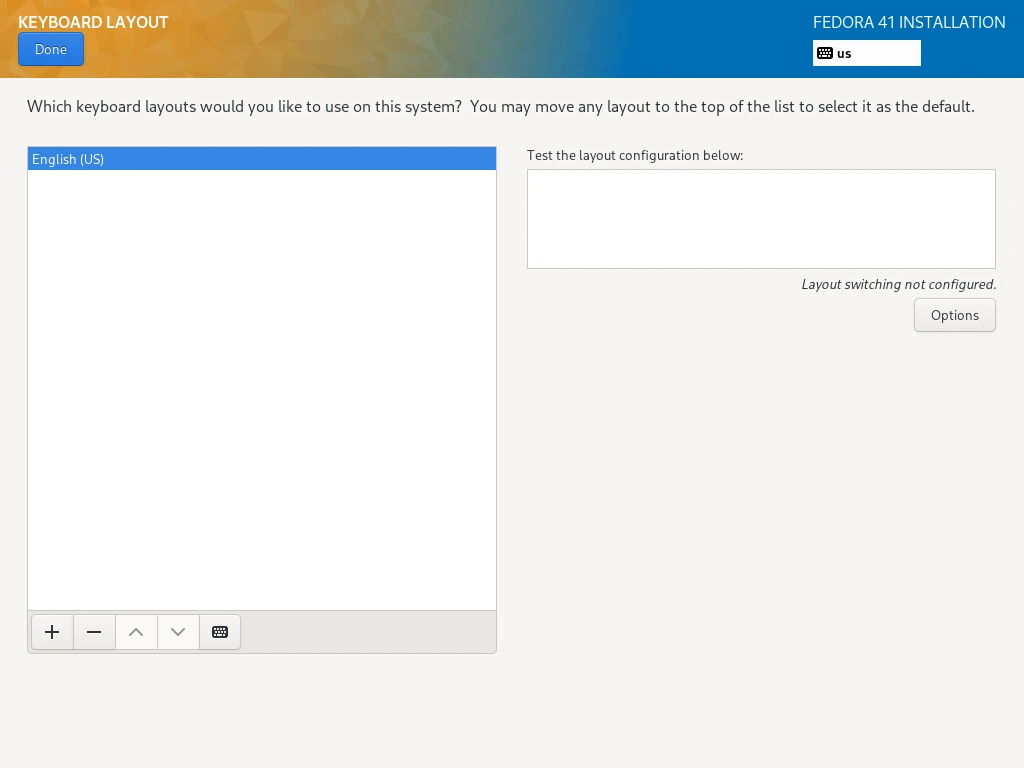
Setup Keyboard Layout
4. Use the + sign to add a keyboard layout and click Add and after that click Done to move to the Installation Summary interface.
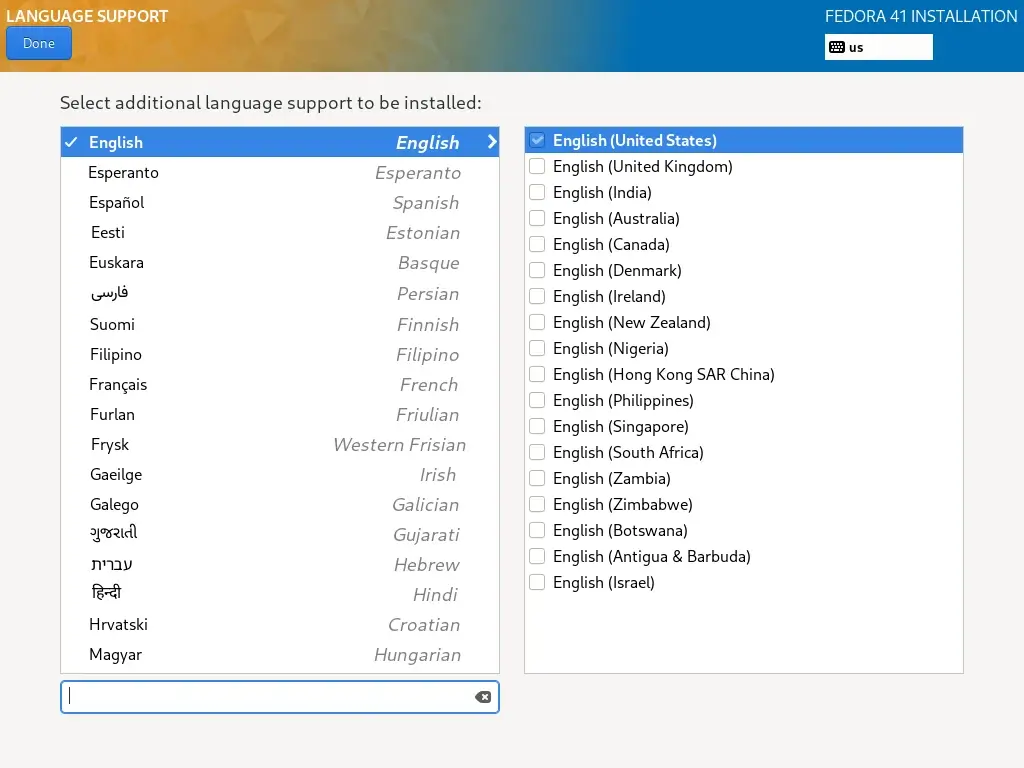
Configure Language Support
5. Under this step, you will set your language support, simply search for the language you want to install and click Add to install it.
Next, click on Done to complete the setting Language support.
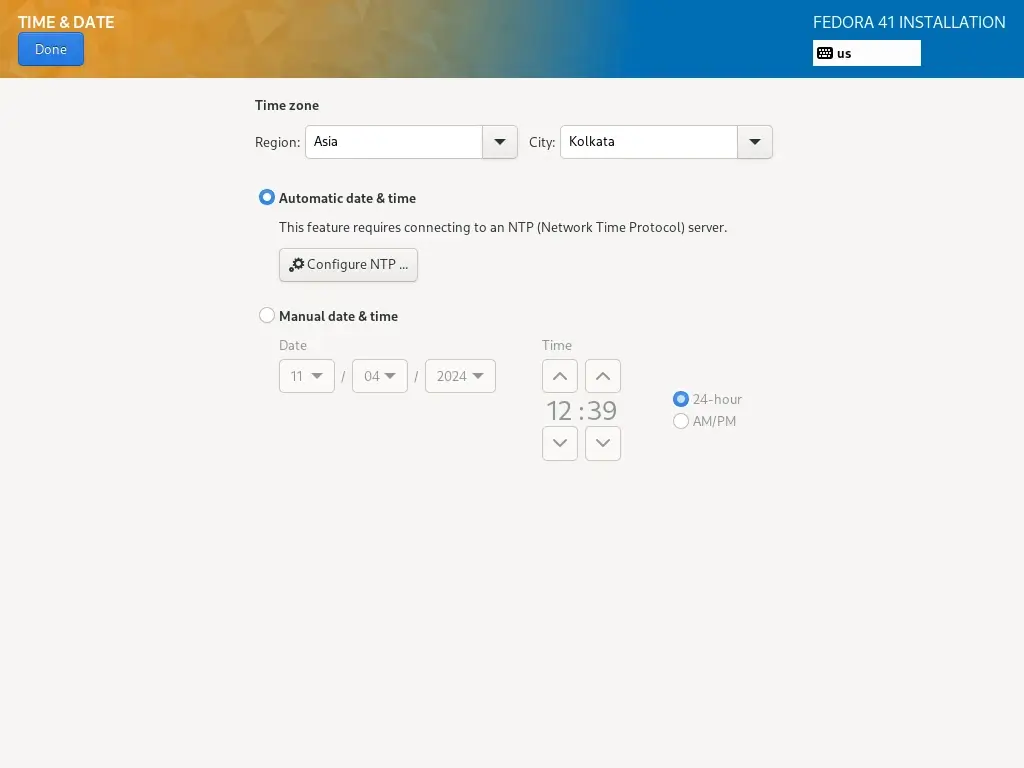
Configure System Time and Date
6. Managing time is very important on a server, so in this step, you can set the default system timezone, time, and date.
When your system is connected to the Internet, the time is detected automatically when you switch on Network Time, but you need to set the timezone according to your location. After setting all that, click Done and move to the next step.
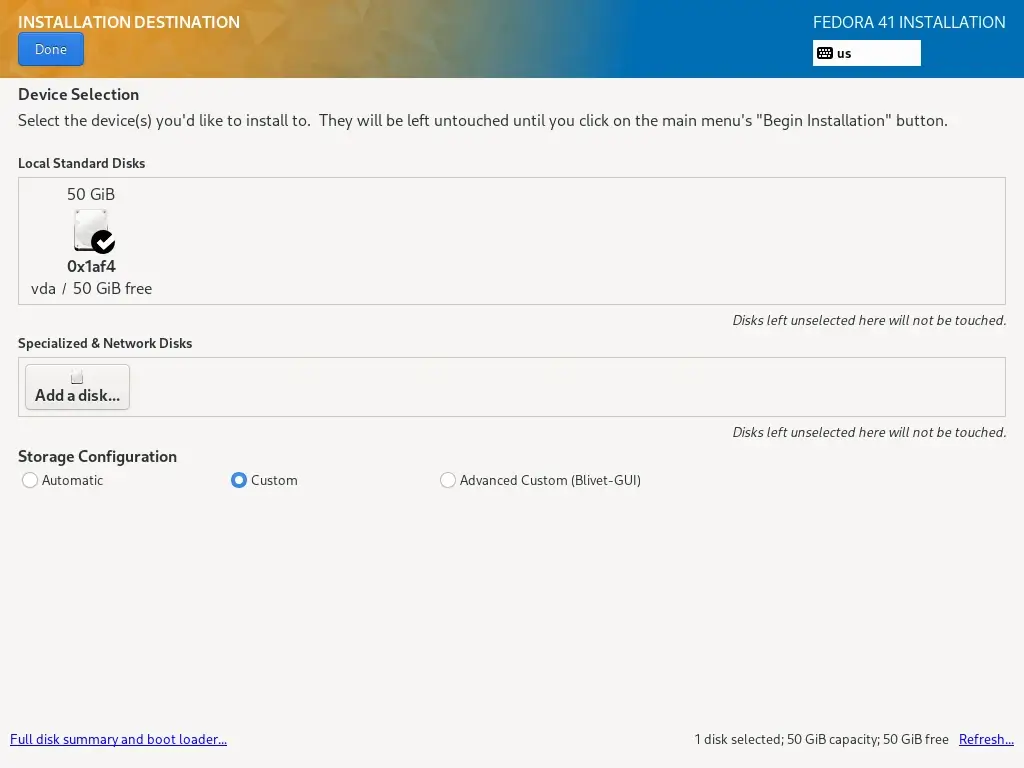
Configure Installation Disk
7. In this step, you will configure your system partitions and filesystem types for every system partition. There are two ways to set up partitions, one is to use automatic settings and another is to perform a manual setup.
In this guide, I have chosen to do everything manually. So, click on the disk image to select it and select “Custom”. Then click Done to go to the next screen in the next step.
8. In the screen below, select the “Standard Partition” partitioning scheme from the drop-down menu, for creating mounting points for the various partitions you will create on your system.
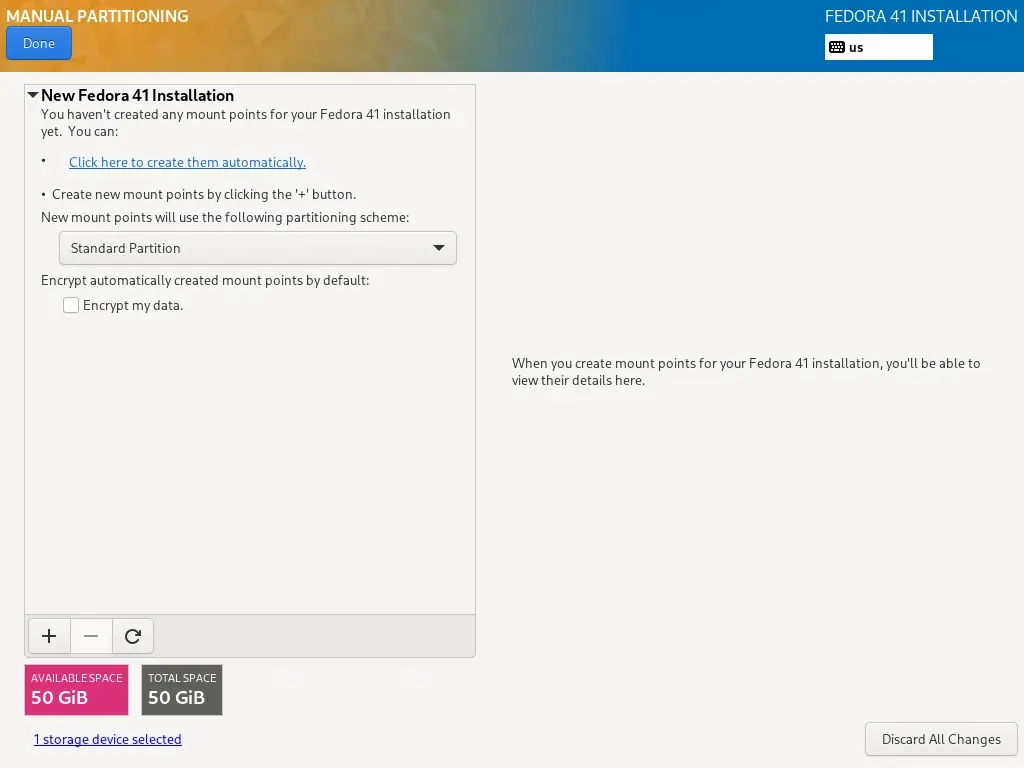
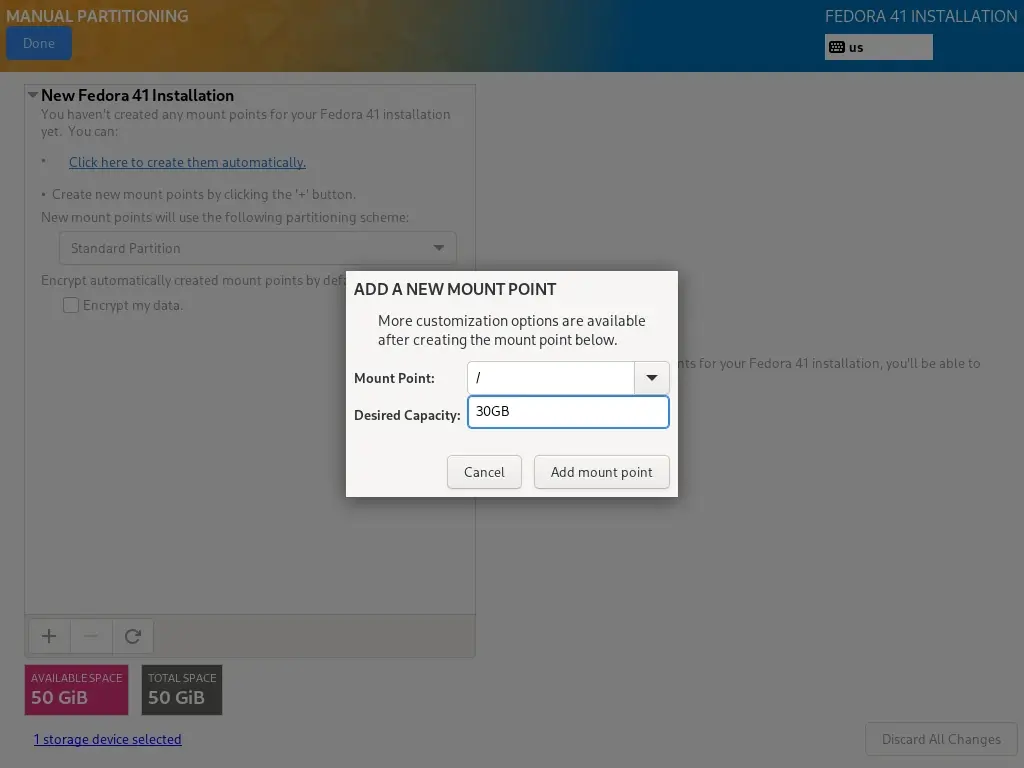
9. To add a new partition, use the “+” button, let us start by creating the root (/) partition, so specify the following in the screen below:
Mount point: /
Desired Capacity: 30GB
The partition size I have set here is for the purpose of this guide, you can set a capacity of your choice according to the size of your system disk.
After that click on “Add mount point” to create a mount point for the partition.
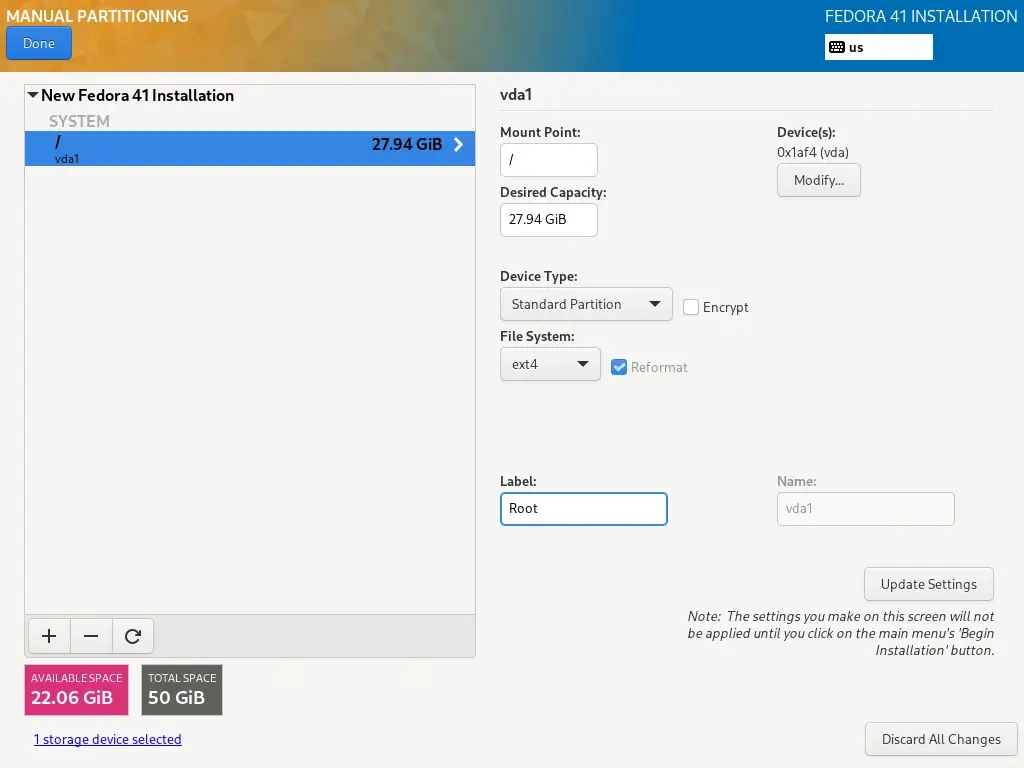
10. Every Linux system partition requires a filesystem type, in this step, you need to set a filesystem for the root file system created in the previous step, I have used ext4 because of its features and good performance.
11. Next, create a home partition and mount point which will store the system user’s files and home directories. Then click on “Add mount point” complete setting it and proceed to the next stage.

11. You also need to set a filesystem type for the home partition as you did for the root partition. I have also used ext4.

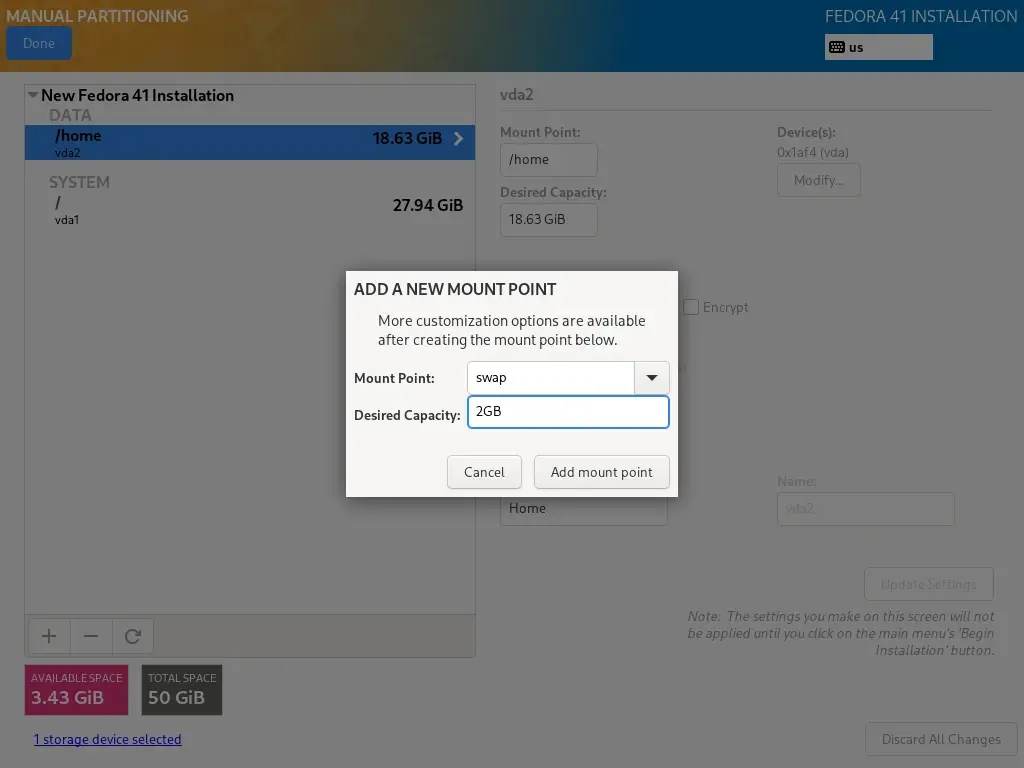
12. Here, you need to create a swap partition which is space on your hard disk that is allocated to temporarily store extra data in system RAM that is not actively being worked upon by the system in the event that RAM is used up. Then click on “Add mount point” to create the swap space.
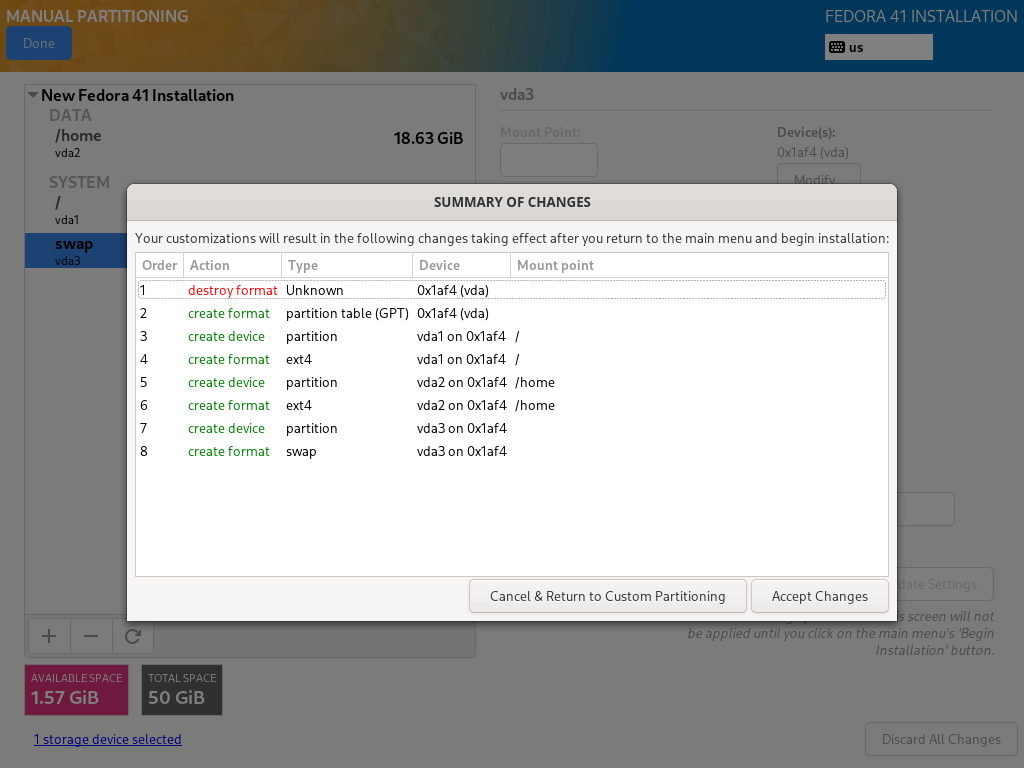
13. When you are done creating all the necessary mount points, then click on the Done button at the top left corner.
You will see the interface below for you to effect all the changes to your disk. Click on “Accept Changes” to continue.
Setup Network and Hostname
14. From the previous step, you will move back to the configuration screen, next, click on “Network and Hostname” to set your Hostname.
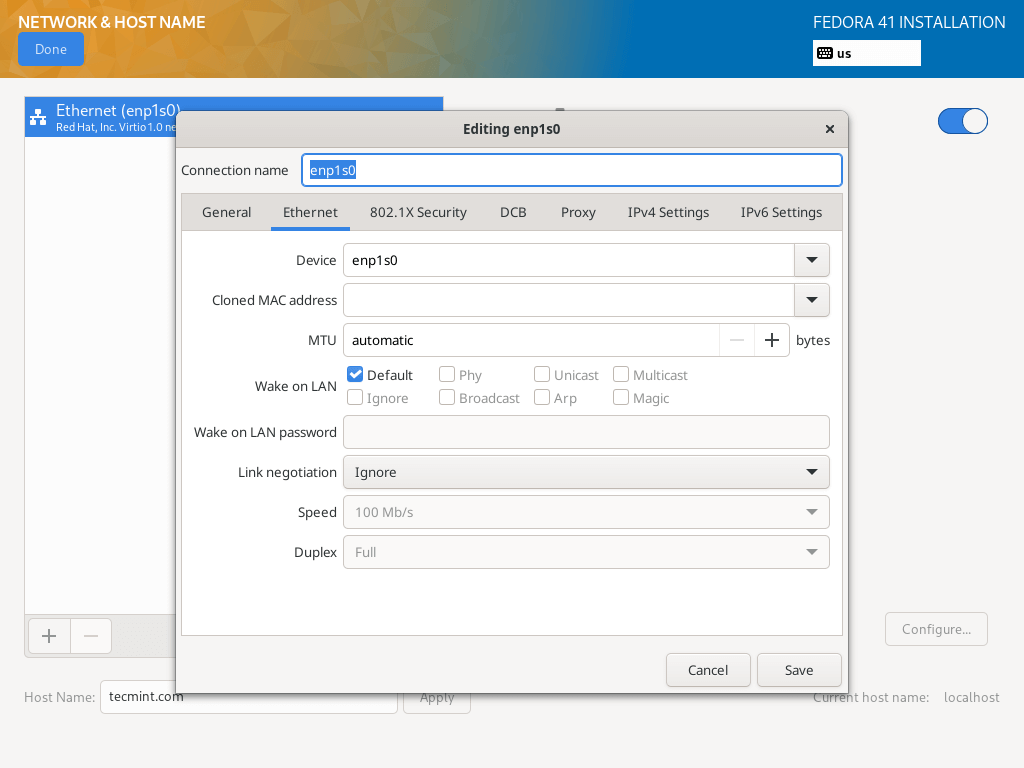
To configure system network settings, click on the “Configure…” button and you will be taken to the next screen.
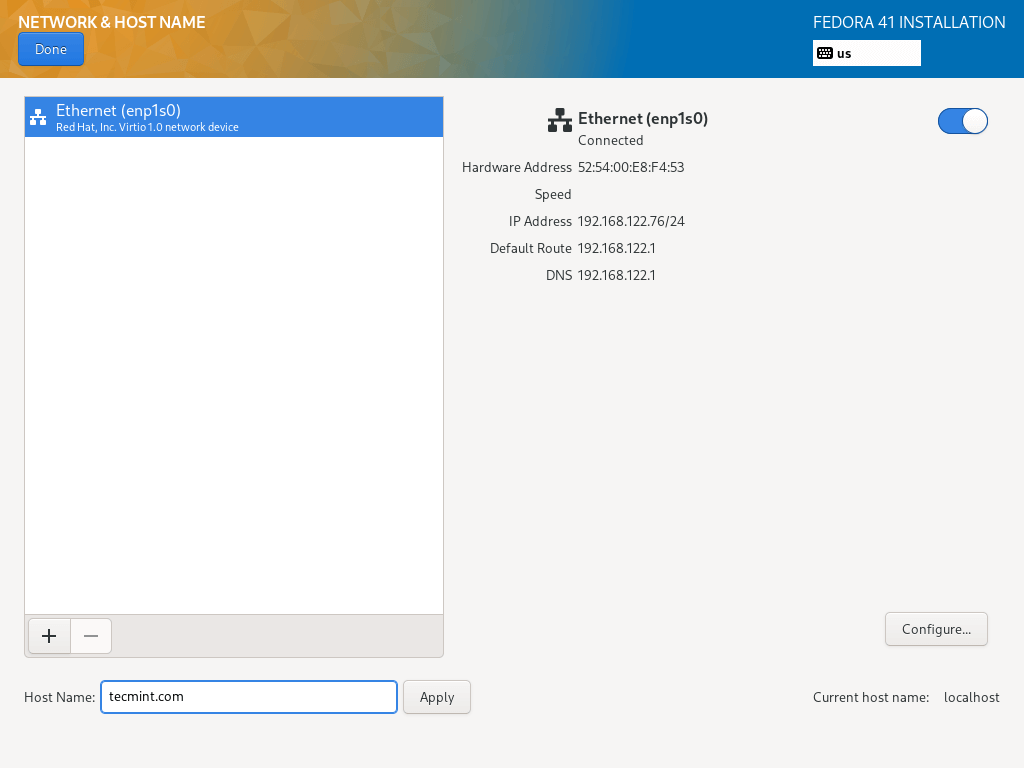
15. Here, you can configure a lot of network settings including server IP address, default gateway, DNS servers plus many more.
Since this is a server, you will need to select the Manual configuration method from the drop-down menu. Navigate the settings to set other network features and properties as per your server environment demands.
After setting everything, click on save and then click on Done at the left top corner to complete Network & Hostname configurations, you will move back to the Installation Summary screen to begin the actual installation of system files.
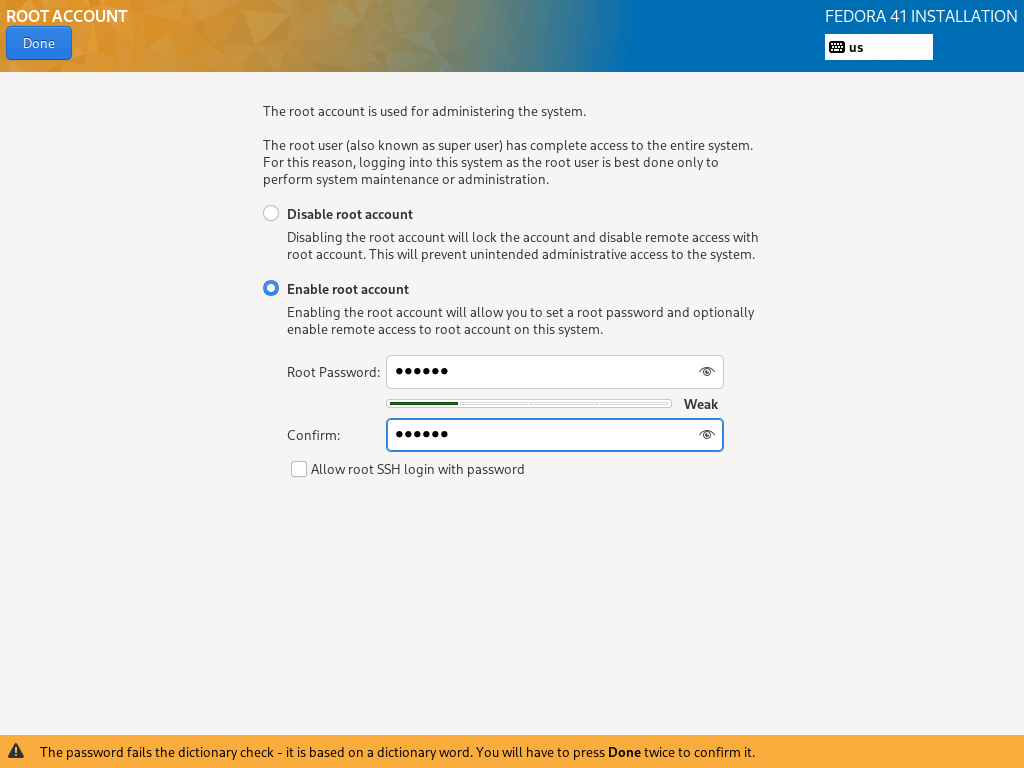
Configure User Settings
There are two more important things to do, as the installation of system files progresses, you will need to enable and create your root user password and an additional system user account.
16. Click on ‘ROOT PASSWORD‘, enable the root account, and set the root user password, when that is done, click Done and move to the next step.
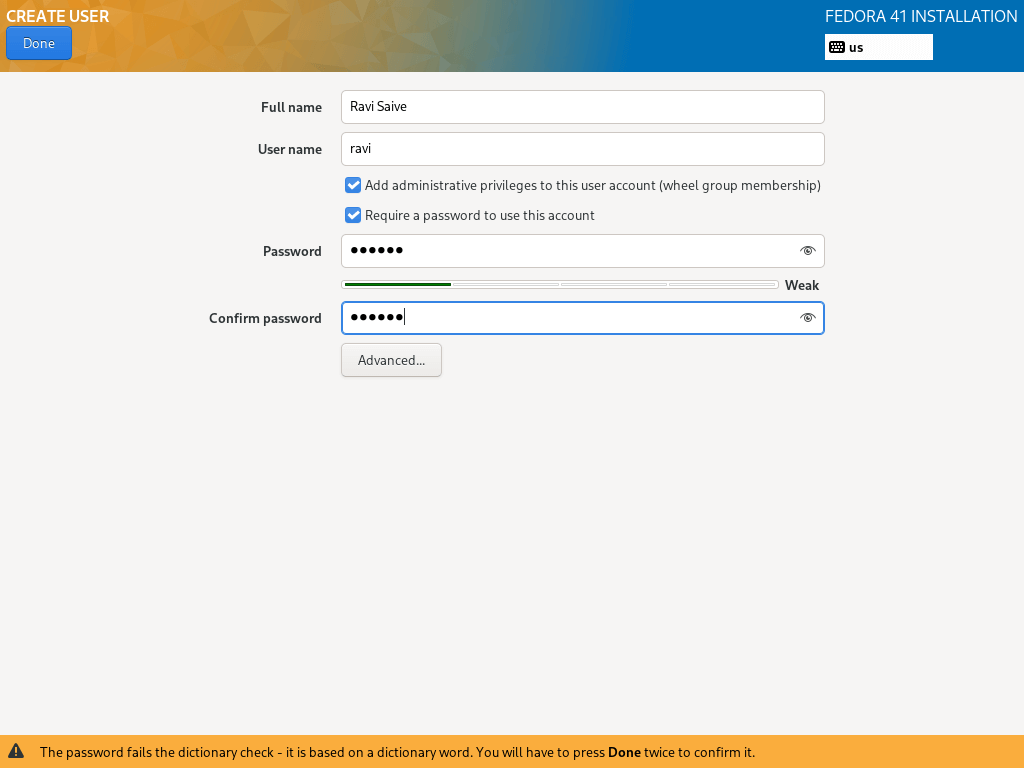
17. To create an additional user account, simply click on “USER CREATION”, and fill in the necessary information.
You can optionally give administrator privileges and also set a password for the user as in the interface below, then click Done after setting all that.
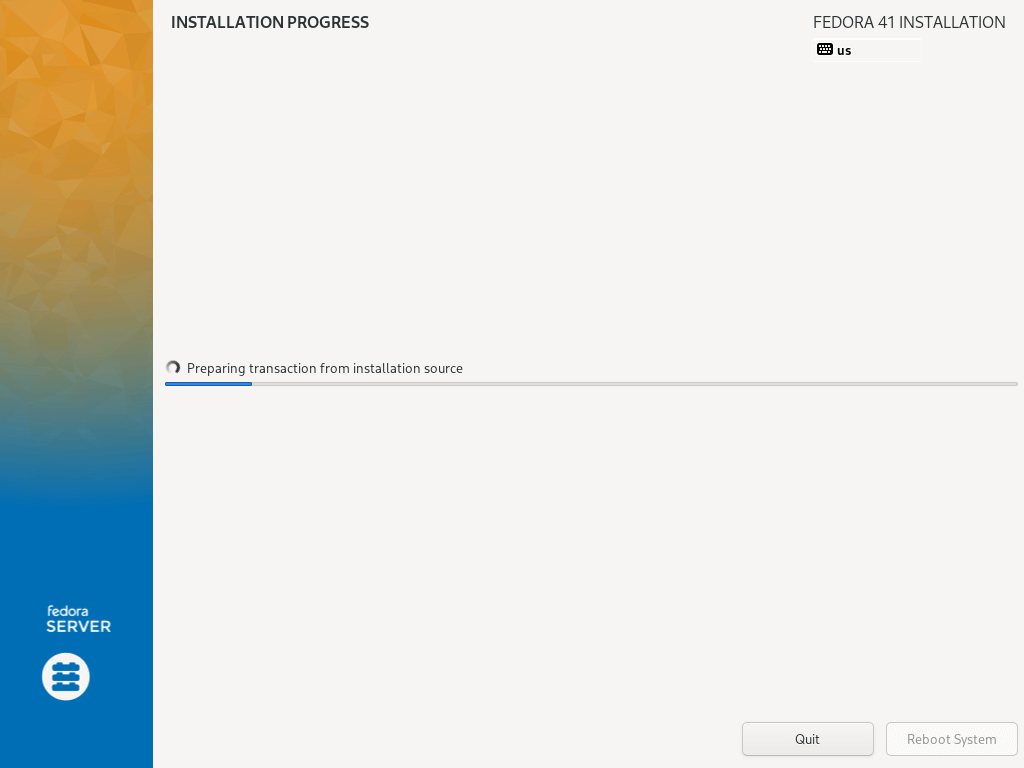
18. Begin the actual Fedora 41 Server installation of system files by clicking on “Begin Installation” from the screen below.
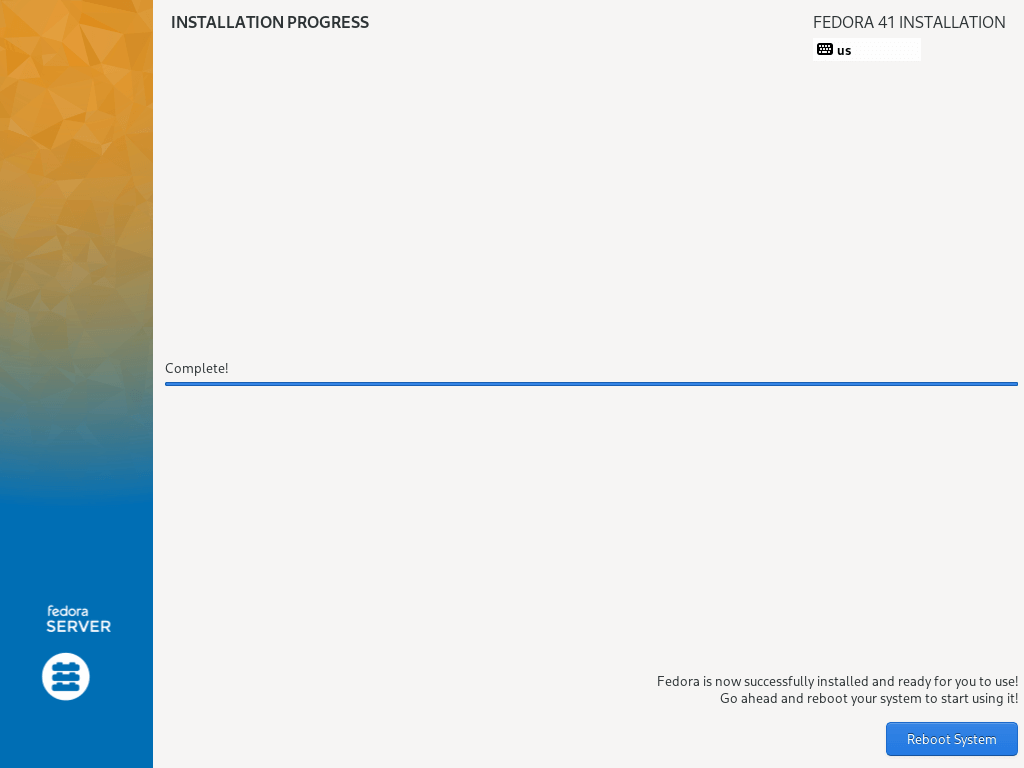
19. Then sit back and relax, waiting for the installation to finish, when it is complete, click on Reboot in the bottom right corner and reboot your machine. Then remove the installation media and boot into the Fedora 41 server.
Fedora Post-Installation Tasks
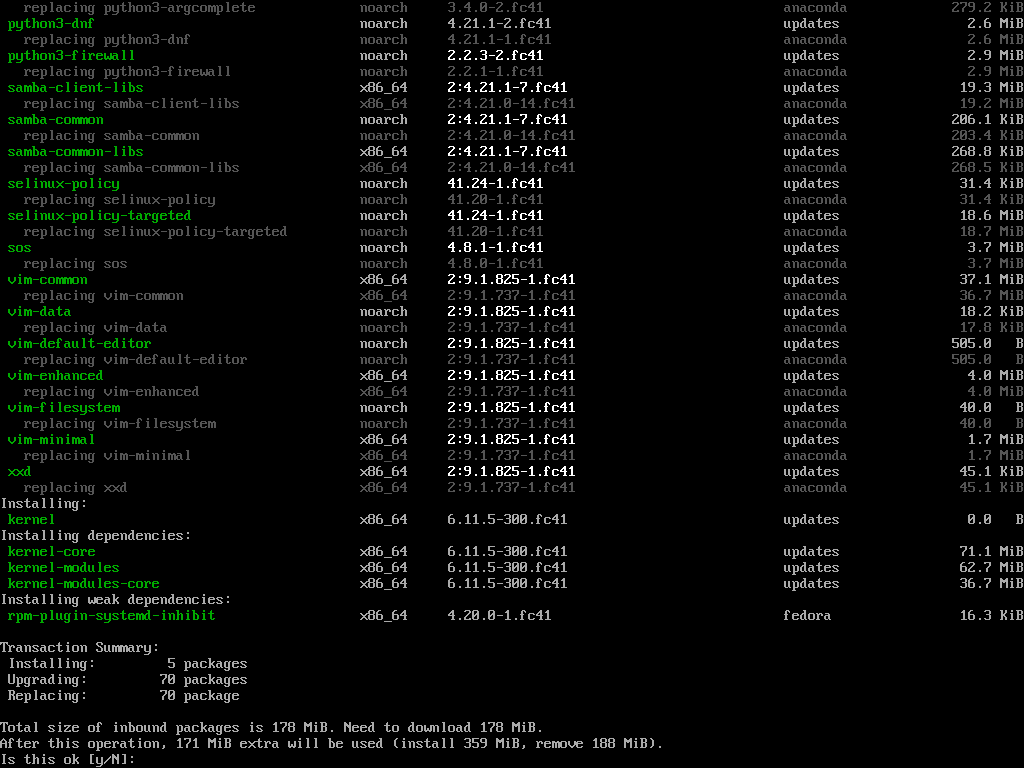
After the installation is complete, perform post-installation tasks such as updating the system, installing essential software, and configuring additional settings as needed.
dnf update
Conclusion
Congratulations! You’ve successfully installed Fedora 41 Server on your system. With its cutting-edge features and versatility, it provides a robust foundation for various server applications.
I believe that the above steps were simple and direct to follow as usual, and hope everything went just fine. Now you are ready to start running Fedora 41 on your server machine.


I meant dos partitions! And blkid does show dvd@
Fedora 33 server wouldn’t install on a new Dell r240 with factory hidden partitions! I accidentally erased them by trying the Ubuntu server or OpenSUSE.
When I tried to install Fedora, cents,redhat6.6,redhat8, the server must have blocked the format programs. Only after the deletion of the 100MB and 2GB partition, was I able to format and install fedora33server! I had Debian buster on my server, it left the door portions alone.
I want a gui, dvd shows KDE, not installed! Mount /dev/sr0 or iso9660 does not work, even though itt shows dvd with fedora33 in it.
How do you enable cockpit?
At this point I’m ready to install OpenSUSE Debian buster has no “ifconfig” or network tool kit and new server not plugged in. cant download, need to copy from ysb or dvd.
ifconfig comes from the net-tools rpm. It’s not available for installation through dnf. ifconfig has been deprecated for years on most distributions in favor of /usr/sbin/ip. However, I also haven’t learned the new “ip” tool and may never do so.
@atomic
You must have installed GNOME/MATE GUI desktop before the commands can work. Try to install a GUI desktop(GNOME/MATE) and then run the commands above, it should work.
It seems the GNOME/MATE GUI desktop doesn’t work on Fedora 24 Server via the following cmdline.
# systemctl set-default graphical.target
# systemctl enable graphical.target
# reboot
Is it an expected result?
Hi, I follow your command to enable GUI, it work fine, thanks