The process of installing a Kubernetes Cluster on CentOS 8 is almost similar to that of CentOS 7 (which you can go through here), but the process here has a few changes. These changes, mostly revolve around the installation of Docker.
Starting from CentOS 8 (and by extension RHEL 8), docker has now natively been replaced by podman and buildah which are tools from Redhat. As a matter of fact, the docker package has now been removed from the default package repository.
With this move, the Redhat team aims to simplify the process of creating and using containers, without needing special permissions, while at the same time, maintaining compatibility with docker images and operating them without needing a daemon. Podman promises to offer more flexibility when running on Kubernetes environments, but the jury remains out there.
For this article, we will run through the process of installing Kubernetes on a CentOS 8 platform, running on Docker-CE (Community Edition). In a later article, we will also run through a similar installation, using podman for our containers.
Prerequisites
- Three servers running CentOS 8 – 1 Master Node and 2 Worker Nodes.
- It is recommended that your nodes should have at least 2 CPUs with 2GB RAM or more per machine. This is not a strict requirement but is largely driven by the needs of the application you intend to run.
- Internet connectivity on all your nodes. We will be fetching Kubernetes and docker packages from the repository. Equally, you will need to make sure that the DNF package manager is installed by default and can fetch packages remotely.
- All your nodes should also be able to connect to one another, either on a private or public network, whichever is available.
- You will also need access to an account with sudo or root privileges. In this tutorial, I will be using my root account.
Precaution
Most nodes generally come with unique MAC addresses, however, in some unique cases, some Virtual Machines may have identical MAC addresses. It is therefore recommended that you confirm that the Product_UUID and the MAC address are not identical in any of the nodes.
Kubernetes uses these values to uniquely identify the nodes in the cluster. If these values are not unique to each node, the installation process may fail.
To check the MAC address of the network interface and compare it.
# ip link
To check the product_uuid and compare, run the following command.
# cat /sys/class/dmi/id/product_uuid
Logical Architecture
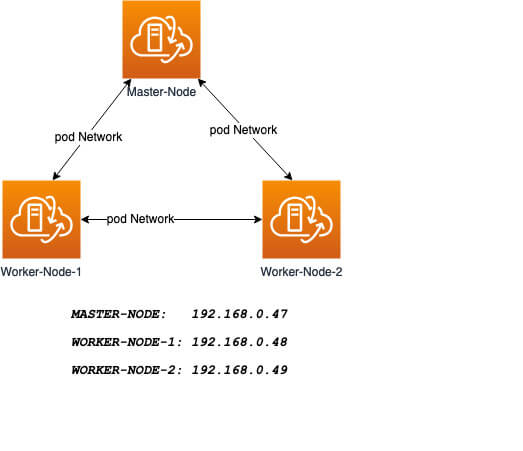
Our installation is designed to have the Master-Node controlling the Worker Nodes. At the end of this installation, our logical architecture will look something like this.
Master Node – This machine generally acts as the control plane and runs the cluster database and the API server (which the kubectl CLI communicates with).
Our 3-node Kubernetes Cluster will look something like this:
Installation of Kubernetes Cluster on Master-Node
For Kubernetes to work, you will need a containerization engine. As mentioned, we will be using Docker-CE.
The following institutions will be performed on CentOS 8 Master-Node.
Step 1: Prepare Hostname, Firewall, and SELinux
On your CentOS 8 Master-Node, set the system hostname and update DNS in your /etc/hosts file.
# hostnamectl set-hostname master-node
# cat <<EOF>> /etc/hosts
192.168.0.47 master-node
192.168.0.48 node-1 worker-node-1
192.168.0.49 node-2 worker-node-2
EOF
Next, ping your worker-node-1 and worker-node-2 to check if your updated host file is working correctly using the ping command.
# ping 192.168.0.48
# ping 192.168.0.49
Next, disable Selinux, as this is required to allow containers to access the host filesystem, which is needed by pod networks and other services.
# setenforce 0
Setting setenforce to 0 effectively sets SELinux to permissive, which effectively disables SELinux until the next reboot. To completely disable it, use the below command and reboot.
# sed -i --follow-symlinks 's/SELINUX=enforcing/SELINUX=disabled/g' /etc/sysconfig/selinux
# reboot
Kubernetes makes use of various ports for communication and access and these ports need to be accessible to Kubernetes and not limited by the firewall.
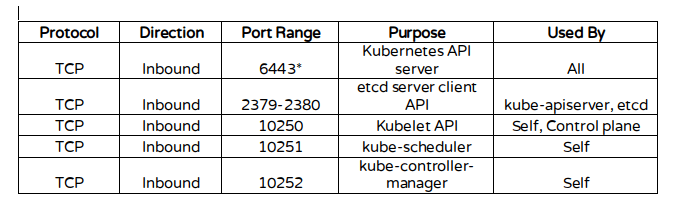
Configure the firewall rules on the ports.
# firewall-cmd --permanent --add-port=6443/tcp
# firewall-cmd --permanent --add-port=2379-2380/tcp
# firewall-cmd --permanent --add-port=10250/tcp
# firewall-cmd --permanent --add-port=10251/tcp
# firewall-cmd --permanent --add-port=10252/tcp
# firewall-cmd --permanent --add-port=10255/tcp
# firewall-cmd --reload
# modprobe br_netfilter
# echo '1' > /proc/sys/net/bridge/bridge-nf-call-iptables
Step 2: Install Docker-CE on CentOS 8
You will need to add the Docker repository first as it is no longer in the default package list using the following dnf config-manager command.
# dnf config-manager --add-repo=https://download.docker.com/linux/centos/docker-ce.repo
Also install containerd.io package which is available as a daemon that manages the complete container lifecycle of its host system, from image transfer and storage to container execution and supervision to low-level storage to network attachments and beyond.
# dnf install https://download.docker.com/linux/centos/7/x86_64/stable/Packages/containerd.io-1.2.6-3.3.el7.x86_64.rpm
Now install the latest version of a docker-ce package.
# dnf install docker-ce
You can now enable and start the docker service.
# systemctl enable docker
# systemctl start docker
Step 3: Install Kubernetes (Kubeadm) on CentOS 8
Next, you will need to add Kubernetes repositories manually as they do not come installed by default on CentOS 8.
# cat <<EOF > /etc/yum.repos.d/kubernetes.repo
[kubernetes]
name=Kubernetes
baseurl=https://packages.cloud.google.com/yum/repos/kubernetes-el7-x86_64
enabled=1
gpgcheck=1
repo_gpgcheck=1
gpgkey=https://packages.cloud.google.com/yum/doc/yum-key.gpg https://packages.cloud.google.com/yum/doc/rpm-package-key.gpg
EOF
Kubeadm helps you bootstrap a minimum viable Kubernetes cluster that conforms to best practices. With kubeadm, your cluster should pass the Kubernetes Conformance tests.
Kubeadm also supports other cluster lifecycle functions, such as upgrades, downgrade, and managing bootstrap tokens. Kubeadm is also integration-friendly with other orchestration tools like Ansible and Terraform.
With the package repo now ready, you can go ahead and install kubeadm package.
# dnf install kubeadm -y
When the installation completes successfully, enable and start the service.
# systemctl enable kubelet
# systemctl start kubelet
Step 4: Create a control-plane Master with kubeadm
The Kubernetes master which acts as the control plane for the cluster runs a few critical services necessary for the cluster. As such, the initialization process will do a series of prechecks to ensure that the machine is ready to run Kubernetes. These prechecks expose warnings and exit on errors. kubeadm init then downloads and installs the cluster control plane components.
Now it’s time to initialize Kubernetes master, but before that, you must disable swap in order to run “kubeadm init“ command.
# swapoff -a
Initializing Kubernetes master is a completely automated process that is controlled by the “kubeadm init“ command as shown.
# kubeadm init
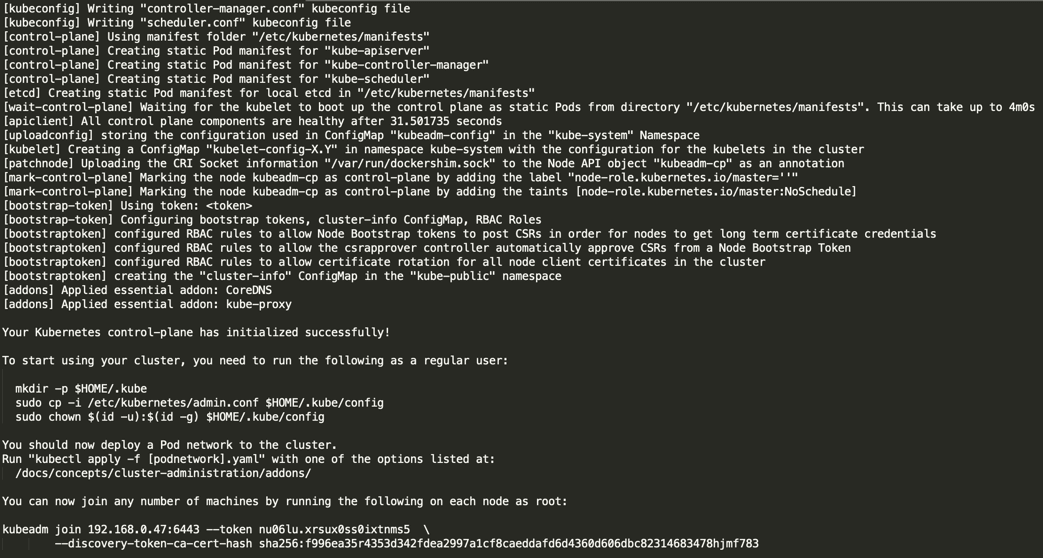
Next, copy the following command and store it somewhere, as we required to run this command on the worker nodes later.
kubeadm join 192.168.0.47:6443 --token nu06lu.xrsux0ss0ixtnms5 \ --discovery-token-ca-cert-hash ha256:f996ea35r4353d342fdea2997a1cf8caeddafd6d4360d606dbc82314683478hjmf7
Tip: Sometimes the above command might throw errors about the arguments passed, so to avoid errors, you need to remove the ‘\’ character and your final command will look like this.
# kubeadm join 192.168.0.47:6443 --token nu06lu.xrsux0ss0ixtnms5 –discovery token-ca-cert-hash sha256:f996ea35r4353d342fdea2997a1cf8caeddafd6d4360d606dbc82314683478hjmf7
Once Kubernetes initialized successfully, you must enable your user to start using the cluster. In our scenario, we will be using the root user. You can also start the cluster using sudo user as shown.
To use root, run:
# mkdir -p $HOME/.kube
# cp -i /etc/kubernetes/admin.conf $HOME/.kube/config
# chown $(id -u):$(id -g) $HOME/.kube/config
To use a sudo enabled user, run:
$ mkdir -p $HOME/.kube
$ sudo cp -i /etc/kubernetes/admin.conf $HOME/.kube/config
$ sudo chown $(id -u):$(id -g) $HOME/.kube/config
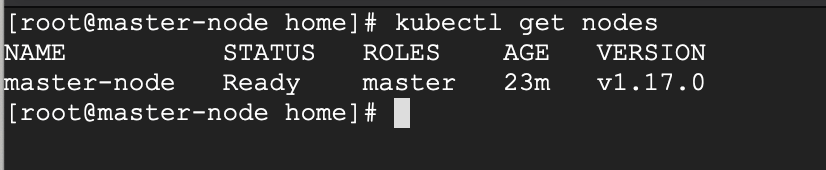
Now confirm that the kubectl command is activated.
# kubectl get nodes

At this moment, you will see the status of the master-node is ‘NotReady’. This is because we are yet to deploy the pod network to the cluster.
The pod Network is the overlay network for the cluster, that is deployed on top of the present node network. It is designed to allow connectivity across the pod.
Step 5: Setup Your Pod Network
Deploying the network cluster is a highly flexible process depending on your needs and there are many options available. Since we want to keep our installation as simple as possible, we will use Weavenet plugin which does not require any configuration or extra code and it provides one IP address per pod which is great for us. If you want to see more options, please check here.
These commands will be important to get the pod network setup.
# export kubever=$(kubectl version | base64 | tr -d '\n')
# kubectl apply -f "https://cloud.weave.works/k8s/net?k8s-version=$kubever"

Now if you check the status of your master-node, it should be ‘Ready’.
# kubectl get nodes
Next, we add the worker nodes to the cluster.
Adding Worker Nodes to Kubernetes Cluster
The following instructions will be performed on each worker node when joining the Kubernetes cluster.
Step 1: Prepare Hostname, Firewall, and SELinux
First set the hostname on your worker-node-1 and worker-node-2, and then add the host entries to the /etc/hosts file.
# hostnamectl set-hostname 'node-1'
# cat <<EOF>> /etc/hosts
192.168.0.47 master-node
192.168.0.48 node-1 worker-node-1
192.168.0.49 node-2 worker-node-2
EOF
Next, ping your master node from your worker nodes to confirm that your updated host file is working fine using the ping command.
# 192.168.0.47
Next, disable SElinux and update your firewall rules.
# setenforce 0
# sed -i --follow-symlinks 's/SELINUX=enforcing/SELINUX=disabled/g' /etc/sysconfig/selinux
# firewall-cmd --permanent --add-port=6783/tcp
# firewall-cmd --permanent --add-port=10250/tcp
# firewall-cmd --permanent --add-port=10255/tcp
# firewall-cmd --permanent --add-port=30000-32767/tcp
# firewall-cmd --reload
# echo '1' > /proc/sys/net/bridge/bridge-nf-call-iptables
Step 2: Setup Docker-CE and Kubernetes Repo
Add the Docker repository first using DNF config-manager.
# dnf config-manager --add-repo=https://download.docker.com/linux/centos/docker-ce.repo
Next, add the containerd.io package.
# dnf install https://download.docker.com/linux/centos/7/x86_64/stable/Packages/containerd.io-1.2.6-3.3.el7.x86_64.rpm
With these two packages installed, install the latest version of docker-ce.
# dnf install docker-ce
Enable and start the docker service.
# systemctl enable docker
# systemctl start docker
You will need to add Kubernetes repositories manually as they do not come pre-installed on CentOS 8.
# cat <<EOF > /etc/yum.repos.d/kubernetes.repo
[kubernetes]
name=Kubernetes
baseurl=https://packages.cloud.google.com/yum/repos/kubernetes-el7-x86_64
enabled=1
gpgcheck=1
repo_gpgcheck=1
gpgkey=https://packages.cloud.google.com/yum/doc/yum-key.gpg https://packages.cloud.google.com/yum/doc/rpm-package-key.gpg
EOF
Step 3: Install Kubeadm on CentOS 8
With the package repo now ready, you can go ahead and install kubeadm.
# dnf install kubeadm -y
Start and enable the service.
# systemctl enable kubelet
# systemctl start kubelet
Step 4: Join the Worker Node to the Kubernetes Cluster
We now require the token that kubeadm init generated, to join the cluster. You can copy and paste it to your node-1 and node-2 if you had copied it somewhere.
# kubeadm join 192.168.0.47:6443 --token nu06lu.xrsux0ss0ixtnms5 --discovery-token-ca-cert-hash sha256:f996ea35r4353d342fdea2997a1cf8caeddafd6d4360d606dbc82314683478hjmf78
As suggested on the last line, go back to your master-node and verify if worker node-1 and worker node-2 have joined the cluster using the following command.
# kubectl get nodes
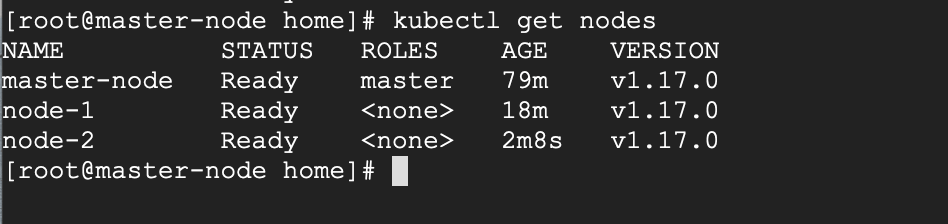
If all the steps run successfully, then, you should see node-1 and node-2 in ready status on the master-node. At this point, you have now successfully deployed a Kubernetes cluster on CentOS 8.
Recommended Read: How to Deploy Nginx on a Kubernetes Cluster
Some Limitations
The cluster we have created here has a single Master node, and as such, if the Master node fails, your cluster may lose data and may need to be recreated from scratch.
For this reason, I recommend a Highly Available setup.


Use the following command for weave.
I have followed the exact steps that show me these errors in kubeadm init
[kubelet-check] The HTTP call equal to 'curl -sSL http://localhost:10248/healthz' failed with error: Get "http://localhost:10248/healthz": dial tcp [::1]:10248: connect: connection refused.[kubelet-check] It seems like the kubelet isn't running or healthy.
[kubelet-check] The HTTP call equal to 'curl -sSL http://localhost:10248/healthz' failed with error: Get "http://localhost:10248/healthz": dial tcp [::1]:10248: connect: connection refused.
[kubelet-check] It seems like the kubelet isn't running or healthy.
[kubelet-check] The HTTP call equal to 'curl -sSL http://localhost:10248/healthz' failed with error: Get "http://localhost:10248/healthz": dial tcp [::1]:10248: connect: connection refused.
[kubelet-check] It seems like the kubelet isn't running or healthy.
[kubelet-check] The HTTP call equal to 'curl -sSL http://localhost:10248/healthz' failed with error: Get "http://localhost:10248/healthz": dial tcp [::1]:10248: connect: connection refused.
On Centos 8 Stream I had to specify the whole package name for kubeadm and kubectl or they gave me a mixed non-functional installation.
AFTER configuring the repository as above I had to use these commands:
to keep Centos8 Stream from using kubeadm 1.18 and kubelet 1.18
Centos Stream 8 is newer so there are some rough edges (with vnc as a systemd service as well).
In order for the Weavenet plugin to successfully create the pod sandbox, the firewall rules should also allow the following ports:
After opening those ports I was able to successfully deploy the nginx container.
Hi,
First, thanks for a good howto, using rocky Linux, and the howto works.
I want to deploy “normal” pods to the master node also so I removed the taint on it that disabled it. Now I am able to deploy “normal” pods like nginx to the workers and master when I scale up. The problem I am having is accessing them from outside.
On the master, I am able to use curl the nginx pod using the pod’s IP, same on the workers no issues at all. But when using a NodePort service to access them from outside using the host IP, with a high port, it will fail with the master IP but not with the workers IP. It is almost as if something is blocking. Have disabled the firewall but still it fails.
I have looked everywhere but I can’t see it, any ideas of what might be wrong or where I should look?
Thanks in advance.
firewall only has been opened for high ports on the worker nodes:
I’m facing the below issue :
[kubelet-check] The HTTP call equal to ‘curl -sSL
http://localhost:10248/healthz‘ failed with error: Get “http://localhost:10248/healthz”: dial tcp [::1]:10248: connect: connection refused.kubelet service is not running.
can anyone have an idea about it?
but no luck and i’m trying to install k8’s in LXC centos8 container.
I had the same issue. I found the fix here https://upcloud.com/community/tutorials/install-kubernetes-cluster-centos-8/
It seems docker is now using cgroupfs driver by default while Kubernetes is expecting systemd. You can change docker to use systemd as well by adding the following to a file /etc/docker/daemon.json.
{
  "exec-opts": ["native.cgroupdriver=systemd"]
}
Next, restart docker
Then reset Kubernetes to clear the failed install
$ kubeadm reset
You should then be able to initialize the master as normal.
This worked for me. Cheers!
In Step 2 for the master node, I get a failure trying to install an unknown version of containerd.io for RHEL 7 on an RHEL 8 system. If I just do “dnf install containerd.io“, I get what appears to be an appropriate version for RHEL 8.
For the worker nodes, there appear to be numerous missing steps, such as turning off swap. Even after that, when I try to run systemctl start kubelet, it fails to start with “Main processes exited”.
If I skip that and join the cluster, it then shows the kubelet service as started, and running “kubectl get nodes” on the master shows them as part of the cluster, but they never come out of the “NotReady” state. Any ideas?
Step 5. The kubectl apply is missing a quote
@David,
Thanks for pointing out, corrected the command in the article…
Hi, there is an error in firewall command
--reloadit is written -reload, kindly correct it.@Agadmin,
Corrected the command in the article…
Thanks
Hi, I am facing this issue after deployed the Pod network.
unable to load in-cluster configuration, KUBERNETES_SERVICE_HOST and
KUBERNETES_SERVICE_PORT must be defined
How can I solve this issue?
While the entire article is about installing Kubernetes on CentOS 8, why are we using EL7 packages? Or is it a typo? Because I see there are corresponding EL8 RPMs also available in RPM repositories. Was it intentional to use EL7 RPMs in this exercise?
E.g.
# dnf install https://download.docker.com/linux/centos/7/x86_64/stable/Packages/containerd.io-1.2.6-3.3.el7.x86_64.rpm
baseurl=https://packages.cloud.google.com/yum/repos/kubernetes-el7-x86_64
Excellent article!
Is it Possible to Mult-Master architecture?
Is inter pod communication working on Centos 8 with this method of install? Heard that it is not supported and all we can do is run single pod applications.
Hi!
I tried it, but I got an error. The masterworks fine, the status is “Ready“.
But the worker cannot join to the cluster. The command “kubeadm join …” run into an error:
http://keptarhely.eu/images/2020/06/01/v01/20200601v01s5erzm.png“… failed to verify JWS signature of a received cluster-info object, can’t trust this API server …”
The kubelet service cannot start on worker: exit status code 255.
What is the problem?
Thanks,
Gabor
Very useful article!
Some notes from me:
Somehow the weave network does not work on my installation.
I use calico instead.
The difference is – when invoke kubeadm init, need to pass pod cidr parameter.
Example:
When you have multiple network interface in you master node, you will need to put
--apiserver-advertise-addressparameter in kubeadm init command, and pass the intended address for kubernetes, for example:Perfect tutorial for installing Kubernetes, thank you.
I installed k8s on my 3 of virtual machines on VirtualBox
Very good article, clear and efficient. As a beginner that I am, it helped me a lot to start with Kubernetes.
A little clarification. I chose as in the example to use weave-net to manage the network, only it seems that it uses port 6783 to communicate with the nodes, which is not indicated in the procedure.
I spent a few hours to find out where the problem came from, the good side is that it allowed me to understand a little bit more the workings and architecture of Kubernetes.
Beautiful article! It helped me a lot.
Why does the `dnf install` of the containerd.io package have the URL if you added the repository in the step before?
Also is there any chance of a guide on how to set up HA master nodes? I am just a beginner playing in a lab, but an HA environment would be critical for production. The Kubernetes documentation on it literally means nothing to me.
Great guide so far, thank you! Think you missed the # modprobe br_netfilter step when setting up the worker nod firewall rules though.
I am getting a repo error when I run the
dnf config-manager --add repo=https://download.docker.com/linux/centos/docker-ce.repothis is what I get
adding repo from: https://download.docker.com/linux/centos/docker-ce.repo
Curl error (28): Timeout was reached for https://download.docker.com/linux/centos/docker-ce.repo [Resolving timed out after 30000 milliseconds]
Error: Configuration of repo failed
Hi Juan,
Have you tried checking if you have any firewalls blocking “
https://download.docker.com” domain?I figured it out it was a DNS error on my network.
Great article! I am also interested in a release using podman and buildah.
AMAZING, you’ve fixed my calico network issue with centos 8. Thanks,
Happy to hear that!
When will you release the article using podman and buildah?
Working on it, stay tuned :)
I want to know command about install wifi driver in CentOS 7
Hi Reyaz! What do you mean? Can you give more detail?
swapoff -aalso on slave?yes also the apply modprobe br_netfilter
modprobe br_netfilteron the slave?