The scope of this tutorial is to demonstrate how Zentyal 3.4 Server can be used as a Web Platform with multiple websites (subdomains) using Apache Virtual Hosts.
Zentyal 3.4 uses Apache (also known as httpd ) package as a webserver witch is the most used webserver on Internet today and is a complete open source.
Virtual Hosting represents Apache ability to serve more than one website ( domains or subdomains) on a single machine or node, a process that is completely transparent to end users which is based on multiple IP or vhosts.
Read Also: Apache Virtual Hosting: IP Based and Name Based Virtual Hosting
Requirements
The former Zentyal Install Guide
Step 1: Install Apache Web Server
1. Logon to Zentyal 3.4 Web Administration Tools pointing the browser to Zentyal IP address or domain name ( https://domain_name ).
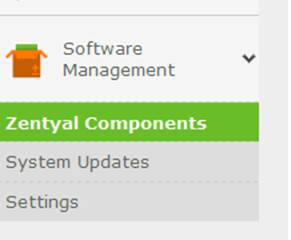
2. Go to Software Management -> Zentyal Components and choose Web Server.

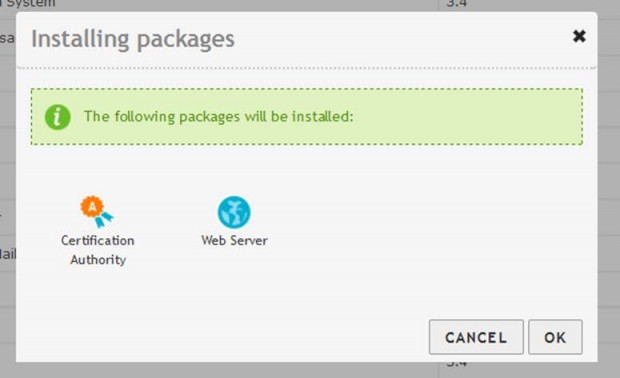
3. Hit Install button and accept Certification Authority package also ( needed for SSL certificates used for encrypting https connections ).
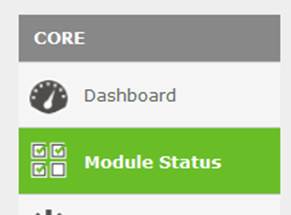
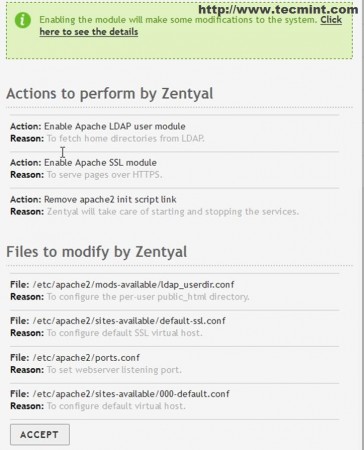
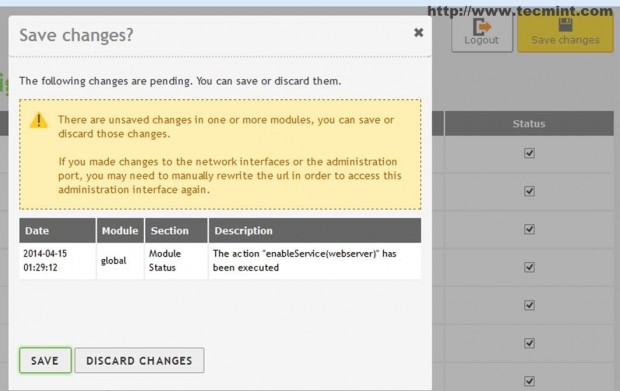
4. After the installation finishes go to Modules Status, select Web Server, Accept the Enabling prompt and hit Save to apply new changes.

The Enable prompt will present you with some details on what packages and configuration files will be modified by Zentyal.
For now Apache Web Server is installed and functional but has only the default configuration so far.
Step 2: Create Virtual Hosts and Tampering DNS Configuration
On this configuration we want to add a Virtual Host on Apache so that our final address will be submitted as a subdomain like http://cloud.mydomain.com, but the problem here is that Zentyal 3.4 Apache module and DNS module will not work for some reasons with virtual hosts on system IP.
The virtual hosts created from Web module are appended to DNS server as a new domain name, not like a new host A record. There are a few tricks for setting up Virtual Hosts on Zentyal, one is using Virtual IP Interfaces.
Fortunately another one to overcome this problem is by doing some configuration tricks on Zentyal DNS module.
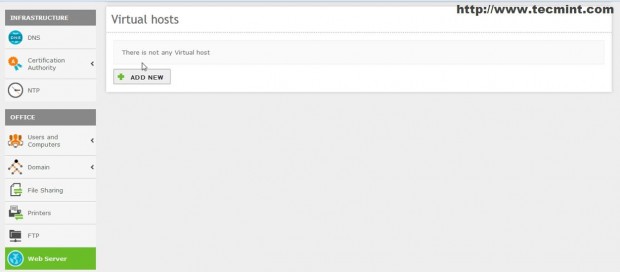
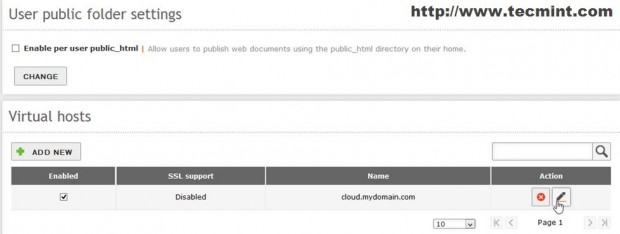
5. For beginning let’s add a virtual host. Go to Web Server Modules -> Virtual Hosts -> ADD NEW.
6. Check Enabled, enter the name for this virtual host ( append the whole dot domain name ) and hit on ADD.
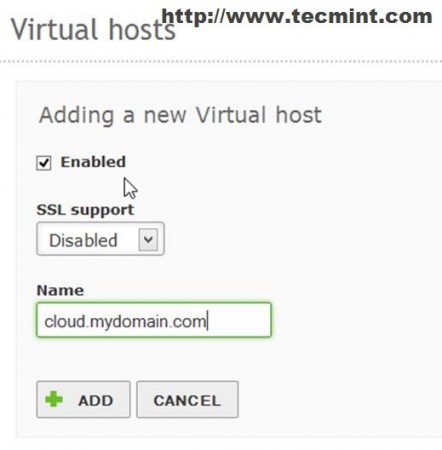
7. After the host has been added and is listed on Virtual Hosts hit upper Save button to apply changes.
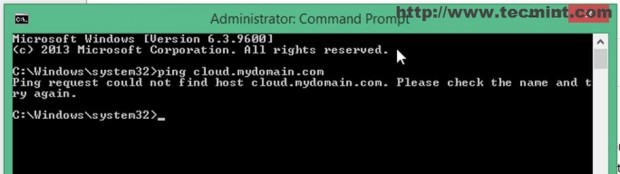
The main problem is that the newly created subdomain (virtual host) is not available because the DNS server does not contain a hostname A record yet.
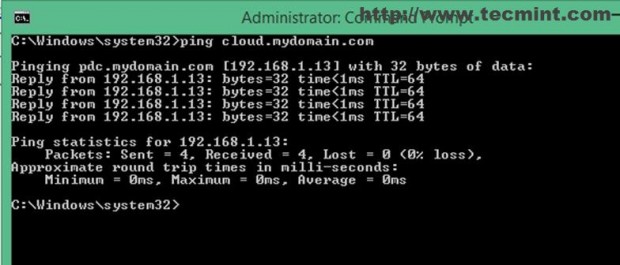
Running a ping command on this subdomain has the same negative answer.
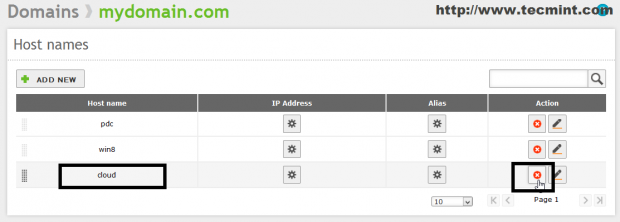
8. To resolve this issue go to DNS module and click on Hostnames under you listed domain.
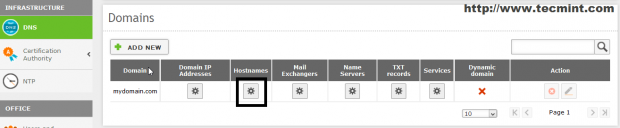
As you can obviously see the created virtual host ( or subdomain ) exists and needs a IP address added.
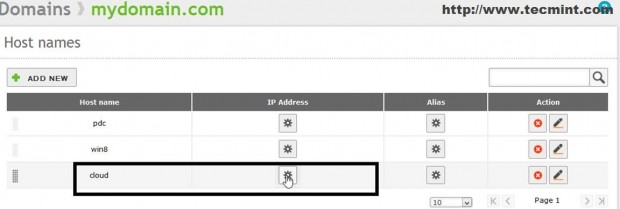
Because virtual hosting is configured for Apache to serve web files form Zentyal node, the DNS module needs a hostname A record to point to Zentyal same IP (setting which Zentyal wont allow).
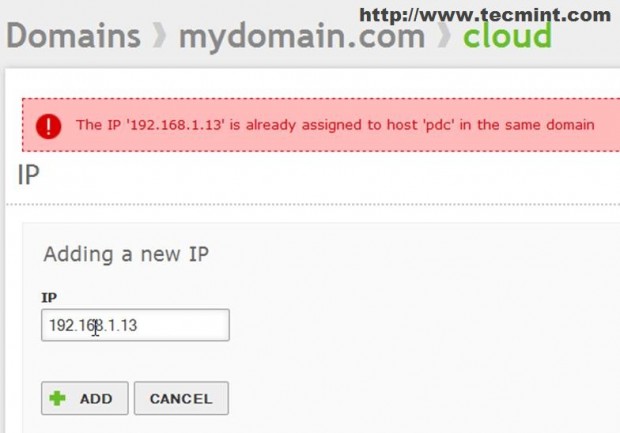
Zentyal 3.4 DNS doesn’t allow to use his assigned system IP address with different hostnames ( multiple DNS hostname A records on same IP ).
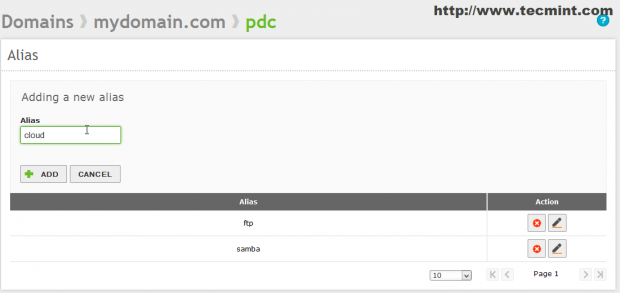
9. To overcome this unwanted situation we will use a trick based on DNS CNAME (Aliases) records. For this to work make the following configuration.
- Delete the DNS hostname record just added to your domain
10. Go to your Zentyal DNS FQDN hostname record, hit on Alias button and then ADD NEW button.

Enter the same name provided on Apache Virtual Host ( without the dot domain) on Alias field, hit on ADD and Save Changes.
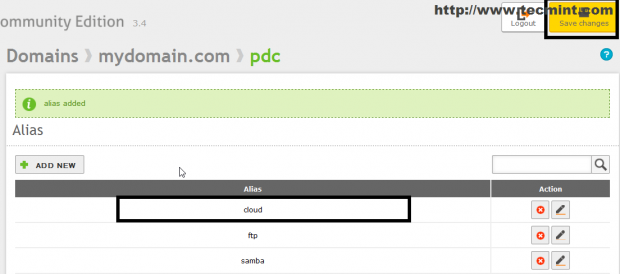
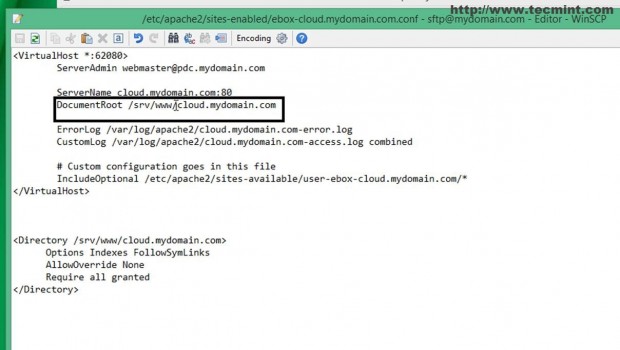
11. Now your DNS record should be fully functional and point to Apache Virtual Host which in exchange will serve web pages hosted on DocumentRoot directive (/srv/www/your_virtual_host_name ) on Zentyal.
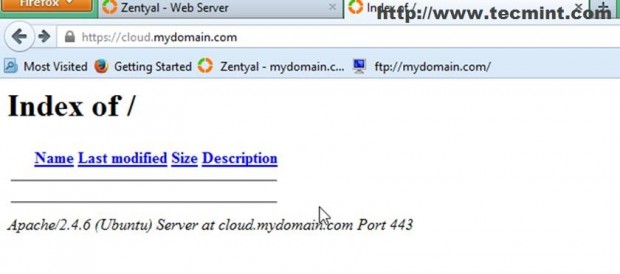
12. To test configuration open a browser and enter on URL your virtual hostname (subdomain) using http protocol.
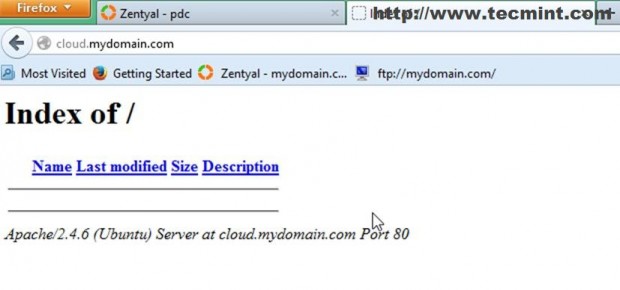
You can also issue a ping command from a different system on your network with the subdomain name.
Now Apache Web Server is configured and enabled to serve web pages on less secure http port 80, but we want to add a secure layer between server and clients, follow the step #3 as instructed below.
Step 3: Create SSL for Apache
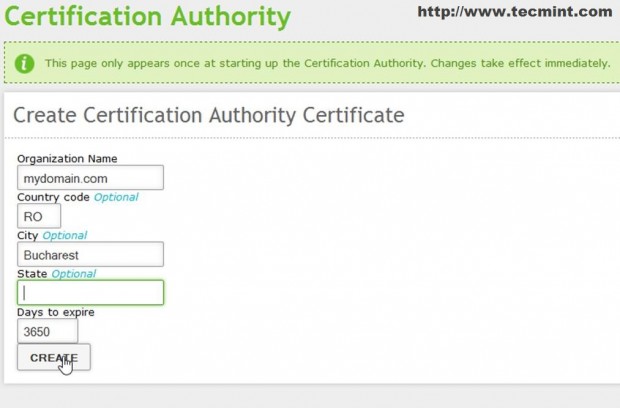
To enable SSL (Secure Sockets Layer) encryption on Zentyal 3.4 needs to become a CA (Certificate Authority) and issue the digital certificate, the public and private keys needed for server and clients exchange data over a secure channel.
13. Navigate to Certification Authority module -> General.
14. On Authority Certificate enter the following settings and then hit Create.
- Organization Name : your domain name ( in this case the domain is “mydomain.com” ).
- Country Code : your country code ( 2-3 characters ).
- City : your organization main location.
- State : leave it empty.
- Days to Expire : 3650 –by default ( 10 years ).
15. After the main Authority Certificate has been created, we issue a new one for our virtual host with the following settings.
- Common Name : enter your virtual host name or server FQDN ( in this case is cloud.mydomain.com ).
- Days to Expire : 3650.
- Subject Alternative Names : the most common parameter here is your email address (email:[email protected]).

16. After the Certificate has been generated you can download it, revoke it or renew it.

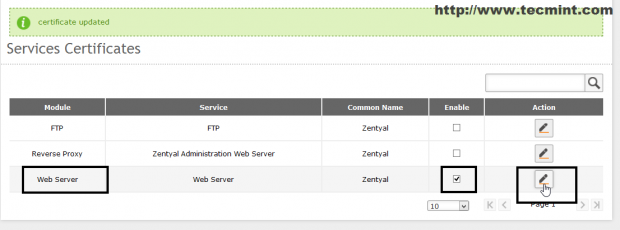
17. The next step is to link this certificate with Apache Service. Go again to Certification Authority -> Services Certificates and highlight Web Server Module.
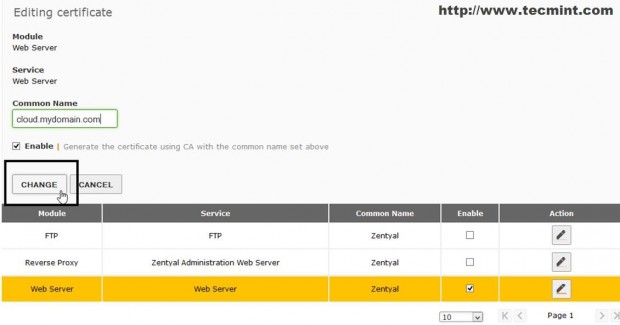
18. On Web Server Module select Enable and then hit Action icon to edit certificate.
19. On Common Name enter the name created earlier on step #15 ( that Common Name is the Certificate Name ), check Enable again , press Change button and then hit top Save changes to apply the new settings.
Now your certificate is generated and linked to Web Server Service, but is not yet operational on Virtual Hosts because HTTPS protocol is not enabled on Web Server.
Step 4: Enable Apache HTTPS
On Zentyal 3.4 SSL handling is done by HAProxy service, but we still need to enable Apache SSL configuration file and Port directive.
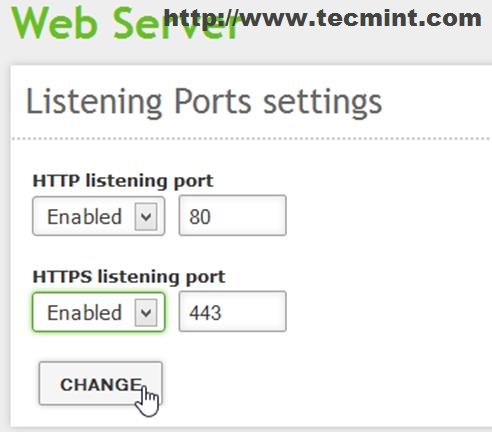
20. Navigate to Web Server –> select Enabled –Port 443 ( default SSL port ) on HTTPS Listening Ports settings and hit on Change button.
21. Navigate bottom on page and click on Action button from your listed Virtual Hosts to edit SSL settings.
22. On SSL support choose Allow SSL option, hit on Change and then hit top Save changes.
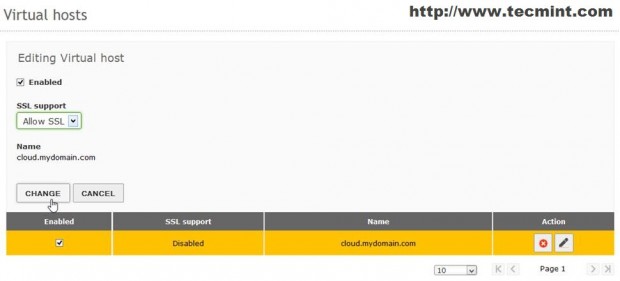
23. Now Apache will serve the “cloud.mydomain.com” virtual host on both default http ports 80 and 443.
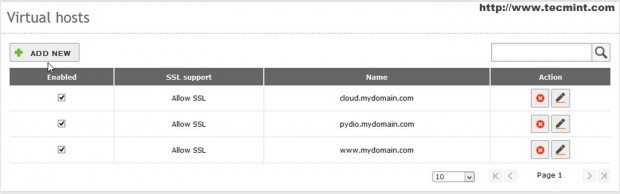
24. Repeating the steps above you can transform Zentyal to a Web hosting box and add as many domains or subdomains with Apache Virtual Host as required and configure all to use HTTP and HTTPS communication protocols using the certificate issued earlier.
Although there may be no complex configuration which implies a real web hosting platform (some can be created from the command line and using the Apache .htaccess file ) Zentyal 3.4 can be used hosting for medium-sized web sites and greatly simplifies editing and configuring web services.

@Andre: As far as I know MySQL is configured to listen only on localhost. Edit mysql configuration to listen on a specific IP address or all addresses(0.0.0.0).
netstat -tlpn command will give a hint on what address MySQL is listening!
Just have an question how do you open port 3306 for access in zentyal. i tried adding it to the service and then to the firewall but nothing nada please HELP!!!!
Great Tutorials:
How can I install an SSL Secured web app within the same domain as my Zentyal Server?
For the MySQL Root password:
sudo cat /var/lib/zentyal/conf/zentyal-mysql.passwd
Hi, I’ve really enjoyed your tutorials/guides so far. I was wondering if you knew how to add a WordPress website to the web server. The problem I’ve had is that I cannot access the mysql database.