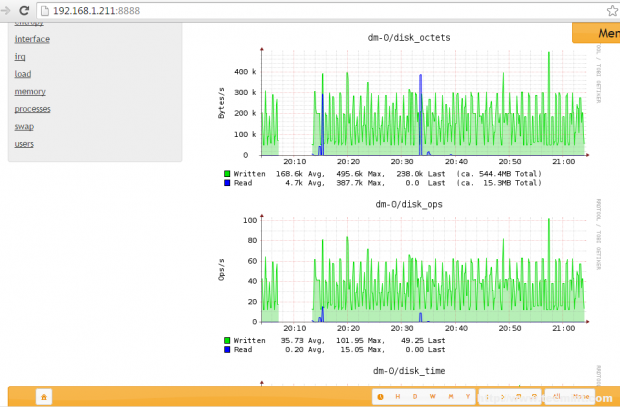
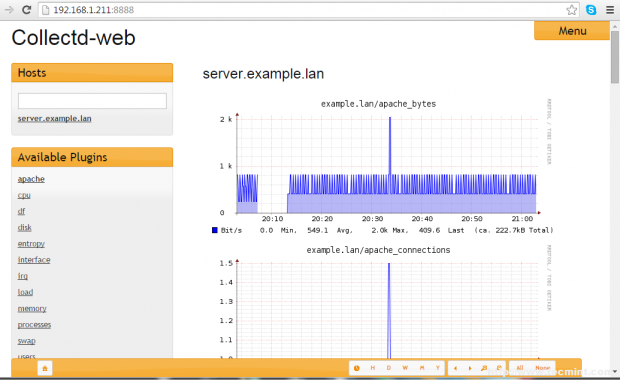
8. To visit Collectd-web interface and display statistics about your host, open a browser and point the URL at your server IP Address and port 8888 using HTTP protocol.
By default you will see a number of graphics about CPU, disk usage, network traffic, RAM, processes and other system resources by clicking on the hostname displayed on Hosts form.
http://192.168.1.211:8888

9. To stop the standalone Python server issue the below command or you may cancel or stop the script by hitting Ctrl+c key:
# killall python
Step 5: Create a Custom Bash Script to Manage the Standalone Python Server
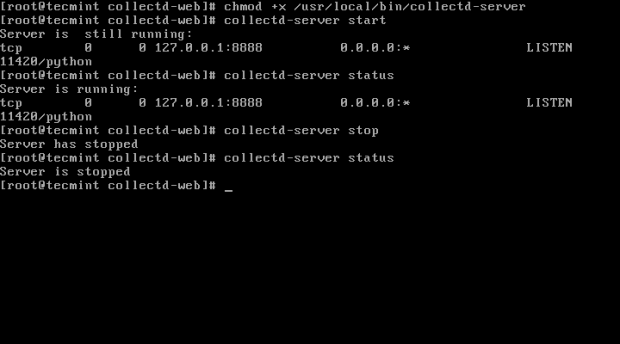
10. To manage the standalone PyhtonCGIServer script more easily (start, stop and view status), create the following collectd-server Bash script at a system executable path with the following configurations:
# nano /usr/local/bin/collectd-server
Add the following excerpt to collectd-server file.
#!/bin/bash

PORT="8888"
  case $1 in
            start)
	cd /usr/local/collectd-web/
	python runserver.py 2> /tmp/collectd.log &
    sleep 1
    stat=`netstat -tlpn 2>/dev/null | grep $PORT | grep "python"| cut -d":" -f2 | cut -d" " -f1`
            if [[ $PORT -eq $stat ]]; then
    sock=`netstat -tlpn 2>/dev/null | grep $PORT | grep "python"`
    echo -e "Server is  still running:\n$sock"
            else
    echo -e "Server has stopped"
            fi
                    ;;
            stop)
    pid=`ps -x | grep "python runserver.py" | grep -v "color"`
            kill -9 $pid 2>/dev/null
    stat=`netstat -tlpn 2>/dev/null | grep $PORT | grep "python"| cut -d":" -f2 | cut -d" " -f1`
            if [[ $PORT -eq $stat ]]; then
    sock=`netstat -tlpn 2>/dev/null | grep $PORT | grep "python"`
    echo -e "Server is  still running:\n$sock"
            else
    echo -e "Server has stopped"
            fi
                    ;;
            status)
    stat=`netstat -tlpn 2>/dev/null |grep $PORT| grep "python" | cut -d":" -f2 | cut -d" " -f1`
            if [[ $PORT -eq $stat ]]; then
    sock=`netstat -tlpn 2>/dev/null | grep $PORT | grep "python"`
    echo -e "Server is running:\n$sock"
            else
    echo -e "Server is stopped"
            fi
                    ;;
            *)
    echo "Use $0 start|stop|status"
                    ;;
    esac
In case you have changed PORT variable number from runserver.py script, make sure you make the port variable changes on this bash file accordingly.
11. Once you have created the collectd-server script, add executing permissions in order to be able to run it. The only thing remaining now is to manage the Collectd-web server in a similar way as you do with a system service by issuing the following commands.
# chmod +x /usr/local/bin/collectd-server
# collectd-server start
# collectd-server status
# collectd-server stop
Step 6: Enable a Collectd Daemon Plug-in
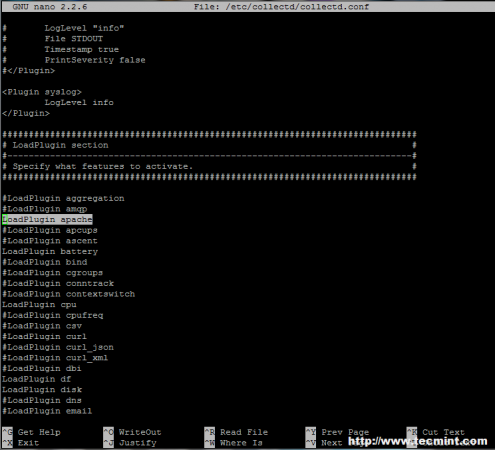
12. In order to activate a plug-in on Collectd service, you must go to its main configuration file, which is located at /etc/collectd/collectd.conf file, open this file for editing and uncomment, the first time (remove the # sign in front) the plug-in name you want to activate.
Once the LoadPlugin statement with the name of the plug-in has been uncommented you must deeply search through the file and locate the same plugin name which holds the configurations required to run.
As an example, here’s how you active Collectd Apache plugin. First open Collectd main configuration file for editing:
# nano /etc/collectd/collectd.conf
A. Use Ctrl+w to enable nano editor search and type apache on below terminal the search filed. Once LoadPlugin apache statement has been found, remove the comment special sign # to uncomment it, as illustrated in the below screenshot.
B. Next, type Ctrl+w to search again, apache should already appear on search filed and press Enter key to find the plug-in configurations.
Once apache plug-in configurations are located (they look similar to Apache web server statements) uncomment the following lines, so that the final configuration should resemble to this:
<Plugin apache>
        <Instance "example.lan">
                URL "http://localhost/server-status?auto"
#               User "www-user"
#               Password "secret"
#               VerifyPeer false
#               VerifyHost false
#               CACert "/etc/ssl/ca.crt"
#               Server "apache"
        </Instance>
#
#       <Instance "bar">
#               URL "http://some.domain.tld/status?auto"
#               Host "some.domain.tld"
#               Server "lighttpd"
#       </Instance>
</Plugin>
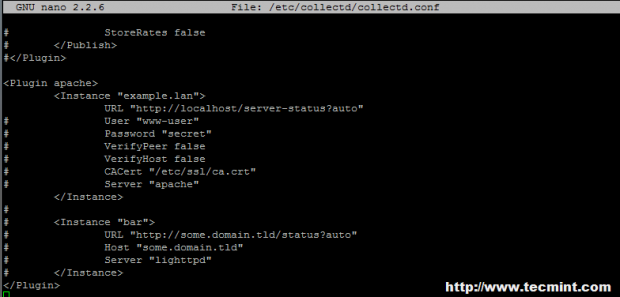
Note: Replace <Instance "example.lan"> statement string according to your server hostname.
C. After you finish editing the file, save it (Ctrl+o) and close it (Ctrl+x), then restart Collectd daemon to apply changes. Clear your browser cache and reload the page to view the statistics collected by Collectd daemon so far for Apache Web Server.
# /usr/local/bin/collectd-server start
To enable other plug-ins please visit Collectd Wiki page.
Step 7: Enable Collectd Daemon and Collectd-web Server System-Wide
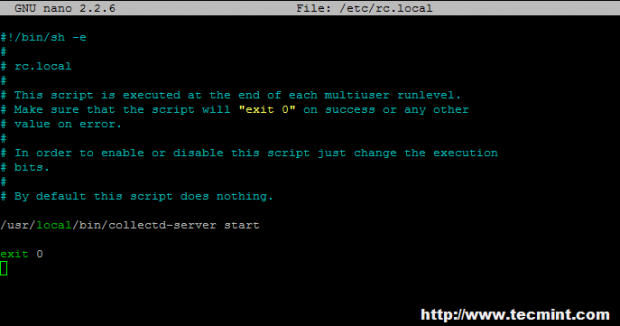
13. In order to automatically start Collectd-web server from the Bash script at boot time, open /etc/rc.local file for editing and add the following line before the exit 0 statement:
/usr/local/bin/collectd-server start
If you’re not using the collectd-server Bash script which manages the Python server script, replace the above line on rc.conf with the following line:
# cd /usr/local/collectd-web/ && python runserver.py 2> /tmp/collectd.log &
Then, enable both system services by issuing the following commands:
------------------ On Debian / Ubuntu ------------------
# update-rc.d collectd enable
# update-rc.d rc.local enable
Optionally, an alternate method to enable this services at boot time would be with the help on sysv-rc-conf package:
------------------ On Debian / Ubuntu ------------------
# sysv-rc-conf collectd on
# sysv-rc-conf rc.local on
------------------ On RHEL/CentOS 6..x/5.x and Fedora 12-19 ------------------
# chkconfig collectd on
# chkconfig --level 5 collectd on
------------------ On RHEL/CentOS 7.x and Fedora 20 onwards ------------------
# systemctl enable collectd
That’s all! Collectd daemon and Collectd-web server prove to be excellent monitoring tools for Linux servers, with minimal impact concerning system resources, which can generate and display some interesting graphical statistics about machines workload, the only drawback so far being the fact the statistics are not displaying in real time without refreshing the browser.


Can anyone draft the
runserver.pyfile to support python3? The current file is not working.Hi
I have installed collectd and the service is up and running. I have configured the ip address in the python script and the UI is accessible, but when i enable the plugin in /etc/collectd.conf i am not able to see anything in the web console.
Kindly help to solve my issue.
Great article but I have a problem already at step 8. It produces a web-page without any graphics and the button “server.example.lan” is missing.
Thank you so much
Hi, I also have this problem, have you found a solution?
@adji: Check if the configuration file look ok by running the following command: collectd -t
This post is bit out dated for CentOS 7.2 yum install collectd does not seem to create folder /etc/collectd/collectd.conf.d or /etc/collectd. collectd.conf file is installed in /etc/collectd.conf. How do i get collectd-web to work with collectd. the version it is installing is collectd.x86_64 0:5.5.2-1.el7
@Kumar
Thanks for pointing out those configuration files of Collectd, let me check the instructions on latest CentOS 7.2 and will update the article with new supported instructions..
Thanks for looking into this. Is there any ETA when you would be able to updated this doc. Looking forward for the latest document.
@Kumar,
Sorry for delay, but I think by this weekend will update this article with new latest instructions..
I want to point out that this is by no means a complete instructional when dealing with Centos 6.7
There were several steps required in order to make this work, such as:
Un-commenting out the rrdtool plugin line in collectd.conf.
Adding the rrdtool plugin definition in collectd.conf https://collectd.org/wiki/index.php/Plugin:RRDtool
Creating a configuration file: collection.conf in /etc/collectd for collectd-web to get rrdfile location details from. https://www.sub-design.co.uk/wordpress/?p=755
Installing the collectd-rrdtool package https://www.sub-design.co.uk/wordpress/?p=769
After I had gone though and did all of these things, collectd started loading information in to my collectd-web interface, but not before. I hope this helps someone who is stuck.
Thank you. This is a great article and I now have everything set up. However, does anybody know how to protect the web interface with a password ? I just don’t like the idea that anybody can connect on the interface and see the data.
htpasswd –c /path/to/collectd_directory/.htpasswd your_user
Open Apache config file and add the following statements:
AuthType basic
AuthName “What ever message you want”
AuthBasicProvider file
AuthUserFile /path/to/collectd_directory/.htpasswd
Require user your_user
Then a2enmod auth_basic and restart apache daemon.
Thank you for your answer. However, I don’t think this solution is appropriate here because we’re not using Apache for the web interface (we are using a python module).
I found a solution by modifying the runserver.py file using the information on this page : https://gist.github.com/fxsjy/5465353
I simply put the content of the class AuthHandler in the class Handler of the runserver.py file and added a few more lines here and there (to use the key and import the stuff needed) and it works !
Thank you so much! You saved my day, ur post is great for beginners like me! Could follow every step :)
Wow this is a great article. I didn’t have to go off your steps once which is rare in my experience.
Great post as usual. But i prefer Munin Server-Client. Can anyone is tecmint please make a tutorial on SAN. I know no one own SAN at home. But it will be helpful if someone make a demo on
1: Discovering HBA and what is WWN and how to know
2: Discovering LUN
3: And multipathing
Because this is one critical thing and Information on this subject is just scattered and there is no sequence like what thing should be done first and then and then and then ……
Please please make a tut on it or if not possible then please give us theoretical tutorial with commands ……. Thanks and Bless you
Hi,
Great article. Could You write manual ex: svn+trac oraz gitolite with migrate actual svn/trac/git arch ?