CentOS is a Industry Standard Linux Distribution which is a derivative of RedHat Enterprise Linux. You may start using the OS as soon as you install it, but to make the most out of your system you need to perform a few updates, install a few packages, configure certain services and application.
This article aims at “30 Things to Do After Installing RHEL/CentOS 7”. The post is written keeping in mind you have installed RHEL/CentOS Minimal Install which is preferred in Enterprise and production environment, if not you can follow below guide that will show you minimal installations of both.
The following are the list of important things, which we’ve covered in this guide based on industry standard requirements. We hoping that, these things will be very helpful in setting up your server.
1. Register and Enable Red Hat Subscription
After minimal RHEL 7 installation, it’s time to register and enable your system to Red Hat Subscription repositories and perform a full system update. This is valid only if you have a valid RedHat Subscription. You need to register your in order to enable official RedHat System repositories and update the OS from time-to-time.
We have already covered a detailed instructions on how to register and active RedHat subscription at the below guide.
Note: This step is only for RedHat Enterprise Linux having a valid subscription. If you are running a CentOS server immediately move to further steps.
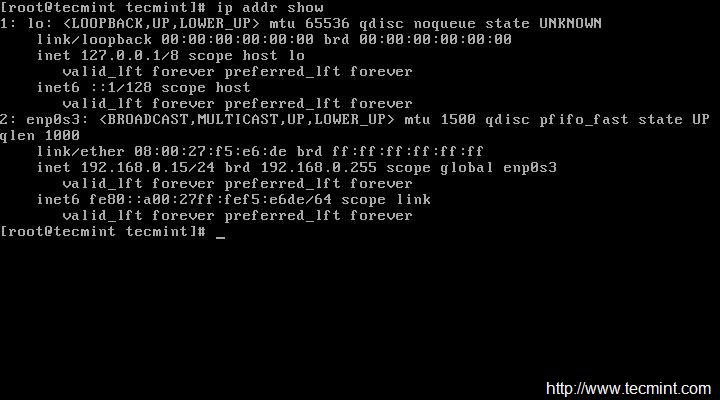
2. Configure Network with Static IP Address
The first thing you need to do is to configure Static IP address, Route and DNS to your CentOS Server. We will be using ip command the replacement of ifconfig command. However, ifconfig command is still available for most of the Linux distributions and can be installed from default repository.
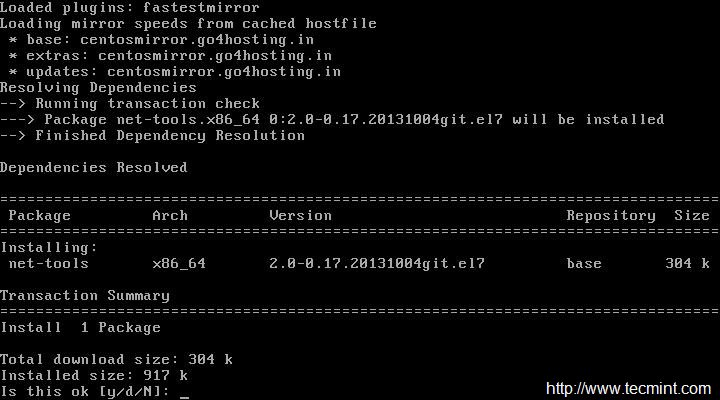
# yum install net-tools [Provides ifconfig utility]
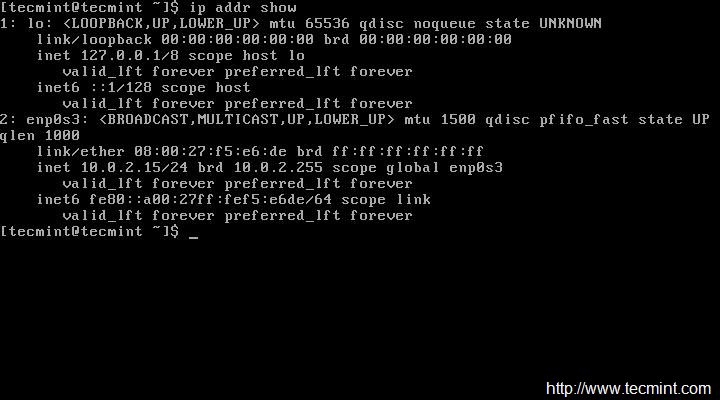
But as I said we will be using ip command to configure static IP address. So, make sure you first check the current IP address.
# ip addr show
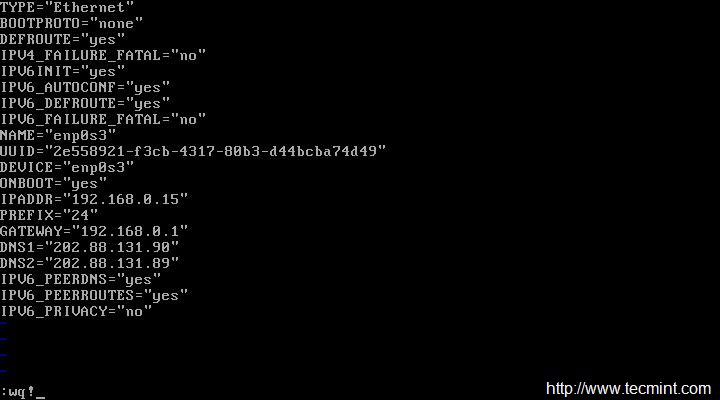
Now open and edit file /etc/sysconfig/network-scripts/ifcfg-enp0s3 using your choice of editor. Here, I’m using Vi editor and make sure you must be root user to make changes…
# vi /etc/sysconfig/network-scripts/ifcfg-enp0s3
Now we will be editing four fields in the file. Note the below four fields and leave everything else untouched. Also leave double quotes as it is and enter your data in between.
IPADDR = “[Enter your static IP here]”
GATEWAY = “[Enter your Default Gateway]”
DNS1 = “[Your Domain Name System 1]”
DNS2 = “[Your Domain Name System 2]”
After making the changes ‘ifcfg-enp0s3‘, looks something like the image below. Notice your IP, GATEWAY and DNS will vary, please confirm it with your ISP. Save and Exit.
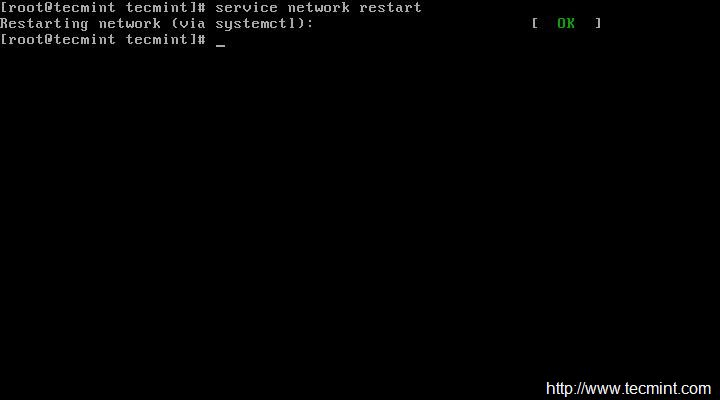
Restart service network and check the IP is correct or not, that was assigned. If everything is ok, Ping to see network status…
# service network restart
After restarting network, make sure to check the IP address and network status…
# ip addr show
# ping -c4 google.com

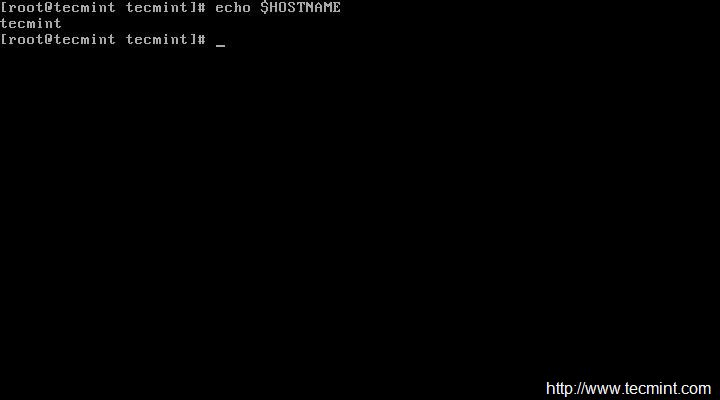
3. Set Hostname of Server
The next thing to do is to change the HOSTNAME of the CentOS sever. Check the currently assigned HOSTNAME.
# echo $HOSTNAME
To set new HOSTNAME we need to edit ‘/etc/hostsname‘ and replace old hostname with the desired one.
# vi /etc/hostname

After setting hostname, make sure to confirm hostname by logout and login again. After login check new hostname.
$ echo $HOSTNAME

Alternatively you may use command ‘hostname‘ command to view your current hotsname.
$ hostname
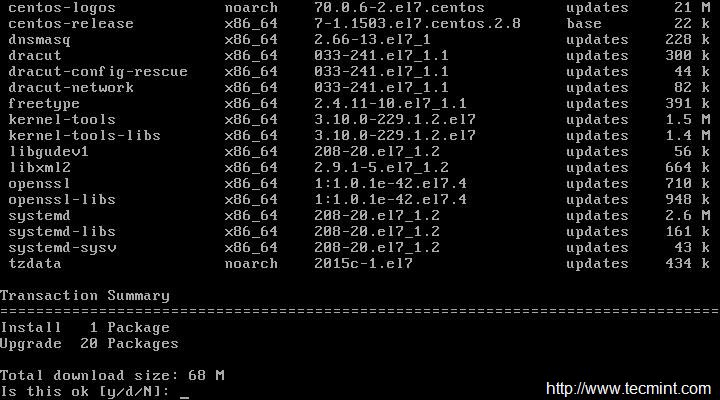
4. Update or Upgrade CentOS Minimal Install
This will not install any new packages other than updating and installing the latest version of installed packages and security updates. Moreover Update and Upgrade are pretty same except the fact that Upgrade = Update + enable obsoletes processing during updates.
# yum update && yum upgrade
Important: You can also run the below command which will not prompt for the packages update and you do not need to type ‘y‘ for accepting the changes.
However it is always a good idea to review the changes which is going to take place on the sever specially in production. Hence using the below command may automate the update and upgrade for you but it is not recommended.
# yum -y update && yum -y upgrade
5. Install Command Line Web Browser
In most cases, specially in production environment, we usually install CentOS as command line with no GUI, in this situation we must have a commandline browsing tool to check websites via terminal. For this, we going to install a most famous tool called ‘links‘.
# yum install links

For usage and examples to browse web sites u links tool, read our article Command Line Web Browsing with Links Tool
6. Install Apache HTTP Server
No matter for what purpose you will be using the server, in most of the cases you need a HTTP server to run websites, multimedia, client side script and many other things.
# yum install httpd

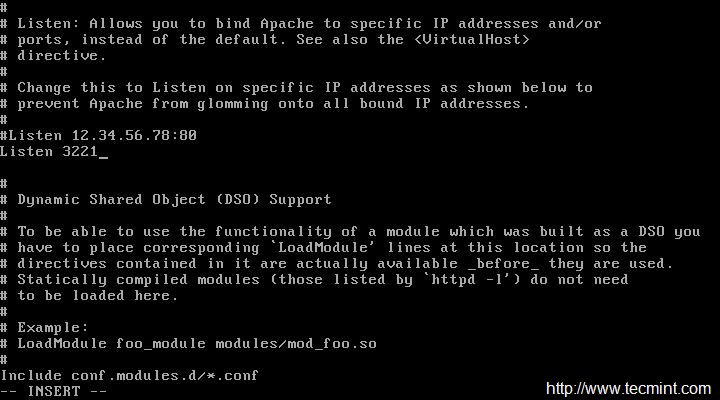
If you would like to change default port (80) of Apache HTTP Server to any other port. You need to edit the configuration file ‘/etc/httpd/conf/httpd.conf‘ and search for the line that starts typically like:
LISTEN 80
Change port number ‘80‘ to any other port (say 3221), save and exit.
Add the port you just opened for Apache through the firewall and then reload the firewall.
Allow service http through firewall (Permanent).
# firewall-cmd --add-service=http
Allow port 3221 through firewall (Permanent).
# firewall-cmd --permanent --add-port=3221/tcp
Reload firewall.
# firewall-cmd --reload
After making all above things, now it’s time to restart Apache HTTP server, so that the new port number is taken into effect.
# systemctl restart httpd.service
Now add the Apache service to system-wide to start automatically when system boots.
# systemctl start httpd.service
# systemctl enable httpd.service
Now verify the Apache HTTP Server by using links command line tool as shown in the below screen.
# links 127.0.0.1


I followed this guide. Its really helpful. As you said quite extensively about installing apache, databases and others.
Can you also provide a guide regarding how to upload a site in CentOS after doing all this?
You can use WordPress and add the blogs.create new website add the domain to that website apache.
I am wondering why httpd,php is installed after installing virtualbox. Initially it is installed, will it conflict
Resourceful tutorial for Linux enthusiast.
There is a mistake in the SSH section. The config file is NOT ‘ssh-config’. That is meant for the SSH client not the server. The SSH server settings are in ‘sshd-config’. As a noob, it took me a while to figure out why my changes had no effect on the server.
Otherwise, this has been a great resource for someone like me learning Linux for the first time. Thanks!
@Gary,
Thanks for notifying, yes it should sshd_config for configuring SSH Server. We’ve corrected in the article.
One of the commands didn’t work for me, the one related to opening up the httpd port through firewalld. I got a syntax error
I got a successful execution with the following command, because I did not choose to assign http a funky port, just the standard one (80)
If you want to use a custom port for httpd, use this command, which specifies the port/protocol:
SOURCE:
https://stackoverflow.com/questions/24729024/open-firewall-port-on-centos-7
Thank you for getting this information together, it is very helpful for people not familiar to minimal dekstop-less installations.
There’s a syntax error in the article, it should say:
(two dashes instead of one, before every argument)
@IvanZ,
Thanks, I have corrected the command in the article..
Hey, thanks for this list. It was very valuable for me to set up a new CentOS 7 configuration. So far I had only to deal with SLES. Thank you
The articel does only contain nonsense. Why somebody should protect grub when it can be by passed so easy?
A speedtest cronjob? wtf?
the guy that wrote to this… went to some trouble to help. Dont be a douche and leave thoughtless comments.
When i change the Listen directive and restart the httpd following error occurs.
Job for httpd.service failed. See ‘systemctl status httpd.service’ and ‘journalctl -xn’ for details.
This happen when i tried to change Listen to 3221, 9090 or :9090 .. anything.
While it works fine for port 80 and 8080
Hi Atul. This could be caused by SELinux. Check if it is enabled by running “sestatus“. If it says enabled, you have to ways:
1. Disable SELinux by running ‘setenforce 0‘;
2. Add SE rules (using ‘semanage‘ command). In this case you will have SELinux enabled (which is recommended);
Hey, thank you for this list. It has been invaluable for me while setting up a new CentOS 7 configuration. I’m technical but this is easily understandable and readable for anyone.
Hi Guys,
Cant open my website with elinks. It is saying that I need to enable my javascript. How to do that on centos7 minimal.
Thanks
@Zack,
Enable JavaScript at browser level, Firefox or chrome.
Use Secure Protocol over the default SSH Protocol and change port number also for extra Security. Edit the SSH configuration file ‘/etc/ssh/ssh_config‘.
why install wget? isn’t curl available by default?
Hi,
The following
# firewall-cmd -permanent -add-port=3221/tcp
should be
# firewall-cmd –permanent –add-port=3221/tcp
4.unable to chown
Hi, is anybody help me I am new to CentOS 7, regarding I am unable to enter into root mode.
After reading point #22, I tried commands, but now i am unable to get into:
why this happened it always says even i tried to attempt…
sudo: >>> /etc/sudoers: syntax error near line 45 <<>> /etc/sudoers: syntax error near line 101 <<<
sudo: parse error in /etc/sudoers near line 45
sudo: no valid sudoers sources found, quitting
sudo: unable to initialize policy plugin
please help me i am new to cent os 7
try su root
Tape
#History
And update ur post please
After installing Webmin you’ll need to allow access on port 10000.
@Zack,
Yes, you right, port should be opened to access from the public network over IP Address or Domain, for example:
Hi, Nice post
would you happen to have solution to install nginx in front of Apache to avoid opening httpd services by apache every time, and saving system resources.
Cheers
@Zack,
You mean both nginx and apache should run on same server without any conflict? if yes, you should run nginx or apache on different ports..
yum install links
should be
yum install elinks
@Smallufo,
Both links and elinks are commandline based web browsers and both are available to install from default repositories, no need to replace…
It was a helpful article sir. In Step 17 “Installing Webmin”, after I install it, I am asked to login http://myipaddress:10000.
When I do that, I get “The owner “abc” has configured their website improperly…..”
@Vaishnavi,
Thanks for finding this article useful, could you share the screenshot of the same? it will help us to understand more better about your problem..
For VirtualBox installation, you might need to copy the repository file http://download.virtualbox.org/virtualbox/rpm/el/virtualbox.repo to /etc/yum.repos.d/. Otherwise, you could get a “No package VirtualBox-X.X available.” error.
@Radix,
Thanks for the tip, will include in the article as suggested..
thanks million for your good post,
i find 2 small mistakes in spelling of commands that maybe because of them some users face problem in copy and paste the commands from the post.
1. “permanent” spell in below section is not correct:
Add service tomcat and default port (8080) through firewall and reload settings.
# firewall-cmd —zone=public —add-port=8080/tcp —permannet
2.reload in below command has just one dash(-):
To add a service say http, temporarily and reload firewalld.
# firewall-cmd –reload
@Mohammad,
Thanks for pointing out those types, corrected in the article..
I’m not sure who wrote this but it seems clear that he/she never attempted to follow her own instructions.
The first step in setting up the network is to invoke
yum install net-tools
yum install requires a functioning network with accessible repositories if using the minimal CD.
These instructions simply won’t ever work with a minimal installation CD.
Cannot connect to X server — not entirely sure what this means.
For people unfamiliar with CLI text editors (vi, vim, nano), etc.
You can configure static IP and hostname in a GUI environment, just type:
# nmtui
Once there, you can edit what you need.
If ‘nmtui’ command not found, install it:
yum install NetworkManager-tui
Done!
My 2 cents…
@Chris,
Thanks for the tip about configuring and setting hostname and IP address using GUI way, hope it will help Desktop Linux users, from me 10 cents to you…:) keep it up..
Good vibrations.
Thanks to you for the great tutorial :-)
Thank You for collecting all that useful and not so useful in one article. :)
Hmm, interesting, how many copypasters have used your sample passwords unchanged? :)
Typos:
# nmap 127.0.01
# visudo
OMG, sorry. visudo isn’t typo ;)
Thanks for the write up, I’m very new to this and it helps a bit. However, when I got to the firewall-cmd commands in step 6 I ran into some problems. Not sure if I did this correct or not but I had to run “yum install firewalld” then start it with “systemctl start firewalld”. Then I had to add a “-” before the arguments (replaced “firewall-cmd -add-service=http” with “firewall-cmd –add-service=http”.
excellent, you debugged the typos and continued the install
as an experienced computer hobbyist, I was able to use this howto with minimal effort, only found some typo’s and all went well
thank you for providing this information in such a well-written format
Hello
my VPS only provide a centos standard version. How to change it to minimal version. What services will be remove?
thank you before…
@Gladwin,
There isn’t any way to go back to minimal version, but you can find and remove unwanted services as explained in these two articles.
https://www.tecmint.com/remove-unwanted-services-in-centos-7/
https://www.tecmint.com/remove-unwanted-services-from-linux/
Plzz provide rhel 7 download links not from redhat but its alternate
Virtual box?! What about the standard KVM?
@Eduardo,
Thanks for suggesting about KVM, I do agree KVM more feature rich virtualization tool than virtualbox. In fact, we’ve already covered a complete series on KVM here.
https://www.tecmint.com/install-and-configure-kvm-in-linux/
Why don’t use “nmcli” and “hostnamectl”? This is a Red Hat standard.
@Eduardo,
Sure we will include both the tools with examples to this list..
Hi,
Your website was very helpful, thank you .
In the Mariadb install section, think to change the following line :
# firewall-cmd –add-service=mysql
to
# firewall-cmd –-add-service=mysql
Regards
@Belkasmi,
That was a really good catch man, corrected in the writeup and thanks for reading the article..
It mustn’t be the best idea to add MySQL as public available service!
For my point of view, the title of this article should be different, Noobies which install all this on their systems might end up with things, not ideally for everybody. Your site has built a huge reputation over time, and you just cannot recommend installing things like java or a compiler on a system, where it might not be explicitly needed!
BUT: Positive to note: You explained mysql_secure_installation, firewalld, and selinux. There are still too may sites out there who forget, or disable this.
How about NTP? That should also be important at least for logging.
@Andy,
Yes i do agree with your point, forgot to mention in the list, no worries here is the article about NTP.
Install and Configure NTP Server/Client in Debian Linux
Install and Configure NTP Server on RHEL/CentOS 7
Synchronize Linux Time with NTP Server on Linux
the reason you installed a minimal OS is to avoid all those unnecessary services. this article just did the opposite.
well i taught us how to do it : )
You have an mistake at Step 7:
echo -e “” > /var/ww/html/phpinfo.php
has to be
echo -e “” > /var/www/html/phpinfo.php
@Andreas,
Good catch, yes it was typo, corrected in the write up..Thanks..
Thanks!
thanks :-)
If you have yum working, wouldn’t most of these be easier to accomplish by doing “groupinstall” of the varios appropriate groups?
Very helpful for me. Thanks for sharing.
Great article, help me to configure some basic stuff and discover others like rkhunter and speedtest-cli
Question, should the static IP address be the private IP of the machine running the VM??
@yemi,
Static IP address is the public IP which is accessible by world over HTTP..
In the three step, why not use “hostname” directly instead of $HOSTNAME?
Good article overall though. Thanks for all the info!
lot of spelling errors in this article for the commands. nmap for example, “# namp 127.0.01” should be “# nmap 127.0.0.1”. the firewall command right after that part, “# firewall-cmd –list-ports” should be “# firewall-cmd –list-ports” (2 – , not 1).
various other mistakes. the screenshots are good, just not the commands in code blocks.
@Cory,
Thanks for the updating us about those errors, we’ve fixed in the writeup..
Thanks alot for sharing such a nice info for manage server.
Welcome Waheed!
Keep connected for more such posts. The best is yet to come.