When you install RHEL 9, the system comes with a minimal set of pre-installed packages and services to keep the system lightweight and secure.
However, over time, as you install new packages and services, your system can become bloated and vulnerable to security threats.
In this article, we will discuss how to disable and remove unwanted services and packages on RHEL-based distributions such as Rocky Linux, AlmaLinux, and Fedora, ensuring that your system remains secure and functional.
If you are planning to use your newly installed RHEL system to host, let’s say, a small website that runs on Apache or Nginx, or to provide network services like DNS, DHCP, PXE boot, FTP server, etc or other services that don’t require to run Postifx MTA, CUPS and Avahi daemons, then why we should keep all these unnecessary daemons installed or even running on your server.
The main external services that your server truly requires to run after you perform a minimal installation would be just a SSH daemon, in order to allow remote logins on the system, and, in some cases, NTP service, to accurately synchronize your server’s internal clock with external NTP servers.
Installing Useful System Utilities
After the installation finishes, login on your server with a root account or a user with root privileges and perform a system update, to make sure that your system is up-to-date with all packages and security patches.
yum update -y
yum upgrade y
The next step would be to install some useful system utilities such as net-tools (this package provides the older but good ifconfig command), nano text editor, wget for file download and curl for URL transfers, lsof (to list your open files), and bash-completion, which auto-completes typed commands.
yum install nano bash-completion net-tools wget curl lsof
Disable and Remove Unwanted Services in Linux
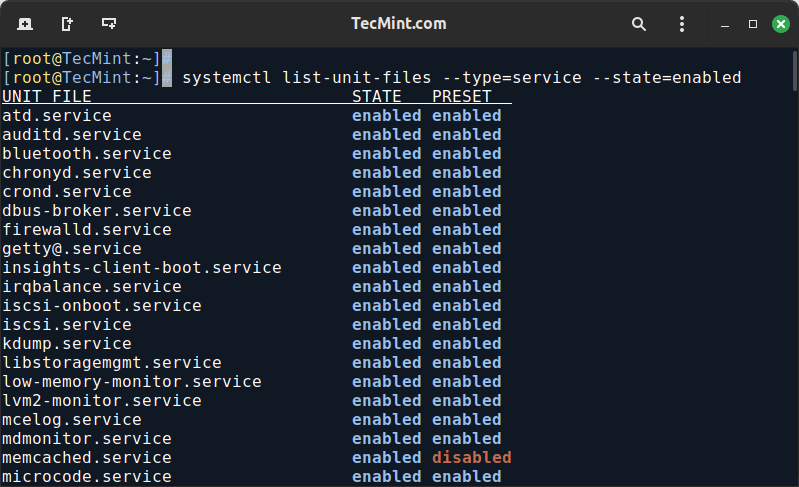
Now you can start disabling and removing pre-installed unwanted services, but before that, you need to get a list of all your enabled and running services on your system.
Checking Enabled Services
Before disabling services, it is essential to check which services are currently enabled on your system.
For SystemD:
systemctl list-unit-files --type=service --state=enabled
For SysVinit:
ls /etc/rc.d/rc3.d/
For OpenRC:
rc-update show
Take note of the services that you want to disable.
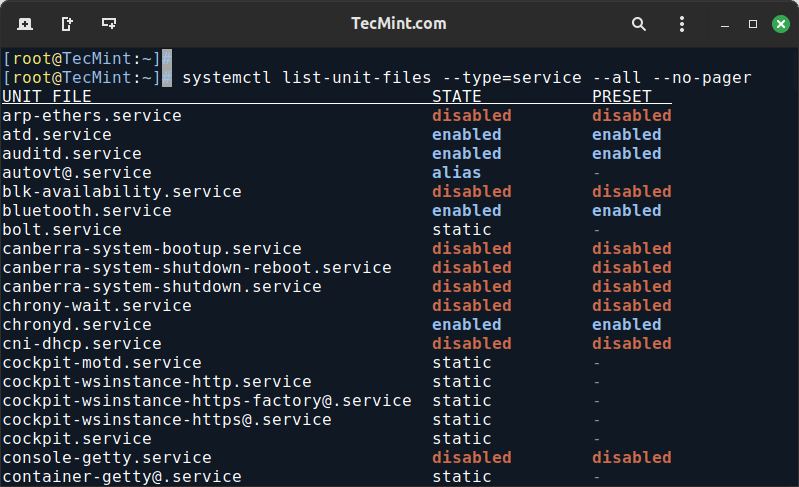
Identifying Unnecessary Services
Before disabling and removing unwanted services, you need to identify which services are necessary and which ones can be safely disabled.
One way to do this is to examine the list of enabled services and look up their descriptions to determine what they do.
For example, the following command will show a list of all enabled services along with their descriptions on systemd-based distributions:
systemctl list-unit-files --type=service --all --no-pager
For SysVinit:
ls /etc/init.d/
For OpenRC:
rc-status --all
You can then examine each service’s description to determine whether it is necessary for your system.
Another approach is to use a tool like systemd-analyze to analyze your system’s boot time and identify services that are slowing down the boot process.
systemd-analyze
systemd-analyze blame
The above command will display a list of all running systemd units (services) sorted by the time they took to initialize.
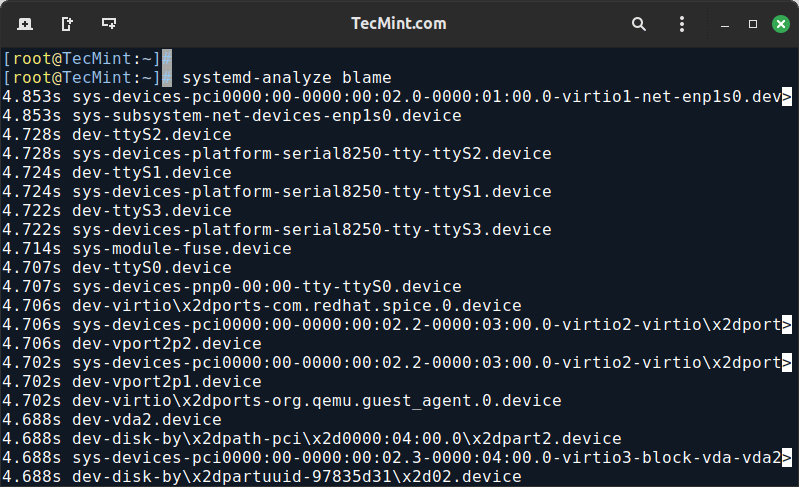
Services that are not critical to system operation and are slowing down the boot process can often be safely disabled.
Disable Unnecessary Services
Once you’ve identified a service that is not critical and might be slowing down boot time, you can disable and stop it using the following commands.
For SystemD:
sudo systemctl disable <service_name>
sudo systemctl stop <service_name>
For SysVinit:
sudo service <service_name> stop
sudo chkconfig <service_name> off
For OpenRC:
sudo rc-service <service_name> stop
sudo rc-update del <service_name> default
While the services that you need to disable or remove will depend on your specific use case, there are a few common services that you may want to consider disabling or removing on a minimal installation of RHEL.
Postfix
Postfix is a mail transfer agent (MTA) that is used to send and receive email on your system. If you are not using your system for email, you can disable and remove this service.
sudo systemctl stop postfix
sudo systemctl disable postfix
sudo yum remove postfix
Avahi
Avahi is a service that is used for zero-configuration networking, allowing devices to discover and communicate with each other on the same network.
If you do not require this functionality, you can disable and remove avahi service.
sudo systemctl stop avahi-daemon.socket
sudo systemctl disable avahi-daemon.socket
sudo yum remove avahi-autoipd avahi-libs avahi-tools
Cups
The cups service is used for printing. If your system does not require printing capabilities, you can disable and stop it:
sudo systemctl disable cups
sudo systemctl stop cups
suod yum remove cups
Removing Unwanted Services
In addition to removing unwanted services, you may also want to remove any packages that are no longer needed. Unused packages can take up disk space and potentially create security vulnerabilities.
First, list the installed packages to identify which ones are associated with unwanted services:
rpm -qa
To find out which package provides a particular service, use:
rpm -qf /usr/lib/systemd/system/<service_name>.service
To remove a package and its associated files, use.
sudo yum remove <package_name>
Best Practices for Disabling and Removing Services
When disabling and removing services, it is essential to follow best practices to ensure that your system remains secure and functional.
Here are some guidelines to follow:
- Before removing a service, disable it to prevent it from running in the background, which can be done using the
systemctl disablecommand. - Stop the service to prevent it from running in the current session, which can be done using the
systemctl stopcommand. - Remove any packages that are no longer needed to free up disk space and reduce security vulnerabilities, which can be done using the
yum removecommand. - After disabling or removing services, refresh the systemd daemon to ensure that the changes take effect, which can be done using the
systemctl daemon-reloadcommand. - After removing services, check for ghost services that may still be running, which can be done using the
systemctl list-unitscommand.
Conclusion
Disabling and removing unwanted services and packages on RHEL is an essential step in maintaining system security and performance.
By following the steps outlined in this article, you can ensure that your system remains secure and functional. Remember to always follow best practices when disabling and removing services, and be cautious when removing packages to avoid potential security vulnerabilities.


“How to Disable and Remove Unnecessary Services on Linux”
Please change your title to show the actual scope of the article – “In this article, we will discuss how to disable and remove unwanted services and packages on RHEL-based distributions”
And this article does not address how to stop unnecessary services on non-systemd distros which also part of Linux.
@Dragonmouth,
Thank you for your feedback. I have now included instructions for disabling and removing unnecessary services on non-systemd distributions as well.
The article now covers both systemd and non-systemd systems, ensuring a comprehensive guide for various Linux environments.
Please let me know if you have any further suggestions or questions!
Thank you for your time – excellent tuts on this site!
I was also able to disable and remove the Avahi daemon with no issues. IS there something that I should keep an eye on just in case? Why are you using ntp instead of chrony?
If you are running a server, removing Avahi daemon is a good security practice. Using ntp instead of crony is a personal choice, anyway if you just want to sync time with upstream ntp servers you can use ntpdate command from crontab.
Well, I just removed the Avahi daemon from a fresh Centos 7 install while connected with SSH, and there was no problem at all. Did a netinstall with a minimal software configuration, maybe that makes a difference. Chrony was not installed, also. Anyway, thanks for the article, very informative. Am just getting my feet wet on Centos 7 and it helped me quite a bit.
Why are you using ntp instead of chrony ???
ps: happy new year :)
sorry for the redundant and unnecessary absolutely word :)
Hi Cezar , nice article, for a minmal install,
very handy even for virtual box,vmware labs when you can clone a base vm with absolutely minimal ,then create a handful of nodes and work on those nodes necessary for your network topology/service requirements(for example internal and external network router dmz scenario ), no need to clone a bloated system with huge ram requirements(given that if your host machine suffers from it)
I have two question what is the absolutely minimal ram for your minimal installation will be? and what is absolutely minimal ram for server with gui with no package selected installation
Thanks
@Joseph Bloe: you are wrong…if you remove Avahi daemon you can lose SSH connectivity because Avahi daemon removes NetworkManager also…so no Network Manager no connection…that’s the point!
What is the top -M alternative in EL7?? I need to see the memory usage in Megabytes when I run top.
LMFAO @ “Caution: Do not attempt to remove Avahi daemon if you connected through SSH.”
That’s not even close to being realistic, since Avahi isn’t required for SSH to function.