As a Linux administrator for more than 6 yrs, I spend most of my time working on terminals, but there are some situations where I need a GUI instead of terminal. By default, RHEL/CentOS 7 server installed as minimal without any Graphical Desktop support. So, to install GUI on the top of minimal installation, we have two options:
- The First method is, installing GUI (i.e. Gnome 3) using default base repository, it will download and install packages from Internet.
- The second method is, installing GUI using RHEL/CentOS 7 ISO image via local CD/DVD device, this will avoid downloading of packages from internet.
The first method is time taking process, as it downloads packages from internet and install it on the system, if you have a fastest internet connection you can simply type the following command on the terminal to install GUI in no time.
# yum groupinstall "GNOME Desktop"        [On CentOS 7]
# yum groupinstall "Server with GUI"      [On RHEL 7]
But, those who have a slower connection, they can follow CD/DVD method, here the packages are installed from your local CD/DVD device, and the installation is much quicker than the first method.
Note: The installation instructions for GUI are same for both methods, but here our main goal is to avoid downloading of packages from internet and minimize time.
Those who are following CD/DVD method, they must have full RHEL/CentOS 7 DVD ISO (download and burn image to CD/DVD) with them, because we use this image to create a local yum repository. So that, during GUI installation, the packages are taken from your CD/DVD.
Note: For the demonstration purpose, I’ve used RHEL/CentOS 7 DVD ISO image to install Gnome 3, but the same instructions also works on RHEL 7 with minor changes in commands.
Step 1: Creating Local Yum Repository
1. Before creating a local yum repository, insert your CentOS 7 DVD ISO image your CD/DVD drive and mount it using the following commands.
First, create a empty ‘cdrom‘ directory under ‘/mnt/‘ location and mount the ‘cdrom‘ (/dev/cdrom is the default name of your device) under ‘/mnt/cdrom‘ path.
[root@tecmint ~]# mkdir /mnt/cdrom
[root@tecmint ~]# mount /dev/cdrom /mnt/cdrom
2. Once the ‘cdrom‘ mounted, you can verify the files under /mnt/cdrom using ls command.
[root@tecmint ~]# cd /mnt/cdrom/
[root@tecmint ~]# $ ls -l

total 607
-rw-r--r-- 1 tecmint tecmint     14 Jul  4 21:31 CentOS_BuildTag
drwxr-xr-x 3 tecmint tecmint   2048 Jul  4 21:29 EFI
-rw-r--r-- 1 tecmint tecmint    611 Jul  4 21:31 EULA
-rw-r--r-- 1 tecmint tecmint  18009 Jul  4 21:31 GPL
drwxr-xr-x 3 tecmint tecmint   2048 Jul  4 21:29 images
drwxr-xr-x 2 tecmint tecmint   2048 Jul  4 21:29 isolinux
drwxr-xr-x 2 tecmint tecmint   2048 Jul  4 21:29 LiveOS
drwxr-xr-x 2 tecmint tecmint 581632 Jul  5 15:56 Packages
drwxr-xr-x 2 tecmint tecmint   4096 Jul  5 16:13 repodata
-rw-r--r-- 1 tecmint tecmint   1690 Jul  4 21:31 RPM-GPG-KEY-CentOS-7
-rw-r--r-- 1 tecmint tecmint   1690 Jul  4 21:31 RPM-GPG-KEY-CentOS-Testing-7
-r--r--r-- 1 tecmint tecmint   2883 Jul  6 23:02 TRANS.TBL
3. Next, create a new local yum repository file under ‘/etc/yum.repos.d/‘ using your favorite editor, here I am using Vi editor.
On CentOS 7
[root@tecmint ~]# vi /etc/yum.repos.d/centos7.repo
Add the following lines to it, save and quit the file.
[centos7]
name=centos7
baseurl=file:///mnt/cdrom/
enabled=1
gpgcheck=1
gpgkey=file:///etc/pki/rpm-gpg/RPM-GPG-KEY-CentOS-7
On RHEL 7
[root@tecmint ~]# vi /etc/yum.repos.d/rhel7.repo
Add the following lines to it, save and quit the file.
[rhel7]
name=rhel7
baseurl=file:///mnt/cdrom/
enabled=1
gpgcheck=1
gpgkey=file:///etc/pki/rpm-gpg/RPM-GPG-KEY-redhat-release
Some explanation about the above lines.
- [centos7]: Name of the new repo section.
- name: Name of the new repository.
- baseurl: The current location of the packages.
- Enabled: Enabled repository, value ‘1’ means enable and ‘0’ means disable.
- gpgcheck: Check the signature of the packages, before installing them.
- gpgkey: Location of the key.
4. Now, check the newly created local repository is available from yum repost list, but before that you must clear the yum cache and verify the local repo.
[root@tecmint ~]# yum clean all
[root@tecmint ~]# yum repolist all
Sample Output
[root@localhost Desktop]# yum repolist all
Loaded plugins: fastestmirror, langpacks
Loading mirror speeds from cached hostfile
 * base: centosmirror.go4hosting.in
 * extras: centosmirror.go4hosting.in
 * updates: centosmirror.go4hosting.in
repo id                      repo name                            status
base/7/x86_64                CentOS-7 - Base                      enabled: 8,465
base-source/7                CentOS-7 - Base Sources              disabled
centos7                      centos7                              enabled: 3,538
centosplus/7/x86_64          CentOS-7 - Plus                      disabled
centosplus-source/7          CentOS-7 - Plus Sources              disabled
debug/x86_64                 CentOS-7 - Debuginfo                 disabled
extras/7/x86_64              CentOS-7 - Extras                    enabled:    80
extras-source/7              CentOS-7 - Extras Sources            disabled
updates/7/x86_64             CentOS-7 - Updates                   enabled: 1,459
updates-source/7             CentOS-7 - Updates Sources           disabled
repolist: 13,542
Note: Did you see in the above output highlighted in red color, that means our local repo is enabled and available to install packages.
But, you will also find multiple repositories are enabled in the above output, if you try to install any package it will take CentOS Base as default repository.
For example, let’s try to install ‘httpd‘ package using yum command.
[root@tecmint ~]# yum install httpd
Sample Output
============================================================================================================================================
 Package                          Arch                        Version                                    Repository                    Size
============================================================================================================================================
Installing:
 httpd                            x86_64                      2.4.6-18.el7.centos                        updates                      2.7 M
Installing for dependencies:
 apr                              x86_64                      1.4.8-3.el7                                base                         103 k
 apr-util                         x86_64                      1.5.2-6.el7                                base                          92 k
 httpd-tools                      x86_64                      2.4.6-18.el7.centos                        updates                       77 k
 mailcap                          noarch                      2.1.41-2.el7                               base                          31 k

Transaction Summary
============================================================================================================================================
Install  1 Package (+4 Dependent packages)

Total download size: 3.0 M
Installed size: 10 M
Is this ok [y/d/N]:
Note: You see in the above output, the package ‘httpd‘ is installing from CentOS base repository, even if you force yum to install packages from local repository by adding ‘–enablerepo‘ option, it still uses CentOS Base as its default repo. Give it a try and see the results, you will get same result as above.
[root@tecmint ~]# yum --enablerepo=centos7 install httpd
So, to install packages from our local repository, we need to use options ‘–disablerepo‘ to disable all repos and ‘–enablerepo‘ to enable centos7 or rhel7 repo.
Step 2: Installing Gnome 3 in RHEL/CentOS 7
5. To install GUI (Gnome 3) on RHEL/CentOS 7 minimal installation server, run the following yum command.
On CentOS 7
[root@tecmint ~]# yum --disablerepo=* --enablerepo=centos7 groupinstall "GNOME Desktop"
On RHEL 7
[root@tecmint ~]# yum --disablerepo=* --enablerepo=rhel7 groupinstall "Server with GUI"
The above command will install and resolve all the dependent packages using local repository, during installation it will ask for the confirmation press “Y” to continue..
6. When the installation finishes, make the system to boot automatically to the Graphical Interface, here we no more using ‘/etc/inittab‘ file to change runlevel, because RHEL/CentOS 7 switched to systemd and here we use ‘targets‘ to change or set default runlevels.
Run the following command to tell the system to boot Gnome Desktop automatically at system startup.
[root@tecmint ~]# ln -sf /lib/systemd/system/runlevel5.target /etc/systemd/system/default.target
7. Once you set the default ‘targets‘ for the GUI, now reboot the server to get into Gnome Desktop.
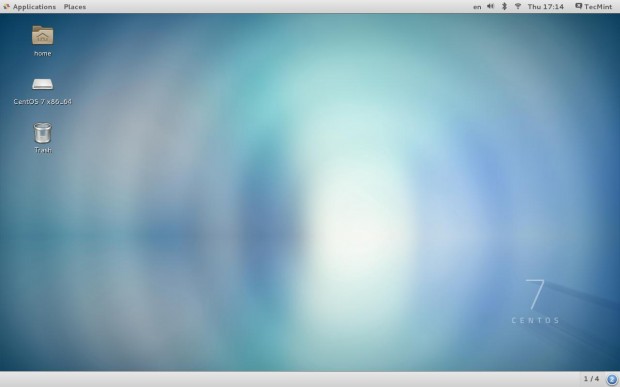
8. Once Gnome 3 installed, unmount the CD/DVD device.
[root@tecmint ~]# umount /mnt/cdrom




Hello
I am new to Cent OS, so my questions may look very basic, but need help to move forward
Installed Cent OS 7 (32 Bit) on Oracle VM, when installing – used Cent OS Everything iso and selected Server with GUI as Base Environment and all the add-ons (it was a long list)
Version check result –
centos-release-7-3.1611.el7.centos.i686
GNOME version 3.14.0
But where is the GUI Package manager Yumex, it is no seen where to find it or install it
Thank you
Hello Ravi, Your post have crystal clear step by step instruction helped me! Thank you!
great!!!
Hi Ravi, I had no luck with the repo as [centos7] but when I changed it to[centos7dvd] the packages downloaded but I ran into another problem with the public key file. Here is the final output:
================================================================================
Transaction Summary: Install 288 Packages (+705 Dependent packages)
Total Download size: 721 M
Installed size: 2.1 G
Is this ok [y/d/N]: y
Downloading Packages:
# warning: /mnt/cdrom/Packages/GConf2-3.2.6-8.e17.x86_64.rpm: Header V3 RSA/SHA256
Signature, key ID f4a80eb5: NOKEY
Public Key for GConf2-3.2.6-8.e17.x86_64.rpm is not installed
—————————————————————————————————————-
Total 7.3 MB/s | 721 MB 01:38
Retrieving key from file: ///etc/pki/rpm-gpg/RPM-GPG-KEY-centOS-7
GPG key retrieval failed: [Errno 14] curl#37 – “Couldn’t open file /etc/pki/rpm-gpg/RPM-GPG-KEY-centOS-7”
Do have any suggestions I can try?
@Optimxr,
Please use following command to import GPG key.
Thanks Ravi, I found the problem, I had a lower case “c” for the PGP= statement instead of “CentOS-7”
I made that change and then ran:
and all 993 packages were installed & verified. I then unmounted the cdrom by typing:
but the message said nothing mounted.
I typed in the GUI target switch as follows:
There were no errors, just went to the root prompt again. When I rebooted, it went to the normal Centos 7 command line login.
I logged in as root and typed
and it then started the GUI.
I repeated this process once more and now it boots to the GUI.
Happy Days!!! Thanks for all you good instructions and patience.
@Optimxr,
Yeah, that’s great to know, you finally install GUI i.e Gnome Desktop on CentOS 7. I hope you learned few things today..
When clearing the yum I get this message;
[root@localhost~]# yum clear all
loaded plugins: fastestmirror
No such command: clear. please use /bin/yum –help
I am not sure what I need to do with –help menu, any suggestions?
@Optimxr,
It should be yum clean all, if you wanted to clear all system repository cache, type:
Thanks Ravi for responding so quickly. A silly mistake on my part. It cleans successfully now.
However, when I do the repolist I do not see centos7 in red and I see enabled: 0 . Could this be due to no network connection( it did not appear when I did the core installation)?
I did every thing right. it said an successful installation. also run the last command to boot with GUI. but it went to usual centos 7 core mode
@Wathsala,
Have you executed the following command without any errors?
What you will getting after reboot? is the server booted into GUI mode or not? or it remains in same server mode? if yes, try
init 5command to switch to GUI mode.Please I have this error:
after to type: mount /dev/cdrom /mnt/cdrom
mount /dev/sr0 is write-protected. mounting read-only
sorry but What is means??
Thanks a lot
@Fherpie,
That means your CD-Rom is mounted as read-only mode, you can’t write to this drive, but you can copy/view the content of cdrom.
Thank you,it is really helpful.
For anyone tring this out, i recommend naming the repo as centos7dvd for the file, the bracket and name. Should get you around the repodata error on CentOS 7
I have Problem i do everything, but when i do the install i have these message: ” Cannot find a valid base url for repo: base/y/x86_64
@Diego,
Try adding following DNS nameservers entries to /etc/resolv.conf file and try again…
Thank you!!!
Thank you!
I test it on RedHat 7.1 minimal installation, but I receive an error:
Error downloading packages:
gnome-settings-daemon-3.8.6.1-12.el7.x86_64: [Errno 256] No more mirrors to try.
Any idea?
Thank!
@Fra,
It seems to me a repository network issue, try after some time or check your network connectivity..
I find the solution!
The ISO was corrupted.
Thanks again!
Thanks…worked like a charm :)
My centos 7 installation automatically mounts the iso at a different mountpoint, but your procedure works like a charm after making this change in the .repo file. Many thanks.
i’ve try to follow, but still didn’t work on my Centos7
@Topan
Any error you getting during installation? can you share with us
Can I do this process in debian too????
@Yair,
No you cannot these instructions only works on RedHat/CentOS based systems, but you can still install Gnome under Debian using following commands.
It worked like a charm on RHEL 7.. thanks for the post !! Cheers !!
This is totally wrong instruction.
yum –disablerepo=* –enablerepo=rhel7 groupinstall “Server with GUI” will never work.
Please dont give wrong instruction.
@Linux,
The given instructions are practically tested on CentOS 7 and worked 100% percentage, if it’s not worked for you, that means you’re doing wrong…the correct command is:
Thanks for finally talking about > How to Install GUI (Gnome 3) Using
CD/DVD on RHEL/CentOS 7 < Liked it!
Thanks a lot…:)
Thanks for the tutorial, I was wondering if I can do the same on Fedora Server 21.
Thank you, @llongala