One of the most important things to set up a Linux server is for the purposes of deploying a website(s). According to NetCraft.com’s February 2022 survey of the 1 million busiest websites in the world, roughly 23.44% of them run on Apache.
This tutorial will walk through the basics of installing and configuring a Linux server (specifically Debian 11 Bullseye) to function as a LAMP server.
What is LAMP Server?
In the computing world LAMP acronym for Linux (Here using Debian 11), Apache, MySQL, and PHP (LAMP). LAMP is commonly used to reference software stacks (specifically MySQL and PHP) on a web server.
Before diving into the configuration aspects, it is important to know about the Apache webserver.
What is Apache Web Server?
Apache was one of the “original” web servers and traces its beginnings back to 1995. Apache is still widely used today and benefits from longevity, high amounts of documentation and tons of modules to add flexibility.
Installing MySQL and PHP in Debian 11
1. This first portion will describe Debian as a MySQL, and PHP server. The Linux segment of the LAMP should already be done by installing Debian 11 by the following article on TecMint:
Once Debian is ready, now it’s time to install the necessary software using the ‘apt‘ meta-packager.
$ sudo apt install mariadb-server php libapache2-mod-php php-zip php-mbstring php-cli php-common php-curl php-xml php-mysql

2. After MySQL and PHP installation finishes, it is often recommended to secure MySQL installation using mysql_secure_installation the utility.
Once you execute the below command, it will ask the user to set the root password and remove things such as anonymous users, test databases, and remove remote root user login to the SQL database.
$ sudo mysql_secure_installation

3. Now that MySQL is configured, let’s move ahead to make some PHP basic settings for this particular server. While there are a bunch of settings that can be configured for PHP, we will do a few basic ones that are mostly always needed.
Open php configuration file is located at /etc/php/7.4/apache2/php.ini.
$ sudo vi /etc/php/7.4/apache2/php.ini
Now search for the string “memory_limit” and increase the limit as per your application needs.
Another important setting to check is the “max_execution_time” and again by default, it will be set to 30. If an application requires more this setting can be changed.
At this point, MySQL and PHP5 are ready to start hosting sites. Now it is time to configure Apache2.
Installing and Configuring Apache2
4. Now it’s time to configure Apache 2 to finish the configuration of the LAMP server. The first step to configuring Apache2 is to actually install the software using the apt meta-packager.
$ sudo apt install apache2
This will install all the necessary files and dependencies for Apache2.

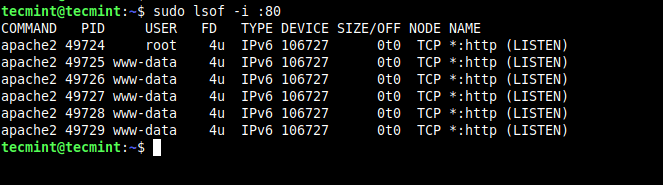
Once installed, the Apache webserver will be up and serving a default web page. There are several ways to confirm that the Apache webserver is up and running. The easiest option is to use the lsof utility:
$ sudo lsof -i :80
The other option is to simply navigate to the IP address of the webserver. Assuming a default installation of Debian, the system will likely be set up to use DHCP to obtain an IP address automatically.
To determine the IP address of the server, one of two utilities can be used. Either utility will work in this situation.
$ ip show addr			[Shown below in red]
$ ifconfig			[Shown below in green]
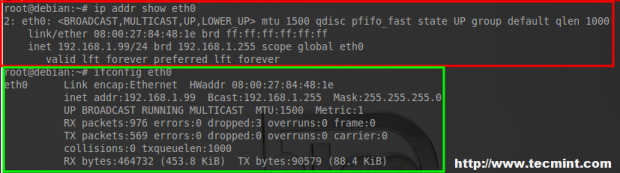
Regardless of which utility is used, the IP address obtained can be entered into a web browser on a computer on the same network to confirm that Apache is displaying the default page.
http://IP-Address
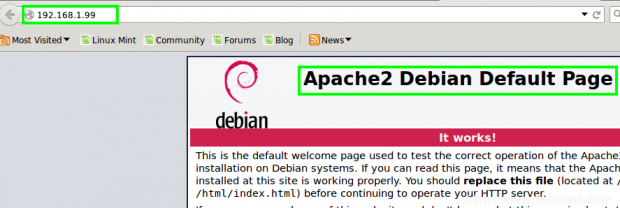
At this point, Apache is up and running. While the Debian default page is a flashy website, most users will want to host something custom. The next steps will walk through setting up Apache 2 to host a different website.
Hosting Multiple Websites with Apache in Debian
5. Debian has packaged some useful utilities for managing both sites and modules. Before walking through how to use these utilities, it is important to understand the functions they serve.
- a2ensite: This utility is used to enable a website after the appropriate configuration file has been created.
- a2dissite: This utility is used to disable a website by specifying the website’s configuration file.
- a2enmod: This utility is used to enable extra Apache2 modules.
- a2dismod: This utility is used to disable extra Apache2 modules.
- a2query: This utility can be used to gather information about sites currently enabled.
First of let’s gather some experience with the first two. Since Apache 2 is currently hosting the ‘default webpage‘ let’s go ahead and disable it with a2dissite.
$ sudo a2dissite 000-default.conf

This command will disable the default apache website seen in the above screenshot. However, in order for any changes to take effect, the Apache 2 configuration must be reloaded.
$ sudo systemctl reload apache2
This command will instruct Apache 2 to update the enabled/disabled sites that it is currently hosting. This can be confirmed by attempting to connect to the web server’s IP address again and noticing that nothing is displayed (some computers will cache information, if the machine still shows the default website after the previous two commands are run, try clearing out the web-browsers cache). Another option to confirm that the site is no longer enabled is to use the a2query utility.
$ sudo a2query -s
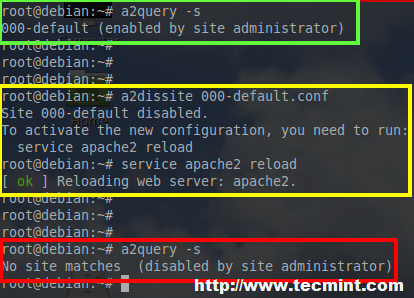
There is a lot going on in this screen-shot so let’s break things down.
- The green box above is
a2query -swhich instructs Apache 2 to state what sites are currently being served. - The yellow box is
a2dissite 000-default.conffollowed by service apache2 reload. These two commands instruct Apache 2 to disable the default site and then reload the active/inactive sites. - The red box is
a2query -sbeing issued again but notice that this time Apache responds back that nothing is being served.
Let’s walk through creating a non-default site now. The first step is to switch to the Apache 2 configuration directory which is /etc/apache2 using the cd utility.
$ cd /etc/apache2
There are several important files and directories in this directory, however, for brevity’s sake, only the necessities will be covered here.
The first thing to do when setting up a new site is to create a new configuration file in the ‘sites-available‘ directory. Change directories into the ‘sites-available‘ directory and then create a new configuration file.
$ cd sites-available
$ sudo cp 000-default.conf tecmint-test-site.conf
This will copy the configuration from the default site into the new site configuration file for further modification. Open the new site configuration page with a text editor.
$ sudo vi tecmint-test-site.conf
Within this file there is one very important line for getting a website hosted, that line is the ‘DocumentRoot‘ line. This line tells Apache where the necessary web files are that it should serve when requests come in for particular resources.
For now, this line will be set to a directory that doesn’t exist but will shortly and will contain a simple website for this Debian server to display.
DocumentRoot /var/www/tecmint
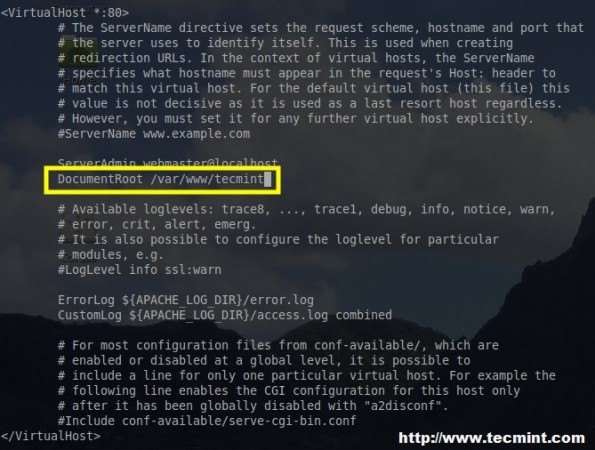
Save the changes to this file and exit the text editor.
Now the directory that Apache 2 was just told to serve files from needs to be created and populated with files. While this article will work HTML files, there isn’t possibly enough time to walk through how to create a full functioning website and leaves that process to the reader.
So let’s create the directory for apache to serve and add a basic html webpage to it called ‘index.html‘.
$ sudo mkdir /var/www/tecmint
$ touch /var/www/tecmint/index.html
$ echo “It's ALIVE!” >> /var/www/tecmint/index.html
The above commands will create a new directory called ‘tecmint‘ as well as a new file called ‘index.html‘ in the tecmint directory.
The echo command will place some text into that file so that it will actually display something in the web browser when Apache serves the website.
Note: The page created for this tutorial by the author will display differently! Now using the commands previously discussed, Apache needs to be told to serve this new html document.
$ sudo a2ensite tecmint-test-site.conf
$ sudo systemctl reload apache2
$ sudo a2query -s tecmint-test-site.conf
The last command above will simply confirm that Apache2 is indeed serving the newly created website. At this point, navigate a web browser to the server’s IP address again and see if the newly created website is being displayed (again computers like to cache data and as such, several refreshes may be necessary to get the new webpage).
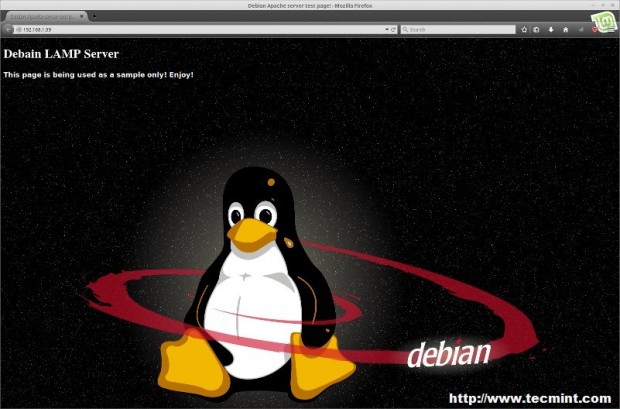
If the newly created “It’s ALIVE!!!” site is showing up, then Apache 2 has been successfully configured and is displaying the website.
Congratulations! While this is a simple setup that prepares a Linux LAMP server to host a site, there are far more complex things that can be done and the configuration depends greatly on that end goal.


Great article, very explanatory and easy to follow. Helped me setup LAMP on my VPS. Thank you very much.
This article helped solve the issue it intended too. Thanks
Yeaoh,
Glad to hear that you were able to get some good use out of this.
Is this tutorial for local host? I was looking for a tutorial for installing LAMP on Debian based DigitalOcean droplet. But I am still not sure how I can fix few errors I am getting when installing the Apache.
Olivedev,
Correct, this guide assumes that you have full access/control over the server. A droplet, from my understanding, should just be a virtual server and you should have full control over the unit. Regardless though, the guide will make the website accessible via the droplet’s IP address and if the proper DNS record exists, FQDN should work as well.
What error are you receiving?