Nowadays most Linux users have to switch between multiple applications all the time to get various tasks done. A web browser, an office suite, a PDF reader, a multimedia player, a video conferencing tool, a file manager, an image editor, and an email client are the minimum set of applications for everyday work. In some cases, you might need even more programs for more specific purposes.
Switching between endless application programs to open the one you need can be very irritating sometimes. Just imagine being able to do a couple of different things using the interface of one solution. For example, editing a document and having a video call at once in the same window. This sounds enticing, doesn’t it?
In this article, you will learn how to enable video conferencing and document editing on Ubuntu by integrating ONLYOFFICE Docs, an open-source office suite, and Jitsi, an open-source app for video and audio calls.
About Jitsi
Jitsi is a secure video conferencing tool that lets you keep in touch with your colleagues or friends via audio and video calls. This open-source software provides reliable encryption so you don’t need to worry about the privacy of your data.
Started as a student project in 2003, now Jitsi is one of the most popular alternatives to Zoom and Skype. It supports WebRTC, the open standard for web communication. With Jitsi, you can make audio calls and organize video conferences with up to 100 participants without even having to create an account.
About ONLYOFFICE Docs
ONLYOFFICE Docs is a self-hosted office package whose source code is open to the public on GitHub. It includes web-based collaborative editors for text documents, spreadsheets, presentations, and fillable forms.
ONLYOFFICE Docs is highly compatible with the Office Open XML formats, so it allows you to work with Word documents, Excel spreadsheets, and PowerPoint presentations on Linux.
ONLYOFFICE Docs is an open-source alternative to Google Docs and Microsoft Office Online because it comes with a full set of features for real-time co-authoring, such as flexible access permissions, two co-editing modes (Fast and Strict), Version history and control, Track changes, comments, and communication.
ONLYOFFICE Docs offers a free desktop client for Linux, Windows, and macOS and makes it possible to create a secure collaborative environment via integration with various services, including Moodle, Nextcloud, Seafile, ownCloud, Alfresco, Confluence, Chamilo, SharePoint, Liferay, Redmine, etc.
Step 1. Install ONLYOFFICE Docs
First things first, you need to deploy ONLYOFFICE Docs. All the system requirements and installation instructions can be found here.
There is also another installation method that you might find easier – Docker. Visit this GitHub page to learn how to install and configure your instance of ONLYOFFICE Docs using a Docker image.
Step 2. Install Jitsi (Optional)
By default, the ONLYOFFICE plugin uses the Jitsi SaaS server located at https://meet.jit.si so that users can become familiar with the solution. That’s why you don’t need to install anything if you want to give Jitsi a try.
However, if you need more security, it might be a good idea to deploy Jitsi on your Ubuntu server. Read this detailed guide to find out how to install Jitsi open-source Zoom alternative.
Step 3. Get the ONLYOFFICE Plugin for Jitsi
When ONLYOFFICE Docs is installed and configured in the right manner on your Ubuntu server, it’s necessary to get a special plugin to integrate the services and enable video conferencing.
The official integration app is available on GitHub. You need to download it and proceed with manual installation.
Step 4. Install the Connector
Currently, the integration plugin for Jitsi can be installed manually. There are two methods to add the plugin to your instance of ONLYOFFICE Docs:
- via the sdkjs-plugins folder;
- using the config.json file.
Method 1. Install via sdkjs-plugins Folder
Put the plugin folder to the ONLYOFFICE Docs folder. On Ubuntu, the path to this folder is the following:
/var/www/onlyoffice/documentserver/sdkjs-plugins/
If done correctly, the Jitsi service will be available to all the users of ONLYOFFICE Docs. In some cases, you might need to restart ONLYOFFICE.
For debugging purposes, you can start ONLYOFFICE Docs with the sdkjs-plugins folder:
# docker run -itd -p 80:80 -v /absolutly_path_to_work_dir:/var/www/onlyoffice/documentserver/sdkjs-plugins/plugin onlyoffice/documentserver-ee:latest
Method 2. Install via config.json File
Using this method, you need to find the ONLYOFFICE Docs config.json file and add the path to the corresponding config.json file of the Jitsi plugin to the plugins.pluginsData parameter:
var docEditor = new DocsAPI.DocEditor("placeholder", {
    "editorConfig": {
        "plugins": {
            "autostart": [
                "asc.{0616AE85-5DBE-4B6B-A0A9-455C4F1503AD}",
                "asc.{FFE1F462-1EA2-4391-990D-4CC84940B754}",
                ...
            ],
            "pluginsData": [
                "https://example.com/plugin1/config.json",
                "https://example.com/plugin2/config.json",
                ...
            ]
        },
        ...
    },
    ...
});
Here example.com is the server name where ONLYOFFICE Docs is installed, and https://example.com/plugin1/config.json is the path to the plugin.
If there is a test example in this file, replace the line /etc/onlyoffice/documentserver-example/local.json with the path to the config.json file of the plugin.
Step 5: Start the Jitsi Plugin
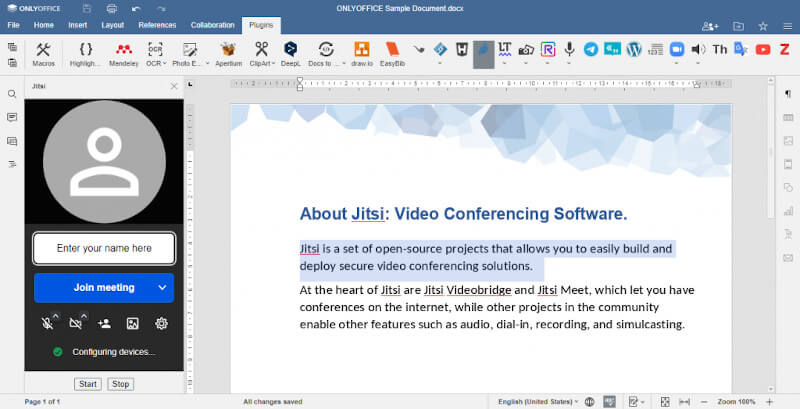
After successful installation of the Jitsi plugin, the corresponding icon will appear on the Plugins tab of the top toolbar in ONLYOFFICE Docs. That means that you no longer need to leave the editor’s interface and launch a separate client to make a video or audio call.
To start video conferencing, follow these simple steps:
- Open a document, spreadsheet, or presentation with ONLYOFFICE Docs;
- Go to the Plugins tab and choose Jitsi;
- Click the start button to create a Jitsi iframe;
- Enter your nickname and allow the browser to use your camera and microphone.
If you want to finish the call, just click the Stop button.
Conclusion
Congratulations! You have passed through the process of integrating the ONLYOFFICE online document editors and the Jitsi video conferencing tool.
Now you know how to make video or audio calls and communicate with your teammates in real-time without having to switch between various applications. Please, share your opinion about the ONLYOFFICE and Jitsi integration by leaving a comment below. Your feedback is always appreciated!


Tecmint editors need to broaden their knowledge of great “integrated” productivity/Office applications like Carbonia reported in the article here:
https://opensource.com/article/22/3/open-source-collaboration-carbonio
This is one of at least two FOSS solutions that satisfy the task requirements you layout in the article. Not only do these integrated FOSS applications provide greater functionality and flexibility than standard Microsoft Exchange server tools, but can and do interact in Microsoft environments.
Several are from Europe where FOSS adoption is significantly stronger and officially confirmed in governments, enterprises, and academia operations.