Since Debian powers a large percentage of web servers all over the world, in this article we will explain how to install the LEMP (Linux + Nginx + MariaDB + PHP-FPM) stack on Debian 9 Stretch as an alternative to LAMP (use this guide to install LAMP on Debian 9).
Additionally, we will show how to perform a minimal Nginx / PHP-FPM configuration so that even new system administrators can set up brand new web servers to set up dynamic pages.
To do this, we will leverage the recent updates to the distribution’s official repositories. It is assumed that you have installed Debian 9 on a bare metal, virtual machine, or VPS, or have upgraded from Jessie.
Installing LEMP in Debian 9 Stretch
You may be wondering why we mentioned PHP-FPM instead of PHP as part of the LEMP stack. As opposed to other web servers, Nginx does not provide native support for PHP.
For that reason, PHP-FPM (Fast Process Manager) is used to handle requests for PHP pages. You can learn more about PHP-FPM in the PHP official site.
The default version provided in the Debian repositories php7.0-fpm. As you can probably guess based on the package’s name, this version can even handle requests to pages including PHP 7 code.
NOTE: If Apache has been installed in the same box previously, make sure it is stopped and disabled before proceeding.
With that said, let’s install the components of the LEMP stack as follows:
# aptitude update
# aptitude install nginx mariadb-server mariadb-client php-mysqli php7.0-fpm
When the installation is complete, let’s first make sure that Nginx and PHP-FPM are running and enabled to start on boot:
# systemctl status nginx php7.0-fpm
If indicates that one or both services are not running, then do.
# systemctl start nginx php7.0-fpm
# systemctl enable nginx php7.0-fpm
As it is the case with every MariaDB or MySQL installation, it is important to run mysql_secure_installation to perform a minimal security configuration and set the password for the database root account.
# mysql_secure_installation
If you don’t know how to do this, you can refer to step #4 in How to Install MariaDB 10 on Debian and Ubuntu.
Configuring Nginx to Use PHP-FPM on Debian 9
The Nginx main configuration file is /etc/nginx/sites-available/default, where we will need to make the following changes inside the server block:
- Ensure the location block that handles PHP requests is enabled, with the exception of the one where the fastcgi_pass directive points to the loopback NIC.
- Add index.php after the index directive to indicate that if found, it should be served by default before index.html or other files.
- Add the server_name directive pointing to the IP address or hostname of your server. This will be 192.168.0.35 in our case.
- Additionally, make sure the root directive points to the location where your
.phpfiles will be stored (/var/www/html by default).
When you’re done, you can use the following command to test the configuration file for errors.
# nginx -t
At this point, your /etc/nginx/sites-available/default should look as follows where the numbers refer to the configuration represent the above list:
# grep -Ev '#' /etc/nginx/sites-available/default

Testing Nginx and PHP-FPM on Debian 9
To make sure we are now using Nginx as our web server, let’s create a file named info.php inside /var/www/html with the following contents:
<?php
	phpinfo();
?>
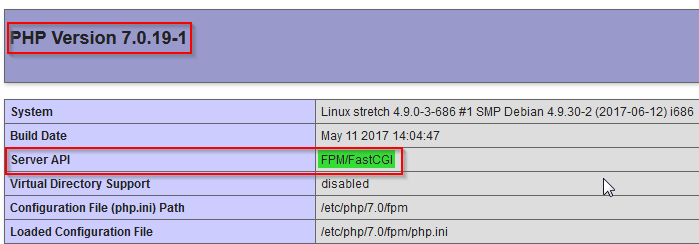
Then go to http://192.168.0.35/info.php and check the top of the page where you should see this:
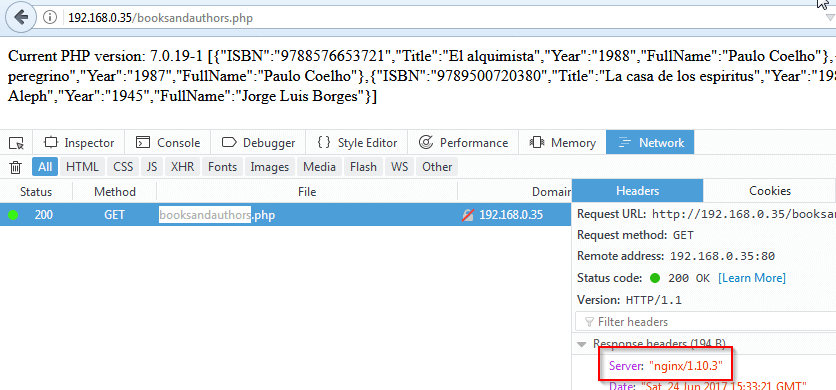
Finally, let’s point our browser to the booksandauthors.php file that we created in Install LAMP (Linux, Apache, MariaDB or MySQL and PHP) Stack on Debian 9.
As you can see in the following image, this file is now being served by Nginx:
NOTE: If you notice that Nginx serves the .php files as downloads instead of executing them, clear your browser cache or try a different browser. Particularly, if you are using Chrome you may want to test with incognito mode.
Summary
In this article we have explained how to install and configure Nginx to serve dynamic .php pages. It is important to note that after this initial setup there are settings that should be taken into account to secure the web server.
You may find a basic summary in The Ultimate Guide to Secure, Harden and Improve Performance of Nginx Web Server.
If you are looking for virtual hosting on Nginx, read How to Setup Name-based and IP-based Virtual Hosts on NGINX.
As always, don’t hesitate to let us know if you have questions or comments about this article.
Thanks, very useful article..
how about sasl support in php7–fpm. as far as i know it does not work. any advice