

MariaDB is a free and open source fork of the popular MySQL database management server software. It is developed under the GPLv2 (General Public License version 2) by the original developers of MySQL and is intended to remain open source.
It is designed to achieve high compatibility with MySQL. For starters, you can read MariaDB vs MySQL features for more information and importantly, it is used by big companies/organizations such as Wikipedia, WordPress.com, Google plus and many more.
In this article, we will show you how to install MariaDB 10.1 stable version in various Debian and Ubuntu distribution releases.
Install MariaDB in Debian and Ubuntu
1. Before installing MariaDB, you’ll have to import the repository key and add the MariaDB repository with the following commands:
On Debian 10(Sid)
$ sudo apt-get install software-properties-common
$ sudo apt-key adv --recv-keys --keyserver keyserver.ubuntu.com 0xF1656F24C74CD1D8
$ sudo add-apt-repository 'deb [arch=amd64,i386] http://www.ftp.saix.net/DB/mariadb/repo/10.1/debian sid main'
On Debian 9 (Stretch)
$ sudo apt-get install software-properties-common
$ sudo apt-key adv --recv-keys --keyserver keyserver.ubuntu.com 0xF1656F24C74CD1D8
$ sudo add-apt-repository 'deb [arch=amd64] http://www.ftp.saix.net/DB/mariadb/repo/10.1/debian stretch main'
On Debian 8 (Jessie)
$ sudo apt-get install software-properties-common
$ sudo apt-key adv --recv-keys --keyserver keyserver.ubuntu.com 0xcbcb082a1bb943db
$ sudo add-apt-repository 'deb [arch=amd64,i386,ppc64el] http://www.ftp.saix.net/DB/mariadb/repo/10.1/debian  jessie main'
On Debian 7 (Wheezy)
$ sudo apt-get install python-software-properties
$ sudo apt-key adv --recv-keys --keyserver keyserver.ubuntu.com 0xcbcb082a1bb943db
$ sudo add-apt-repository 'deb [arch=amd64,i386] http://www.ftp.saix.net/DB/mariadb/repo/10.1/debian wheezy main'
On Ubuntu 16.10 (Yakkety Yak)
$ sudo apt-get install software-properties-common
$ sudo apt-key adv --recv-keys --keyserver hkp://keyserver.ubuntu.com:80 0xF1656F24C74CD1D8
$ sudo add-apt-repository 'deb [arch=amd64,i386] http://www.ftp.saix.net/DB/mariadb/repo/10.1/ubuntu yakkety main'
On Ubuntu 16.04 (Xenial Xerus)
$ sudo apt-get install software-properties-common
$ sudo apt-key adv --recv-keys --keyserver hkp://keyserver.ubuntu.com:80 0xF1656F24C74CD1D8
$ sudo add-apt-repository 'deb [arch=amd64,i386,ppc64el] http://www.ftp.saix.net/DB/mariadb/repo/10.1/ubuntu xenial main'
On Ubuntu 14.04 (Trusty)
$ sudo apt-get install software-properties-common
$ sudo apt-key adv --recv-keys --keyserver hkp://keyserver.ubuntu.com:80 0xcbcb082a1bb943db
$ sudo add-apt-repository 'deb [arch=amd64,i386,ppc64el] http://www.ftp.saix.net/DB/mariadb/repo/10.1/ubuntu trusty main'
2. Then update the system packages sources list, and install MariaDB server like so:
$ sudo apt-get update
$ sudo apt-get install mariadb-server
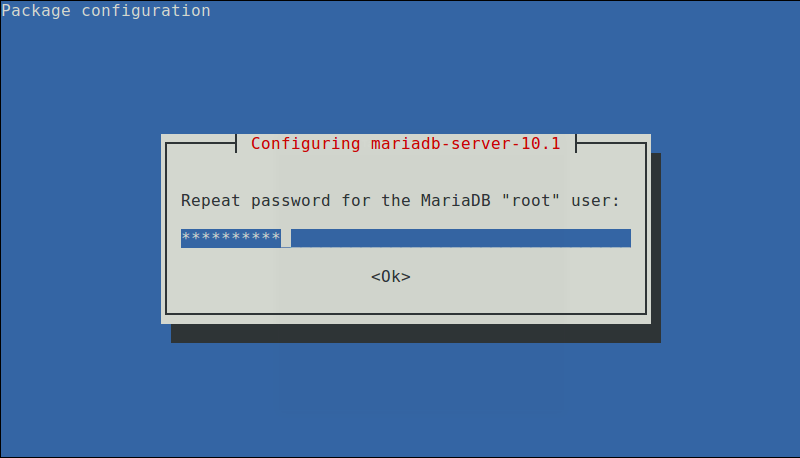
During the course of installation, you’ll be asked to configure the MariaDB server; set a secure root user password in the interface below.

Re-enter the password and press [Enter] to continue with the installation process.
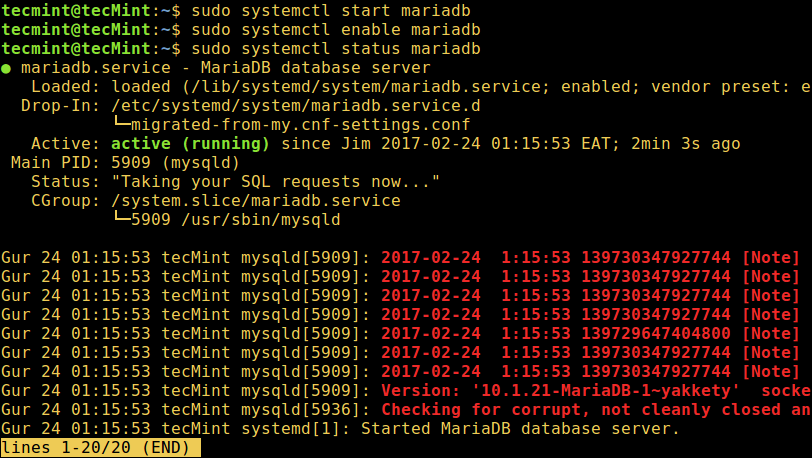
3. When the installation of MariaDB packages completes, start the database server daemon for the mean time and enable it to start automatically at the next boot as follows:
------------- On SystemD Systems -------------
$ sudo systemctl start mariadb
$ sudo systemctl enable mariadb
$ sudo systemctl status mariadb

------------- On SysVinit Systems -------------
$ sudo service mysql  start
$ chkconfig --level 35 mysql on
OR
$ update-rc.d mysql defaults
$ sudo service mysql status
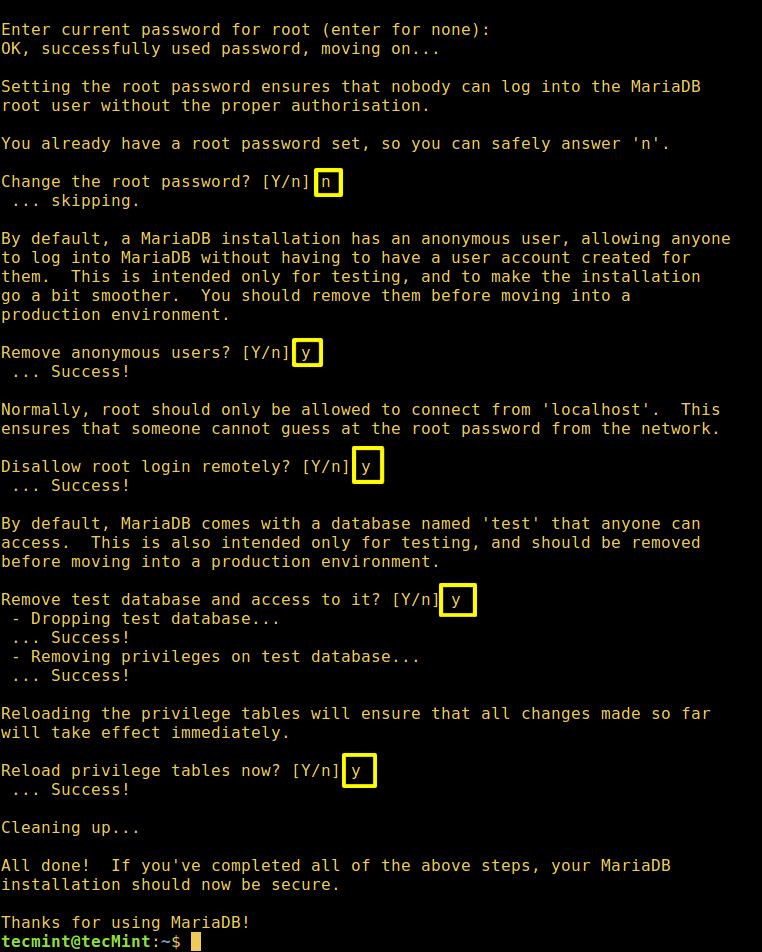
4. Then run the mysql_secure_installation script to secure the database where you can:
- set root password (if not set in the configuration step above).
- disable remote root login
- remove test database
- remove anonymous users and
- reload privileges
$ sudo mysql_secure_installation
5. Once the database server is secured, check it’s installed version and login to the MariaDB command shell as follows:
$ mysql -V
$ mysql -u root -p

To start learning MySQL/MariaDB, read through:
- Learn MySQL / MariaDB for Beginners – Part 1
- Learn MySQL / MariaDB for Beginners – Part 2
- MySQL Basic Database Administration Commands – Part III
- 20 MySQL (Mysqladmin) Commands for Database Administration – Part IV
And check out these 4 useful commandline tools to monitor MySQL/MariaDB performance in Linux and also go through these 15 useful MySQL/MariaDB performance tuning and optimization tips.
That’s all. In this article, we showed you how to install MariaDB 10.1 stable version in various Debian and Ubuntu releases. You can send us any questions/thoughts via the comment form below.

Is step 1 needed? i skipped it and started with 2 maria db is running fine. Also i did not need step 3 because it was added as a server by default and after reboot it started up.
The only problem is have is running the mysql_secure_installation step which does not do any thing. i get the questions but there is no change in the databases. i still can enter the database without a password.
i think i can only access mariadb as root, which seems safe as well. (so with sudo)
When you get error like this one:
The solution is pretty easy:
@Nugroho
Many thanks for sharing this.
Hey, Guys I guess i am using Kali Linux Rolling ISO, which one should i follow?
@pulok
Try to use instructions for Debian 10(Sid).
Great article, it took me only half an hour to install everything
Thanks
@Kaspar
Welcome, thanks for the feedback.
Hey, Aaron. Great article on installing MariaDB! Once you have it installed, you need to make sure to configure your firewall using a service like HeatShield, as MariaDB listens on the same ports as MySQL.
@Ben
Okay, useful tip here. We’ll do just that, thanks for stopping by and always following us.