MariaDB is an open-source and popular relational database management system (RDBMS) made by the original developers of MySQL. It is a fast, scalable and robust database system, with a rich ecosystem of storage engines, plugins, and many other tools which provides an SQL interface for accessing data.
MariaDB is an enhanced, drop-in replacement for MySQL being used by organizations and companies such as Wikipedia, WordPress.com, Google and many others.
In this short article, we will show you how to install and secure a MariaDB server in Debian 10.
Requirement:
Note: If you are operating the system as a non-administrative user, employ the sudo command to gain root privileges and if you have MySQL installed and running, stop it and disable it before you continue.
Installing MariaDB Server in Debian 10
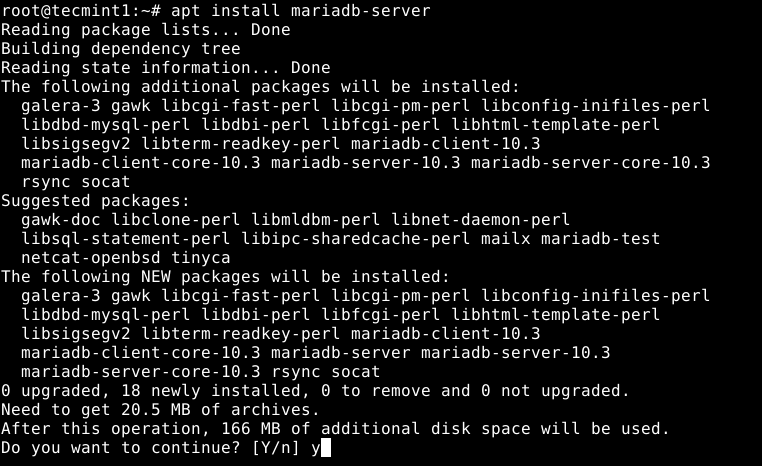
You can install the MariaDB server package from the Debian official repositories by running the following command, which will install the MariaDB server, client and all its dependencies.
# apt install mariadb-server
It is a common practice within Debian and its derivatives such as Ubuntu to automatically start and enable daemons via systemd, immediately after they’re installed. The same applies to the MariaDB service.
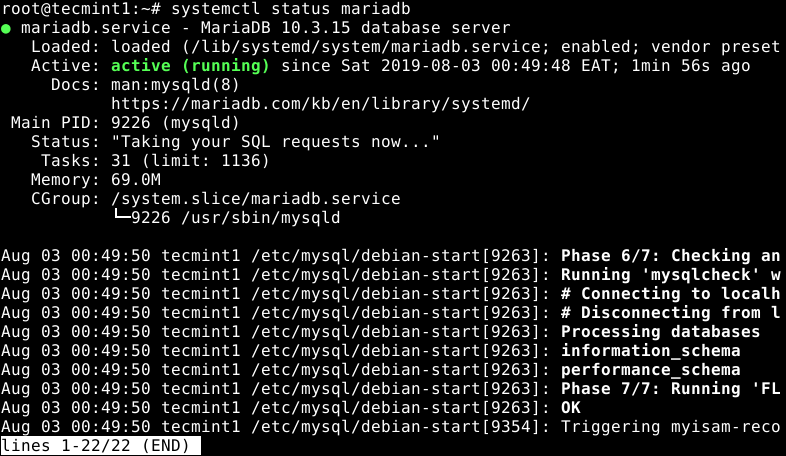
You can check whether MariaDB service is up and running using the following systemctl command.
# systemctl status mariadb
Additionally, you need to also know other common commands for managing the MariaDB service under systemd, which include commands to start, restart, stop and reload the MariaDB service as shown.
# systemctl start mariadb
# systemctl restart mariadb
# systemctl stop mariadb
# systemctl reload mariadb
Securing MariaDB Server in Debian 10
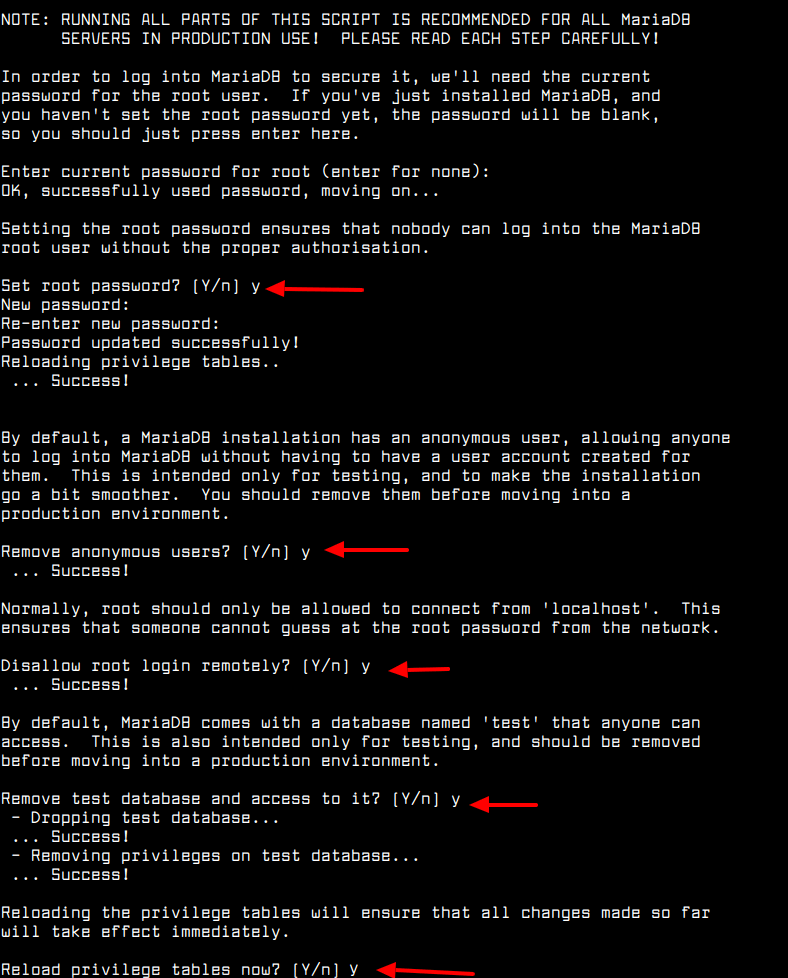
The MariaDB installation process involves securing the default installation and it can be done by running the mysql_secure_installation shell script, which will allows you to add a bit of extra security to your MariaDB instance by:
- Setting a password for root accounts.
- Disabling remote root login.
- Removing the anonymous-user accounts.
- Removing the test database, which by default can be accessed by anonymous users.
- And reloading privileges.
To invoke the security script, run the following command and answer the questions as shown in the following screenshot.
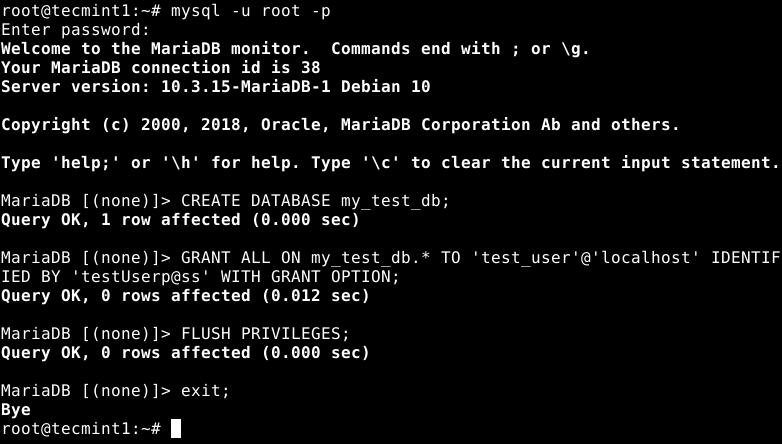
Once you have secured your MariaDB installation, you can connect to mysql shell using the root user password.
# mysql -u root -p
To create a database named "my_test_db" and a user named "test_user" with full privileges to manage the database run the following SQL commands.
MariaDB [(none)]> CREATE DATABASE  my_test_db;
MariaDB [(none)]> GRANT ALL ON my_test_db.* TO 'test_user'@'localhost' IDENTIFIED BY 'test_user_pass_here' WITH GRANT OPTION;
MariaDB [(none)]> FLUSH PRIVILEGES;
MariaDB [(none)]> exit;
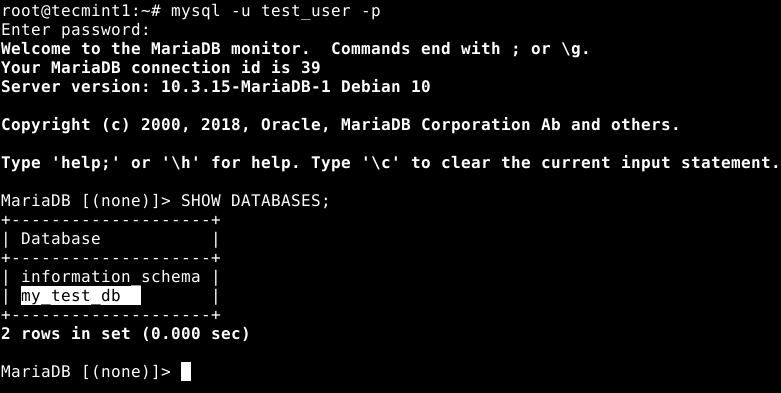
After creating a new database and database user, try to access the MariaDB shell using the new user account and show all databases assigned to the user as follows.
# mysql -u test_user -p
MariaDB [(none)]> SHOW DATABASES;
You might also like to read these useful following articles on MariaDB.
- Learn MySQL / MariaDB for Beginners – Part 1
- Learn How to Use Several Functions of MySQL and MariaDB – Part 2
- 12 MySQL/MariaDB Security Best Practices for Linux
- How to Backup/Restore MySQL/MariaDB and PostgreSQL Using ‘Automysqlbackup’ and ‘Autopostgresqlbackup’ Tools
- Useful Tips to Troubleshoot Common Errors in MySQL
That’s it for now! In this guide, we showed how to install and secure a MariaDB server in a Debian 10 minimal server installation. Use the comment form below to reach us for any questions or information you would like to share with us.


It’s not recommended to set a root password. When you set a root password, you are actually introducing a second way to log in. By default, the system’s root user can log in to MariaDB as root using Unix sockets without further authentication.
This means that the database’s root user is as secure as the system’s root user is. This is necessary to retain, or else Debian’s apt can’t update the database when MariaDB updates are applied. When you put a password on the root user, it doesn’t disable Unix socket access to the root user, it just adds password authentication as ANOTHER login method. This means any user on your system can try and hack into the database’s root user. It is more secure to leave the root account without a password.
MariaDB is installed but it showing error after running
systemctl status mariadbcommand.But mysql command is working. Why so?
@Arun,
May I know what error you getting after running the command? Could you share the output of the command here, so that we can help you out..