Nginx is an opensource, high-performance web server that commands a huge market share in production environments. It’s a lightweight and robust web server that is mostly used in hosting high-traffic websites.
Related Read: How to Install Apache Web Server on Ubuntu 20.04
In this guide, you will learn how to install the Nginx web server and configuring the Nginx server block (virtual hosts) on Ubuntu 20.04 LTS.
Prerequisites
To get started, ensure that you have an instance of Ubuntu 20.04 LTS with SSH access and a Sudo user with root privileges. In addition, a stable internet connection is recommended to install Nginx packages.
Installing Nginx on Ubuntu 20.04
1. Before installing Nginx, update your server’s package lists.
$ sudo apt update
2. Then install Nginx by running the command:
$ sudo apt install nginx
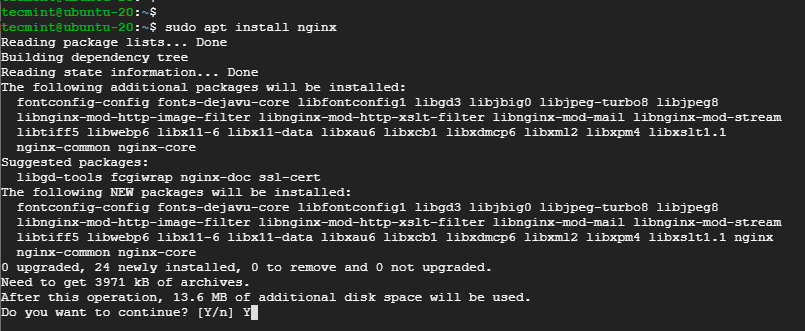
When prompted to continue, press 'Y' on the keyboard and hit ENTER. The installation will be done in just a few seconds.
3. With Nginx successfully installed, you can start and verify it by running:
$ sudo systemctl start nginx
$ sudo systemctl status nginx
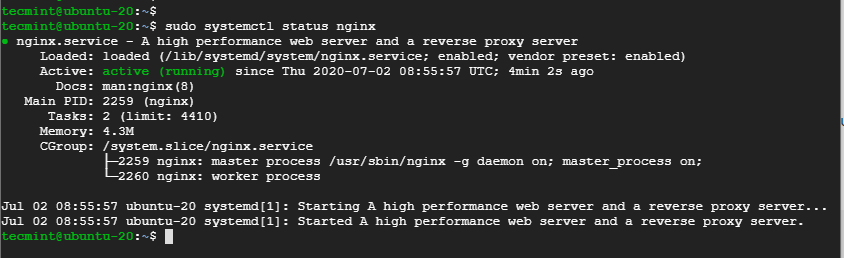
The output above clearly indicates that Nginx is running.
4. To check the version of Nginx, run:
$ sudo dpkg -l nginx

The output indicates that we are running Nginx 1.17.10 which is the latest version at the time of penning down this article.
Open Nginx Ports on UFW Firewall
Now that you have Nginx installed and running as expected, a few adjustments are required for Nginx to be accessed via a web browser. If you are running the UFW firewall, you need to allow the Nginx application profile.
There are 3 Nginx profiles associated with ufw firewall.
- Nginx Full – This opens both port 80 & 443 (For SSL / TLS encryption).
- Nginx HTTP – This open only port 80 ( For unencrypted web traffic).
- Nginx HTTPS – Opens only port 443 (For SSL / TLS encryption).
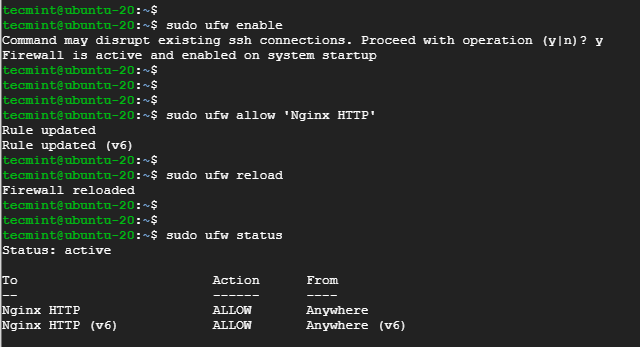
5. Begin by enabling the firewall on Ubuntu 20.04.
$ sudo ufw enable
6. For now, since we are not on an encrypted server, we will only allow the Nginx HTTP profile that will allow traffic on port 80.
$ sudo ufw allow 'Nginx HTTP'
7. Then reload the firewall for the changes to persist.
$ sudo ufw reload
8. Now check the status of the firewall to verify the profiles that have been allowed.
$ sudo ufw status
Testing the Nginx on Ubuntu 20.04
Nginx runs on the browser as you would expect with any web server and the surest way to test if it’s running as expected is to send requests via a browser.
9. So head out to your browser and browse the server’s IP address or domain name. To check your server’s IP, run the ifconfig command:
$ ifconfig
10. If you are on a cloud server, run the curl command below to retrieve the server’s public IP.
$ curl ifconfig.me
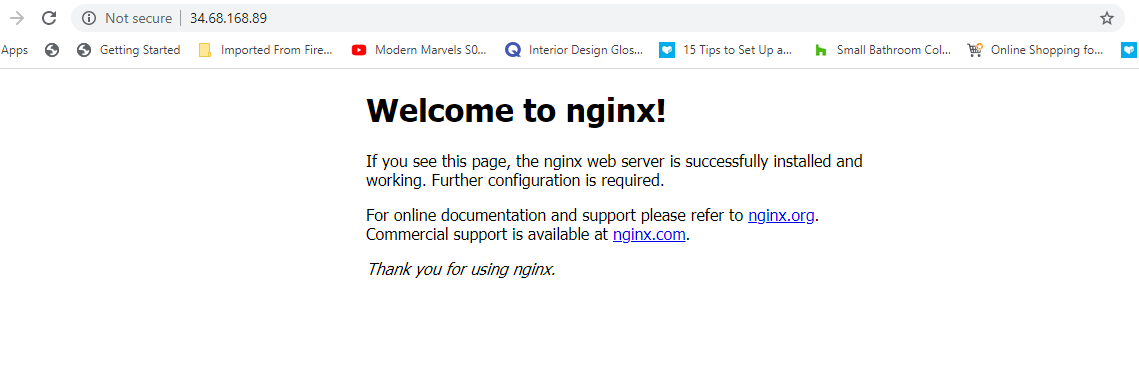
11. On your browser’s URL field, enter your server’s IP address or domain name and hit ENTER.
http://server-IP or domain-name
You should get a default Nginx welcome page as shown.
Manage Nginx Process in Ubuntu 20.04
12. To stop the Nginx web server, simply run:
$ sudo systemctl stop nginx
13. To bring the webserver up again execute:
$ sudo systemctl start nginx
14. To automatically start Nginx on boot or a reboot run:
$ sudo systemctl enable nginx
15. If you want to restart the webserver especially after making changes to the configuration files, run:
$ sudo systemctl restart nginx
16. Alternatively, you can reload to avoid dropping connections as shown.
$ sudo systemctl reload nginx
Configuring Nginx Server Block in Ubuntu 20.04
If you are planning to host more than one site on your server, then setting up an Nginx Server block comes highly recommended. The server block is the equivalent of Apache’s virtual host.
By default, Nginx ships with its default server block which is set to serve web content at the /var/www/html path.
We are going to create a separate Nginx block to serve our domain’s content. For this guide, we are going to use the domain crazytechgeek.info.
For your case, ensure you replace this with your own domain name.
17. To create a server block file, First, create a directory for your domain as shown.
$ sudo mkdir -p /var/www/crazytechgeek.info/html
18. Next, assign the ownership to the new directory using the $USER variable.
$ sudo chown -R $USER:$USER /var/www/crazytechgeek.info/html
19. Ensure that you also assign directory permissions accordingly allowing the owner to have all the permissions (read, write and execute) and granting other parties only read and execute permissions.
$ sudo chmod -R 755 /var/www/crazytechgeek.info
20. Inside the domain directory, create an index.html a file that will contain the web content of the domain.
$ sudo vim /var/www/crazytechgeek.info/html/index.html
Paste the content below to the sample testing file.
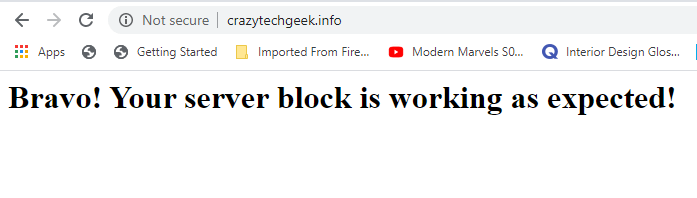
<html>
    <head>
        <title>Welcome to your_domain!</title>
    </head>
    <body>
        <h1>Bravo! Your server block is working as expected!</h1>
    </body>
</html>
Save the changes and exit the file.
21. For Nginx webserver to serve the content you’ve just added, you need to create a server block with the appropriate directives. In this case, we created a new server block at:
$ sudo vim /etc/nginx/sites-available/crazytechgeek.info
Paste the configuration shown.
server {
        listen 80;
        listen [::]:80;

        root /var/www/crazytechgeek.info/html;
        index index.html index.htm index.nginx-debian.html;

        server_name crazytechgeek.info  www.crazytechgeek.info;

        location / {
                try_files $uri $uri/ =404;
        }
}
Save and exit.
22. Now enable the server block file by linking it to the sites-enabled directory from which the Nginx server reads on startup.
$ sudo ln -s /etc/nginx/sites-available/crazytechgeek.info /etc/nginx/sites-enabled/
23. For the changes to be effected, restart the Nginx webserver.
$ sudo systemctl restart nginx
24. Just to be sure that all configurations are in order, run the command:
$ nginx -t
If all the configurations are in order, you should get the output shown below:

25. The Nginx web server should now serve your domain’s content. Once again, head out to your browser and browse your server’s domain.
http://domain-name
Your custom content in your domain’s directory will be served as shown.
Important Nginx Configuration Files
Before we wrap up, it’s crucial we examine some of the important configuration files associated with Nginx.
Nginx Configuration Files
- /etc/nginx/nginx.conf: This is the main configuration file. You can modify the settings to meet your server’s requirements.
- /etc/nginx/sites-available: This is the directory that stores the server block configuration. Nginx only uses the server blocks if they are linked to the sites-enabled directory.
- /etc/nginx/sites-enabled: The directory contains per-site Nginx server blocks that are already enabled.
Nginx Log Files
There are two main log files that you can use to troubleshoot your Nginx web server:
- /var/log/nginx/access.log: This logs all the requests made to the webserver.
- /var/log/nginx/error.log: This is the error log file and it records all the errors that Nginx encounters.
Conclusion
We have reached the end of this tutorial. We have shown how you can install Nginx on Ubuntu 20.04 and how you can set up Nginx server blocks to serve your domain’s content. Your feedback is welcome.


Awesome! Straight Up! Works like.
Hi,
I just followed these instructions and was able to get nginx installed. I get the welcome screen page when I do the server IP. After configuring the server blocks portion, when I go to the DNS name, I get a “403 Forbidden – you don’t have permission to access this resource”.
This was a fresh install of Ubuntu 20.04 Server and Nginx. I didn’t add any users or anything to the system, so in your $USER section, is that where is the issue? Nginx is running as a service.
Thanks in advance.
@Ryan,
Better assign user Nginx to your website directory, for example.
Hello,
Just installed nginx followed all the steps. sudo nginx -t successful, configuration ok.
But when I access the
http://mydomainI get an error.Any idea how could I solve the issue?
@Dan,
Could you share the error message here? so that will help you out..
Hi, sir can you explain to me how to host PHP and nuxt.js with an Nginx web server?