How to Install Ubuntu 20.04 Server

Ubuntu Server 20.04, also named Focal Fossa, has been released by Canonical and it’s now ready for installation. This article will walk you through the process of installing Ubuntu 20.04 Server Edition with Long Time Support on your machine.

If you’re looking for a fresh desktop installation or server up-gradation, then read our previous articles: Installation of Ubuntu 20.04 Desktop and How to Upgrade to Ubuntu 20.04.

Download Ubuntu 20.04 ISO Image

Use the following link to download the Ubuntu 20.04 live server install ISO image, which is provided only for 64-bit systems.

  1. ubuntu-20.04-live-server-amd64.iso

After downloading the ISO image, you need to create a bootable DVD using Rufus tool or a bootable USB drive using the Unetbootin LiveUSB Creator.

Install Ubuntu 20.04 Server Edition

1. To kickstart the installation process, place the bootable CD/DVD into a drive or USB in a port on your machine. Then boot from it by pressing your computer’s boot key (which should be one of F9, F10, F11, or F12 depending on the manufacturer settings).

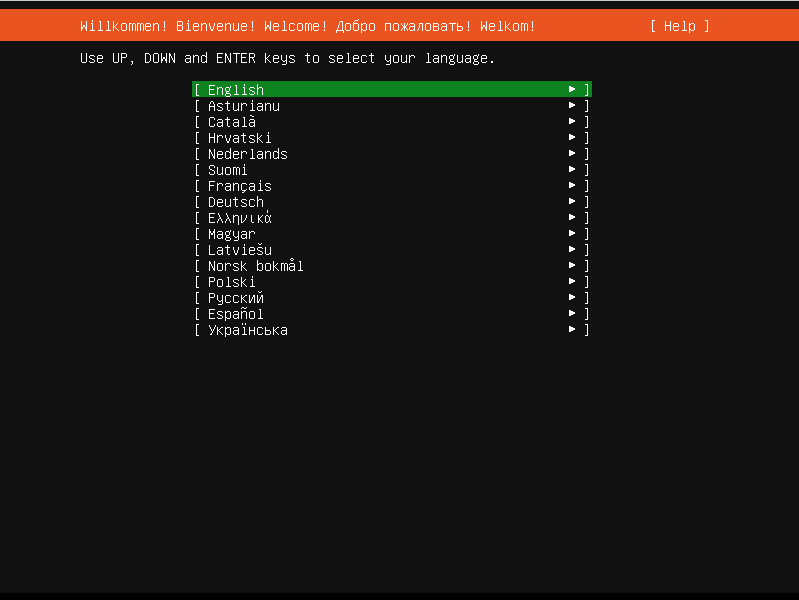
Once the system has booted, you will land on the installer welcome interface shown in the following screenshot asking you to select the installation language. Press Enter to continue.

Select Ubuntu Installation Language

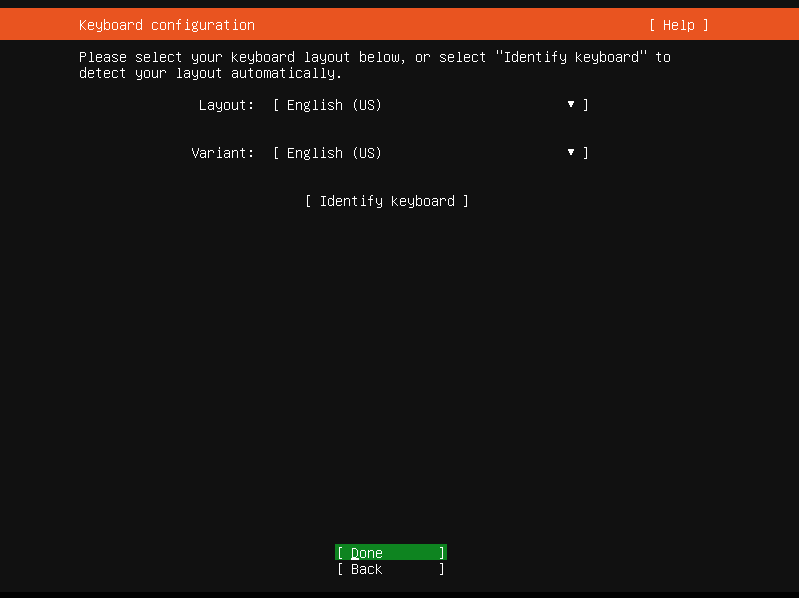
2. Next, select your keyboard layout and press Enter to proceed.

Select Ubuntu Keyboard Layout

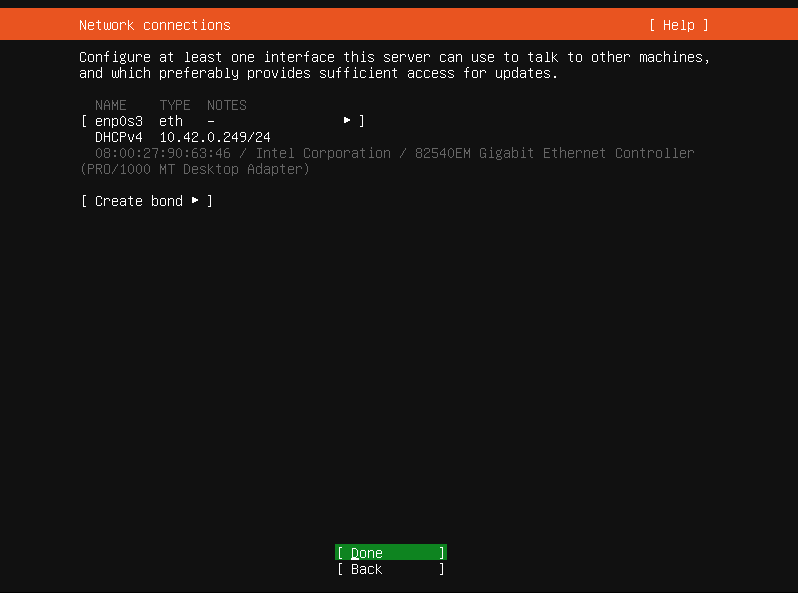
3. If your system is connected to a network, it should receive an IP address from your DHCP server. Press Done to continue.

Ubuntu Network Connection

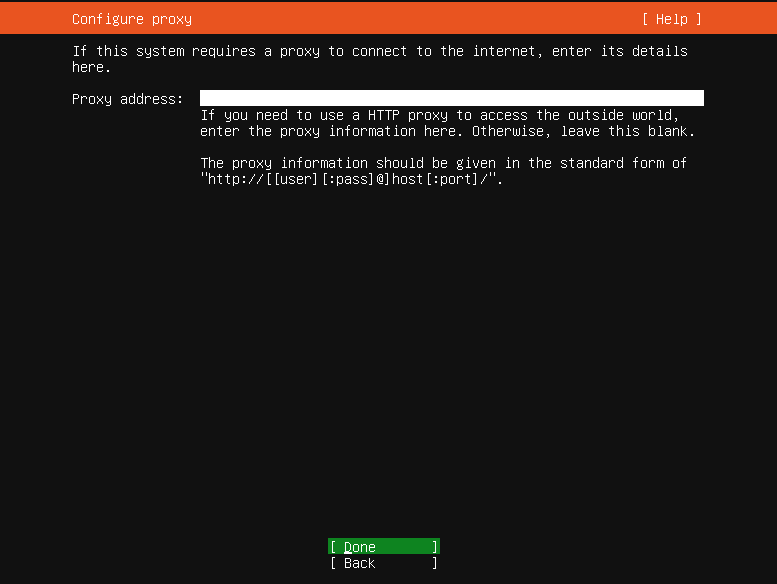
4. Based on your network set up, if you need a proxy server to connect to the internet, enter its details here. Otherwise, leave it empty and press Done.

Configure Proxy
Configure Proxy

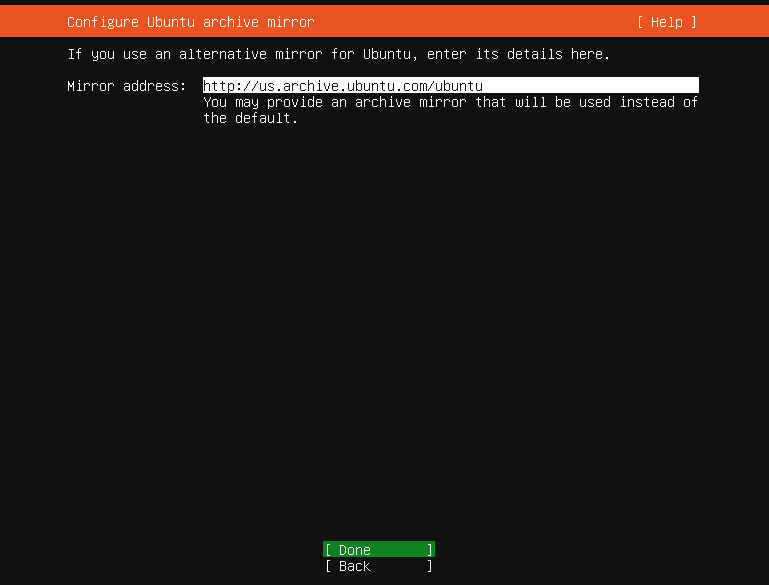
5. Next, you need to configure the Ubuntu archive mirror. The installer will select it automatically based on your country. Press Done to proceed.

Configure Ubuntu Archive Mirror

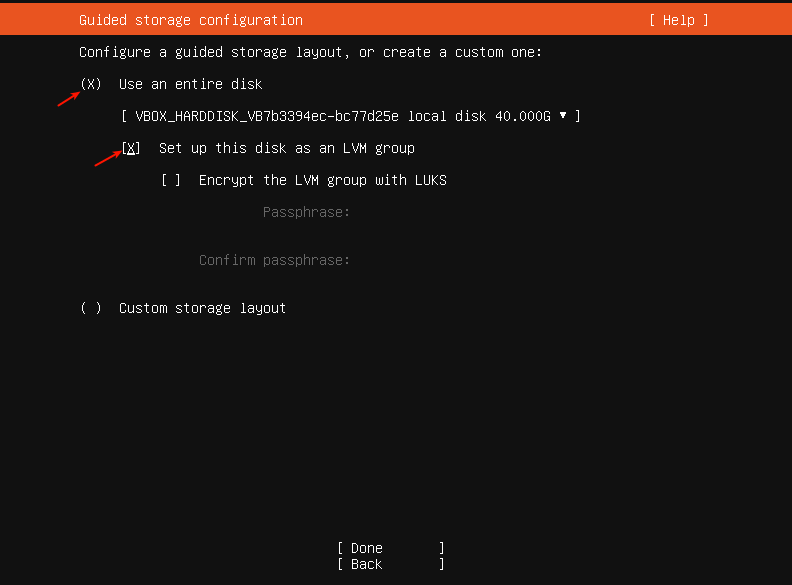
6. Now its time to configure your storage. You need to create the storage layout as explained below. For this guide, we will show how to do this manually, therefore, go to Use an entire disk and then select check the option Set up this disk as an LVM group.

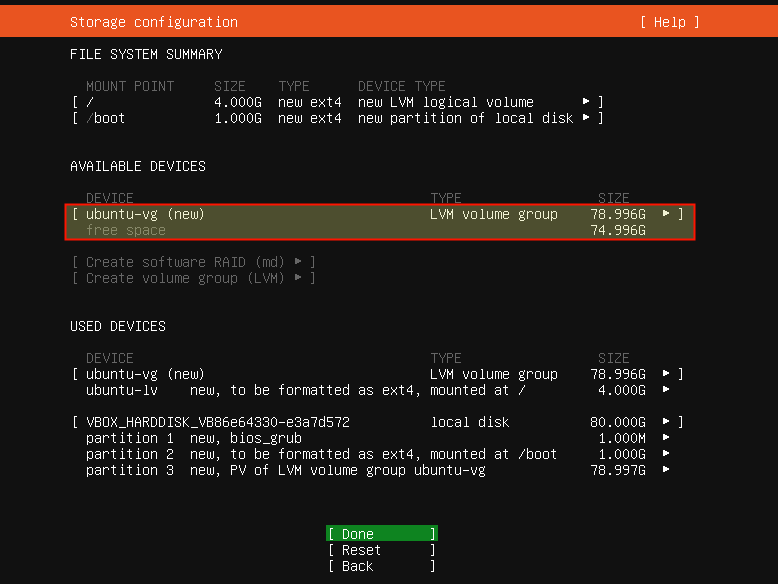
Note that the installer will create the root partition (with a small size by default), then you can manually edit its sizes and also create a swap partition.

Guided Storage Configuration

The following screenshot shows the default file system summary. Our test machine has a total of 80 GB hard disk capacity.

Storage Configuration Summary

Creating/Editing Root Partition Size

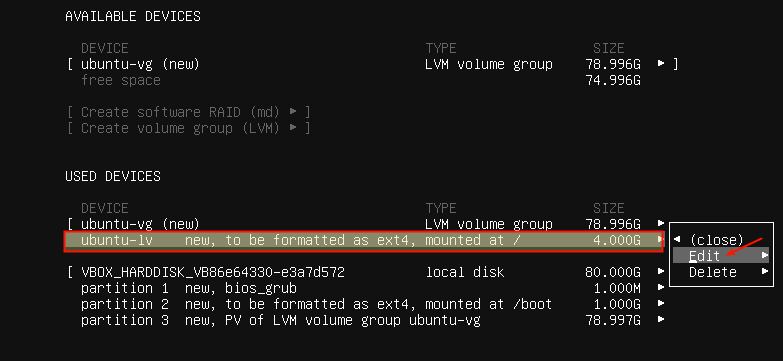
7. Next, under USED DEVICES, scroll to the root partition and press enter to get partitioning options. Select Edit as shown in the following screenshot, and press Enter.

Select Root Partition

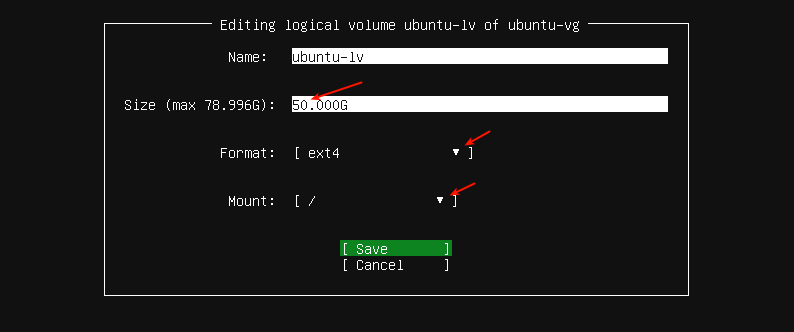
8. Then edit the partition size as shown in the following screenshot. For example, set it to 50GB and scroll down or use tab to go to Save and press Enter.

Set Root Partition Size

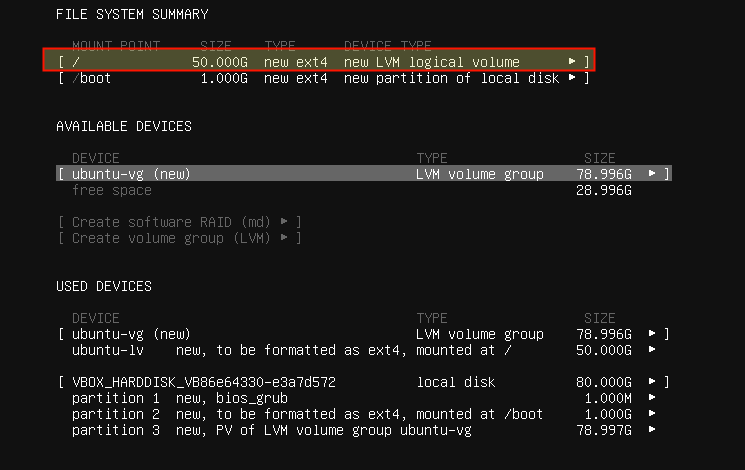
9. Now the root partition should have a size amounting to what you specified while editing it, as highlighted in the following screenshot.

Root Partition Summary

Note: If you do not want to create a separate /home partition, skip the next step, head over to create a swap partition.

Creating a Separate /home Partition

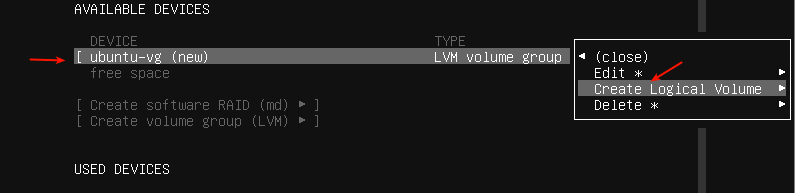
10. Next, you need to create a home partition for storing user files. Under AVAILABLE DEVICES, select the LVM volume group and press Enter. In the partitioning options, scroll down to Create Logical Volume.

Create Home Partition

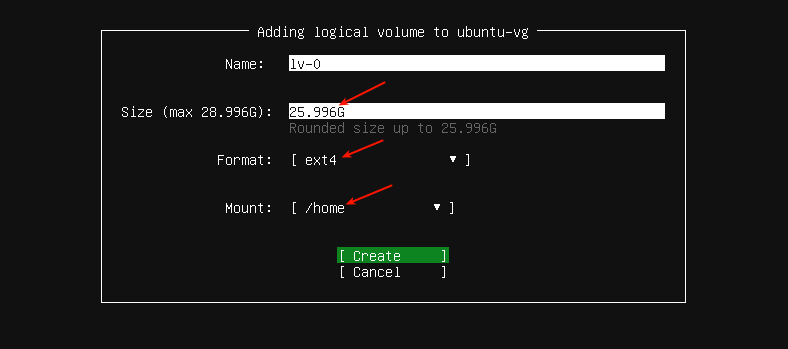
11. Next, enter the home partition size. Set it appropriately so that you leave some space for a swap partition/area. Under Format, select ext4 and Mount should be /home as highlighted in the following screenshot. Then scroll down to Create and press Enter.

Set Home Partition Size

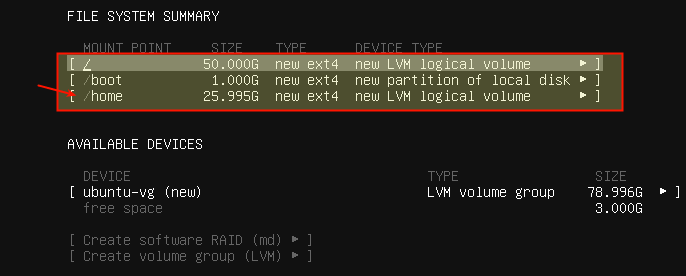
The /home file system has been created successfully.

Home Partition Summary

Creating a Swap Partition

12. Now you need to create a swap partition. Under AVAILABLE DEVICES, select the LVM volume group and press Enter. In the partitioning options, scroll down to Create Logical Volume.

Create Swap Partition

13. Then edit the partition size and set the Format field to swap as highlighted in the following screenshot and press Enter.

Set Swap Partition Size

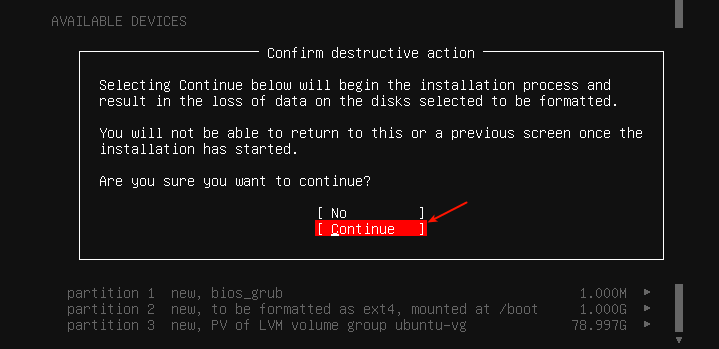
14. Your new file system summary should now have a /boot, /root, /home, and swap partition as shown in the following screenshot. To write the changes to the harddisk, scroll down to Done, and press Enter.

File System Partition Summary

15. Confirm the action by selecting Continue and press Enter.

Confirm Partition Changes to Disk

16. Now create a user profile by mentioning your name, server’s name, username, and a secure and strong password. Then scroll to Done and press Enter.

Create New User
Create New User

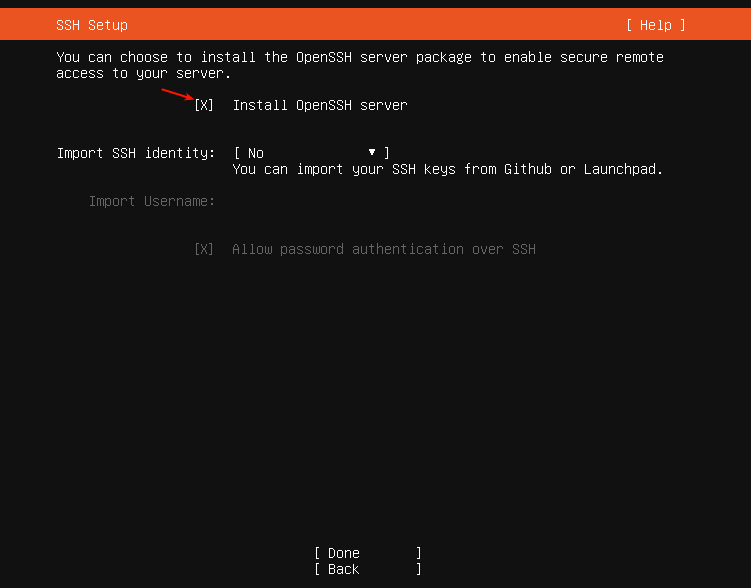
17. Next, the installer will prompt you to install the OpenSSH package for remote access. Use space to choose that option. Then scroll down to Done and press Enter.

Install SSH Server
Install SSH Server

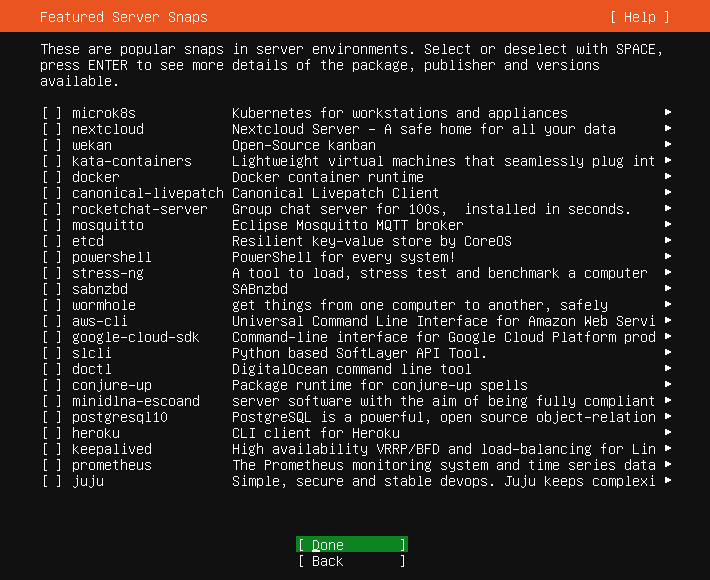
18. If you want to install some snaps, select them from the provided list. Use the space bar to select a snap. Then go to Done and press Enter.

Choose Snaps to Install

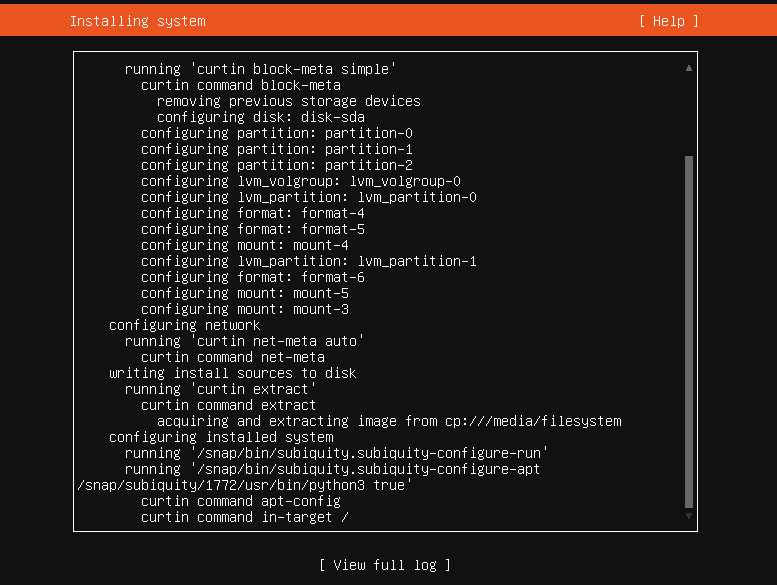
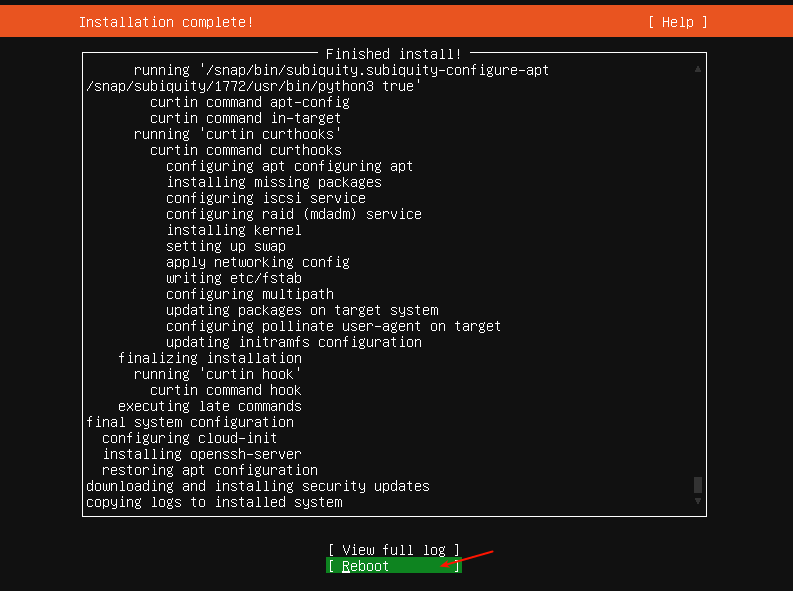
19. The installation process should now start as shown in the following screenshot. Once it is done, press Enter to reboot the system.

Installing Ubuntu System
Installation Complete

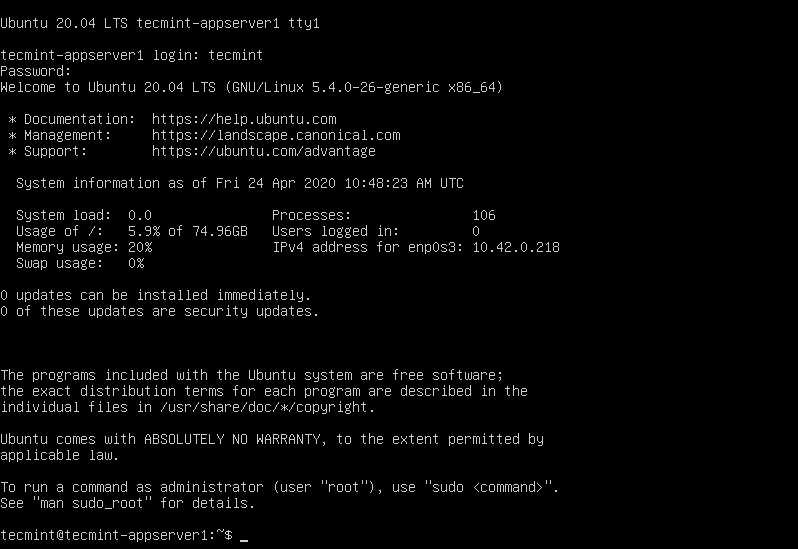
20. After a reboot, you can now log into your new Ubuntu 20.04 LTS server as shown in the following screenshot.

Log into New Ubuntu 20.04 Server

That’s all friends! You have successfully installed Ubuntu 20.04 LTS server edition on your machine. You can leave a comment concerning this guide via the feedback form below.

Aaron Kili
Aaron Kili is a Linux and F.O.S.S enthusiast, an upcoming Linux SysAdmin, web developer, and currently a content creator for TecMint who loves working with computers and strongly believes in sharing knowledge.

Each tutorial at TecMint is created by a team of experienced Linux system administrators so that it meets our high-quality standards.

Join the TecMint Weekly Newsletter (More Than 156,129 Linux Enthusiasts Have Subscribed)
Was this article helpful? Please add a comment or buy me a coffee to show your appreciation.

11 thoughts on “How to Install Ubuntu 20.04 Server”

  1. Hi, I am not sure what I did wrong. But after following this, I started to follow your LAMP setup and this happens:

    # apt-get install apache2
    
    Reading package lists... Done
    Building dependency tree
    Reading state information... Done
    The following additional packages will be installed:
      apache2-bin apache2-data apache2-utils libapr1 libaprutil1 libaprutil1-dbd-sqlite3 libaprutil1-ldap libjansson4 liblua5.2-0 ssl-cert
    Suggested packages:
      apache2-doc apache2-suexec-pristine | apache2-suexec-custom www-browser openssl-blacklist
    The following NEW packages will be installed:
      apache2 apache2-bin apache2-data apache2-utils libapr1 libaprutil1 libaprutil1-dbd-sqlite3 libaprutil1-ldap libjansson4 liblua5.2-0 ssl-cert
    0 upgraded, 11 newly installed, 0 to remove and 0 not upgraded.
    Need to get 1,865 kB of archives.
    After this operation, 8,080 kB of additional disk space will be used.
    Do you want to continue? [Y/n]
    Err:1 http://us.archive.ubuntu.com/ubuntu focal/main amd64 libapr1 amd64 1.6.5-1ubuntu1
      Temporary failure resolving 'us.archive.ubuntu.com'
    Err:2 http://us.archive.ubuntu.com/ubuntu focal/main amd64 libaprutil1 amd64 1.6.1-4ubuntu2
      Temporary failure resolving 'us.archive.ubuntu.com'
    Err:3 http://us.archive.ubuntu.com/ubuntu focal/main amd64 libaprutil1-dbd-sqlite3 amd64 1.6.1-4ubuntu2
      Temporary failure resolving 'us.archive.ubuntu.com'
    Err:4 http://us.archive.ubuntu.com/ubuntu focal/main amd64 libaprutil1-ldap amd64 1.6.1-4ubuntu2
      Temporary failure resolving 'us.archive.ubuntu.com'
    Err:5 http://us.archive.ubuntu.com/ubuntu focal/main amd64 libjansson4 amd64 2.12-1build1
      Temporary failure resolving 'us.archive.ubuntu.com'
    Err:6 http://us.archive.ubuntu.com/ubuntu focal/main amd64 liblua5.2-0 amd64 5.2.4-1.1build3
      Temporary failure resolving 'us.archive.ubuntu.com'
    Ign:7 http://us.archive.ubuntu.com/ubuntu focal-updates/main amd64 apache2-bin amd64 2.4.41-4ubuntu3.1
    Ign:8 http://us.archive.ubuntu.com/ubuntu focal-updates/main amd64 apache2-data all 2.4.41-4ubuntu3.1
    Ign:9 http://us.archive.ubuntu.com/ubuntu focal-updates/main amd64 apache2-utils amd64 2.4.41-4ubuntu3.1
    Ign:10 http://us.archive.ubuntu.com/ubuntu focal-updates/main amd64 apache2 amd64 2.4.41-4ubuntu3.1
    Err:11 http://us.archive.ubuntu.com/ubuntu focal/main amd64 ssl-cert all 1.0.39
      Temporary failure resolving 'us.archive.ubuntu.com'
    Err:7 http://us.archive.ubuntu.com/ubuntu focal-updates/main amd64 apache2-bin amd64 2.4.41-4ubuntu3.1
      Temporary failure resolving 'us.archive.ubuntu.com'
    Err:8 http://us.archive.ubuntu.com/ubuntu focal-updates/main amd64 apache2-data all 2.4.41-4ubuntu3.1
      Temporary failure resolving 'us.archive.ubuntu.com'
    Err:9 http://us.archive.ubuntu.com/ubuntu focal-updates/main amd64 apache2-utils amd64 2.4.41-4ubuntu3.1
      Temporary failure resolving 'us.archive.ubuntu.com'
    Err:10 http://us.archive.ubuntu.com/ubuntu focal-updates/main amd64 apache2 amd64 2.4.41-4ubuntu3.1
      Temporary failure resolving 'us.archive.ubuntu.com'
    E: Failed to fetch http://us.archive.ubuntu.com/ubuntu/pool/main/a/apr/libapr1_1.6.5-1ubuntu1_amd64.deb  Temporary failure resolving 'us.archive.ubuntu.com'
    E: Failed to fetch http://us.archive.ubuntu.com/ubuntu/pool/main/a/apr-util/libaprutil1_1.6.1-4ubuntu2_amd64.deb  Temporary failure resolving 'us.archive.ubuntu.com'
    E: Failed to fetch http://us.archive.ubuntu.com/ubuntu/pool/main/a/apr-util/libaprutil1-dbd-sqlite3_1.6.1-4ubuntu2_amd64.deb  Temporary failure resolving 'us.archive.ubuntu.com'
    E: Failed to fetch http://us.archive.ubuntu.com/ubuntu/pool/main/a/apr-util/libaprutil1-ldap_1.6.1-4ubuntu2_amd64.deb  Temporary failure resolving 'us.archive.ubuntu.com'
    E: Failed to fetch http://us.archive.ubuntu.com/ubuntu/pool/main/j/jansson/libjansson4_2.12-1build1_amd64.deb  Temporary failure resolving 'us.archive.ubuntu.com'
    E: Failed to fetch http://us.archive.ubuntu.com/ubuntu/pool/main/l/lua5.2/liblua5.2-0_5.2.4-1.1build3_amd64.deb  Temporary failure resolving 'us.archive.ubuntu.com'
    E: Failed to fetch http://us.archive.ubuntu.com/ubuntu/pool/main/a/apache2/apache2-bin_2.4.41-4ubuntu3.1_amd64.deb  Temporary failure resolving 'us.archive.ubuntu.com'
    E: Failed to fetch http://us.archive.ubuntu.com/ubuntu/pool/main/a/apache2/apache2-data_2.4.41-4ubuntu3.1_all.deb  Temporary failure resolving 'us.archive.ubuntu.com'
    E: Failed to fetch http://us.archive.ubuntu.com/ubuntu/pool/main/a/apache2/apache2-utils_2.4.41-4ubuntu3.1_amd64.deb  Temporary failure resolving 'us.archive.ubuntu.com'
    E: Failed to fetch http://us.archive.ubuntu.com/ubuntu/pool/main/a/apache2/apache2_2.4.41-4ubuntu3.1_amd64.deb  Temporary failure resolving 'us.archive.ubuntu.com'
    E: Failed to fetch http://us.archive.ubuntu.com/ubuntu/pool/main/s/ssl-cert/ssl-cert_1.0.39_all.deb  Temporary failure resolving 'us.archive.ubuntu.com'
    E: Unable to fetch some archives, maybe run apt-get update or try with --fix-missing?
    

    Help?

    Reply
  2. I have the Ubuntu 19.04 DT installed. I wanted to upgrade to 20.04 but when I ran the Installer it tells me that it will take many hours. After waiting overnight nothing happened. This went on for three attempts. I do have a fast internet connection

    I am frustrated and I have downloaded the ISO version of 20.04. Can I go ahead and install the 20.04 directly from this? I know that I have to put it on a flash drive first.

    Reply
  3. When I try to install MATE on Ubuntu Server 20.04 I get GNOME 3. This happens with the packets mate-desktop, mate-desktop-environment and ubuntu-mate-desktop.

    Reply
      • Hi,

        Thank you for your rich content, Please I just curious, Where are your from like your continent if you can say your Country. I am a guest from Cameroon in Africa and I have a profit a lot from your write up. I hope you don’t find this offensive.

        Thank you

        Reply
        • @Mbah

          I am from Uganda, also in Africa. I am glad that you find our content useful and it has helped you a lot at work. Many thanks for the feedback.

          Reply
    • @Muhammad,
      Yes its possible, as you can install any desktop environments like cinnamon, mate, gnome or xfce with one single command.

      Install Gnome Desktop:

      $ sudo apt-get install gnome-shell ubuntu-gnome-desktop
      

      Install Mate Desktop:

      $ sudo apt-get install ubuntu-mate-desktop
      

      Install Cinnamon Desktop:

      $ sudo apt-get install cinnamon-desktop-environment
      
      Reply

Got something to say? Join the discussion.

Thank you for taking the time to share your thoughts with us. We appreciate your decision to leave a comment and value your contribution to the discussion. It's important to note that we moderate all comments in accordance with our comment policy to ensure a respectful and constructive conversation.

Rest assured that your email address will remain private and will not be published or shared with anyone. We prioritize the privacy and security of our users.