OpenVPN is an open-source, fast, popular program for creating a VPN (Virtual Private Network). It uses both the TCP and UDP transmission protocols, and VPN tunnels are secured with OpenVPN protocol with SSL/TLS authentication, certificates, credentials, and optionally MAC address lock as well as multi-factor authentication.
OpenVPN can be used on a wide variety of devices and systems. Like most VPN protocols out there, has a client-server architecture. The OpenVPN access server runs on a Linux system, and the clients can be installed on other Linux systems, Windows, and macOS, as well as mobile operating systems such as Android, Windows Mobile, and iOS.
The OpenVPN access server accepts incoming VPN connections and OpenVPN Connect clients or any open-source clients compatible with OpenVPN can initiate a connection to the server.
In this article, you will learn how to set up an OpenVPN access server on Ubuntu 22.04/Ubuntu 20.04 and connect VPN clients from other Linux systems.
Prerequisites:
Table of Contents
Step 1: Setting Up OpenVPN Server on Ubuntu
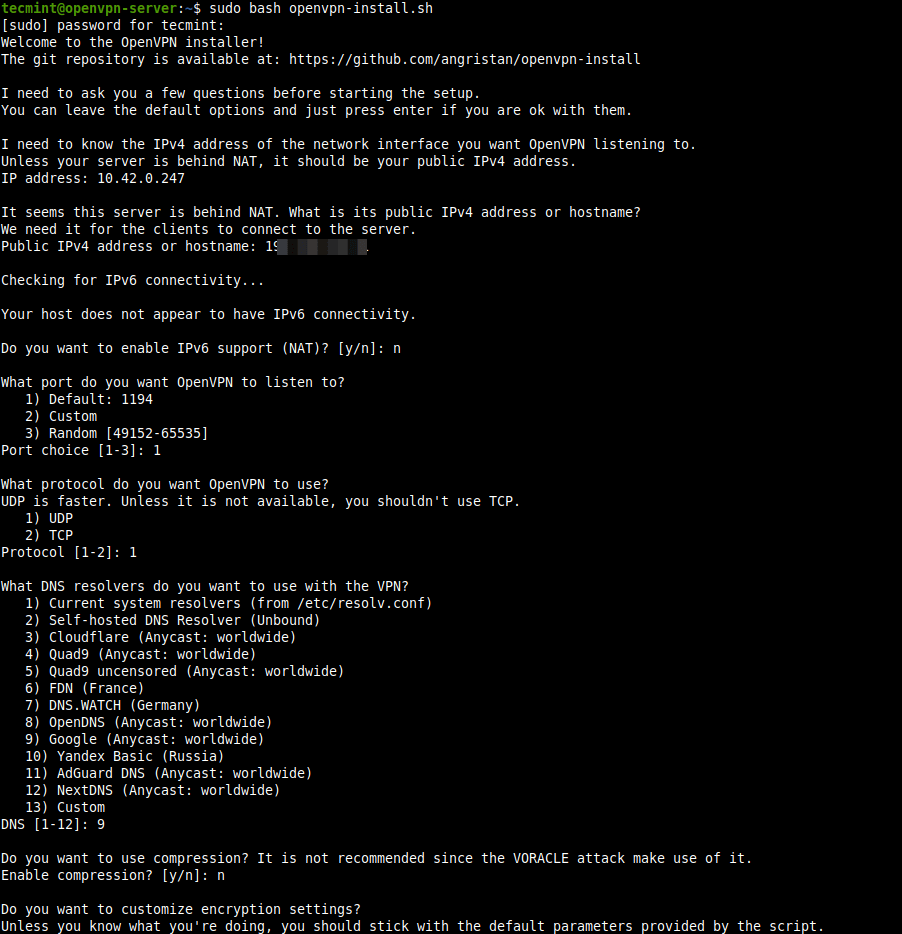
1. Installing and configuring an OpenVPN server manually is not a simple task from my experience. That’s the reason, we will be using a script that lets you set up your own secure OpenVPN server in a matter of seconds.
Before downloading and running the script, note that the script will auto-detect your server’s private IP address, but you need to take note of your server’s public IP address especially if it is running behind NAT.
To find out your server’s public IP address, run the following wget command or dig command.
$ wget -qO - icanhazip.com
OR
$ dig +short myip.opendns.com @resolver1.opendns.com

2. Now download the installer script using the curl command-line tool, then make it executable using the chmod command as follows.
$ curl -O https://raw.githubusercontent.com/angristan/openvpn-install/master/openvpn-install.sh
$ chmod +x openvpn-install.sh
3. Next, run the executable installer script as shown.
$ sudo bash openvpn-install.sh
When executed for the first time, the script will ask you some questions, read them carefully, and provide answers according to your preferences, to set up your OpenVPN server.
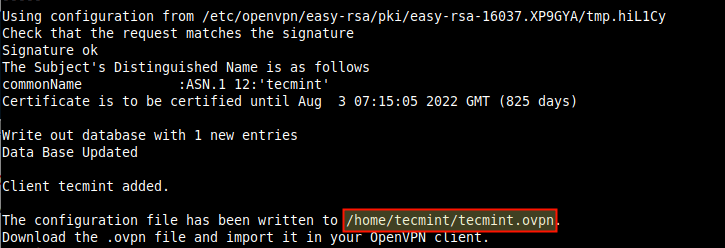
4. Once the VPN installation process is complete, a client configuration file will be written under the current working directory. This is the file you will use to configure your OpenVPN client as described in the next section.
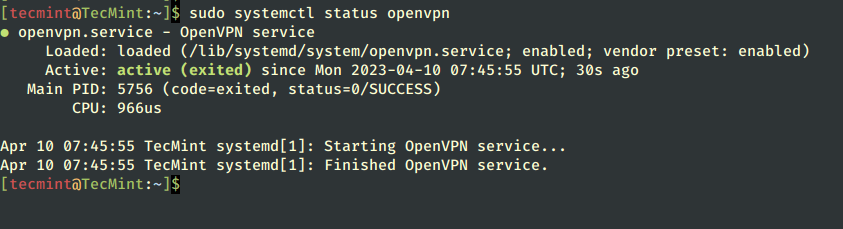
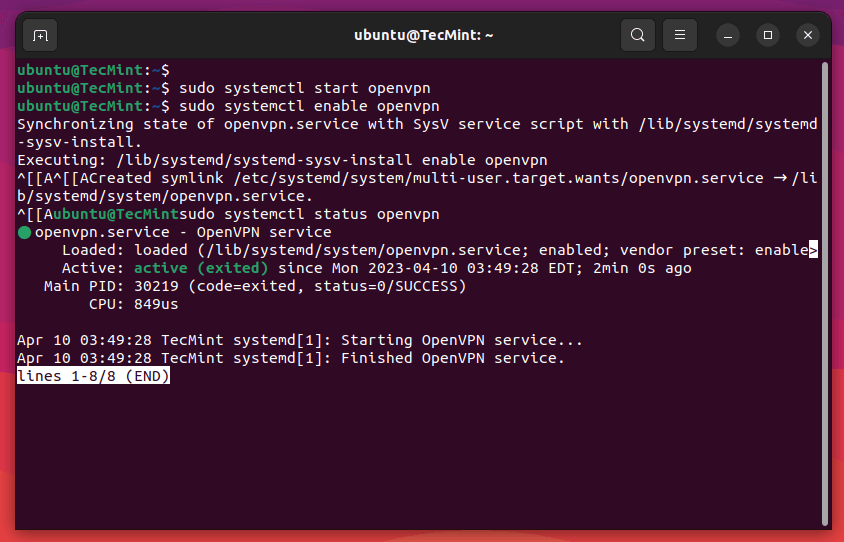
5. Next, confirm that the OpenVPN service is up and running by checking its status using the following systemctl command.
$ sudo systemctl status openvpn
6. Also, confirm that the OpenVPN daemon is listening on the port you instructed the script to use, using the ss command as shown.
$ sudo ss -tupln | grep openvpn

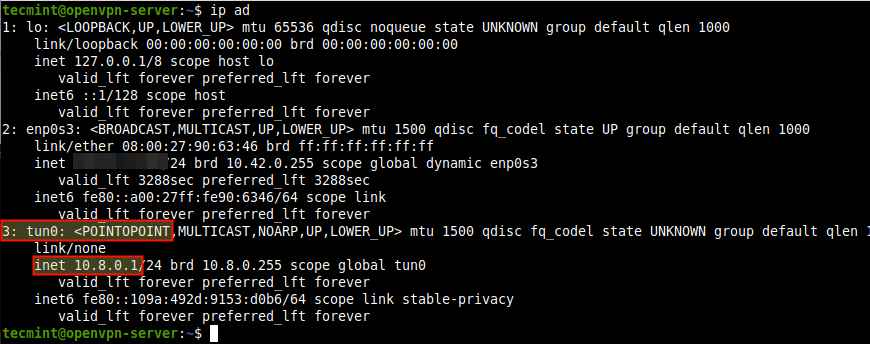
7. If you check your network interfaces, a new interface has been created for a VPN tunnel, you can confirm this by using the IP command.
$ ip add
Step 2: Setup OpenVPN Clients in Ubuntu
8. Now it’s time to set up your OpenVPN client and connect it to the VPN server. First, install the OpenVPN package in the client machine as follows.
$ sudo yum install openvpn	#RHEL-based Systems
$ sudo apt install openvpn	#Debian-based Systems
$ sudo dnf install openvpn	#Fedora Linux
9. On a desktop system, you also need to install the network-manager-openvpn package to make VPN settings from the graphical interface.
$ sudo yum install network-manager-openvpn	#RHEL-based Systems
$ sudo apt install network-manager-openvpn	#Debian-based Systems
$ sudo dnf install network-manager-openvpn	#Fedora Linux
10. After installing the above packages, start the OpenVPN service, for now, enable it to automatically start at system boot and check its status to confirm that it’s up and running.
$ sudo systemctl start openvpn
$ sudo systemctl enable openvpn
$ sudo systemctl status openvpn
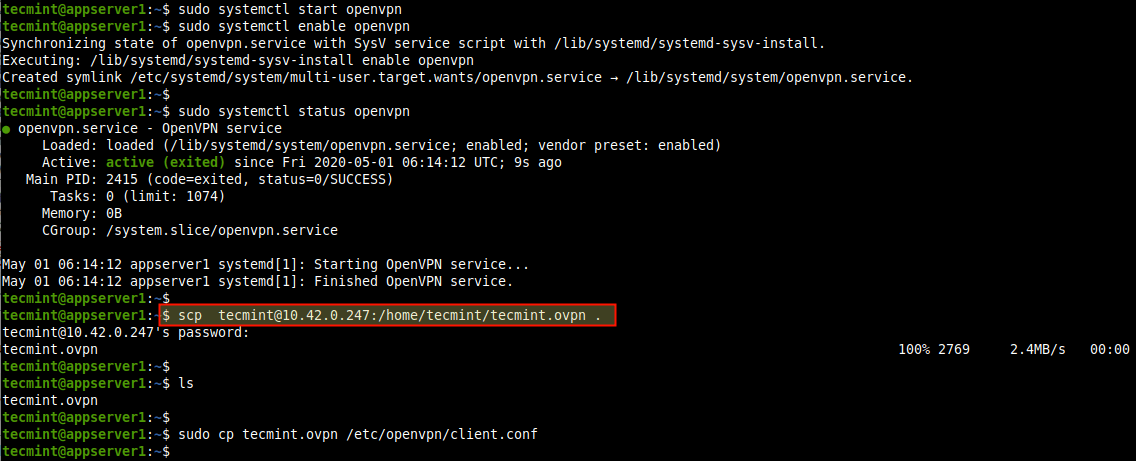
11. Now you need to import the OpenVPN client settings from the OpenVPN server. Open a terminal window and use the SCP command to grab the file as shown.
$ cd ~
$ scp [email protected]:/home/tecmint/tecmint.ovpn .

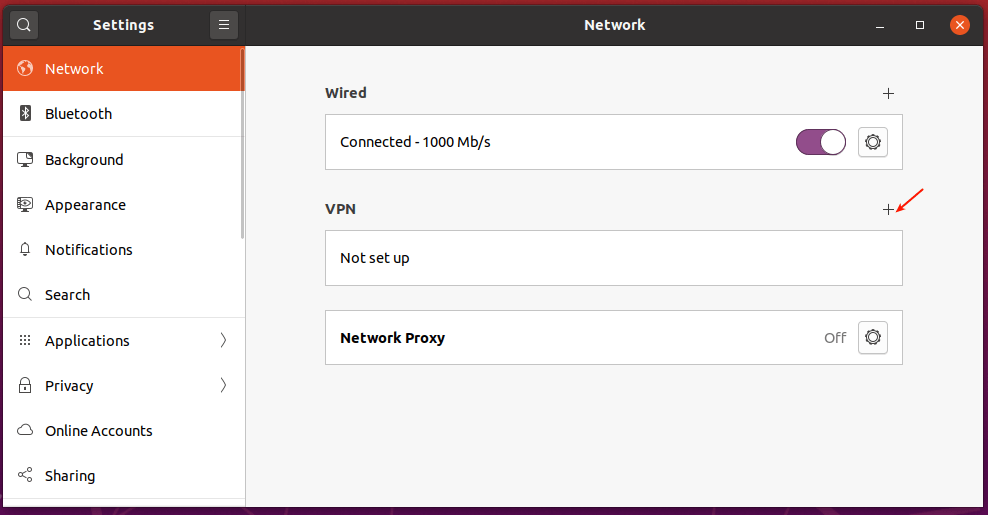
12. Open system Settings, then go to Networks. Under VPN, click the add button to get the necessary options.
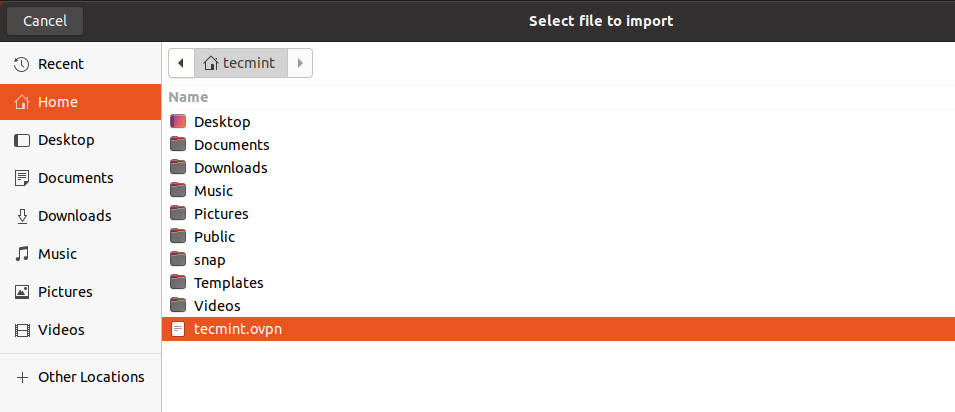
13. In the pop-up window, choose “Import from file” as highlighted in the following screenshot. Then browse your file manager and select the .ovpn client config file you downloaded from the server.

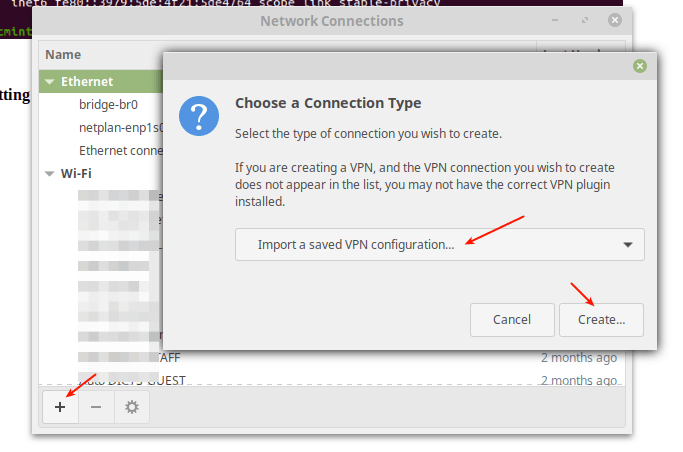
14. On other Linux desktop systems, click on the network icon on the system panel, go to Network Connections. Then click the plus button to add a new connection. From the drop, select “Import a saved VPN configuration…” as highlighted in the following screenshot.
Create the connection and import the file.
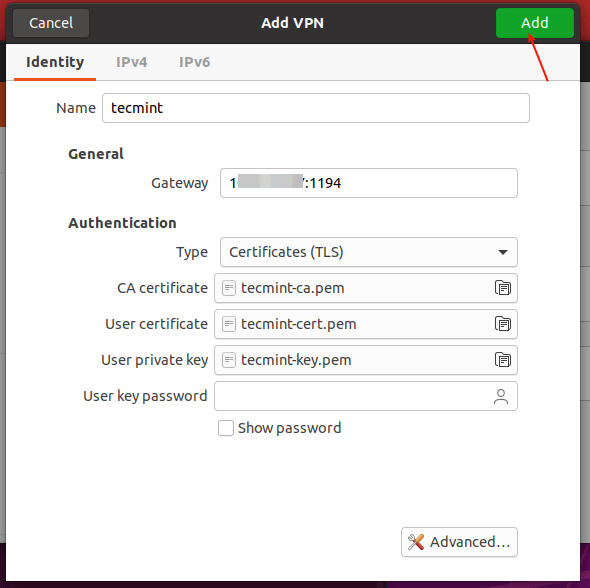
15. After importing the file, the VPN settings should be added as shown in the following screenshot. Then click Add.
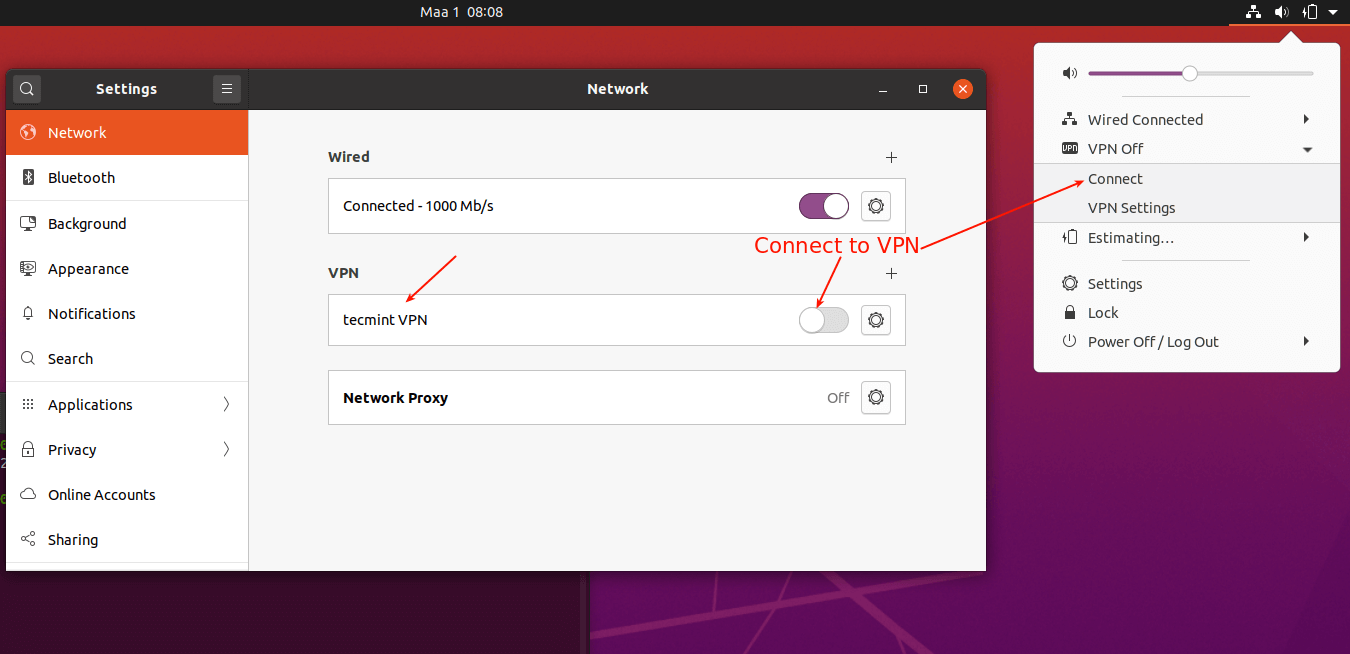
16. Your VPN client settings should be added successfully. You can connect to the OpenVPN server by turning on the VPN as highlighted in the following screenshot.
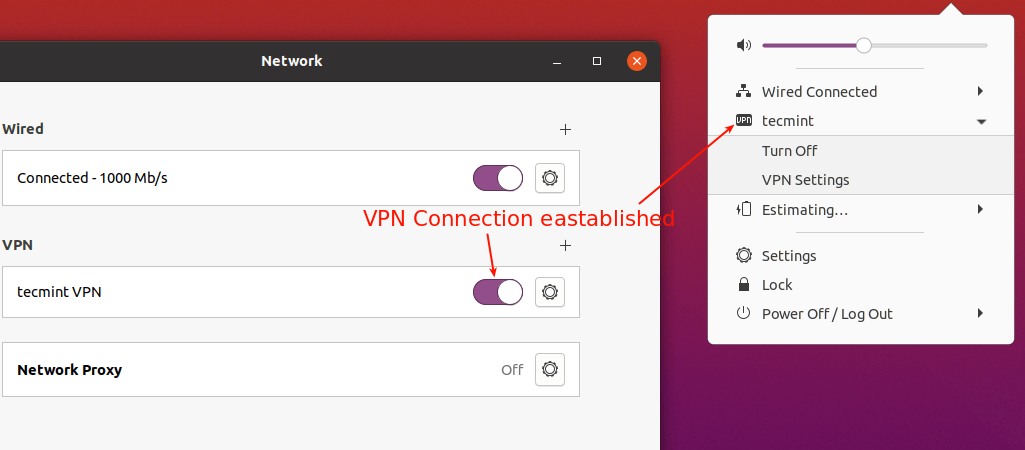
17. Now the VPN connection should be established successfully as shown in the following screenshot.
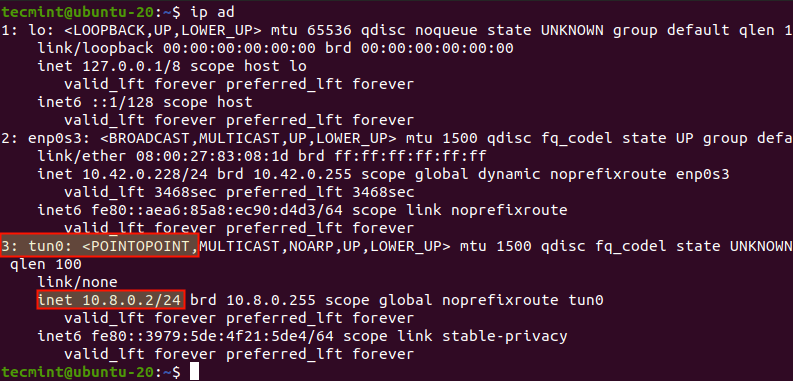
18. If you check your network interface connections using the IP add command, there should now exist a VPN tunnel interface as highlighted in the following screenshot.
$ ip add
Step 3: Setup OpenVPN Client in Linux
19. To connect another Linux server as a VPN client, ensure that you have installed the OpenVPN package, and started, and enabled the OpenVPN service as described above.
Then download the .ovpn client file, and copy it to the /etc/openvpn/ directory as shown.
$ scp [email protected]:/home/tecmint/tecmint.ovpn .
$ ls
$ sudo cp tecmint.ovpn /etc/openvpn/client.conf
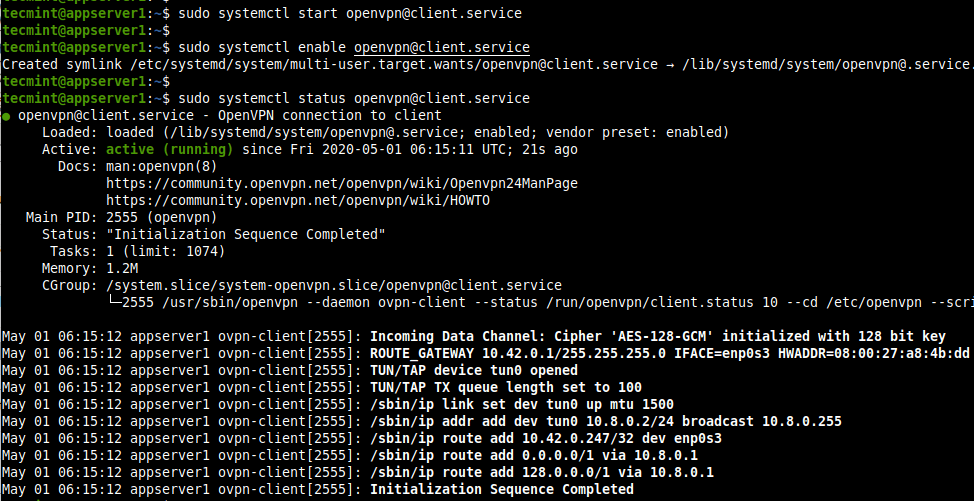
20. Next, start the VPN client service, enable it, and check its status with the following commands.
$ sudo systemctl start [email protected]
$ sudo systemctl enable [email protected]
$ sudo systemctl status [email protected]
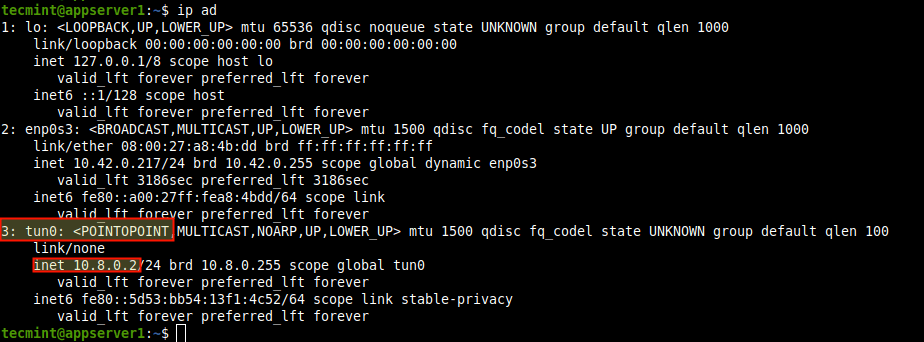
21. Then confirm that a VPN tunnel interface has been created using the IP add command as shown.
$ ip add
22. To set up other OpenVPN clients on operating systems, use the following clients:
- Windows: The official OpenVPN community client for Windows.
- Android: The OpenVPN client for Android.
- iOS: The official OpenVPN Connect client for iOS.
Step 4: Uninstall OpenVPN from Ubuntu
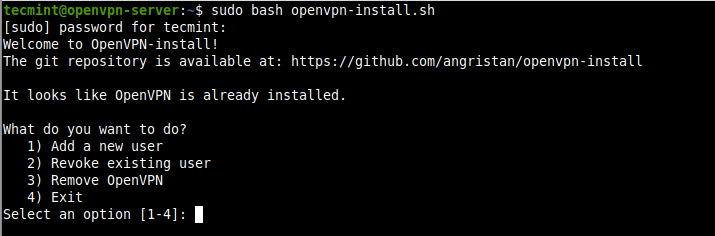
23. If you want to add a new VN user or revoke an existing user or remove the OpenVPN server from your system, simply run the installer script again. Then select what you wish to do from the list of options and follow the prompts.
$ sudo bash openvpn-install.sh
That brings us to the end of this guide. To share any thoughts with us or ask questions, use the feedback form below. For more information, go to the openvpn-install script Github repository.


Hi,
I did the entire process, no problems. But even though the service is active on the server, I can’t connect to the server through the client.
I use 2 network cards in the server and point to installation for the secondary cards. Already looked at routing, reinstalled VPN, but to no avail. any tips on what to check to fix the problem?
I made it as far as the “check to make sure” things and both fail — having a listener on the desired port, and being able to see a tunnel device. Neither are there so… now what?
Up and running in minutes. Thanks
Hello, can anyone help me on step 2 – part 11 the “scp” part. I’m new so I’m having trouble
Hi,
Great article!
Would be good to have added how to keep the VPN connection alive as the Openvpn connection regularly drops after a few minutes if say reading a webpage.
Thanks
Hi,
The installation script works perfectly, thanks for sharing.
I used it on a fresh install as the root user. The installation worked fine (of course), except the config file was not created (I guess the script can’t write into the /home/root directory).
Next, I created a new Linux user, downloaded the script again added a new user. This way the config file was generated successfully.
Thanks for this tutorial. Just want to point out a small mistake in step 10. The spelling would enable.
@Parthesh,
Thanks corrected the command in the article…
The main reason why I won’t use Linux is the difficulty of the VPN. I just don’t want to spend hours to set up, and another hour to create a kill switch. I reckon security and VPN come together, and until Linux doesn’t implement a click to install and click to kill switch on I’ll stay with other operating systems like Windows (what I don’t like) where just install it, and use it without I need to worry what if the VPN connection drop. The Linux systems need at least 10 years to make it terminal free.
Think of Linux as Gourmet cooking versus Windows as Microwave cooking.
Some people just enjoy Gourmet cooking and some people just love quick microwaved food. I can see why some people love to quickly press the 5-minute timer and be ready to eat. The trick to Gourmet cooking is to have lists of ingredients ready to copy over to your dish prompt.
Well said Dennis!
I don’t like microwave food, and I love to do some programming and etc. What I don’t like to spend hours setting up basic things in order to start my job or enjoy myself. I don’t have problems with terminal / PowerShell things if I want to fine-tune. But spend hours setting up basic stuff is ridiculous in 2020.
I’ve spoken a lot of people and most of them don’t use Linux because out of the few options in the control panel they just don’t want to / don’t feel comfortable to start the Sudo thing.
Ati likes to eat at restaurants where he doesn’t have to mess around with cooking. Everything comes served on a platter.
Use, Pritunl a open source distributed enterprise VPN server built using the OpenVPN protocol.
@Rafael
Thanks for sharing, we just checked it out. We will give it a try. There is a free plan with support for a single server (instance) and an unlimited number of users and devices.