TFTP (Trivial File Transfer Protocol) is a simple file transfer protocol that is often used for transferring files between computers on a remote network host.
It is lightweight and doesn’t provide the advanced features of FTP or SFTP but is commonly used for tasks like network device configuration and firmware updates.
This article will explore how to install and configure a TFTP server on Ubuntu and Debian distributions.
Step 1: Install TFTP Server on Ubuntu
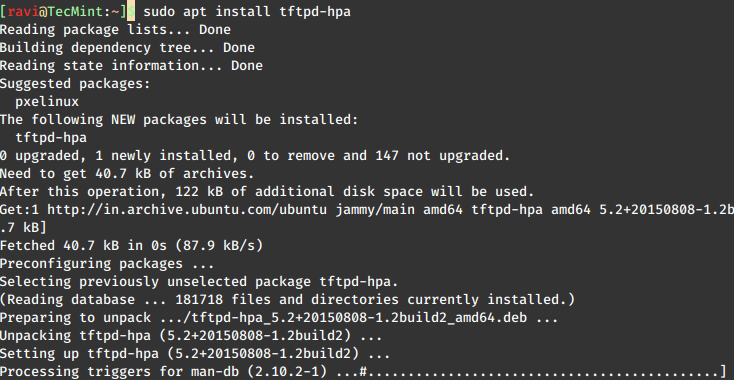
Open a terminal on your system and run the following apt commands to update the local software package list and install the TFTP server as shown.
sudo apt update
sudo apt install tftpd-hpa
While installing, it is crucial to ensure that we have selected the correct package, as we require the enhanced version of TFTP, known as the tftp-hpa package.
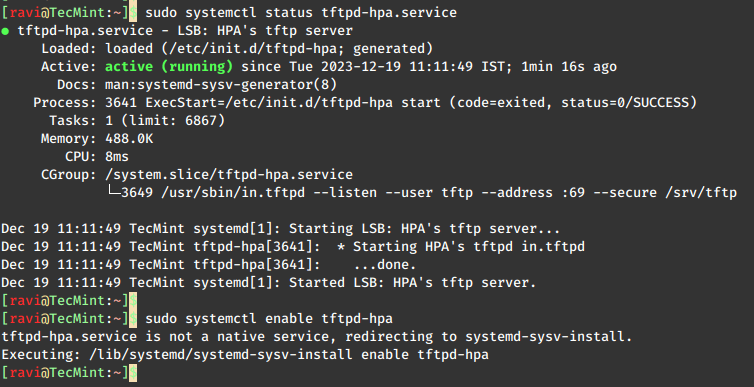
After completing the installation, let’s confirm that the TFTP server is running and has been installed successfully.
sudo systemctl status tftpd-hpa.service
Alternatively, we can configure the TFTP server to start automatically during boot.
sudo systemctl enable tftpd-hpa
It’s important to recognize that the TFTP protocol lacks authentication and security features. Consequently, it is advisable for the remote server to implement access control measures or a firewall. These access restrictions are specific to the server and should be configured based on individual requirements.
Step 2: Configure TFTP Server on Ubuntu
Once the installation is complete, you need to configure the TFTP server’s mail main configuration file located at /etc/default/tftpd-hpa.
Open this file with your favorite text editor or use the following command.
sudo nano /etc/default/tftpd-hpa
In the editor, modify the values of TFTP_DIRECTORY and TFTP_ADDRESS by editing them and making sure they look like the following.
TFTP_USERNAME="tftp"
TFTP_DIRECTORY="/var/lib/tftpboot"
TFTP_ADDRESS="0.0.0.0:69"
TFTP_OPTIONS="--secure"
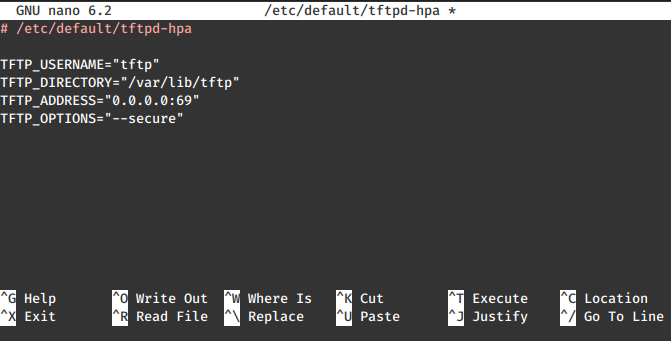
The default configuration file includes the following settings:
- TFTP_USERNAME: Indicates the user utilized by TFTP for execution.
- TFTP_DIRECTORY: Initially set to /srv/tftp, it is advisable to customize this location. In this guide, we’ll use /var/lib/tftpboot.
- TFTP_ADDRESS: Initially set as ‘:69‘, we’ve modified it to 0.0.0.0:69. The preceding zeros indicate that the server accepts connections from any client on port 69.
- TFTP_OPTIONS: Permits the specification of particular parameters for the TFTP server. In this instance, we’ve set it to ‘secure‘.
The TFTP_OPTIONS uses various aspects of the TFTP server’s behavior, including timeout, security settings, block size, transfer size limits, and other parameters related to file transfer operations.
The -s (--secure) flag is used here, and other possible flags include -c (--create), -a (--address), -u (--user), etc. Not specifying the -c flag disallows any connected client from uploading new items to the server.
Step 3: Create TFTP Directory in Ubuntu
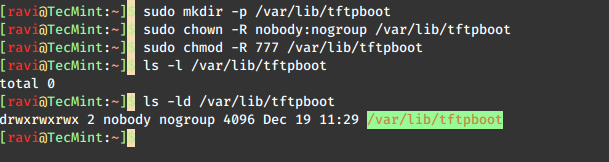
Once the configuration is complete, create a shared directory and set the required permissions that allow users to access it.
sudo mkdir -p /var/lib/tftpboot
sudo chown -R nobody:nogroup /var/lib/tftpboot
sudo chmod -R 777 /var/lib/tftpboot
These commands set the ownership to the TFTP server’s default user and group (nobody:nogroup) and allow full read and write access.
After making these changes, restart the TFTP server for the configuration to take effect.
sudo systemctl restart tftpd-hpa
Step 4: Test TFTP Server
To test the TFTP server, you can install a commonly used TFTP client called tftp-hpa on your local computer.
sudo apt install tftp-hpa
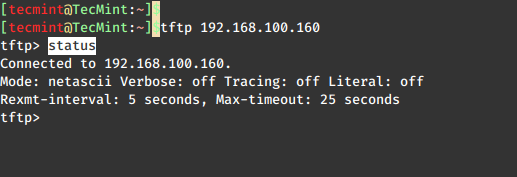
Then, use the tftp command to connect to the server.
tftp 192.168.100.160
If the tftp connection is successful, we’ll see a tftp prompt, where you can check the status of the connection.
tftp> status
To download a file from the tftp server use the get command as shown.
tftp> get tecmint.info
To upload a file to the tftp server use the put command as shown.
tftp> put tecmint.txt
Conclusion
Setting up a TFTP server on Ubuntu is a straightforward process. By following these steps, you can quickly have a TFTP server ready for file transfers within your network.
Remember to consider security aspects, especially if the TFTP server is accessible from untrusted networks, as TFTP itself does not provide encryption or authentication mechanisms.


Unencrypted protocols are dangerous. The risk is mentioned very shortly at the end, but that is not enough in my opinion. There should be a very strong warning badge. This protocol is only a lost resort when no other option is available and should only be scheduled as long as they are needed in a trusted LAN – if at all.
@Sebastian,
I appreciate your concern about unencrypted protocols. It’s crucial to prioritize security. Your suggestion of a strong warning badge and limiting use to trusted LANs aligns with best practices.
Security should be a top priority when selecting a protocol.