Hello folks. First of all, my apologies for the delay of the last part of this cluster series. Let’s get on to work without getting any more delayed.
As we many of you have completed all three previous parts, I will brief you what we have completed so far. Now we already have enough knowledge to install and configure cluster packages for two nodes and enable fencing and failover in a clustered environment.

You can refer my previous parts if you don’t remember since it took a little longer to post the last part.
Introduction to Linux Clustering and Advantages/Disadvanges of Clustering – Part 1
How to Install and Configure Cluster with Two Nodes in Linux – Part 2
Fencing and Adding a Failover to Clustering – Part 3
We will start by adding resources to the cluster. In this case we can add a file system or a web service as your need. Now I have /dev/sda3 partition mounted to /x01 which I wish to add as a file system resource.
1. I use below command to add a file system as a resource:
# ccs -h 172.16.1.250 --addresource fs name=my_fs device=/dev/mapper/tecminttest_lv_vol01 mountpoint=/x01 fstype=ext3

Additionally, if you want to add a service also, you can by using below methodology. Issue the following command.
# ccs -h 172.16.1.250 --addservice my_web domain=testdomain recovery=relocate autostart=1
You can verify it by viewing the cluster.conf file as we did in previous lessons.
2. Now enter following entry in cluster.conf file to add a reference tag to the service.
<fs ref="my_fs"/>

3. All set. No we will see how we can sync the configurations we made to cluster among the 2 nodes we have. Following command will do the needful.
# ccs -h 172.16.1.250 --sync --activate
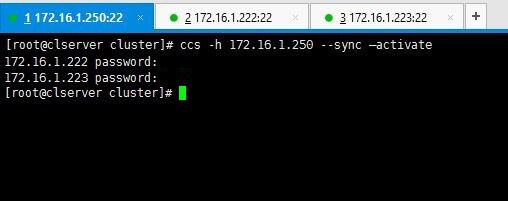
Note: Enter passwords we set for ricci in the early stages when we were installing packages.
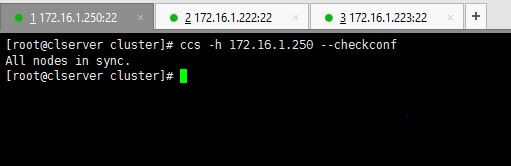
You can verify your configurations by using below command.
# ccs -h 172.16.1.250 --checkconf
4. Now it’s time to start the things up. You can use one of below commands as you prefer.
To start only one node use the command with relevant IP.
# ccs -h 172.16.1.222 start
Or if you want to start all nodes use --startall option as follows.
# ccs -h 172.16.1.250 –startall
You can use stop or --stopall if you needed to stop the cluster.
In a scenario like if you wanted to start the cluster without enabling the resources (resources will automatically be enabled when the cluster is started), like a situation where you have intentionally disabled the resources in a particular node in order to disable fencing loops, you don’t want to enable those resources when the cluster is starting.
For that purpose you can use below command which starts the cluster but does not enable the resources.
# ccs -h 172.16.1.250 --startall --noenable
5. After the cluster has been started up, you can view the stats by issuing clustat command.
# clustat

Above output says there are two nodes in the cluster and both are up and running at the moment.
6. You can remember we have added a failover mechanism in our previous lessons. Want to check it works? This is how you do it. Force shutdown one node and look for cluster stats using clustat command for the results of failover.
I have shut down my node02server(172.16.1.223) using shutdown -h now command. Then executed clustat command from my cluster_server(172.16.1.250).
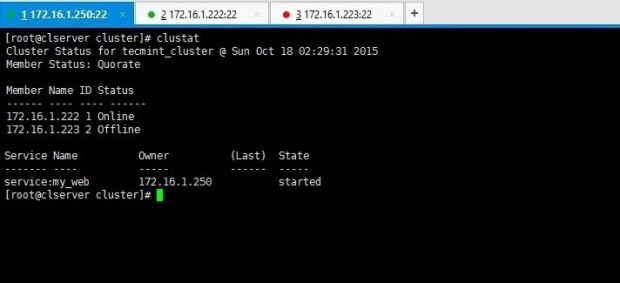
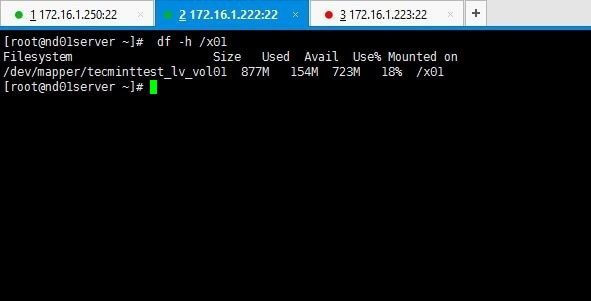
Above output clarifies you that node 1 is online while node 2 has gone offline as we shut it down. Yet service and the file system we shared are still online as you can see if you check it on node01 which is online.
# df -h /x01
Refer the cluster.conf file with whole config set relevant to our setup used for tecmint.
<?xml version="1.0"?>
<cluster config_version="15" name="tecmint_cluster">
        <fence_daemon post_join_delay="10"/>
        <clusternodes>
                <clusternode name="172.16.1.222" nodeid="1">
                        <fence>
                                <method name="Method01">
                                        <device name="tecmintfence"/>
                                </method>
                        </fence>
                </clusternode>
                <clusternode name="172.16.1.223" nodeid="2">
                        <fence>
                                <method name="Method01">
                                        <device name="tecmintfence"/>
                                </method>
                        </fence>
                </clusternode>
        </clusternodes>
        <cman/>
        <fencedevices>
                <fencedevice agent="fence_virt" name="tecmintfence"/>
        </fencedevices>
        <rm>
                <failoverdomains>
                        <failoverdomain name="tecmintfod" nofailback="0" ordered="1" restricted="0">
                                <failoverdomainnode name="172.16.1.222" priority="1"/>
                                <failoverdomainnode name="172.16.1.223" priority="2"/>
                        </failoverdomain>
                </failoverdomains>
                <resources>
                        <fs device="/dev/mapper/tecminttest_lv_vol01" fstype="ext3" mountpoint="/x01" name="my_fs"/>
                </resources>
                <service autostart="1" domain="testdomain" name="my_web" recovery="relocate"/>
                <fs ref="my_fs"/>
       </rm>
</cluster>
Hope you’ll enjoyed the whole series of clustering lessons. Keep in touch with tecmint for more handy guides everyday and feel free to comment your ideas and queries.


There are many things that don’t make sense.
The LVM that’s added, is that a shared storage between all nodes or is it local to cluster server?
If that is a local storage, what happens when the cluster server goes down. The data that’s on LVM which local to cluster server gets replicated across all nodes. If so to which location on member nodes?
Dear Brother,
Interesting lesson, I got a validation error in “ccs -h 172.16.1.250 –addresource fs name=my_fs device=/dev/mapper/tecminttest_lv_vol01 mountpoint=/x01 fstype=ext3” this part below commend I have tried “ccs -h 192.168.1.87 –addresource fs name=my_fs device=/dev/sda4 mountpoint=/test fstype=ext4” kindly need a advice the session.
Thanks
Parthiban
Hello interesting documentation friend I’m lost in this part.
ccs -h 172.16.1.250 –addresource fs name = my_fs device = / dev / mapper / tecminttest_lv_vol01 mountpoint = / x01 fstype = ext3
my question is the following one, is to know if you already have created this file system /dev/mapper/tecminttest_lv_vol01 and create it and then mount it.
Following the step 3 and ran “ccs -h 172.16.1.250 –sync –activate” but showing the error with “unable to connect to 172.16.1.222, make sure the ricci server is started”.
Then, I ran “service ricci status” for all three servers that showing “ricci (pid 1863) is running“….no idea what to do next. Please advice.
HI Thank you for your sharing about cluster.
I just got error that when I type
then make sure the ricci server is started
please help I am just newbie
Hello,
I have completed configuration till part 3.
Non cluster: 192.168.5.2
2 nodes: 192.168.5.3, 192.168.5.7
While firing this command.
It gives error: Unable to connect to 192.168.5.7, make sure the ricci server is started.
However, ricci is running on all 3 servers.
Please help me out asap.
Make sure you stopped iptables on both nodes. If you need that to be run, then add the necessary rules.
Using 3 virtual machines setup as mentioned and following the entire configuration, everything went smooth and my nodes also got successfully synced except when i tried
and it returned
SETUP DETAILS:
If remove the tag in cluster.conf file I can able to start cluster and the nodes are online but the shared drive is not showing in both of the nodes.
If I add a tag to the cluster.conf file I am getting the error message as “Validation Failure, unable to modify configuration file (use -i to ignore this error)“
I have run the command:
# ccs -h 192.168.1.122 --addresource fs name=my_fs device=/dev/mapper/vg_clusterserver-lv_home mountpoint=/home fstype=ext4
Error:
Validation Failure, unable to modify configuration file (use -i to ignore this error).
Please give the solution?
Karuppasamy,
Note, in the case this can be due to lack of permission to the config file. Please check the permissions.
Request to post something on Pacemaker cluster also this was very nice :)
Anish,
Will try my best to do onw.
Thanx
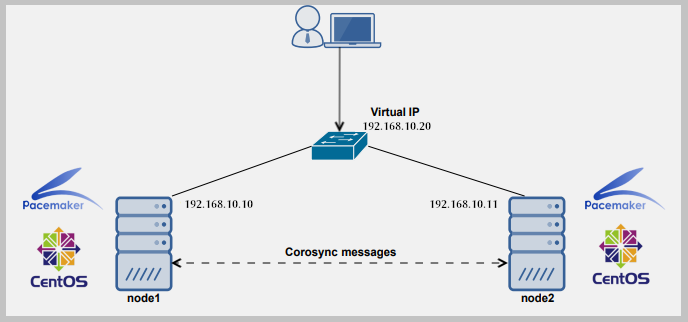
What happens when the Cluster Server dies? Isn’t that like a single point of failure?
Yes this point failure is applicable for any clustered or fail over environment. We can failover the failover env, but it is stupid since we can ask the same question again infinity times
Hello,
I’ve completed all 3 parts successfully on CentOS 6.3 32 bit OS, but can’t justify 4th Part. I am configuring apache in failover mode. Below is the error I am having since more than 2 hours.
# ccs -h 192.168.45.105 --addservice webservice1 domain=linuxboxfod recovery=relocate autostart=1
Validation Failure, unable to modify configuration file (use -i to ignore this error).
Could be due to a syntax error or DNS resolving issue.
Try to set passwd ricci for every node instead of just cluster node and also do not use the reference tag as mentioned () kindly do not try to add it.
I hope the issue will get resolved as mine.
Hi Thilina,
can you share your /etc/hosts file of your management node?
When i run the command clustat it shows only one node active.
My /etc/hosts is:
[root@master cluster]# cat /etc/hosts
127.0.0.1 localhost localhost.localdomain localhost4 localhost4.localdomain4
::1 localhost localhost.localdomain localhost6 localhost6.localdomain6
10.91.18.143 node1.uic.com node1.uic.com
10.91.18.144 node2.uic.com node1.uic.com
10.91.18.145 master.uic.com node1.uic.com
If i dont add node1.uic.com as alias for 144 & 145 then cman service doesnt start.
145 is my master node. Can you help me in this?
I’m sorry i’m not able to share my hosts file at the moment. But I guess you can check firewall rules, iptables and security enabling configs to make sure your nodes can talk to each other.
Very interesting series indeed, However there is a single point of failure: the cluster server.
How do you suggest to come over?
Yes this point failure is applicable for any clustered or fail over environment. We can failover the failover env, but it is stupid since we can ask the same question again infinity times.
During the add resource command I’m getting error like Validate failed. But I checked each and every syntax all are fine. Please give me a suggestion how to resolve the error used (ccs -h 192.168.1.9 –addresource fs name=my_fs device=/dev/sdb1 mountpoint=/cluster fstype=ext4)
@ Sandesh Hegde,
Did you find the solution?
could be due to a wrong syntax or wrongly configured volumes.
Hello,
First of all, great article.
I am having trouble in one step .. as soon as run “ccs -h manager.example.com –sync –activate”, I get the error “Cluster.conf file specified is not a valid cluster.conf file (use -i to ignore this error)”.
Any suggestion?
I tried everything again but this time all the things worked fine except for “clustat” command .. I got “Could not connect to CMAN: No such file or directory” .. Do I need to start cman on my cluster server ?
CMAN should be online as a mandatory fact.
Getting this error while starting cman at master:
service cman start
Starting cluster:
Checking if cluster has been disabled at boot… [ OK ]
Checking Network Manager… [ OK ]
Global setup… [ OK ]
Loading kernel modules… [ OK ]
Mounting configfs… [ OK ]
Starting cman… Cannot find node name in cluster.conf
Unable to get the configuration
Cannot find node name in cluster.conf
cman_tool: corosync daemon didn’t start Check cluster logs for details
[FAILED]
Stopping cluster:
Leaving fence domain… [ OK ]
Stopping gfs_controld… [ OK ]
Stopping dlm_controld… [ OK ]
Stopping fenced… [ OK ]
Stopping cman… [ OK ]
Unloading kernel modules… [ OK ]
Unmounting configfs… [ OK ]
Here is the sample Cluster.conf
Topology is Node 1 :node1.uic.com
Node2 :node2.uic.com
Master Server :master.uic.com.Iam running luci onmaster server and cman is running fine on node 1 and 2
Can master server resolve the node servers?
Make sure your firewall rules and security enabeling configurations are set in a way that nodes can talk to each other without issue.
how to take at luci interface please update sir
At a Web browser, place the URL of the luci server into the URL address box and click Go (or the equivalent). The URL syntax for the luci server is https://luci_server_hostname:8084. The first time you access luci, two SSL certificate dialog boxes are displayed. Upon acknowledging the dialog boxes, your Web browser displays the luci login page.
REF:https://access.redhat.com/documentation/en-US/Red_Hat_Enterprise_Linux/4/html/Cluster_Administration/s1-start-luci-ricci-conga-CA.html
Thanks a lot to shared your knowledge to us . I have learnt a real experience about cluster implementation, configuration setup.
Thanx Ramesh
I have configured all, but when i try to sync & proceed with next steps i get the below error for all commands
Cluster.conf file specified is not a valid cluster.conf file (use -i to ignore this error)
could anyone please help?
thanks in advance.
Vinay
After i added “ccs -f cluster.conf –addresource fs name=my_fs device=/dev/mapper/vg1-data_lv mountpoint=/x01 fstype=ext4” I don’t see it added in the cluster.conf file
also when i run sync i get below error
[root@practice cluster]# ccs -h 192.168.0.102 –sync –activate
Cluster.conf file specified is not a valid cluster.conf file (use -i to ignore this error)
Hi,
First of all, I would like to say thanks for providing this wonderful post.
But I got an error message when I was trying to get the status of cluster.
***************************************
[root@CM mapper]# clustat
-bash: clustat: command not found
****************************************
Hi Suraj,
This simply says that clustat command package is not installed properly. Try installing it using yum and try again. ;)
I am getting a following error
service cman restart
Stopping cluster:
Leaving fence domain… [ OK ]
Stopping gfs_controld… [ OK ]
Stopping dlm_controld… [ OK ]
Stopping fenced… [ OK ]
Stopping cman… [ OK ]
Unloading kernel modules… [ OK ]
Unmounting configfs… [ OK ]
Starting cluster:
Checking if cluster has been disabled at boot… [ OK ]
Checking Network Manager… [ OK ]
Global setup… [ OK ]
Loading kernel modules… [ OK ]
Mounting configfs… [ OK ]
Starting cman… Cannot find node name in cluster.conf
Unable to get the configuration
Cannot find node name in cluster.conf
cman_tool: corosync daemon didn’t start Check cluster logs for details
[FAILED]
Stopping cluster:
Leaving fence domain… [ OK ]
Stopping gfs_controld… [ OK ]
Stopping dlm_controld… [ OK ]
Stopping fenced… [ OK ]
Stopping cman… [ OK ]
Unloading kernel modules… [ OK ]
Unmounting configfs… [ OK ]
Rahul,
This is causing due to wrong configurations in conf file. Make sure your hostnames are resolving correctly. Are your nodes in different LANs? if so, make sure they can communicate between them without any issue. Further refer below URLs for more knowledge.
https://access.redhat.com/documentation/en-US/Red_Hat_Enterprise_Linux/6/html/Cluster_Administration/index.html
http://www.redhat.com/archives/linux-cluster/2012-January/msg00050.html
Hi, this is not working in my case, I am getting error
ccs -h hostip –checkconf
“Cluster.conf file specified is not a valid cluster.conf file (use -i to ignore this error)”
service cman start
Starting cman… Cannot find node name in cluster.conf
Unable to get the configuration
Cannot find node name in cluster.conf
cman_tool: corosync daemon didn’t start Check cluster logs for details
my file is exact replica of your cluster.conf file , please help
Shail,
Did you use IPs or hostnames in the conf? If used hostnames, can u check whether they are resolving correctly?
Does it sync each and every service eg httpd, mysqld etc running on node01 into node02 ??
Rahul,
Not each service, you’ ll have to define which services you need to be synced.
ccs -h 10.44.2.89 –addresource fs name=my_fs device=/dev/mapper/vgcluster-data mountpoint=/ex01 fstype=ext4
Validation Failure, unable to modify configuration file (use -i to ignore this error).
i’m getting above error . pls help selinux and iptables are disbled
Wonderfully article is it possible to implement in ubuntu server 14.04 if yes please let me know the link
Hi anil,
Actually I didn’t use this in an Ubuntu environment. Theoretically it should work though. I’ll update you if I had a chace to try.
ccs -h 10.44.2.89 –addresource fs name=my_fs device=/dev/mapper/vgcluster-data mountpoint=/ex01 fstype=ext4
Validation Failure, unable to modify configuration file (use -i to ignore this error).
i’m getting above error . pls help
Hi Shamal,
Did you check your SELinux and iptables? make SELinux Disabled and iptables stopped or flushed.
SELinux and iptables disabled, But still I have the same error.
Hi Shamal,
Could you try with ”
ccs -f cluster.conf –addresource lvm ……” option and let me know.
Hi, It is a useful post. how the ip address will sync if one node down, if i have a web server.
Hi Sundar,
That’ why we have setup a failover in the begining in case of one node becoming inactive. And since the webservice is synced across the both nodes, webservice won’t be down even if one node becomes down.
Hi Thilina,
Very nice article, it would be somewhat better and easier for beginners if you choose luci web interface for configuring cluster instead of using this command line. Any how you did a great job.
Thanx Raghu