An IDE (Integrated Development Environment) is simply software that offers much-needed programming facilities and components in a single program, to maximize programmer productivity. IDEs put forward a single program in which all development can be done, enabling a programmer to write, modify, compile, deploy and debug programs.
In this article, we will describe how to install and configure the Vim editor as a Bash-IDE using the bash-support vim plug-in.
What is bash-support.vim plug-in?
bash-support is a highly-customizable vim plug-in, which allows you to insert: file headers, complete statements, comments, functions, and code snippets. It also enables you to perform syntax checking, make a script executable, start a debugger simply with a keystroke; do all this without closing the editor.
It generally makes bash scripting fun and enjoyable through organized and consistent writing/insertion of file content using shortcut keys (mappings).
The current version plug-in is 4.3, version 4.0 was a rewriting of version 3.12.1; version 4.0 or better, are based on a comprehensively new and more powerful template system, with changed template syntax unlike previous versions.
How To Install Bash-support Plug-in in Linux
Start by downloading the latest version of bash-support plug-in using the command below:
$ cd Downloads
$ curl http://www.vim.org/scripts/download_script.php?src_id=24452 >bash-support.zip
Then install it as follows; create the .vim directory in your home folder (in case it doesn’t exist), move into it, and extract the contents of bash-support.zip there:
$ mkdir ~/.vim
$ cd .vim
$ unzip ~/Downloads/bash-support.zip
Next, activate it from the .vimrc file:
$ vi ~/.vimrc
By inserting the line below:
filetype plugin on
set number   #optionally add this to show line numbers in vim
How To Use Bash-support plug-in with Vim Editor
To simplify its usage, the frequently used constructs, as well as certain operations, can be inserted/performed with key mappings respectively. The mappings are described in ~/.vim/doc/bashsupport.txt and ~/.vim/bash-support/doc/bash-hotkeys.pdf or ~/.vim/bash-support/doc/bash-hotkeys.tex files.
Important:
- All mappings (
(\)+charater(s)combination) are filetype specific: they are only working with ‘sh’ files, in order to avoid conflicts with mappings from other plug-ins. - Typing speed matters-when using key mapping, the combination of a leader
('\')and the following character(s) will only be recognized for a short time (possibly less than 3 seconds – based on assumption).
Below are certain remarkable features of this plug-in that we will explain and learn how to use:
How To Generate an Automatic Header for New Scripts
Look at the sample header below, to have this header created automatically in all your new bash scripts, follow the steps below.

Start by setting your personal details (author name, author reference, organization, company, etc). Use the map \ntw inside a Bash buffer (open a test script like the one below) to start the template setup wizard.
Select option (1) to set up the personalization file, then press [Enter].
$ vi test.sh

Afterward, hit [Enter] again. Then select option (1) one more time to set the location of the personalization file and hit [Enter].

The wizard will copy the template file .vim/bash-support/rc/personal.templates to .vim/templates/personal.templates and open it for editing, where you can insert your details.
Press i to insert the appropriate values within the single quotes as shown in the screenshot.

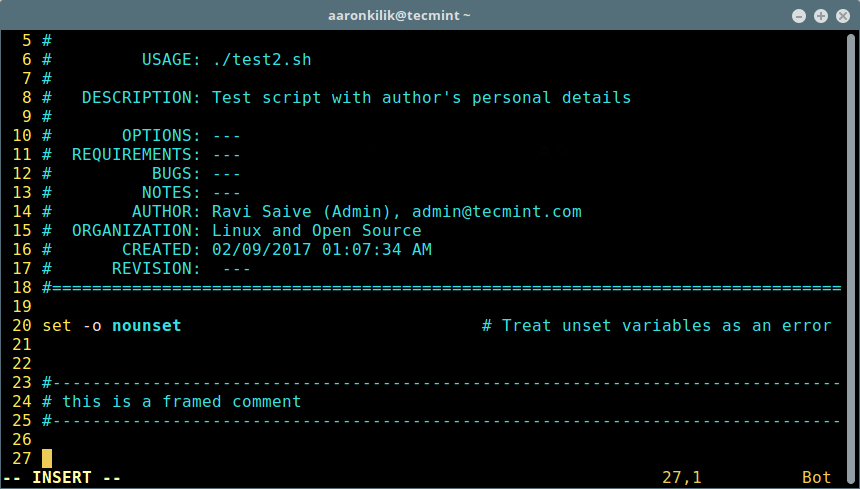
Once you have set the correct values, type :wq to save and exit the file. Close the Bash test script, open another script to check the new configuration. The file header should now have your personal details similar to that in the screenshot below:
$ test2.sh

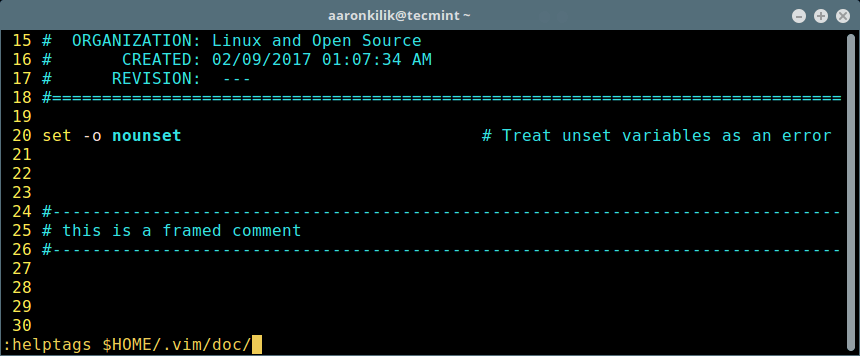
Make Bash-support Plug-in Help Accessible
To do this, type the command below on the Vim command line and press [Enter], it will create a file .vim/doc/tags:
:helptags $HOME/.vim/doc/
How To Insert Comments in Shell Scripts
To insert a framed comment, type \cfr in normal mode:
How To Insert Statements in a Shell Script
The following are key mappings for inserting statements (n – normal mode, i – insert mode):
\sc– case in … esac (n, I)\sei– elif then (n, I)\sf– for in do done (n, i, v)\sfo– for ((…)) do done (n, i, v)\si– if then fi (n, i, v)\sie– if then else fi (n, i, v)\ss– select in do done (n, i, v)\su– until do done (n, i, v)\sw– while do done (n, i, v)\sfu– function (n, i, v)\se– echo -e “…” (n, i, v)\sp– printf “…” (n, i, v)\sa– array element, ${.[.]} (n, i, v) and many more array features.
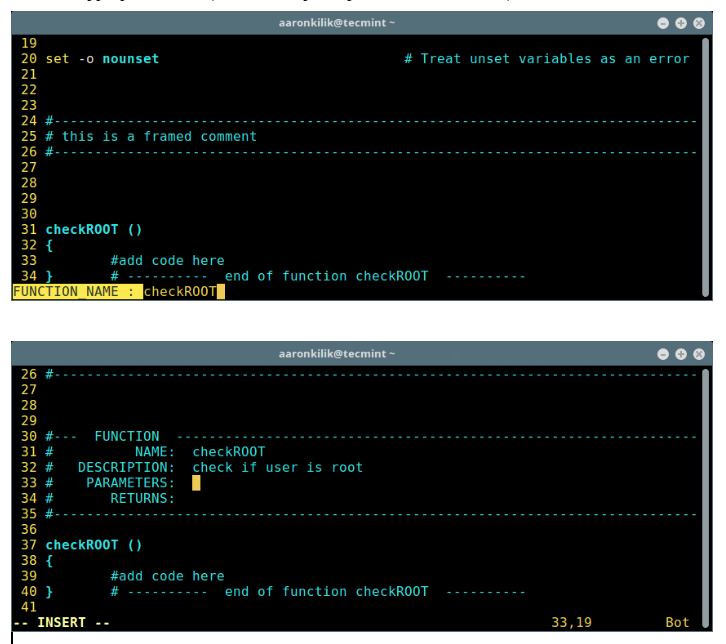
Insert a Function and Function Header
Type \sfu to add a new empty function, then add the function name and press [Enter] to create it. Afterward, add your function code.

To create a header for the function above, type \cfu, enter the name of the function, click [Enter], and fill in the appropriate values (name, description, parameters, and returns):
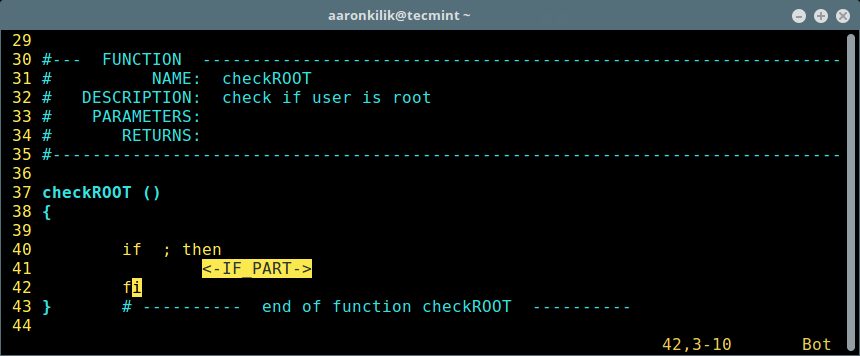
More Examples of Adding Bash Statements
Below is an example showing insertion of an if statement using \si:
Next example shows addition of an echo statement using \se:

How To Use Run Operation in Vi Editor
The following is a list of some run operations key mappings:
\rr– update file, run script (n, I)\ra– set script cmd line arguments (n, I)\rc– update file, check syntax (n, I)\rco– syntax check options (n, I)\rd– start the debugger (n, I)\re– make script executable/not exec.(*) (in)
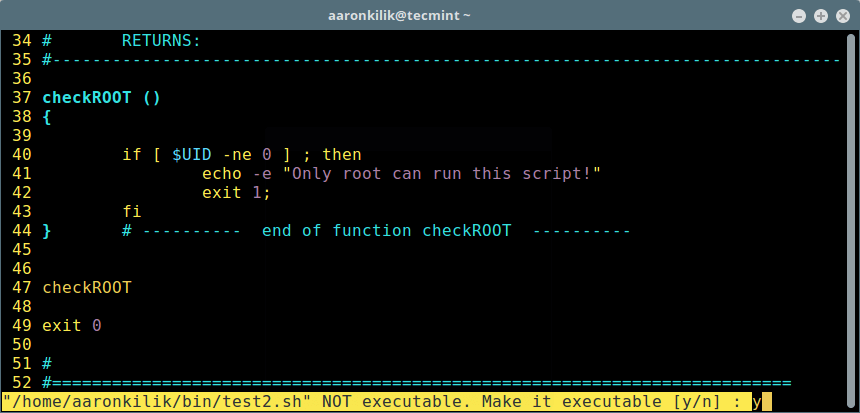
Make Script Executable
After writing the script, save it and type \re to make it executable by pressing [Enter].
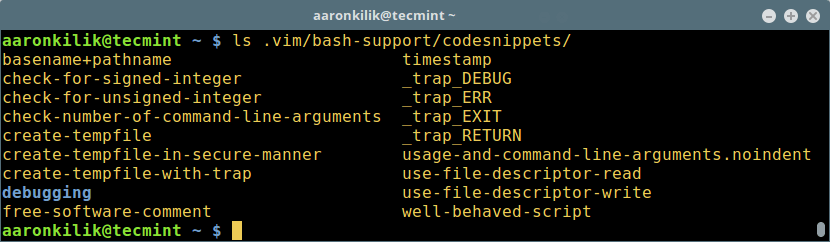
How To Use Predefined Code Snippets To a Bash Script
Predefined code snippets are files that contain already written code meant for a specific purpose. To add code snippets, type \nr and \nw to read/write predefined code snippets. Issue the command that follows to list default code snippets:
$ .vim/bash-support/codesnippets/
To use a code snippet such as free-software-comment, type \nr and use the auto-completion feature to select its name, and press [Enter]:

Create Custom Predefined Code Snippets
It is possible to write your own code snippets under ~/.vim/bash-support/codesnippets/. Importantly, you can also create your own code snippets from normal script code:
- choose the section of code that you want to use as a code snippet, then press
\nw, and closely give it a filename. - to read it, type
\nrand use the filename to add your custom code snippet.
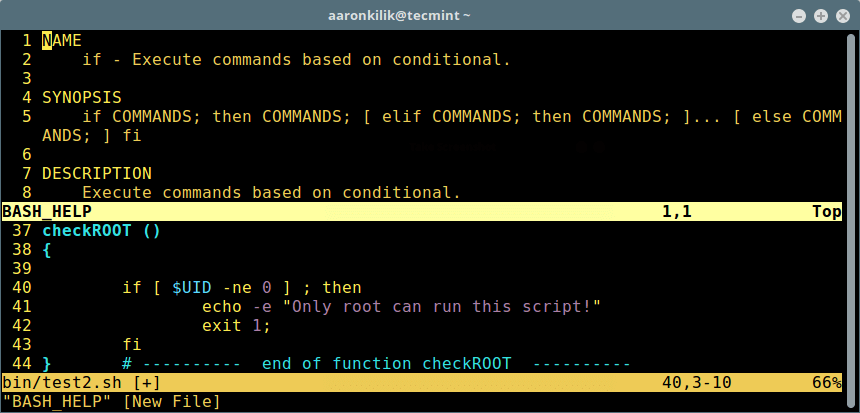
View Help For the Built-in and Command Under the Cursor
To display help, in normal mode, type:
\hh– for built-in help\hm– for a command help
For more reference, read through the file :
~/.vim/doc/bashsupport.txt  #copy of online documentation
~/.vim/doc/tags
Visit the Bash-support plug-in Github repository: https://github.com/WolfgangMehner/bash-support
Visit Bash-support plug-in on the Vim Website: http://www.vim.org/scripts/script.php?script_id=365
That’s all for now, in this article, we described the steps of installing and configuring Vim as a Bash-IDE in Linux using bash-support plug-in. Check out the other exciting features of this plug-in, and do share them with us in the comments.


You’ve got a typo:
`filetype plug-in on` should be `filetype plugin on`.
Great article thank you. One question – how does one add more options like ‘set nounset’ to be added automatically?
@John
Welcome, simply add them in the ~/.vimrc file.
Unless you mean Bash options. You can edit the template files, or overwrite the stock templates in a template customization file (which can be set up via the wizard as well).
Have a look at the documentation: https://github.com/WolfgangMehner/bash-support/blob/master/doc/bashsupport.txt#L1007
PS. @Aaron, thanks for the nice review.
@Wolfgang M
Welcome, and many thanks for the heads plus the useful information you have shared here. We will surely look through it in-depth and answer any future queries.
Again, thanks for developing and maintaining this remarkable plugin.