WireGuard is a modern, secure, cross-platform and general-purpose VPN implementation that uses state-of-the-art cryptography. It aims to be speedy, simpler, leaner and more functional than IPsec and it intends to be more performant than OpenVPN.
It is designed for use in various circumstances and can be deployed on embedded interfaces, fully loaded backbone routers, and supercomputers alike; and runs on Linux, Windows, macOS, BSD, iOS, and Android operating systems.
Recommended Read: 13 Best VPN Services with Lifetime Subscription
It presents an extremely basic yet powerful interface that aims to be simple, as easy to configure and deploy as SSH. Its key features include a simple network interface, crypto key routing, built-in roaming and container support.
Note that at the time of writing, it is under heavy development: some of its parts are working toward a stable 1.0 release, while others are already there (working fine).
In this article, you will learn how to install and configure WireGuard in Linux to create a VPN tunnel between two Linux hosts.
Testing Environment
For this guide, our setup (hostname and public IP) is as follows:
Node 1 : tecmint-appserver1: 		10.20.20.4
Node 2 : tecmint-dbserver1: 		10.20.20.3
How to Install WireGuard in Linux Distributions
Log into your both nodes and install WireGuard using the following appropriate command for your Linux distributions as follows.
Install WireGuard in RHEL 8
$ sudo yum install https://dl.fedoraproject.org/pub/epel/epel-release-latest-8.noarch.rpm
$ sudo subscription-manager repos --enable codeready-builder-for-rhel-8-$(arch)-rpms
$ sudo yum copr enable jdoss/wireguard
$ sudo yum install wireguard-dkms wireguard-tools
Install WireGuard in CentOS 8
$ sudo yum install epel-release
$ sudo yum config-manager --set-enabled PowerTools
$ sudo yum copr enable jdoss/wireguard
$ sudo yum install wireguard-dkms wireguard-tools
Install WireGuard in RHEL/CentOS 7
$ sudo yum install https://dl.fedoraproject.org/pub/epel/epel-release-latest-7.noarch.rpm
$ sudo curl -o /etc/yum.repos.d/jdoss-wireguard-epel-7.repo https://copr.fedorainfracloud.org/coprs/jdoss/wireguard/repo/epel-7/jdoss-wireguard-epel-7.repo
$ sudo yum install wireguard-dkms wireguard-tools
Install WireGuard in Fedora
$ sudo dnf install wireguard-tools
Install WireGuard in Debian
# echo "deb http://deb.debian.org/debian/ unstable main" > /etc/apt/sources.list.d/unstable.list
# printf 'Package: *\nPin: release a=unstable\nPin-Priority: 90\n' > /etc/apt/preferences.d/limit-unstable
# apt update
# apt install wireguard
Install WireGuard in Ubuntu
$ sudo add-apt-repository ppa:wireguard/wireguard
$ sudo apt-get update
$ sudo apt-get install wireguard
Install WireGuard in OpenSUSE
$ sudo zypper addrepo -f obs://network:vpn:wireguard wireguard
$ sudo zypper install wireguard-kmp-default wireguard-tools
Configuring a WireGuard VPN Tunnel Between Two Linux Hosts
When the installation of wireguard is complete on both nodes, you can reboot your nodes or add the wireguard module from the Linux kernel using the following command on both nodes.
$ sudo modprobe wireguard
OR
# modprobe wireguard
Next, generate base64-encoded public and private keys using the wg utility on both nodes as shown.
---------- On Node 1 ----------
$ umask 077
$ wg genkey >private_appserver1

---------- On Node 2 ----------
$ umask 077
$ wg genkey >private_dbserver1
$ wg pubkey < private_dbserver1

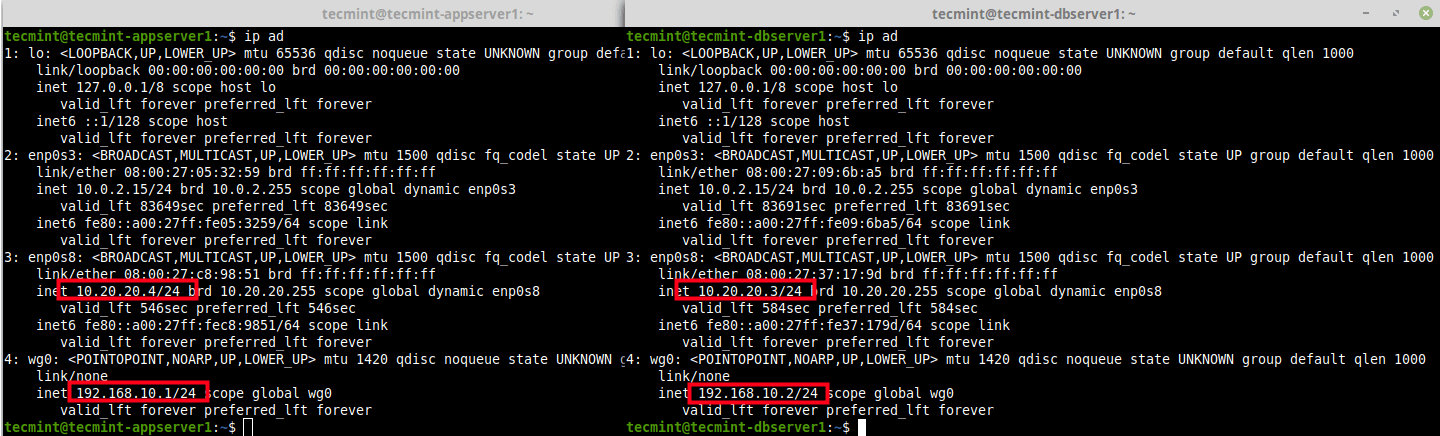
Next, you need to create a network interface (e.g wg0) for wiregaurd on the peers as shown below. Then assign IP addresses to the new network interface created (for this guide, we will use the network 192.168.10.0/24).
---------- On Node 1 ----------
$ sudo ip link add dev wg0 type wireguard
$ sudo ip addr add 192.168.10.1/24 dev wg0

---------- On Node 2 ----------
$ sudo ip link add dev wg0 type wireguard
$ sudo ip addr add 192.168.10.2/24 dev wg0
To view the attached network interfaces on the peers and their IP addresses, use the following IP command.
$ ip ad
Next, assign the private key for each peer to the wg0 network interface and bring up the interface as shown.
---------- On Node 1 ----------
$ sudo wg set wg0 private-key ./private_appserver1
$ sudo ip link set wg0 up

---------- On Node 2 ----------
$ sudo wg set wg0 private-key ./private_dbserver1
$ sudo ip link set wg0 up
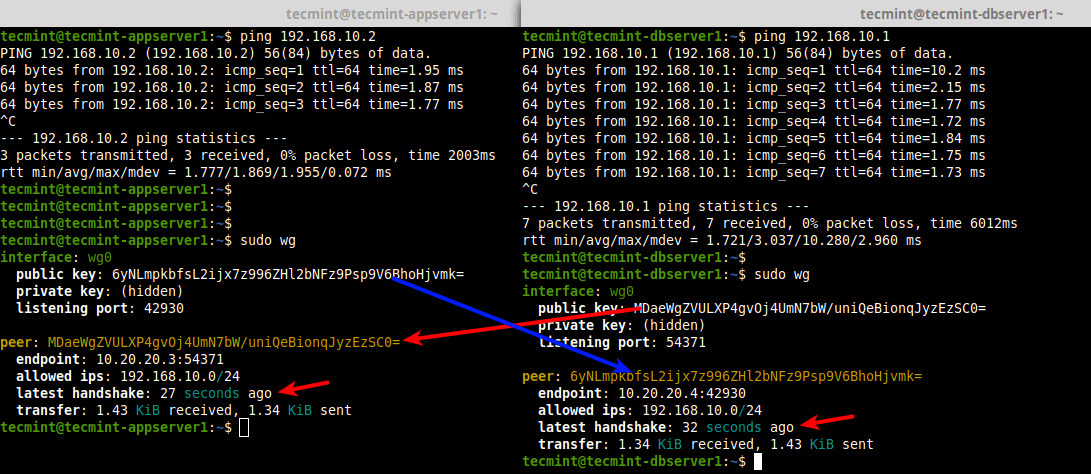
Now that both links are up each with private keys associated with them, run the wg utility without any arguments to retrieve the configuration of WireGuard interfaces on the peers. Then create your wireguard VPN tunnel as follows.
The peer (public key), allowed-ips (network/subnet mask) and endpoint (public ip:port) are of the opposite peer.
----------  On Node1 (Use the IPs and Public Key of Node 2) ----------
$ sudo wg
$ sudo wg set wg0 peer MDaeWgZVULXP4gvOj4UmN7bW/uniQeBionqJyzEzSC0= allowed-ips 192.168.10.0/24  endpoint  10.20.20.3:54371

----------  On Node2 (Use the IPs and Public Key of Node 1) ----------
$ sudo wg
$ sudo wg set wg0 peer 6yNLmpkbfsL2ijx7z996ZHl2bNFz9Psp9V6BhoHjvmk= allowed-ips 192.168.10.0/24 endpoint  10.20.20.4:42930

Testing WireGuard VPN Tunnel Between Linux Systems
Once the wireguard VPN tunnel has been created, ping the opposite peer using the address of the wireguard network interface. Then run the wg utility once again to confirm a handshake between the peers as shown.
---------- On Node 1 ----------
$ ping 192.168.10.2
$ sudo wg

---------- On Node 2 ----------
$ ping 192.168.10.1
$ sudo wg
That’s it for now! WireGuard is a modern, secure, simple yet powerful and easy-to-configure VPN solution for the future. It is undergoing heavy development thus work in progress. You can get more information especially about its internal inner workings and other configuration options from the WireGuard homepage.


This doesn’t work anymore for Red Hat 8.
modprobe: FATAL: Module wireguard not found in directory /lib/modules/4.18.0-425.19.2.el8_7.x86_64
Hi,
I want to download wireguard-dkms and wireguard-tools rpm packages.
When can I get this?
Hi
I set up a pivpn (using wireguard) server (rpi4) at home for all of my devices when I’m out for a while
its work flawlessly, and like any tunnel, I can access anything that is in my home network (for example some local address IP running an http server) except from my ….computer under Linux mint 20
I tried with my smartphone, there is no problem accessing for example 192.168.1.50:8089 through the VPN, but I can’t access it from my Linux mint computer (I’m obliged to use ddns name)
I can conclude it comes only from the computer, have you any idea about solving that problem?