One of the most common reasons to set up a Linux system is for the purposes of hosting a website(s). According to NetCraft.com’s February 2016 survey of the 1 million busiest websites in the world, roughly 15.60% of them run on Nginx.
Paired with the high likely-hood that there is some sort of dynamic content being served as well as some sort of database back-end for the websites, the ability for an administrator to be able to setup LEMP servers is very beneficial to job seekers and employers a-like!
This tutorial will walk through the basics of installing and configuring a Linux server (specifically Debian 8 Jessie) to function as a LEMP server.
What is LEMP Server?
Great question! As with most things in the computing world LEMP is acronym for Linux, Nginx, MySQL and PHP.
This acronym is commonly used to reference software collections on a web server. This tutorial will first walk through setting up LEMP, specifically MySQL and PHP.
Before separating into the configuration aspects of the systems, it is important to know about Nginx.
What is Nginx?
Nginx began its life in 2002 when the computing world began to realize that websites with ten thousand or more concurrent connections was a very real possibility and as a result Nginx was created from scratch to address this issue.
Installing and Configuring a MySQL and PHP
1. This first section will cover Debian as a MySQL, and PHP server. The Linux part of the LEMP server should already be done by installing Debian! However, should there be a need for a guide on how to install Debian, please read the following article on TecMint:
Once Debian is ready to go the process of installing the rest of the necessary software can be completed with one quick command using the ‘apt‘ meta-packager.
# apt-get install mysql-server-5.5 php5-mysql php5
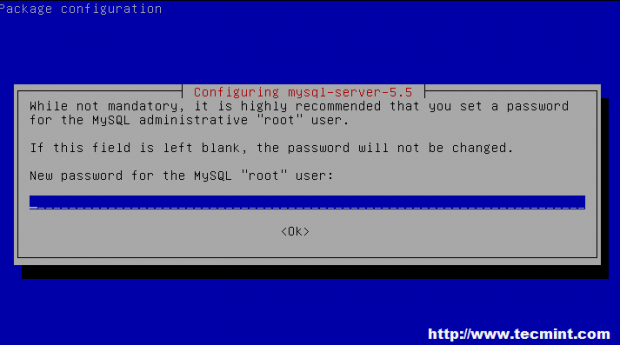
Depending on the system hardware and the Internet connection, this process could take some time. As of this writing, a fresh Debian Jessie install with all updates applied required about 70MB of archives from the repositories (not all that bad considering what the server will be doing when things are done)! During the installation process, the system may prompt for the user to set a SQL root user password. This is different than the actual root user’s password and for security’s sake, should probably remain different.
2. Once apt finishes installing all of the software, the basic services will be up and running. However, stopping here would make for a very short tutorial! So let’s dive a little more into the configuration of each of the pieces of software installed starting with MySQL.
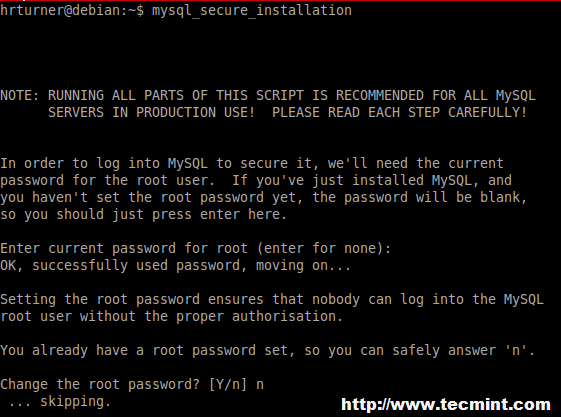
3. After MySQL installation, it is often recommended that the SQL server have some basic house keeping done on the default install. This is easily accomplished with the mysql_secure_installation utility.
This command is simply run from the command line and will prompt the user to remove things such as anonymous users, test databases, and remove the ability for remote root user login to the SQL database.
# mysql_secure_installation
This command will start an interactive prompt that will ask questions regarding the above topics. Since apt already prompted for a MySQL root password, that password will need to be entered in order to make any changes. Since the root password was already set, No can be the answer to the prompt about changing the root password on the MySQL server.
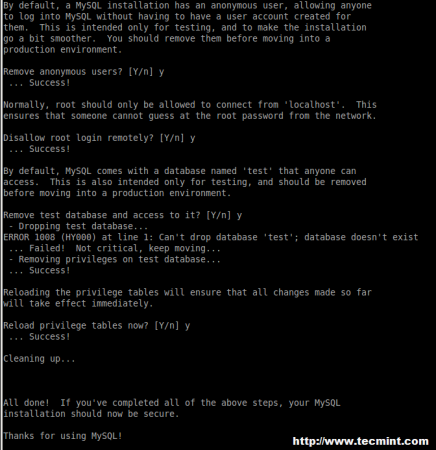
4. The next set of questions will be in regards to anonymous users, the ‘test‘ database, and root access to the database remotely. It is typically safe to answer Yes to all of these prompts unless there is a particular reason why the setup would need one of these options left intact.
NOTE: There may be an error about failure to delete a database called ‘test‘, do not worry about this as the database may or may not exist and regardless the script will continue to do what is needed.
At this point MySQL is ready to go. Without knowing what databases or users will be needed, it is difficult to do much more configuration. However, most websites will often auto-create the necessary databases and users when the software is installed. This is very software dependent though and would require a quick glance over the software’s README files or installation instructions.
5. Now that MySQL is configured, let’s go forward and setup some basic PHP settings for this particular server. While there are tons of settings that can be manipulated for PHP there are only a few basic ones that almost always should be modified. The php configuration file is located at /etc/php5/fpm/php.ini. Open this file with any text editor.
# nano /etc/php5/fpm/php.ini
Using nano’s searching abilities ctrl+w search for the string “memory_limit” (omitting the quotes). On a default install this line will already be set to 128M but should an application need more, this line can be changed to accommodate the requirements.
Another important option to check is the “max_execution_time” and again by default it will be set to 30. Should an application require more this option can be changed. Some people prefer to also setup php logging to a special file/directory as well. Should this be a requirement, search for the string “error_log =” and then uncomment the line by removing the semi-colon that is generally there by default.
At this point a value for the log file can be added to the end of the line. Be sure that the path exists on the system. Once finished making any necessary changes to the php.ini file, save the changes and exit the text editor. At this point, MySQL and PHP5 are ready to start hosting sites. Now it is time to configure Nginx.
Installing and Configuring Nginx
6. Nginx (engine X) is an alternative and very powerful web server. This section of this tutorial will walk through setting up a web page for Nginx to host. The first step to configuring Nginx is to install the necessary packages using the ‘apt‘ utility.
# apt-get install nginx
Assuming all dependencies are satisfied, navigating to the server’s IP address in a web browser should yield the default Nginx website.
NOTE: There are instances where after installing Nginx, the server isn’t started automatically. If navigating to the server’s IP address in a web browser doesn’t yield the page below, issue the following command to ensure that Nginx is started.
# service nginx start

Nginx is now successfully hosting the default page. While the Debian default page is a flashy website, most users will want to host something custom.
7. The next steps will walk through setting up Nginx to host a different website. Nginx, much like Apache 2, has its own configurations directory located at /etc/nginx. Switch into this directory using the cd utility.
# cd /etc/nginx
For this tutorial there are several important files and directories for setting up a website using Nginx. The first two directories that are important are the ‘sites-available‘ and the ‘sites-enabled‘ directories. Much like Apache 2, Nginx uses configuration files for each site in the sites-available directory that when active are symbolically linked in the sites-enabled directory.
The first thing needed to get rid of the default site is to remove the symbolic link in sites-enabled.
# rm sites-enabled/default
8. Now a new site configuration file needs to be created and linked in order for Nginx to serve the page. Creating the site configuration file can be simplified by copying and modifying the default sites configuration.
# cp sites-available/default sites-available/tecmint-test
This will create a new site configuration file to work with. Open this file in a text editor to change the path that Nginx will serve files.
# nano sites-available tecmint-test
Within this file there are several important options to change in order for Nginx to serve a site. The first is the line that begins with ‘root‘ as this line defines where Nginx should serve files for this particular site.
This tutorial will leave it as the default of ‘/var/www/html‘ and simply place the html files to be served in this directory. However, be sure to modify this path if there is to be multiple sites or a custom configuration on this server.
The next line of importance is the ‘index‘ line. Since this article is about LEMP installation and a site could potentially be serving php pages, Nginx needs to be informed that the default page may be a php page. To do this, simply add ‘index.php‘ to the end of the index list of files.

Before enabling the new site, there needs to be something there for Nginx to serve. The default index page already exists but to confirm that another site is working, let’s replace the contents of the default page with something else.
# echo “It's ALIVE!” > /var/www/html/index.html
9. The next step is to enable the new site by linking the configuration file just created to the sites-enabled directory. This is easily accomplish with the use of the ln command and then reloading Nginx’s configuration with the service utility.
# ln -s /etc/nginx/sites-available/tecmint-test sites-enabled/tecmint-test
# service nginx reload
At this point Nginx should be serving the new ‘simple’ web page. This can be confirmed by navigating to the server’s IP address via a web browser!
Again, this article meant to be very simple configurations of LEMP. Most sites would require further configuration to all parts involved but the configuration options could range in the thousands! Best of luck in which ever setup chosen to host websites.