Creating VM Images
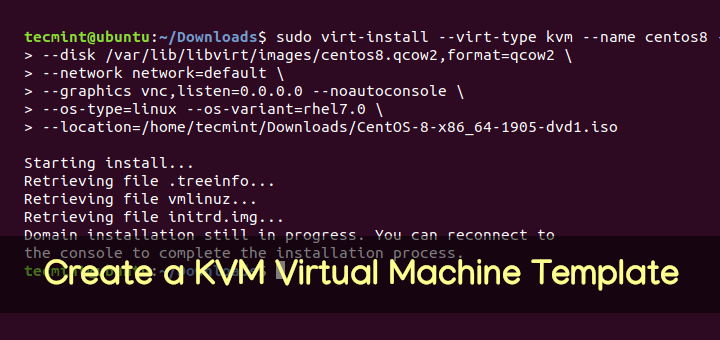
By default, VM images will be created to /var/lib/libvirt/images and you are strongly advised to not change this unless you really need to, know what you’re doing, and want to handle SELinux settings yourself (such topic is out of the scope of this tutorial but you can refer to Part 13 of the RHCSA series: Mandatory Access Control Essentials with SELinux if you want to refresh your memory).
This means that you need to make sure that you have allocated the necessary space in that filesystem to accommodate your virtual machines.
The following command will create a virtual machine named tecmint-virt01 with 1 virtual CPU, 1 GB (=1024 MB) of RAM, and 20 GB of disk space (represented by /var/lib/libvirt/images/tecmint-virt01.img) using the rhel-server-7.0-x86_64-dvd.iso image located inside /home/gacanepa/ISOs as installation media and the br0 as network bridge:
# virt-install \
--network bridge=br0
--name tecmint-virt01 \
--ram=1024 \
--vcpus=1 \
--disk path=/var/lib/libvirt/images/tecmint-virt01.img,size=20 \
--graphics none \
--cdrom /home/gacanepa/ISOs/rhel-server-7.0-x86_64-dvd.iso
--extra-args="console=tty0 console=ttyS0,115200"
If the installation file was located in a HTTP server instead of an image stored in your disk, you will have to replace the –cdrom flag with –location and indicate the address of the online repository.
As for the –graphics none option, it tells the installer to perform the installation in text-mode exclusively. You can omit that flag if you are using a GUI interface and a VNC window to access the main VM console. Finally, with –extra-args we are passing kernel boot parameters to the installer that set up a serial VM console.
The installation should now proceed as a regular (real) server now. If not, please review the steps listed above.
Managing Virtual Machines
These are some typical administration tasks that you, as a system administrator, will need to perform on your virtual machines. Note that all of the following commands need to be run from your host:
1. List all VMs:
# virsh list --all
From the output of the above command you will have to note the Id for the virtual machine (although it will also return its name and current status) because you will need it for most administration tasks related to a particular VM.
2. Display information about a guest:
# virsh dominfo [VM Id]
3. Start, restart, or stop a guest operating system:
# virsh start | reboot | shutdown [VM Id]
4. Access a VM’s serial console if networking is not available and no X server is running on the host:
# virsh console [VM Id]
Note that this will require that you add the serial console configuration information to the /etc/grub.conf file (refer to the argument passed to the –extra-args option when the VM was created).
5. Modify assigned memory or virtual CPUs:
First, shutdown the guest:
# virsh shutdown [VM Id]
Edit the VM configuration for RAM:
# virsh edit [VM Id]
Then modify
<memory>[Memory size here without brackets]</memory>
Restart the VM with the new settings:
# virsh create /etc/libvirt/qemu/tecmint-virt01.xml
Finally, change the memory dynamically:
# virsh setmem [VM Id] [Memory size here without brackets]
For CPU:
# virsh edit [VM Id]
Then modify
<cpu>[Number of CPUs here without brackets]</cpu>
For further commands and details, please refer to table 26.1 in Chapter 26 of the RHEL 5 Virtualization guide (that guide, though a bit old, includes an exhaustive list of virsh commands used for guest administration).
SUMMARY
In this article we have covered some basic aspects of virtualization with KVM in RHEL 7, which is both a vast and a fascinating topic, and I hope it will be helpful as a starting guide for you to later explore more advanced subjects found in the official RHEL virtualization getting started and deployment / administration guides.
In addition, you can refer to the preceding articles in this KVM series in order to clarify or expand some of the concepts explained here.


Is this available in PDF form at all?
@Johnson,
The whole RHCSA/RHCE series is available in PDF format as a ebook at $25 very soon, probably next week…
oh, cool. I’ll check back soon then. Thanks!
Thank you for the wonderful tutorials! When is part 16 etc going to be put on the website?
@Majid,
This was a 15-article series, so this is the last guide. Watch out for the coming RHCE series!
Once the VT/AMD-V bios settings are in place, it is never enough to just save and restart. For the features to become enabled, you need to power down the machine, and start it up again.