SSHGuard is an open-source daemon that shields hosts from brute-force attacks. It accomplishes this through monitoring and aggregation of system logs, detecting attacks, and blocking attackers using one of the Linux firewall backends: iptables, FirewallD, pf, and ipfw.
Initially designed to provide an extra layer of protection for the OpenSSH service, SSHGuard also protects a wide range of services such as Vsftpd and Postfix. It recognizes several log formats including Syslog, Syslog-ng, and raw log files.
[ You might also like: How to Secure and Harden OpenSSH Server ]
SSHGuard is quite similar to Fail2ban only that it is written in C (Fail2ban is written in Python), is lighter, and provides fewer features.
In this guide, we will demonstrate how you can install and configure SSHGuard to block SSH brute force attacks in your Linux server.
Step 1: Install SSHGuard on Linux
We start off with the installation of SSHGuard on Linux.
Install SSHGuard on Debian/Ubuntu
First, update the package lists and then install SSHGuard from the default repositories using the apt package manager.
$ sudo apt update
$ sudo apt install sshguard
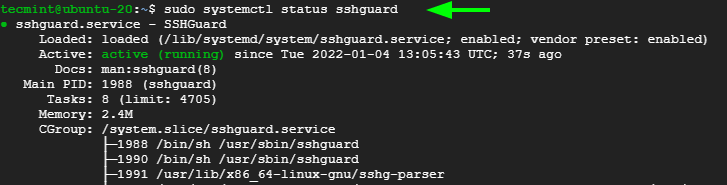
Once installed, the SSHGuard service starts automatically, and you can verify this using the command:
$ sudo systemctl status sshguard
Install SSHGuard on RHEL Systems
For RHEL-based distributions such as CentOS, Rocky, and AlmaLinux, start off by installing the EPEL repository as provided in the command below.
$ sudo dnf install https://dl.fedoraproject.org/pub/epel/epel-release-latest-8.noarch.rpm
OR
$ sudo dnf install epel-release
With EPEL in place, go ahead and install SSHGuard using the dnf package manager.
$ sudo dnf install sshguard
Once installed, start and set SSHGuard to start on system startup or reboot.
$ sudo systemctl start sshguard
$ sudo systemctl enable sshguard
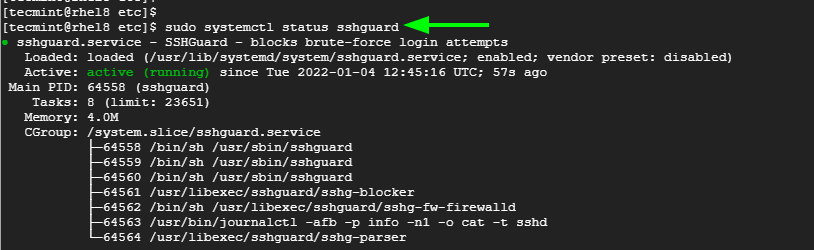
Be sure to verify that SSHGuard is running as expected.
$ sudo systemctl status sshguard
Step 2: SSHGuard Configuration on Linux
SSHGuard actively monitors the /var/log/auth.log, /var/log/secure systemd journal, and syslog-ng log files for failed login attempts.
For each unsuccessful login attempt, the remote host is banned for a limited amount of time which, by default is set at 120 seconds. Thereafter, the ban time goes up by a factor of 1.5 with each successive failed login attempt.
The time the offending hosts are banned, in addition to other parameters is specified in the sshguard.conf file. You can access the configuration file using the vim editor as shown.
$ sudo vim /etc/sshguard/sshguard.conf
On RHEL-based distributions, the config file is located in the following path.
$ sudo vim /etc/sshguard.conf
Here is a sample of the configuration file when viewed from Ubuntu / Debian.
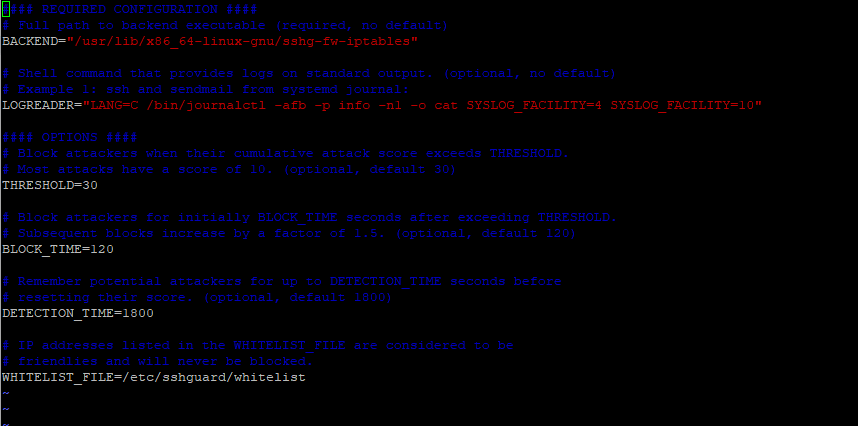
Let’s focus on the main option.
- The BACKEND directive points to the full path of the backend executable. In this example, we see that IPtables is set as the default firewall backend.
- The THRESHOLD directive blocks attackers when their attack score exceeds the specified value.
- The BLOCK_TIME option is the number of seconds that an attacker is blocked after every successive failed login attempt. By default, this is set to 120 after the first attempt. This increases with each successive failed login attempt.
- The DETECTION_TIME option refers to the time in seconds during which the attacker is registered or remembered by the system before their score is reset.
- The WHITELIST_file option point to the full path of the whitelist file that contains hosts which are not supposed to be blacklisted./li>
Step 3: Configure SSHGuard to Block SSH Brute Force Attacks
To ward off brute-force attacks, you need to configure on the following firewalls to work with sshguard.
Block SSH Attacks Using UFW
If you have UFW installed and enabled on your Ubuntu / Debian system, modify the /etc/ufw/before.rules file.
$ sudo vim etc/ufw/before.rules
Add the following lines just after the allow all on loopback section.
# allow all on loopback
-A ufw-before-input -i lo -j ACCEPT
-A ufw-before-output -o lo -j ACCEPT

# hand off control for sshd to sshguard
:sshguard - [0:0]
-A ufw-before-input -p tcp --dport 22 -j sshguard
Save the file and restart UFW.
$ sudo systemctl restart ufw
Now attempt logging into the server from a different system with the wrong credentials and notice that you will be locked out for 120 seconds after the first failed login attempt.
You can verify this by checking the auth.log log file.
$ sudo tail -f /var/log/auth.log

After the next failed log attempt, the block time increases to 240 seconds, then 480 seconds, then 960 seconds, and so on.
Block SSH Attacks Using Firewalld
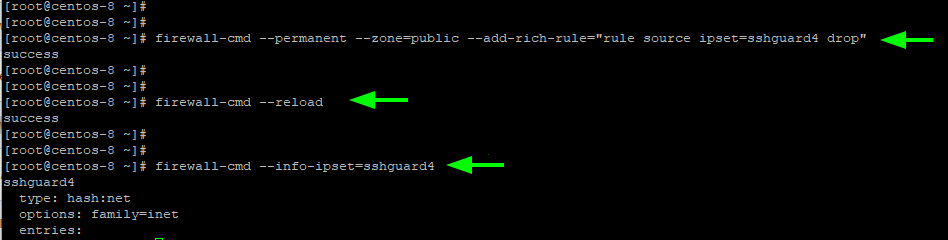
If you are running firewalld, ensure that it is set up and enabled. Then execute the following command to enable sshguard on your preferred zone.
$ sudo firewall-cmd --permanent --zone=public --add-rich-rule="rule source ipset=sshguard4 drop"
To apply the changes, reload Firewalld and sshguard.
$ sudo firewall-cmd --reload
$ sudo systemctl restart sshguard
Then verify the rule as follows:
$ sudo firewall-cmd —-info-ipset=sshguard4
Block SSH Attacks Using Iptables
If you are still using Iptables, first, create a new chain rule for sshguard in Iptables to start blocking the bad guys.
# iptables -N sshguard
Next, update the INPUT chain to direct traffic to sshguard and block all traffic from nefarious parties.
# iptables -A INPUT -j sshguard
To block specific ports such as SSH, POP, and IMAP from abusers run the command:
# iptables -A INPUT -m multiport -p tcp --destination-ports 22,110,143 -j sshguard
And finally, save the rule for the changes to come into effect.
# iptables-save > /etc/iptables/iptables.rules
Step 4: How to Whitelist SSH Blocked Hosts
To whitelist a blocked host, simply specify its hostname or IP address in the whitelist file which is located in:
/etc/sshguard/whitelist - Ubuntu/Debian
/etc/sshguard.whitelist - RHEL-based distros
Thereafter, be sure to restart the sshguard daemon and the firewall backend for the changes to apply.
In this guide, we have demonstrated how you can block SSH Bruteforce attacks using SSHGuard daemon in Linux servers. Your feedback is welcome.


[Debian] Before restarting ufw service, to prevent ufw spamming syslog or kernel.log full of [UFW_BLOCK] messages, you might want to edit /etc/rsyslog.d/20-ufw.conf and uncomment the last line (& stop) so that the messages go only to ufw.log.
Fail2ban and SSH guard is all good but why not use something truly innovative like CrowdSec (https://crowdsec.net) which works in a more modern way by blocking attacks and sharing the information on attackers with other users?
Nothing new, fai2ban does the same in a better way…