This tutorial will concentrate on how to build a custom Docker image based on Ubuntu with Apache service installed. The whole process will be automated using a Dockerfile.
Docker images can be automatically built from text files, named Dockerfiles. A Docker file contains step-by-step ordered instructions or commands used to create and configure a Docker image.
Requirements
- Install Docker and Learn Docker Container Manipulation – Part 1
- Deploy and Run Applications under Docker Containers – Part 2
Basically, a Docker file contains various instructions in order to build and configure a specific container based on your requirements. The following instructions are the most used, some of them being mandatory:
FROM= Mandatory as the first instruction in a Docker file. Instructs Docker to pull the base image from which you are building the new image. Use a tag to specify the exact image from which you are building:
Ex: FROM ubuntu:20.04
MAINTAINER= Author of the build imageRUN= This instruction can be used on multiple lines and runs any commands after a Docker image has been created.CMD= Run any command when the Docker image is started. Use only one CMD instruction in a Dockerfile.ENTRYPOINT= Same as CMD but used as the main command for the image.EXPOSE= Instructs the container to listen on network ports when running. The container ports are not reachable from the host by default.ENV= Set container environment variables.ADD= Copy resources (files, directories, or files from URLs).
Step 1: Creating or Writing Dockerfile Repository
1. First, let’s create some kind of Dockerfile repositories in order to reuse files in the future to create other images. Make an empty directory somewhere in /var partition where we will create the file with the instructions that will be used to build the newly Docker image.
# mkdir -p /var/docker/ubuntu/apache
# touch /var/docker/ubuntu/apache/Dockerfile

2. Next, start editing the file with the following instructions:
# vi /var/docker/ubuntu/apache/Dockerfile
Dokerfile excerpt:
FROM ubuntu
MAINTAINER  your_name  <[email protected]>
RUN apt-get -y install apache2
RUN echo “Hello Apache server on Ubuntu Docker” > /var/www/html/index.html
EXPOSE 80
CMD /usr/sbin/apache2ctl -D FOREGROUND

Now, let’s go through the file instructions:
The first line tells us that we are building from an Ubuntu image. If no tag is submitted, say 14:10 for example, the latest image from Docker Hub is used.
On the second line, we’ve added the name and email of the image creator. Next two RUN lines will be executed in the container when building the image and will install Apache daemon and echo some text into the default apache web page.
The EXPOSE line will instruct the Docker container to listen on port 80, but the port will be not available to outside. The last line instructs the container to run Apache service in the foreground after the container is started.
3. The last thing we need to do is to start creating the image by issuing the below command, which will locally create a new Docker image named ubuntu-apache based on the Dockerfile created earlier, as shown in this example:
# docker build -t ubuntu-apache /var/docker/ubuntu/apache/
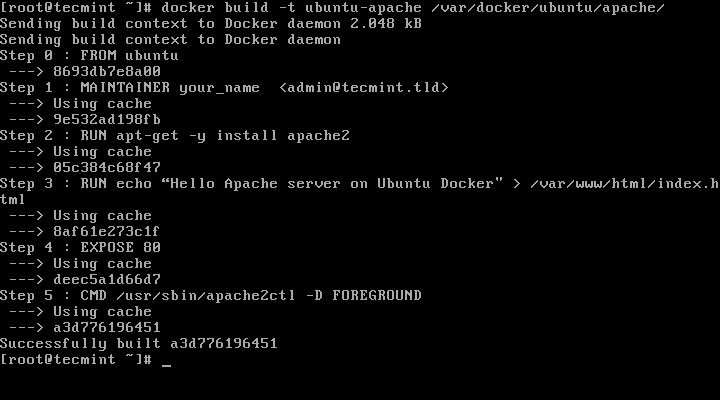
4. After the image has been created by Docker, you can list all available images and identify your image by issuing the following command:
# docker images
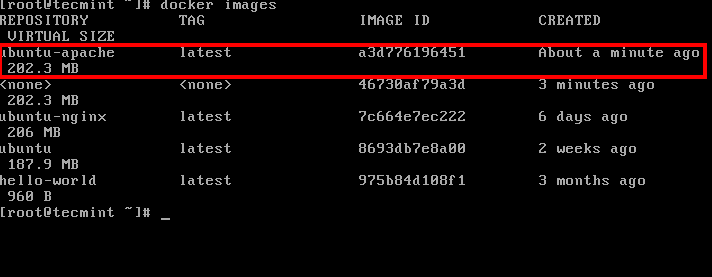
Step 2: Run the Container and Access Apache from LAN
5. In order to run the container continuously (in the background) and access the container exposed services (ports) from the host or other remote machine in your LAN, run the below command on your host terminal prompt:
# docker run -d -p 81:80 ubuntu-apache

Here, the -d option runs the ubuntu-apache container in background (as a daemon) and the -p option maps the container port 80 to your localhost port 81. Outside LAN access to Apache service can be reached through port 81 only.
Netstat command will give you an idea about what ports the host is listening to.
After the container has been started, you can also run docker ps command to view the status of the running container.
6. The webpage can be displayed on your host from the command line using curl utility against your machine IP Address, localhost, or docker net interface on port 81. Use IP command line to show network interface IP addresses.
# ip addr               [List nework interfaces]
# curl ip-address:81    [System Docker IP Address]
# curl localhost:81     [Localhost]
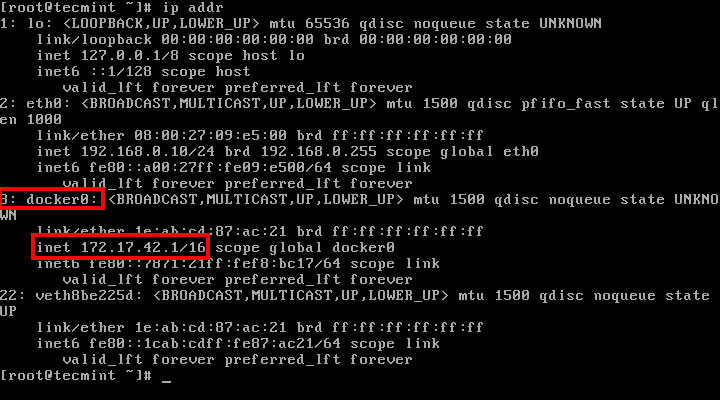

7. To visit the container webpage from your network, open a browser at a remote location and use HTTP protocol, the IP Address of the machine where the container is running, followed by port 81 as illustrated on the below image.
http://ip-address:81
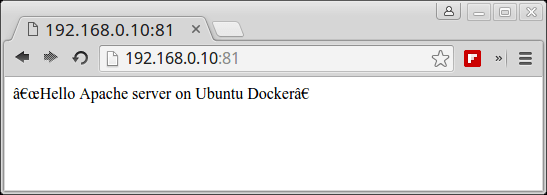
8. To get an inside of what processes are running inside the container issue the following command:
# docker ps
# docker top <name or ID of the container>
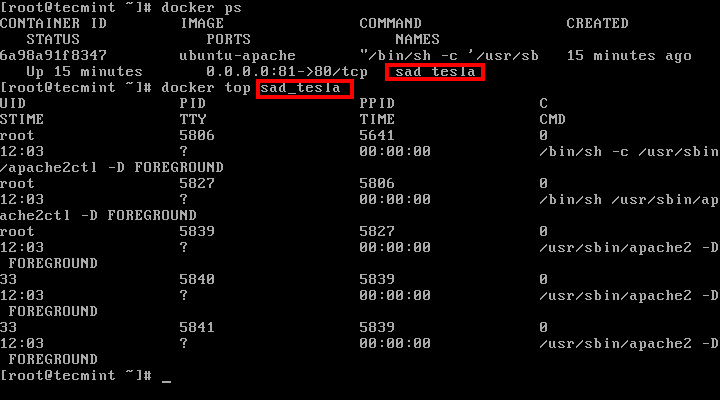
9. To stop the container issue docker stop command followed by the container ID or name.
# docker stop <name or ID of the container>
# docker ps
10. In case you want to assign a descriptive name for the container use the --name option as shown in the below example:
# docker run --name my-www -d -p 81:80 ubuntu-apache
# docker ps

Now you can reference the container for manipulation (start, stop, top, stats, etc) only by using the assigned name.
# docker stats my-www

Step 3: Create a System-wide Configuration File for Docker Container
11. On CentOS/RHEL you can create a systemd configuration file and manage the container as you normally do for any other local service.
For instance, create a new systemd file named, let’s say, apache-docker.service using the following command:
# vi /etc/systemd/system/apache-docker.service
apache-docker.service file excerpt:
[Unit]
Description=apache container
Requires=docker.service
After=docker.service

[Service]
Restart=always
ExecStart=/usr/bin/docker start -a my-www
ExecStop=/usr/bin/docker stop -t 2 my-www

[Install]
WantedBy=local.target
12. After you finish editing the file, close it, reload the systemd daemon to reflect changes and start the container by issuing the following commands:
# systemctl daemon-reload
# systemctl start apache-docker.service
# systemctl status apache-docker.service
This was just a simple example of what you can do with a simple Dockerfile but you can pre-build some pretty sophisticated applications that you can fire-up in just a matter of seconds with minimal resources and effort.
Further Reading:


Hi guys, I had an error while installed apache with the docker file, the problem was configuring the timezone, when I selected my TZ, the installation freezing, so I had to add these parameters in the docker file for predefining the TZ in the installation:
RUN
I add that in the docker file and it works!!
Thank you for this hands-on Docker tutorial. Worked fine.
In the Dockerfile, had to replace one line with this to avoid a error finding apache2:
Help, years old instructions..
So, i have to hand write a dockerfile, and know what the variables are. So lets just say i followed section 3, the Apache setup, less the mounting external file inside the container, went to follow the instructions to contain it and pump it to AWS/docker service so i need to:
“”
docker build -t test .” and i get:“unable to prepare context: unable to evaluate symlinks in Dockerfile path: lstat /var/lib/docker/Dockerfile: no such file or directory”
You have a “The following instructions are the most used, some of them being mandatory:”
so: “FROM” is that the base OS? or the encapsulated OS?, and what is it referencing that from since its “Mandatory” i cant just do a “ASDF”? doing a little looking, that’s the container’s OS variant.. so “FROM httpd:2.4” ?
Can I add “CMD docker cp /media/home/me/Desktop/files.php Container:/var/www/html” ?
Will that pull files from my desktop when “docker build” command runs? or do i have to get a container running then do that manually?
So I am some what surprised this isn’t populated in a file when you get a docker container to run, you’d think it’ll be part of the docker creation process, base stats with the variables, all the other lovely files are created, why not the basic dockerfile? why does it have to be hand written? so many mistakes can be made like that..
and someone explain to me why docker containers have a underline OS? i thought this system used the base OS and plug dependencies though a “firewall” like feature.
Seems like its: BaseOS -> Docker -> Container OS -> Application
looks a lot like a VM process: BaseOS -> VME -> VMOS -> Application
Thank you for the great article Matei Cezar
Can you please share the docker image script of centos image?
Replace the following variables:
FROM centos
RUN yum -y install httpd
CMD /usr/sbin/apachectl -D FOREGROUND