In this article, we will show you how to create an ISO from a bootable USB drive in Linux. We will explain two ways to achieve this: via the command line interface (CLI) and a graphical user interface (GUI) program.
Create An ISO From A Bootable USB Drive Using dd Tool
dd is a commonly used command-line tool for Linux and other Unix-like operating systems, used to convert and copy files.
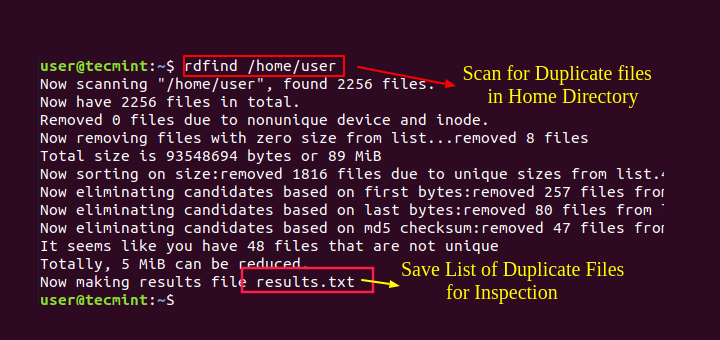
To create an ISO image from a Bootable USB Drive files, first you need to insert your USB drive and then find the device name of your USB using following df command.
$ df -hT
Sample Output
Filesystem     Type      Size  Used Avail Use% Mounted on
udev           devtmpfs  3.9G     0  3.9G   0% /dev
tmpfs          tmpfs     787M  1.5M  786M   1% /run
/dev/sda3      ext4      147G   28G  112G  20% /
tmpfs          tmpfs     3.9G  148M  3.7G   4% /dev/shm
tmpfs          tmpfs     5.0M  4.0K  5.0M   1% /run/lock
tmpfs          tmpfs     3.9G     0  3.9G   0% /sys/fs/cgroup
/dev/sda1      vfat      299M   11M  288M   4% /boot/efi
tmpfs          tmpfs     787M   56K  787M   1% /run/user/1000
/dev/sda5      ext4      379G  117G  242G  33% /media/tecmint/Data_Storage
/dev/sdb1 iso9660 1.8G 1.8G 0 100% /media/tecmint/Linux Mint 19 Xfce 64-bit
From the output above, you can clearly see that our attached USB device name is /dev/sdb1.
Now you can run the following command to create an ISO from a bootable USB drive as shown. Make sure to replace /dev/sdb1 with your USB drive and /home/tecmint/Documents/Linux_Mint_19_XFCE.iso with the full name of the new ISO image.
$ sudo dd if=/dev/sdb1 of=/home/tecmint/Documents/Linux_Mint_19_XFCE.iso
In the above command, the option:
- if – means read from specified FILE instead of stdin.
- of – means write to specified FILE instead of stdout.
Once done, you can verify the ISO image using following ls command as shown.
$ ls -l /home/tecmint/Documents/Linux_Mint_19_XFCE.iso

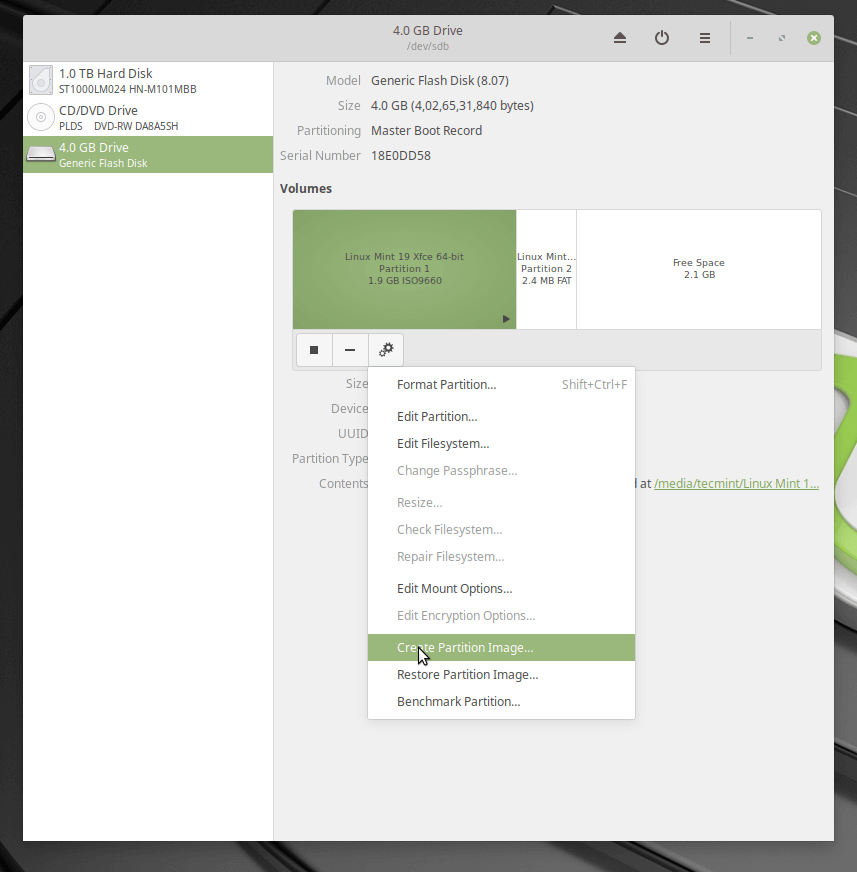
Create An ISO From A Bootable USB Drive Using Gnome Disks
Gnome Disks is a graphical tool used to manage disk drives and media in Linux. It is used to format and partition drives, mount and unmount partitions, and query S.M.A.R.T. (Self-Monitoring Analysis and Reporting Technology) attributes.
If you don’t have gnome-disk utility on your system, you can install it by running the following command.
$ sudo apt install gnome-disk-utility        #Ubuntu/Debian
$ sudo yum install gnome-disk-utility        #CentOS/RHEL
$ sudo dnf install gnome-disk-utility        #Fedora 22+
After successfully installing Gnome disk, search and open it from the system menu or dash. Then from the default interface, select the bootable device from the list of mounted devices on the left-hand pane, by clicking on it and click on disk options. Then click on Create Disk Image option as shown in the following image.
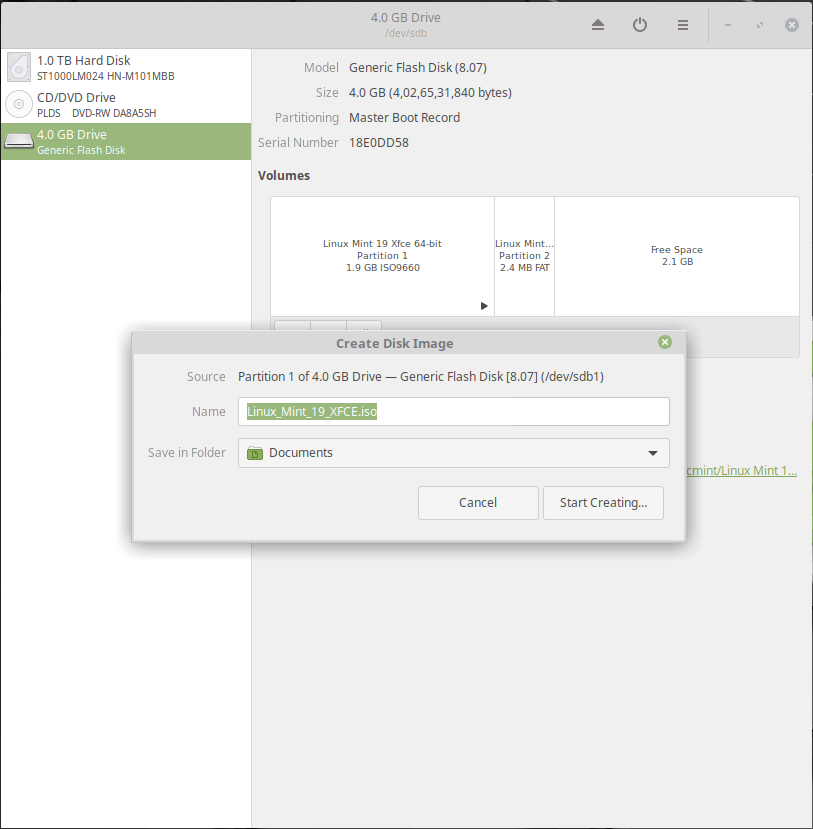
From the dialog window, set the name of the ISO file, its location and click Start creating. Then enter your password to open the bootable device and the process should start if the authentication is successful.
That’s it for now! In this article, we’ve explained two ways to create an ISO from a bootable USB drive in Linux. Use the comment form below to share your thoughts with us or ask questions.


Now, the downside of the Gnome Disks method is that it creates an ISO file that includes the free space (!), and if the free space is 1T, say, you’re looking at at least 45 mins of creation time, which is prohibitive not to mention that restoring such a big image takes somewhere around 1hr(!), while the user data is not bigger than 20Gs at the most.
If only there was a method to create an ISO disk image without the free space!
I had a utility called Systemback installed on Xubuntu 16.04 (and 18.04) which would also create an ISO to put on USB or SD card (I don’t recall if it was directly or using a usb startup creator disks tool like dd or usb-creator).
Those systems were 32-bit… *Ubuntus now only come in 64 bit and I was given an older XP laptop that only ran 32-bit. So I pulled out that old USB adapter and SD card, and BAM, my old system installed on that old thing.
Considering it’s a single-core Celeron and came with XP and has been out of support for just ages, that’s amazing. The Systemback on that SD gave the options of installing just the OS (and blank user) or also installing the /home folder from the previous install (which I did NOT do, as the drive was rather small on the old laptop.)
Dude! could be possible that you could share somehow that OS for old laptops? or some mirror link? Right now I’m on the same boat of trying to save& use a kinda like the one you mention. thanks :)
Win To USB is a lightweight software that allows you to install and run Windows on a USB hard drive. An easy-to-use wizard code that provides a detailed guide to creating USB To Go USB drives.
Ronaldo
you have
ifandofmixed up in the dd command.Correct! why don’t they fix the article?
AARON KILI FIX THE COMMAND PLEASE!
@Yuri
There is nothing to fix, the command is correct.
Ifandofare command line options for the dd command, kindly read the manpage of the dd command.In this case, we are not creating a bootable USB drive, but creating an ISO image from a bootable drive already created.
@j
I ask you to kindly read the dd man page to understand the meaning of
ifandofin the command, if what is explained in the article is not enough:Thanks!
Can I use this method to say, boot a Debian-live.iso (text only NO DE) from a USB stick, install software; e.g, a windows manager + some apps, then use this approach to save that and the resulting file will be a bootable custom.iso?
Hi Moltke, No, a Live iso uses a squash.file that can not be modified without the special procedure of decompressing squash file – build OS – rebuild squash (very complicated). To build a custom OS USB build.iso with Debian or what I use Sparkylinux 5 to a USB stick,
Hope this helps!
Hi Aaron,
Great Post! Thank you for sharing this informative post on creating iso from bootable USB in Linux. I am pretty with the content and It really works…
Keep up the Good Work… Keep sharing…
Thanks
@Pulkit
How nice it is to get feedback from you. Many thanks.
Perfect! Thanks!
I needed to free up my 4G USB thumb drive to make a different flavor – live bootable stick (gonna try Antix) but wanted to keep the Mint19.3 ISO in case I need it again.
I had deleted the original ISO download so I wanted to get it back off the bootable USB. I can’t believe the confusion in the comments here…
It is clear which way the IF and OF are oriented and what the commands are intended to achieve.
In fact, there are any number of google results about how to go from ISO to bootable USB but very few on going the other way, so THANKS again !!
@Kohn
We do understand, many users are only familiar with creating a bootable USB using an ISO image but creating an ISO from a bootable USB. Many thanks for the useful feedback.
IFandOFare swapped this will write the contents of your stick in the.isofile -.-Thanks for that. I thought so as, well. :-)
Your USB Stick has ISO9660v Partition that is not a problem to make an iso from it! But the most Bootable USB-Sticks has a vfat or fat32 or ext2/3/4 formatted partition
And Now ??
This Instruction will not Work with formats other than ISO9660
I have a 16GB USB-Stick with a bootable Linux Partition (Type 83) and need this as a bootable iso file
Did you ever figure out how to make it work with fat32/vfat partitions?
Shouldn’t you provide the iso filename for if=... and the media for of=…? In the parameter definition, you say so but in the example, you do the other way.
@SEBI
Check the heading, “2 Ways to Create an ISO from a Bootable USB in Linux”. We are showing how to create an ISO(/home/tecmint/Documents/Linux_Mint_19_XFCE.iso) from a bootable media(/dev/sdb1).
I had the exact same problem as sebi!
I have an iso file of an operating system and have been wanting to create a bootable USB stick with it, and running into problems. After searching and following a few different sets of directions, I stumbled on your article. I did not read the title carefully and therefore followed the advice even though what I’m trying to do is the opposite.
The article is good, but perhaps you might consider editing it to warn readers that this is NOT for creating a bootable USB from an iso, since I suspect it’s more common to want to do that.
@Laur
Thanks for sharing your thoughts with us, we will add a note about this.
I accidentally deleted my image so i re created .Thanks buddy
@AbdulRehman
Good to know that this worked for you. Thanks for the feedback.
Thank you!
This will create an image of USB (.img actual file type) and not standard ISO9660 format iso file, you are just changing the extension name, and the size of the output file is equal to the size of the input USB drive, ie: if there is 300MB of content in the 2GB USB drive, then the output file is 2GB only!.
I use “cp file.iso /dev/sdx” :-)
@Carlos
Many thanks for sharing.
Wanted to know how to make a USB bootable from a bootable ISO image that is booted without any problem using vmware/virtualbox.
When I put this ISO image on USB stick it doesn’t boot at all. I tried many programs, many techniques and none of them worked.
Copy-Paste ISO to USB is not working as you have to write boot sector to the underlaying hardware. Try to use a program like UUByte to make a bootable USB from ISO.
@hurukan
Check this out: https://www.tecmint.com/install-linux-os-on-usb-drive/ or https://www.tecmint.com/create-bootable-usb-in-linux-commandline/