Our environment consist of one datacenter attached with ISCSI shared storage. This datacenter included one cluster with two hosts/nodes which will be used to host our virtual machine.
Basically in any environment, we could deploy physical/virtual machines by using popular methods such as From ISO/DVD, Network, Kickstart and so on. For our environment, there is no huge difference about previous fact, as we will use the same methods/installation types.
As a start we are discussing VM deployment using ISO file/image. RHEV entertainment is very organized one, so it has special domain used only for this target, store ISO files used to create virtual machines, this domain is storage one called ISO Domain.
Step 1: Deploy New ISO Domain
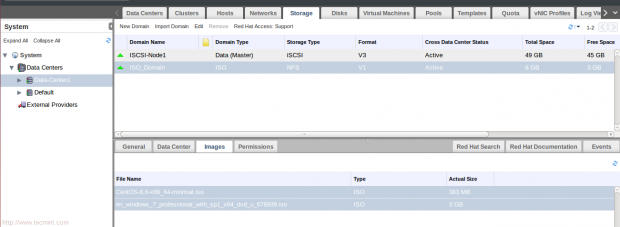
Actually, RHEVM creates ISO Domain during installation process. To check that, just navigate storage tab for the environment.
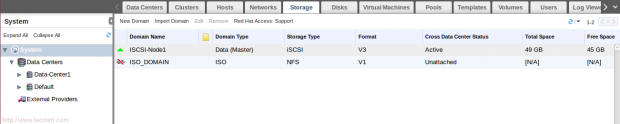
We could use the exist one and attach it to our datacenter, but lets create new one for more practice.
Note: The exist one is used NFS shared storage on the rhevm machine IP:11.0.0.3. The new created one will use NFS shared storage on our storage node IP:11.0.0.6.
1. To Deploy NFS service on our storage node,
[root@storage ~]# yum install nfs-utils -y
[root@storage ~]# chkconfig nfs on
[root@storage ~]# service rpcbind start
[root@storage ~]# service nfs start
2. We should create new directory to be shared using NFS.
[root@storage ~]# mkdir /ISO_Domain
3. Share the directory by add this line to /etc/exports file and then apply changes.
/ISO_Domain 11.0.0.0/24(rw)
[root@storage ~]# exportfs -a
Important: Change the ownership of the directory to be with uid:36 and gid:36.
[root@storage ~]# chown 36:36 /ISO_Domain/
Note: The 36 is the uid for vdsm user “RHEVM agent” and the gid of kvm group.
It is mandatory to make the exported directory is accessible be RHEVM. So, your NFS should be ready to be attached as ISO Domain to our environment.
4. To create New ISO domain with NFS type… choose Data-Center1 From system tab, then click on New Domain from storage tab.

5. Then Fill the appeared window as shown:
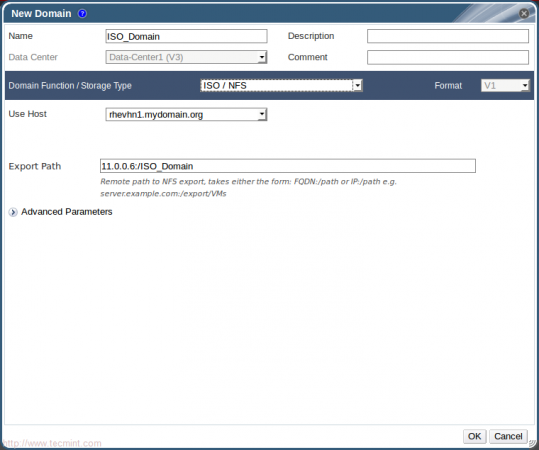
Note: Make sure about the Domain function/Storage type is ISO / NFS.
Wait a moment and check again under storage tab.
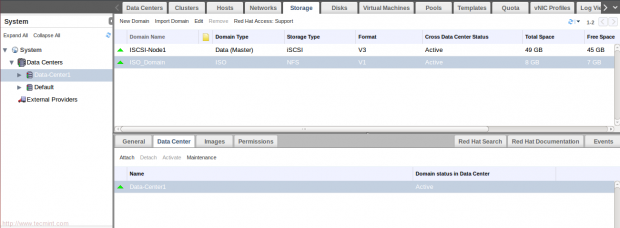
Now, our ISO Domain is successfully created and attached. So, lets upload some ISO’s to it for VM’s deploying.
6. Make sure you have ISO file on your RHEVM server. We will work with two ISO’s one for Linux {CentOS_6.6} and the other one for windows {Windows_7}.

7. RHEVM provides tool called (rhevm-iso-uploader). It used to upload ISO’s to ISO Domains beside useful tasks.
First, we will use it to list all available ISO Doamins.

Hint: The upload operation supports multiple files (separated by spaces) and wildcards. Second, we will use it to upload ISO’s to our iso domain “ISO_Domain”.

Note: Uploading process takes some time as it depends on your network.
Hint: ISO domain could be on the RHEVM machine, its recommended in some cases, any way its totally depend on your environment and infrastructure needs.
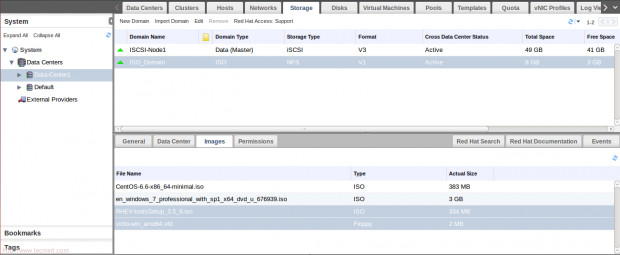
8. Check the uploaded ISO’s from web interface.
Its time for second section “Virtual Machines Deployment”.
Step 2: Virtual Machines Deployment – Linux
11. Switch to Virtual Machines tab and click “New VM”.

12. Then fill the appeared windows as shown:
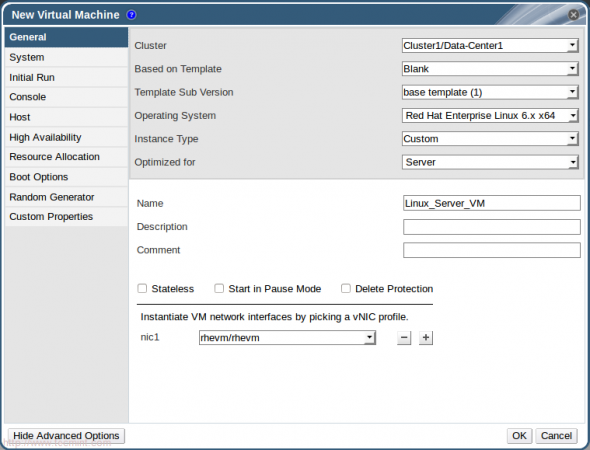
To modify some options like memory allocation and boot options, press “Show Advanced Options”.
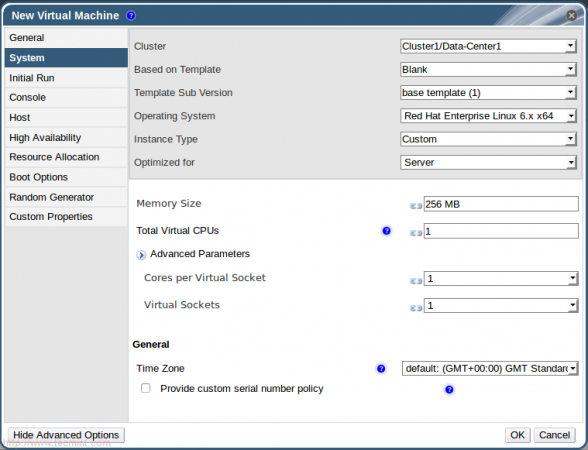
13. Select “System” to modify Memory and vCPU’s.
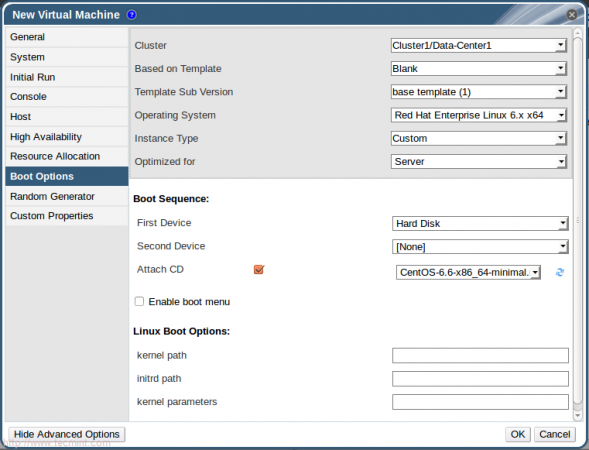
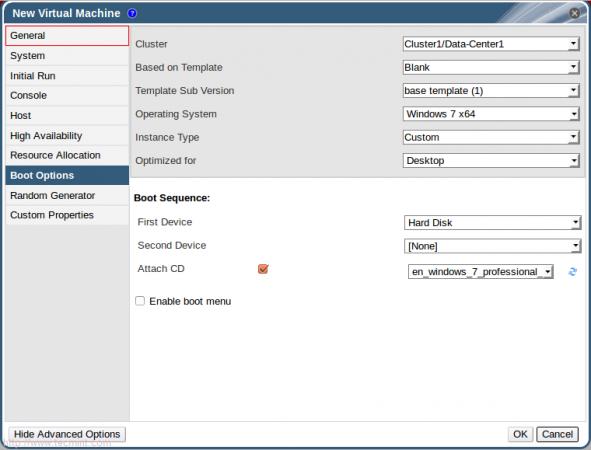
14. Select Boot Options to attach our ISO image to virtual machines, then press OK.
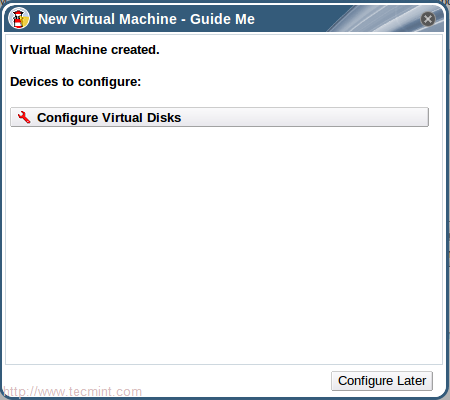
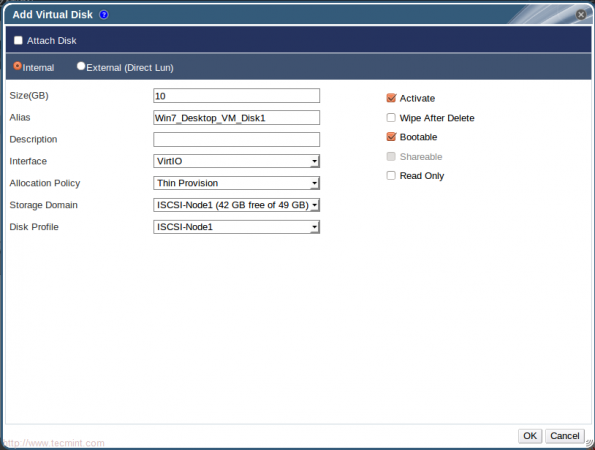
15. Before starting your virtual machine, you should create and attach virtual disk. So, press “Configure Virtual Disks“ in the automatically appeared window.
16. Then Fill the next appeared window as shown and press OK.
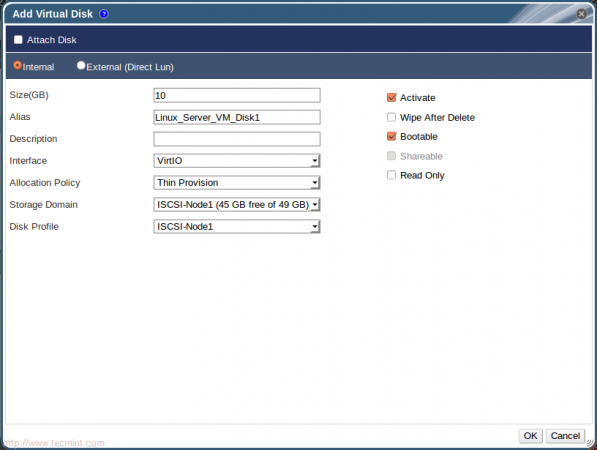
Hint: We discussed the difference between “Pre-allocated” and “Thin Provision” previously in this article from kvm series at Manage KVM Storage Volumes and Pools – Part 3.
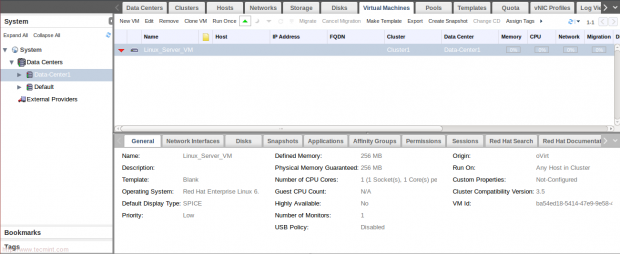
17. Close the window asks about adding another virtual disk. Now, Lets check our virtual machine.
Hint: You may need to install SPICE plug-in to make sure virtual machine console will work fine.
For Redhat based Distro’s
# yum install spice-xpi
For Debian based Distro’s
# apt-get install browser-plugin-spice
Then restart your Firefox browser.
18. For first time, we will run virtual machine from “Run once”…just click on it and then change the order of boot options – make First one is CD-ROM.
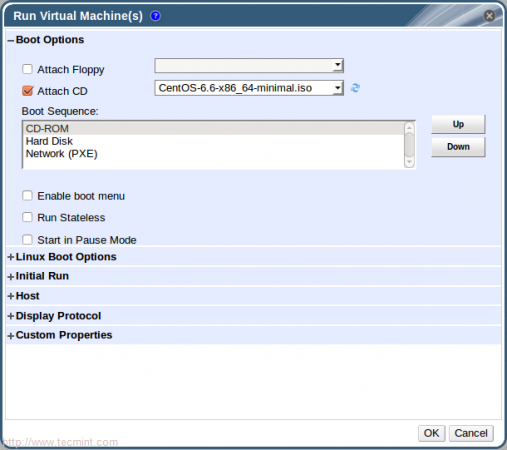
Note: Run once is used for modify vm setting just for one time (Not Permanent) for testing or installation.
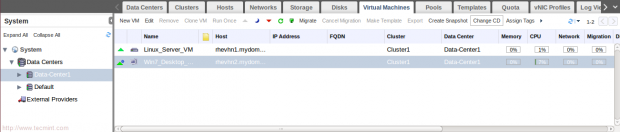
19. After Clicking (OK), you will notice the state of virtual machine is changed to starting then to up!!.
![]()
![]()
20. Click on icon open Virtual Machine’s Console.
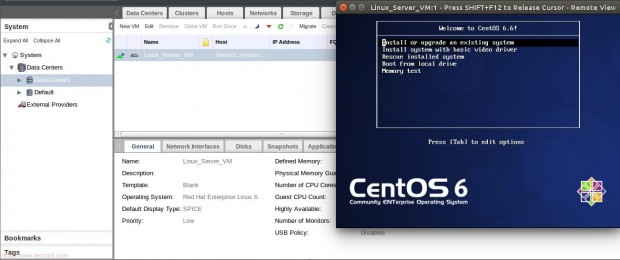
Basically, we created a linux-server virtual machine successfully which hosted on node1 {RHEVHN1}.
Step 3: Virtual Machines Deployment – Windows
So, lets complete the journey with deploying another virtual machine acts as desktop machine, we will discuss the difference between server and desktop type later, this desktop virtual machine will be Windows7.
Generally, we will repeat almost previous steps with some additional ones. Follow steps as shown in next screens:
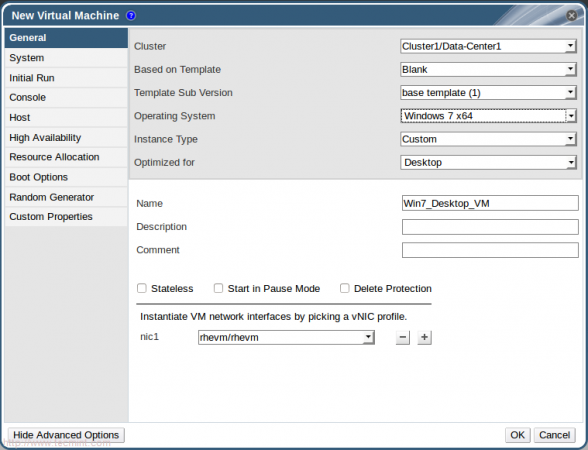
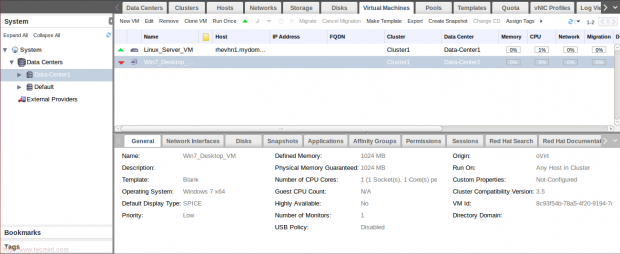
21. Click New VM and then fill the requested information.
22. Create a new disk and confirm that the windows VM is created.
Before continue to next steps, windows virtual machines needs some special paravirtualization drivers and tools to be installed successfully…you can find them under:
/usr/share/virtio-win/
/usr/share/rhev-guest-tools-iso/
For this ISO used in this tutorial, we will need to upload those files to our ISO Domain and confirm from web interface.
/usr/share/rhev-guest-tools-iso/RHEV-toolsSetup_3.5_9.iso
/usr/share/virtio-win/virtio-win_amd64.vfd

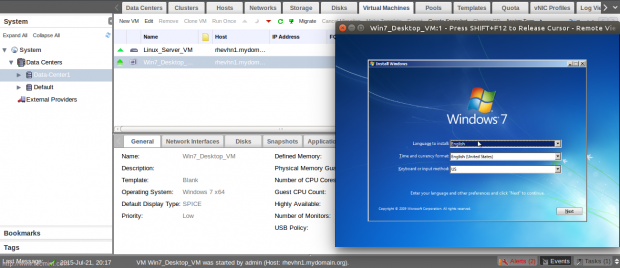
23. Click Run once and Don’t forget to attach the virtual floppy disk to open VM console.

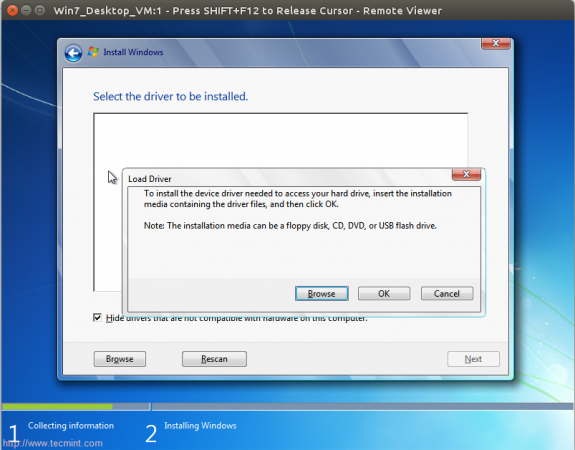
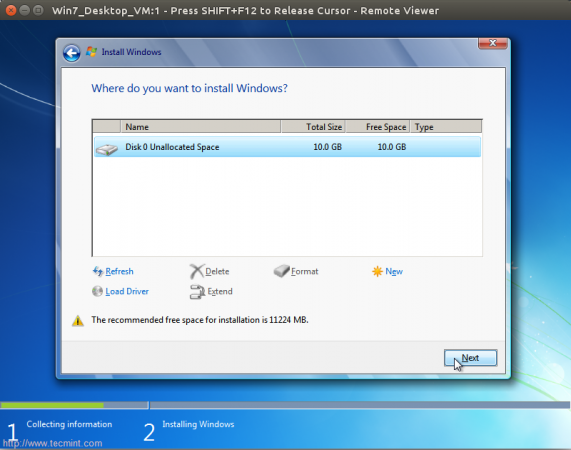
24. Follow windows instruction to complete the installation. At Disk partitioning stage, you will notice there is no appeared disks. Click on ”Load Driver” then ”Browse”.
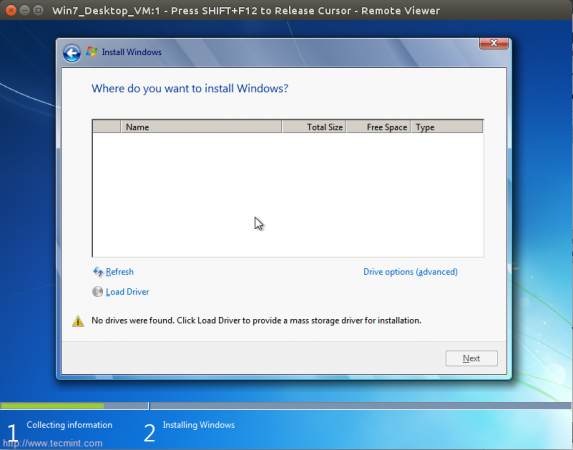
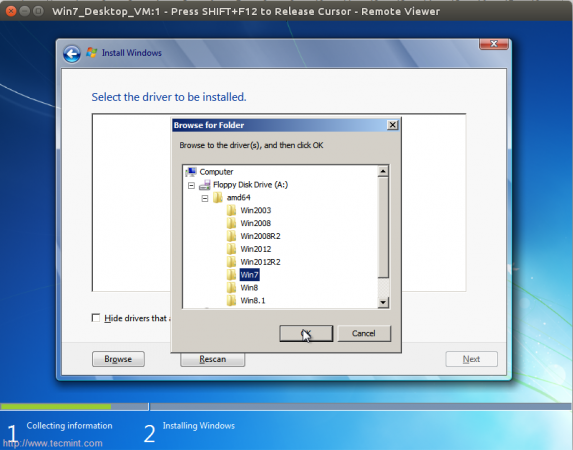
25. Then locate the path of drivers on the virtual floppy disk and select the two drivers related to Ethernet and SCSI controller.
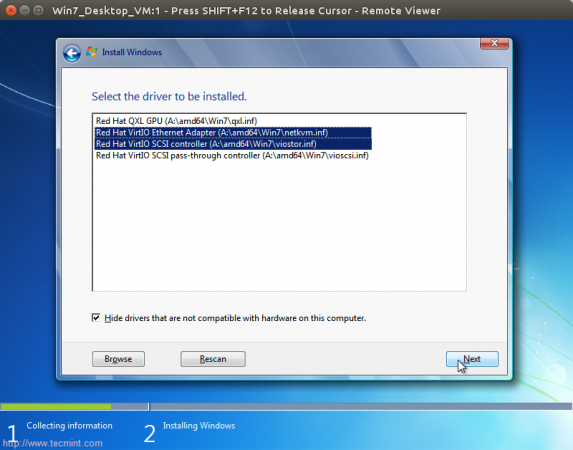
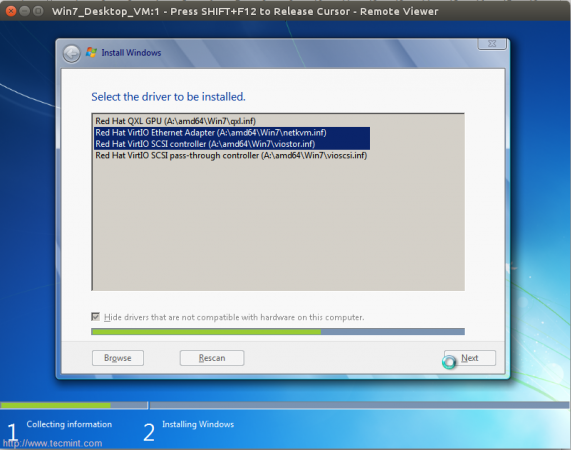
26. Then Next and wait some time to load our 10G virtual disk is appeared.
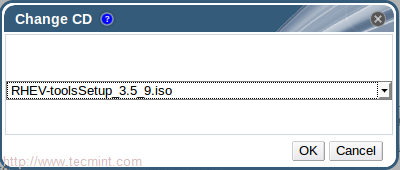
Complete the installation process until it finished successfully. Once it finished successfully, go to RHEVM web interface and change the attached CD.
27. Now attach RHEV tools CD and then go back to windows virtual machine, you will find tools CD is attached. Install RHEV tools as shown..
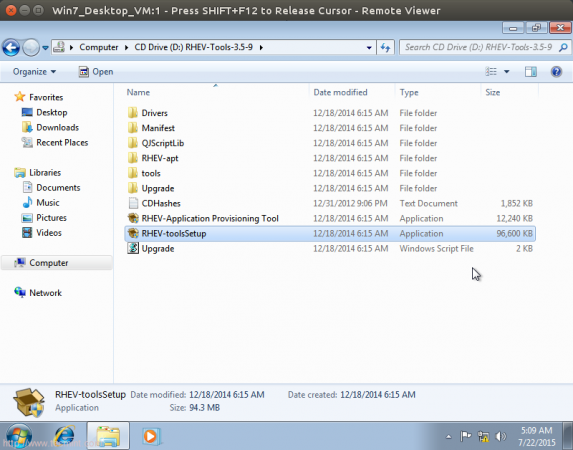
Follow the sequentially steps until it finished successfully then reboot the system.
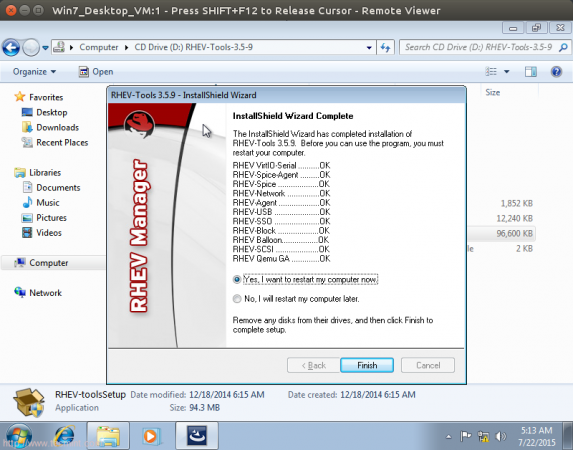
and finally, your windows virtual machine is healthy up and running..:)
Conclusion
We discussed in this part, ISO Domain importance and deployment then how to use for storing ISO files which be used later to deploy virtual machines. Linux and windows virtual machines have been deployed and fine working. In next part, we will discuss Clustering importance and tasks with how to use clustering features in our environment.


Mohammad,
Thanks for your help to people like us, its really a great stuff.
Mohammad, when i confiugre ISO_Domain it cannot able to added . Error: Error while executing action Add Storage Connection: Problem while trying to mount target. ….2016-02-22 23:35:37,467 ERROR [org.ovirt.engine.core.vdsbroker.vdsbroker.CreateStorageDomainVDSCommand] (ajp–127.0.0.1-8702-13) [68cd6c58] Failed in CreateStorageDomainVDS method
2016-02-22 23:35:37,468 INFO [org.ovirt.engine.core.vdsbroker.vdsbroker.CreateStorageDomainVDSCommand] (ajp–127.0.0.1-8702-13) [68cd6c58] Command org.ovirt.engine.core.vdsbroker.vdsbroker.CreateStorageDomainVDSCommand return value
StatusOnlyReturnForXmlRpc [mStatus=StatusForXmlRpc [mCode=351, mMessage=Error creating a storage domain: (‘storageType=1, sdUUID=f6782fea-b223-49a2-adb7-d11636f11e33, domainName=ISO, domClass=2, typeSpecificArg=10.195.224.147:/iso_domain domVersion=0’,)]]
2016-02-22 23:35:37,469 INFO [org.ovirt.engine.core.vdsbroker.vdsbroker.CreateStorageDomainVDSCommand] (ajp–127.0.0.1-8702-13) [68cd6c58] HostName = RHEVH-N1.ryk.org
2016-02-22 23:35:37,471 ERROR [org.ovirt.engine.core.vdsbroker.vdsbroker.CreateStorageDomainVDSCommand] (ajp–127.0.0.1-8702-13) [68cd6c58] Command CreateStorageDomainVDSCommand(HostName = RHEVH-N1.ryk.org, HostId = e104c8cb-f188-4562-9e6a-991307019618, storageDomain=StorageDomainStatic[ISO, f6782fea-b223-49a2-adb7-d11636f11e33], args=10.195.224.147:/iso_domain) execution failed. Exception: VDSErrorException: VDSGenericException: VDSErrorException: Failed to CreateStorageDomainVDS, error = Error creating a storage domain: (‘storageType=1, sdUUID=f6782fea-b223-49a2-adb7-d11636f11e33, domainName=ISO, domClass=2, typeSpecificArg=10.195.224.147:/iso_domain domVersion=0’,), code = 351
2016-02-22 23:35:37,480 INFO [org.ovirt.engine.core.vdsbroker.vdsbroker.CreateStorageDomainVDSCommand] (ajp–127.0.0.1-8702-13) [68cd6c58] FINISH, CreateStorageDomainVDSCommand, log id: 473ea435
2016-02-22 23:35:37,482 ERROR [org.ovirt.engine.core.bll.storage.AddNFSStorageDomainCommand] (ajp–127.0.0.1-8702-13) [68cd6c58] Command org.ovirt.engine.core.bll.storage.AddNFSStorageDomainCommand throw Vdc Bll exception. With error message VdcBLLException: org.ovirt.engine.core.vdsbroker.vdsbroker.VDSErrorException: VDSGenericException: VDSErrorException: Failed to CreateStorageDomainVDS, error = Error creating a storage domain: (‘storageType=1, sdUUID=f6782fea-b223-49a2-adb7-d11636f11e33, domainName=ISO, domClass=2, typeSpecificArg=10.195.224.147:/iso_domain domVersion=0’,), code = 351 (Failed with error StorageDomainCreationError and code 351)
2016-02-22 23:35:37,489 INFO [org.ovirt.engine.core.bll.storage.AddNFSStorageDomainCommand] (ajp–127.0.0.1-8702-13) [68cd6c58] Command [id=03be06b4-7654-46ec-bbab-0f18dd64683c]: Compensating NEW_ENTITY_ID of org.ovirt.engine.core.common.businessentities.StorageDomainDynamic; snapshot: f6782fea-b223-49a2-adb7-d11636f11e33.
2016-02-22 23:35:37,492 INFO [org.ovirt.engine.core.bll.storage.AddNFSStorageDomainCommand] (ajp–127.0.0.1-8702-13) [68cd6c58] Command [id=03be06b4-7654-46ec-bbab-0f18dd64683c]: Compensating NEW_ENTITY_ID of org.ovirt.engine.core.common.businessentities.StorageDomainStatic; snapshot: f6782fea-b223-49a2-adb7-d11636f11e33.
2016-02-22 23:35:37,508 ERROR [org.ovirt.engine.core.bll.storage.AddNFSStorageDomainCommand] (ajp–127.0.0.1-8702-13) [68cd6c58] Transaction rolled-back for command: org.ovirt.engine.core.bll.storage.AddNFSStorageDomainCommand.
2016-02-22 23:35:37,537 ERROR [org.ovirt.engine.core.dal.dbbroker.auditloghandling.AuditLogDirector] (ajp–127.0.0.1-8702-13) [68cd6c58] Correlation ID: 68cd6c58, Job ID: 8d8705d3-b897-431d-8fd7-1e58578ba942, Call Stack: null, Custom Event ID: -1, Message: Failed to add Storage Domain ISO. (User: admin@internal)
2016-02-22 23:35:37,651 INFO [org.ovirt.engine.core.bll.storage.RemoveStorageServerConnectionCommand] (ajp–127.0.0.1-8702-7) [5e45a8b5] Lock Acquired to object EngineLock [exclusiveLocks= key: a666a972-171b-4733-b747-3eabe5be42ac value: STORAGE_CONNECTION
key: 10.195.224.147:/iso_domain value: STORAGE_CONNECTION
, sharedLocks= ]
2016-02-22 23:35:37,675 INFO [org.ovirt.engine.core.bll.storage.RemoveStorageServerConnectionCommand] (ajp–127.0.0.1-8702-7) [5e45a8b5] Running command: RemoveStorageServerConnectionCommand internal: false. Entities affected : ID: aaa00000-0000-0000-0000-123456789aaa Type: SystemAction group CREATE_STORAGE_DOMAIN with role type ADMIN
2016-02-22 23:35:37,684 INFO [org.ovirt.engine.core.bll.storage.RemoveStorageServerConnectionCommand] (ajp–127.0.0.1-8702-7) [5e45a8b5] Removing connection a666a972-171b-4733-b747-3eabe5be42ac from database
2016-02-22 23:35:37,687 INFO [org.ovirt.engine.core.vdsbroker.vdsbroker.DisconnectStorageServerVDSCommand] (ajp–127.0.0.1-8702-7) [5e45a8b5] START, DisconnectStorageServerVDSCommand(HostName = RHEVH-N1.ryk.org, HostId = e104c8cb-f188-4562-9e6a-991307019618, storagePoolId = 00000000-0000-0000-0000-000000000000, storageType = NFS, connectionList = [{ id: a666a972-171b-4733-b747-3eabe5be42ac, connection: 10.195.224.147:/iso_domain, iqn: null, vfsType: null, mountOptions: null, nfsVersion: null, nfsRetrans: null, nfsTimeo: null };]), log id: 5fe2c1db
2016-02-22 23:35:37,879 INFO [org.ovirt.engine.core.vdsbroker.vdsbroker.DisconnectStorageServerVDSCommand] (ajp–127.0.0.1-8702-7) [5e45a8b5] FINISH, DisconnectStorageServerVDSCommand, return: {a666a972-171b-4733-b747-3eabe5be42ac=0}, log id: 5fe2c1db
2016-02-22 23:35:37,886 INFO [org.ovirt.engine.core.bll.storage.RemoveStorageServerConnectionCommand] (ajp–127.0.0.1-8702-7) [5e45a8b5] Lock freed to object EngineLock [exclusiveLocks= key: a666a972-171b-4733-b747-3eabe5be42ac value: STORAGE_CONNECTION
key: 10.195.224.147:/iso_domain value: STORAGE_CONNECTION
Thank you for comment,,
For ISO domain ….it was inadvertent fault…I asked the owner to change the title…
For using “deploy ” word with vms…Officially, Red hat used the same word in docs and books :)
Thank you again for your hint and advise…
Why do you keep using the word “deploy” here? And why “under” ISO domains? ISO domain is just a location to store the installation ISOs used for VM setup, deploying is very different, and can be done using Foreman and the oVirt plugins, or software like ansible, it’s more than just getting the install disk to the virtual hardware.