In this part 3 of our tutorial, we are discussing how to create and manage KVM Storage volumes and Pools using virt-manager GUI tool.
In general, we use storage devices with different file systems everyday. We have also some storage technologies/techniques like ISCSI, SAN, NAS and so on.
There is no huge different in the basic concepts for our virtual environment, we just use the basic concept to deploy awesome and scale-able virtual storage platform.
With KVM environment , you can use block devices or files as local storage devices within guest operating systems.
We use the physical storage devices to create virtual machine’s volumes. We could describe volumes as a virtual machine’s virtual disk. Volumes cloud be block devices or files as we have mentioned previously.

As a performance consideration, the block devices have the higher hand. Also block files still have the higher hand in the areas of system management and storage capacity use. At any way for scenarios where disk performance from the guest operating system is not critical, its prefer to use disk image files.
Storage volumes also is a part of Storage Pool, actually you can’t create storage volumes before having at least one storage pool.
There is no new prerequisite, just the same one we have discussed in previous parts. If something new I will mention it. So, let’s dive on.
Stage One: Creating Storage Pools in KVM
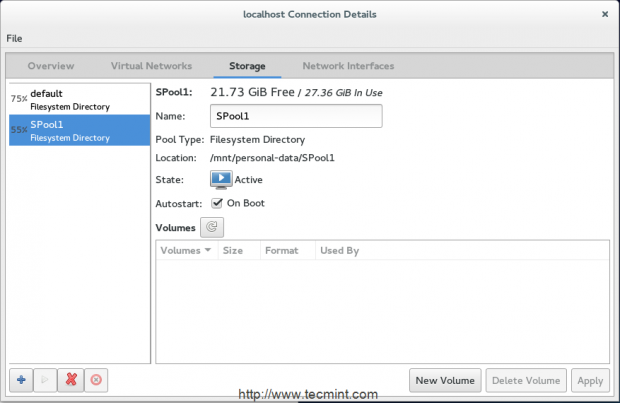
1. Firstly, let’s display the available pools in our environment by the way we did it before from Details section after right clicking on (localhost) in the main window. This window will appear
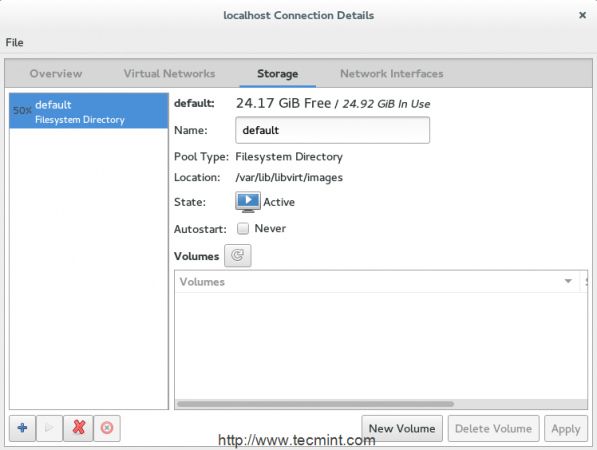
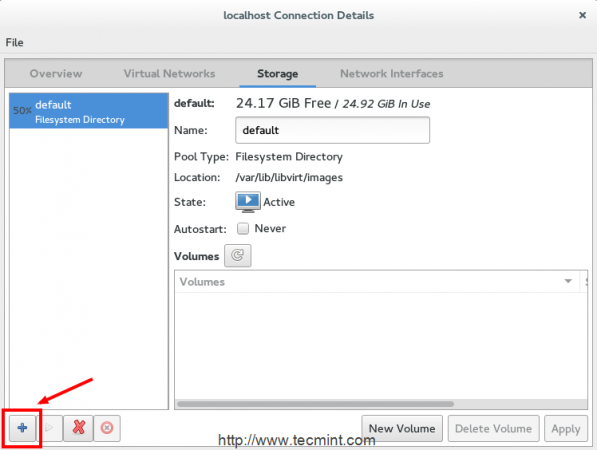
As a default, there is one storage pool which called “Default” uses the rootfs partition to store vm’s volumes under /var/lib/libvirt/images path.
In many cases, its not recommended to use this pool, just to make this free space for your system. At any way let’s create our first storage pool by clicking on ‘+‘ button from the same window.
Next, you may provide the name of your new storage pool and select the type of the storage which will be used to deploy the storage pools. KVM supports nine types:
- -dir – Uses Filesystem Directory to store storage volumes.
- -disk – Uses Physical Hard Disks to store storage volumes.
- -fs – Uses Pre-Formatted Partitions to store storage volumes.
- -netfs – Uses Network-shared storage like NFS to store storage volumes.
- -gluster – Depends on Gluster filesystems storage.
- -iscsi – Uses Network-shared ISCSI storage to store storage volumes.
- -scsi – Uses local SCSI storage to store storage volumes.
- -lvm – Depends on LVM Volume groups to store storage volumes.
- -mpath –
At the moment, multipathing Volume creation is not supported.
You may be familiar with a lot of them, but we will discuss one or two of them for this tutorial. Lets start with the popular one, (dir) type.
(Dir) type is very popular used as it doesn’t require many modification in current storage schema you have.
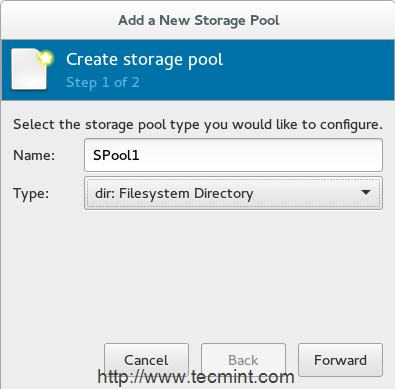
3. There is no restriction where the storage pool will be created, but it is very recommended to create ‘SPool1‘ directory on separate partition. One important thing also is to give the right permissions and ownership for this directory.
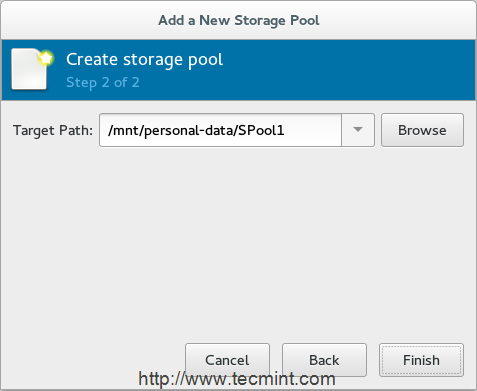
I will use /dev/sda3 as my partition, you may have a different one. Make sure you have mounted it properly.
# mount -t ext4 /dev/sda3 /mnt/personal-data/
4. After mounting the partition under ‘/mnt/personal-data/‘ directory, then provide the path of mount point to that storage directory (i.e. /mnt/personal-data/SPool1).
5. After finishing, you will find new storage pool “SPool1” appeared in the list.
Before going to the stage two to create volumes, Let’s discuss another type of our Storage Pool called fs.
The (FS) type is depends on Preformatted partitions and it is useful for whom want to specify complete partition for virtual machine disks/storage.
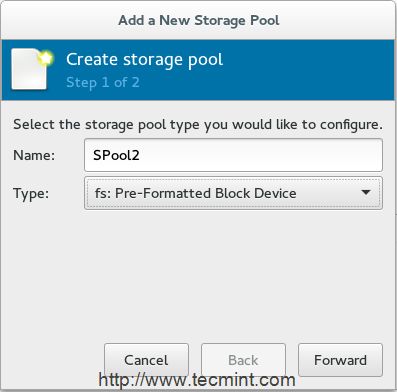
6. We will create another storage pool using per-formatted partition that is the ((fs) Pre-Formatted Block Device) type. You need to prepare another new partition with desired file system.
You could use “fdisk” or “parted” to create new partition and use “mkfs” for formatting with new file-system. For this section, (sda6) will be our new partition.
# mkfs.ext4 /dev/sda6
Also create a new directory (i.e. SPool2), it acts as a mount point for the selected partition.
7. After selecting (fs) type from the drop-menu, next provide the name of the new pool as shown
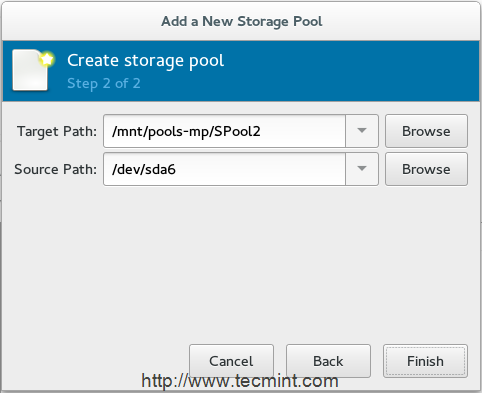
8. In the next window, you need to provide the path of your partition ‘/dev/sda6‘ in our case – in the “Source Path” field and the path of the directory which acts as a mount point /mnt/personal-data/SPool2 in the “Target Path” field.
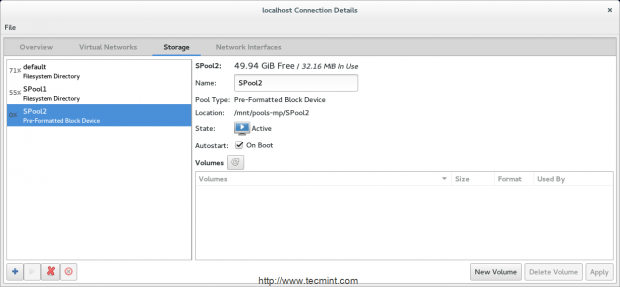
9. Finally, there is a third storage pool added in the main storage list.
So, we will discuss deploying another storage types in our next part using CLI tools, for now let’s move to create volumes.
Stage Two: Create Storage Volumes
As we discussed before, you could consider the storage volumes as a virtual disks for virtual machines. We also still have many formats for this volumes.
In general, this formats allow you to use your volumes with QEMU, VMware, Oracle VirtualBox and Hyper-V.
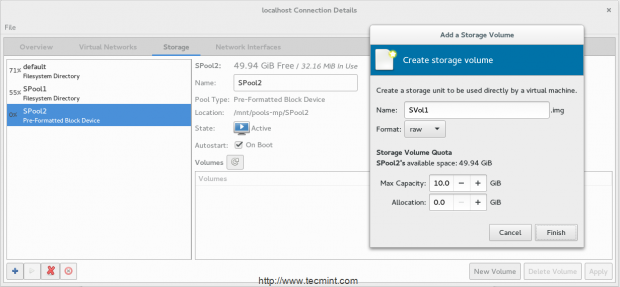
10. Select the storage pool which you want to storage volume be part of ‘New Volume‘. Press on ‘New Volume’ button to start.
11. Next, provide the name of the new volume and select the format of it. Don’t forget to set proper size also.
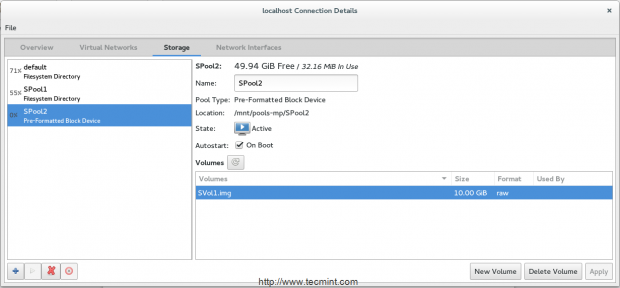
12. Now your volume is ready to attached with virtual machines
Conclusion
Now you’ve learned the difference between Storage Pools and Volumes and how to create and manage them under KVM environment using virt-manager GUI tool. Also we discussed the types of Pools and the importance of volume’s formats. It’s your turn to make your hands more dirty.
Reference Links
KVM HomePage
KVM Documentation

The iscsi direct target is not working in centos 8 KVM using cockpit, can anyone help on this?
I need to add 1 extra virtual HDD, the first HDD I installed the CentOS. I need it for testing fdisk, how can I add in VM?
When I create a dir type storage pool, it spits out the following error.
Error creating pool: Could not build storage pool: failed to create directory ‘/media/matrix/sdb9/pool’: File exists
The target path of the pool is /media/matrix/sdb9/pool/. No matter what directory I choose as the target path, it always shows this error.
Any idea?
Hi, In Stage 1, Step 3 you say that “One important thing also is to give the right permissions and ownership for this directory.” What exactly are the permissions I need to apply to the directory? When I choose the directory for the pool, VMM changes the ownership to root.
I’m trying to create the storage pool on an additional drive with partition type Linux LVM, formatted as EXT4 filesystem. I get to the step where I use VMM to create a new pool in a directory in that drive. I then created a volume in qcow2 format in that pool. When I try to create my virtual machine, and select this image, I get an error that reads: “The emulator may not have search permissions for the path ‘/media/it/BAY2/Spool1/NetSUS.img’.”
It asks if I want to correct this now? and I choose “Yes.” I then get the following error: “Errors were encountered changing permissions for the following directories: /media/it : [Errno 1] Operation not permitted: ‘/media/it'”
How do I fix this?
Meanwhile, I’ll try to create this VM in the default Pool.