In the first part of the Nagios series article, we’ve explained in detail how to install and configure the latest version of Nagios Core and Nagios Plugins in RHEL-based distributions such as CentOS Stream, Rocky Linux, AlmaLinux, and Fedora.
In this article, we will show you how to add a Remote Linux machine and its services to the Nagios Core Monitoring host using NRPE (Nagios Remote Plugin Executor) agent.
We hope you already have Nagios Core installed and running properly. If not, please use the following installation guide to install it on the system.
If you are planning to add a remote Windows host to the Nagios monitoring server, use the following guide:
Once you’ve installed it, you can proceed further to install the NRPE agent on your Remote Linux host. Before heading further, let us give you a short description of NRPE.
Table of Contents
What is NRPE?
The NRPE (Nagios Remote Plugin Executor) plugin allows you to monitor any remote Linux/Unix services, network devices, or resources like CPU load, Swap, Memory usage, Online users, etc. on local/remote Linux machines.
After all, these local resources are not mostly exposed to external machines, an NRPE agent must be installed and configured on the remote machines.
Note: The NRPE addon requires that Nagios Plugins must be installed on the remote Linux machine. Without these, the NRPE daemon will not work and will not monitor anything.
Installation of NRPE Plugin in Nagios Server and Remote Linux Host
To use the NRPE, you will need to do some additional tasks on both the Nagios Monitoring Server and the Remote Linux Host that the NRPE is installed on. We will be covering both installation parts separately.
Installing Nagios Plugins and NRPE On Remote Linux Host
Please use the below instructions to install Nagios Plugins and NRPE daemon on the Remote Linux Host.
Step 1: Install Required Dependencies
We need to install required libraries like gcc, glibc, glibc-common, and GD and its development libraries using the yum package manager.
# yum install -y gcc glibc glibc-common gd gd-devel make net-snmp openssl-devel tar wget
Step 2: Create Nagios User
Create a new nagios user account and set a password.
# useradd nagios
# passwd nagios
Step 3: Install the Nagios Plugins
Create a directory for nagios plugin installation and all its future downloads.
# mkdir /root/nagios
# cd /root/nagios
Now download the latest Nagios Plugins package with the wget command.
# wget https://nagios-plugins.org/download/nagios-plugins-2.3.3.tar.gz
Step 4: Extract Nagios Plugins
Run the following tar command to extract the source code tarball.
# tar -xvf nagios-plugins-2.3.3.tar.gz
After, extracting one new folder will appear in that directory.
# ls -l

total 2724
drwxr-xr-x. 15 root root    4096 Mar 11  2020 nagios-plugins-2.3.3
-rw-r--r--.  1 root root 2782610 Mar 11  2020 nagios-plugins-2.3.3.tar.gz
Step 5: Compile and Install Nagios Plugins
Next, compile and install nagios plugins using the following commands
# cd nagios-plugins-2.3.3
# ./configure
# make
# make install
Set the permissions on the plugin directory using the chown command.
# chown nagios.nagios /usr/local/nagios
# chown -R nagios.nagios /usr/local/nagios/libexec
Step 6: Installing NRPE Plugin
To install the nrpe plugin, first, download the latest NRPE Plugin or use the following wget command.
# cd /root/nagios
# wget https://github.com/NagiosEnterprises/nrpe/releases/download/nrpe-4.0.2/nrpe-4.0.2.tar.gz
Unpack the NRPE source code tarball.
# tar xzf nrpe-4.0.2.tar.gz
# cd nrpe-4.0.2
Compile and install the NRPE addon.
# ./configure
# make all
Note: If you get the following error while running the ‘make all‘ command:
In file included from ../include/common.h:34,
                 from ./nrpe.c:38:
/usr/include/openssl/err.h:413:15: note: declared here
  413 | unsigned long ERR_get_error_line_data(const char **file, int *line,
      |               ^~~~~~~~~~~~~~~~~~~~~~~
/usr/bin/ld: /tmp/ccWQBjHb.o: in function `init_ssl':
/root/nagios/nrpe-4.0.2/src/./nrpe.c:474: undefined reference to `get_dh2048'
collect2: error: ld returned 1 exit status
make[1]: *** [Makefile:48: nrpe] Error 1
Then, you need to disable SSL for nrpe configuration with ./configure --disable-ssl flag as shown.
# ./configure --disable-ssl
# make all
Next, install the NRPE plugin daemon, and sample config files.
# make install-plugin
# make install-daemon
# make install-config
Install the NRPE daemon under systemd as a service.
# make install-init
Step 7: Configuring NRPE Plugin
Now open /usr/local/nagios/etc/nrpe.cfg file and add the local host and IP address of the Nagios Monitoring Server.
allowed_hosts=127.0.0.1,192.168.102
Next, enable and restart the nrpe service.
# systemctl enable nrpe
# systemctl restart nrpe
Step 8: Open NRPE Port in Firewall
Make sure that the Firewall on the local machine will allow the NRPE daemon to be accessed from remote servers. To do this, run the following iptables command.
# firewall-cmd --zone=public --add-port=5666/tcp
# firewall-cmd --zone=public --add-port=5666/tcp --permanent
Step 8: Verify NRPE Daemon Locally
Run the following netstat command to verify the NRPE daemon working correctly under systemd.
# netstat -at | grep nrpe
OR
# netstat -na | grep "5666"


tcp        0      0 0.0.0.0:nrpe            0.0.0.0:*               LISTEN
tcp6       0      0 [::]:nrpe               [::]:*                  LISTEN
If you get output similar to the above, means it working correctly. If not, make sure to check the following things.
- Make sure to check that the nrpe entry is correctly added in the/etc/services file.
- The allowed_hosts contains an entry for “nagios_ip_address” in the /usr/local/nagios/etc/nrpe.cfg file.
- Check for the errors in the system log files for about nrpe and fix those problems.
Next, verify the NRPE daemon is functioning properly by running the “check_nrpe” command that was installed earlier for testing purposes.
# /usr/local/nagios/libexec/check_nrpe -H 127.0.0.1
You will get the following string on the screen, it shows you what version of NRPE is installed:
NRPE v4.0.2
Step 9: Customize NRPE Commands
The default NRPE configuration file that got installed has several command definitions that will be used to monitor this machine. The sample configuration file is located at.
# vi /usr/local/nagios/etc/nrpe.cfg
The following are the default command definitions that are located at the bottom of the configuration file. For the time being, we assume you are using these commands. You can check them by using the following commands.
# /usr/local/nagios/libexec/check_nrpe -H 127.0.0.1 -c check_users

USERS OK - 1 users currently logged in |users=1;5;10;0
# /usr/local/nagios/libexec/check_nrpe -H 127.0.0.1 -c check_load

OK - load average: 3.90, 4.37, 3.94|load1=3.900;15.000;30.000;0; load5=4.370;10.000;25.000;0; load15=3.940;5.000;20.000;0;
# /usr/local/nagios/libexec/check_nrpe -H 127.0.0.1 -c check_hda1

DISK OK - free space: /boot 154 MB (84% inode=99%);| /boot=29MB;154;173;0;193
# /usr/local/nagios/libexec/check_nrpe -H 127.0.0.1 -c check_total_procs

PROCS CRITICAL: 297 processes
# /usr/local/nagios/libexec/check_nrpe -H 127.0.0.1 -c check_zombie_procs

PROCS OK: 0 processes with STATE = Z
You can edit and add new command definitions by editing the NRPE config file. Finally, you’ve successfully installed and configured NRPE agent on the Remote Linux Host.
Now it’s time to install an NRPE component and add some services to your Nagios Monitoring Server…
Installing NRPE On Nagios Monitoring Server
Now login into your Nagios Monitoring Server. Here you will need to do the following things:
- Install the check_nrpe plugin.
- Create a Nagios command definition using the check_nrpe plugin.
- Create a Nagios host and add service definitions for monitoring the remote Linux host.
Step 1: Install NRPE Plugin in Nagios
Go to the nagios download directory and download the latest NRPE Plugin or use the following wget command.
# cd /root/nagios
# wget https://github.com/NagiosEnterprises/nrpe/releases/download/nrpe-4.0.2/nrpe-4.0.2.tar.gz
Unpack the NRPE source code tarball.
# tar xzf nrpe-4.0.2.tar.gz
# cd nrpe-4.0.2
Compile and install the NRPE addon.
# ./configure
# make all
# make install-plugin
# make install-daemon
# make install-init
Step 2: Verify NRPE Daemon Remotely
Make sure that the check_nrpe plugin can communicate with the NRPE daemon on the remote Linux host. Add the IP address in the command below with the IP address of your Remote Linux host.
# /usr/local/nagios/libexec/check_nrpe -H <remote_linux_ip_address>
You will get a string back that shows you what version of NRPE is installed on the remote host, like this:
NRPE v4.0.2
If your receive a plugin time-out error, then check the following things.
- Make sure your firewall isn’t blocking the communication between the remote host and the monitoring host.
- Make sure that the NRPE daemon is installed correctly under systemd.
- Make sure that the remote Linux host firewall rules block the monitoring server from communicating with the NRPE daemon.
Adding Remote Linux Host to Nagios Monitoring Server
To add a remote host you need to create two new files “hosts.cfg” and “services.cfg” under the “/usr/local/nagios/etc/” location.
Step 1: Creating Nagios Host and Services File
# cd /usr/local/nagios/etc/
# touch hosts.cfg
# touch services.cfg
Now add these two files to the main Nagios configuration file. Open the nagios.cfg file with any editor.
# vi /usr/local/nagios/etc/nagios.cfg
Now add the two newly created files as shown below.
# You can specify individual object config files as shown below:
cfg_file=/usr/local/nagios/etc/hosts.cfg
cfg_file=/usr/local/nagios/etc/services.cfg
Step 2: Configuring Nagios Host and Services File
Now open hosts.cfg file and add the default host template name and define remote hosts as shown below. Make sure to replace host_name, alias, and address with your remote host server details.
# vi /usr/local/nagios/etc/hosts.cfg
## Default Linux Host Template ##
define host{
name                            linux-box               ; Name of this template
use                             generic-host            ; Inherit default values
check_period                    24x7
check_interval                  5
retry_interval                  1
max_check_attempts              10
check_command                   check-host-alive
notification_period             24x7
notification_interval           30
notification_options            d,r
contact_groups                  admins
register                        0                       ; DONT REGISTER THIS - ITS A TEMPLATE
}

## Default
define host{
use                             linux-box               ; Inherit default values from a template
host_name                       tecmint		        ; The name we're giving to this server
alias                           CentOS 6                ; A longer name for the server
address                         5.175.142.66            ; IP address of Remote Linux host
}
Next open services.cfg file and add the following services to be monitored.
# vi /usr/local/nagios/etc/services.cfg
define service{
        use                     generic-service
        host_name               tecmint
        service_description     CPU Load
        check_command           check_nrpe!check_load
        }

define service{
        use                     generic-service
        host_name               tecmint
        service_description     Total Processes
        check_command           check_nrpe!check_total_procs
        }

define service{
        use                     generic-service
        host_name               tecmint
        service_description     Current Users
        check_command           check_nrpe!check_users
        }

define service{
        use                     generic-service
        host_name               tecmint
        service_description     SSH Monitoring
        check_command           check_nrpe!check_ssh
        }

define service{
        use                     generic-service
        host_name               tecmint
        service_description     FTP Monitoring
        check_command           check_nrpe!check_ftp
        }
Step 3: Configuring NRPE Command Definition
Now NRPE command definition needs to be created in commands.cfg file.
# vi /usr/local/nagios/etc/objects/commands.cfg
Add the following NRPE command definition at the bottom of the file.
###############################################################################
# NRPE CHECK COMMAND
#
# Command to use NRPE to check remote host systems
###############################################################################

define command{
        command_name check_nrpe
        command_line $USER1$/check_nrpe -H $HOSTADDRESS$ -c $ARG1$
        }
Finally, verify Nagios Configuration files for any errors.
# /usr/local/nagios/bin/nagios -v /usr/local/nagios/etc/nagios.cfg

Total Warnings: 0
Total Errors:   0
Finally, restart Nagios to apply recent configuration changes:
# systemctl restart nagios
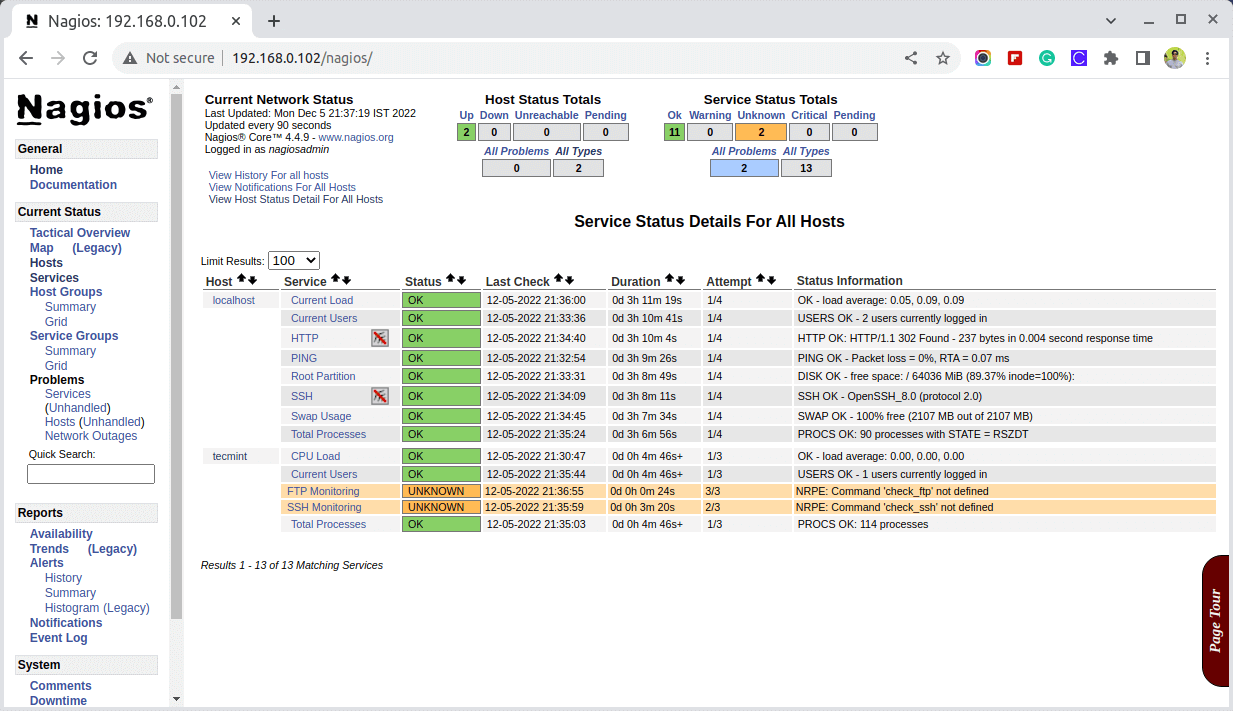
Step 4: Monitoring Remote Linux in Nagios
Now go to the Nagios Monitoring Web interface at “http://Your-server-IP-address/nagios” or “http://FQDN/nagios” and Provide the username “nagiosadmin” and password. Check that the Remote Linux Host was added and is being monitored.
Conclusion
That’s it! for now, in my upcoming article, I will show you how to add a Windows host to Nagios monitoring Server. If you’re facing any difficulties while adding the remote host to Nagios.
Please do comment on your queries or problem via the comment section, till then stay tuned to Tecmint.com for more such valuable articles.


I am getting this error for ./configure command
[root@localhost nagios-plugins-2.3.3]# ./configure
configure: error: working directory cannot be determined
Can I add a remote server using the Nagios GUI?
@Rajan,
Yes, if you’re using Nagios XI, it provides a user-friendly web interface that allows you to add remote servers easily.
I got the following error while running the
make allcommand.# make all ./nrpe.c:287:9: warning: ‘ENGINE_load_builtin_engines’ is deprecated: Since OpenSSL 3.0 [-Wdeprecated-declarations] 287 | ENGINE_load_builtin_engines(); | ^~~~~~~~~~~~~~~~~~~~~~~~~~~So I fixed it by using the latest version nrpe-4.1 from github:
I am getting an error that says:
“Redirecting to /bin/systemctl start nagios.service
Job for nagios.service failed because the control process exited with an error code. See “systemctl status nagios.service” and “journalctl -xe” for details.”
Hello,
I am administering our NAGIOS XI server (v5.5.9) and it is working fine and monitoring LINUX hosts with a variety of LINUX OS v7.9 and lower. This is my first use of CentOS8.x node in our environment and I’m unable to get the tools installed for monitoring using the steps outlined above.
In my case, the verification in Step 8 fails —
Also, I cannot verify the Step 10 “Customize NRPE Commands” file /usr/local/nagios/etc/nrpe.cfg because the directory /usr/local/nagios/etc/ is not installed.
Any suggestions?
I need help, I just want to ask you if, the Nagios, Nagios-Plugins, NRPE, and Xinetd are installed in one machine or different?
@Partik,
Nagios is installed on the server machine, and Nagios-Plugins, NRPE, and Xinetd are installed on client machines…
@Pratik,
You must install Nagios-Plugins, NRPE, and Xinetd on a remote Linux host that you want to monitor under the Nagios server.
Dear Tecmit team,
Why I am getting the below error while installing nrpe?
I am also getting:
What do we need to do to work around that?
Solved it, see this article:
https://support.nagios.com/kb/article.php?id=515CHECK_NRPE STATE CRITICAL: Socket timeout after 10 seconds.
Yes,
ps -ef | grep -iis the best way to check for any process running. You can also use the top command to check the same.I was hoping to find a few more examples. I am trying to figure out how to check for specific processes running on my servers. For example, if I wanted to know if Firefox was running. How do you write a command_check to perform a
ps -ef |grep -i firefoxor something of the sort?Tried this:
and getting this error:
Enter the above command to change ownership and start the nrpe service.
Do we have to restart nagios every time after we added a new host?
Hi,
Good work but some errors while configuring the remote host.
1) While installing nrpe the command given as shown below:
I think it should be
cd nrpe-3.2.1.2) I am getting an error while executing the below command.
@Atul,
Yes, it should be
cd nrpe-3.2.1and I have corrected it in the article.The error you get is because you have missed installing the required dependencies.
Which command or which dependency can you please give me that command?
I am also getting the same error please explain which dependencies I am missing.
Hi, This error is coming while I am restarting the Nagios service for email configuration.
Sample Output:
Running configuration check... Nagios Core 4.4.3 Copyright (c) 2009-present Nagios Core Development Team and Community Contributors Copyright (c) 1999-2009 Ethan Galstad Last Modified: 2019-01-15 License: GPL Website: https://www.nagios.org Reading configuration data... Read main config file okay... Error: Template 'linux-server' specified in host definition could not be not found (config file '/usr/local/nagios/etc/objects/localhost.cfg', starting on line 21) Error: Service notification period '24×7' specified for contact 'nagiosadmin' is not defined anywhere! Error: Could not register contact (config file '/usr/local/nagios/etc/objects/contacts.cfg', starting on line 27) Error processing object config files! ***> One or more problems was encountered while processing the config files... Check your configuration file(s) to ensure that they contain valid directives and data definitions. If you are upgrading from a previous version of Nagios, you should be aware that some variables/definitions may have been removed or modified in this version. Make sure to read the HTML documentation regarding the config files, as well as the 'Whats New' section to find out what has changed.I want to know the meaning of this nagios status information as I am new to the Linux platform.
HTTP WARNING: HTTP/1.1 404 – 1234 bytes in 0.004 second response time.
@Buddy,
The 404 error means the page is not found, it means your Apache is running but the requested page is not found…
What if I am installing a third server? How do I apply the service file I append the same info to the bottom and change the hostname to a new host but the Nagios monitor displays unknown services (NRPE: Unable to read output) for the service. The host was added fine.
Hi David,
Try restarting NRPE on remote client after the config changes:
Hi,
I have installed nagioscore-4.4.1, nagios-plugins-2.2.1 & nrpe-3.0.1 on my machine. Nagios Server is CentOS and Remote host is Suse Linux.
I am getting error ‘CHECK_NRPE: Error – Could not connect to 10.211.7.5: Connection reset by peer‘
@Shayja,
Does it work with the localhost IP address (127.0.0.1)? If yes, might you need to disable IPv6 support? Another solution is, to search for the following line in /etc/xinetd.d/nrpe file.
and simply change it to “no“, then:
Restart the service.
Hi @Ravi Saive,
Thanks for your reply. After the change, I am getting the below error in Nagios Server.
Output from Nagios Server.
How to add the host IP address and users in the nagios server?
As I mentioned in my previous comment…
I followed two methods.
1. I tried to open port for 5666 in iptables
2. I disabled iptables and tried for some time.
but am getting the same issues…
@Jagadeesh,
First, verify that the port 5666 is running using the following command.
If not, you should check your NRPE installation…
I still get the same error:
@Jagadeesh,
Please open the Nagios NRPE Port 5666 on the firewall to allow connection from remote machines…
I tried two things.
1. I tried to open port for 5666 in iptables
2. I disabled iptables and tried for some time.
I tried both but am getting the same issues.
This tutorial is very very confusing because which part will do on the server and which will be done on the remote machine is not clear.
@Jagadeesh,
If you know how Nagios works, you should clearly understand how these instructions work…
I can’t install xinted in centos 6.10. Please anyone tell me.
@Jagadeesh,
It’s easy, just run the following command to install Xinetd on CentOS or Fedora.
I am getting the following error while compiling Nagios:
Getting this error, Kindly let me know what is the issue.
I have checked the permission and member of nagios user of port user
Hi bro, I added multiple Linux servers to Nagios server but all added server showing same
"/"partition sizes and swap sizes, my partitions are created with LVM in all configuration files i modified “Hostname, alias, IPaddress“, is there any modifications i have to do?How to remove the nrpe 3.2.1 setup from scratch in the client machine?
I want to remove all the files & folders related nrpe and want make a fresh start. Assist me in it
@Zaid,
Use find command to locate all NRPE relate files and delete them..
[root@tlaserver21 nrpe-3.2.1]# /usr/local/nagios/libexec/check_nrpe -H localhost
CHECK_NRPE: Error – Could not connect to ::1c00:0:ffff:ffff: Connection reset by peer
@Zaid,
Please enable IPv6 in networking and also open NRPE port on Firewall..
Sample Output
can you please update the url of nrpe 3.0 plugin.
@Mszaid,
Thanks for pointing out, I’ve updated the URL of NRPE to latest version i.e 3.2.1.
make: *** No rule to make target `install-daemon-config‘. Stop.
You have new mail in /var/spool/mail/root
[[email protected]]# make install-xinetd
make: *** No rule to make target `install-xinetd’. Stop.
[root@cloud86 nrpe-3.0]# make install-inetd
No inetd file to install
make: *** [install-
getting above error
@Rasmita,
Please install all needed packages for Nagios to compile as shown.
every package is installed and latest but still the same issue
same error as received by mubarak. All the package is installed and latest
Same issue here. There appears to be a missing step in the instructions. I’ve validated that all the listed packages are installed–my guess is that there is a package missing, and it is not listed in these instructions.
I downloaded nrpe plugin tarball on nagios server and extracted it in /root/nagios/. Now when I am going inside that directory and running
./configureit is giving me these error. Can any one help me!!!@Partha,
Please first install required libraries on your Linux distribution you are using.
Hi, How can I provide remote server port in host.cfg file.
this command shows:
what it means?
@Ajay,
You need to enable Red Hat subscription to make use of their repositories to install software packages.
Good day,
I am stuck at extracting the file tar -xvf nagios-plugins-2.1.2.tar.gz, it only says
I already installed unzip, gzip and tar. Do you have any ideas on how to solve this?
@Henrich,
It seems your download tar archive is corrupted or damaged during download, try to download new copy tar archive file and then extract it again..
@Ravi,
Thanks a lot bro, I remove the file and download again. It works
Hi Ravi,
A very basic question!!!
I have installed Nagios on an EC2 instance and its up and running. But now when I try to access http://ec2-ip/nagios from my windows machine, I am unable to access it.
I have configured port 80 for inbound rules in the security group still I am unable to access the web-interface.
@Nitish,
Does http://ec2-ip/nagios accessed locally? i mean like this: http://localhost/nagios on same machine. If yes, you need to configure your Apache to allow nagios access from remote machines.
Hi Guys,
I am new for Nagios i need document to install Nagios and Monitoring for linux and windows servers in Nagios.
@Nath,
Please follow the Nagios installation guide.
Hi Ravi,
I see two sets of configuration files, one set in /usr/local/nagios/etc and another in /etc/nagios/.
Which one of them is picked? Am trying to add hostgroups to nagios but its not picking up the hosts information.
nrpe tcp/5666 #nrpe : Hash is Missing
Hi Ravi,
I have the same problem as Partha:
[root@host nrpe-3.0]# make install-plugin
cd ./src/; make install-plugin
make[1]: Entering directory `/root/nagios/nrpe-3.0/src’
/usr/bin/install -c -m 755 -d /usr/local/nagios/bin
/usr/bin/install -c -m 755 ../uninstall /usr/local/nagios/bin/nrpe-uninstall
/usr/bin/install -c -m 775 -o nagios -g nagios -d /usr/local/nagios/libexec
/usr/bin/install -c -m 775 -o nagios -g nagios -d /usr/local/nagios/libexec
/usr/bin/install -c -m 775 -o nagios -g nagios check_nrpe /usr/local/nagios/libexec
make[1]: Leaving directory `/root/nagios/nrpe-3.0/src’
[root@host nrpe-3.0]# make install-daemon
cd ./src/; make install-daemon
make[1]: Entering directory `/root/nagios/nrpe-3.0/src’
/usr/bin/install -c -m 755 -d /usr/local/nagios/bin
/usr/bin/install -c -m 755 ../uninstall /usr/local/nagios/bin/nrpe-uninstall
/usr/bin/install -c -m 755 nrpe /usr/local/nagios/bin
/usr/bin/install -c -m 755 -o nagios -g nagios -d /usr/local/nagios/var
/usr/bin/install -c -m 644 ../startup/tmpfile.conf /usr/lib/tmpfiles.d/nrpe.conf
make[1]: Leaving directory `/root/nagios/nrpe-3.0/src’
#I guess problem starts here#
[root@host nrpe-3.0]# make install-daemon-config
make: *** No rule to make target `install-daemon-config’. Stop.
[root@host nrpe-3.0]# make install-xinetd
make: *** No rule to make target `install-xinetd’. Stop.
[root@host nrpe-3.0]# make install-inetd
/usr/bin/install -c -m 644 startup/default-xinetd /etc/xinetd.d/nrpe
***** MAKE SURE ‘nrpe 5666/tcp’ IS IN YOUR /etc/services FILE
Would appreciate your advice.
Regards,
Piotr
Hi there,
Used these instructions to setup NRPE and it KIND OF worked:
https://support.nagios.com/kb/article.php?id=515
I mean I got it running but now stumbled upon another problem and cannot find any solution anywhere.
———————
[root@host init.d]# /usr/local/nagios/libexec/check_nrpe -H localhost
CHECK_NRPE: Error – Could not connect to ::3668:6c6e:7556:0: Connection reset by peer
[root@host init.d]# /usr/local/nagios/libexec/check_nrpe -H localhost -c check_load
CHECK_NRPE: Error – Could not connect to ::3668:6c6e:7556:0: Connection reset by peer
————————
HELP!
1) /usr/local/nagios/etc/nrpe.cfg must be present
2)grep -i disable /etc/xinetd.d/nrpe
disable = no
3)If you don’t need IPv6 try disabling it in /etc/sysctl.conf
# grep -i ipv6 /etc/sysctl.conf
net.ipv6.conf.all.disable_ipv6 = 1
net.ipv6.conf.default.disable_ipv6 = 1
net.ipv6.conf.lo.disable_ipv6 = 1
Then run sysctl -p
Hi,
I have the same problem as you, how did you resolve this?
Thanks.
Hello Ravi,
I stuck on this command “make install-daemon-config”. It is showing the error “make: *** No rule to make target `install-daemon-config’. Stop”.
Check this one mate
https://support.nagios.com/kb/article.php?id=515
Hi, thanks for the tutorial
let me know how to add windows host to nagios server.
@Nirmal,
Here is the guide that shows how to add Windows host to Nagios.
I am having the same problem. The check_nrpe file is not in the /usr/local/nagios/libexec/ directory
@Mani,
That means your NRPE installation was not successful, try to install again and see if the nrpe plugin available from libexec directory…
Hi Ravi
On Nagios Monitoring Server
Not able to perform step 2
[root@tecmint]# /usr/local/nagios/libexec/check_nrpe -H
@Satyam,
What error you getting on the screen while checking NRPE version with host?
No such file and directory found, according to your document, it should show version of Nagios. Second question, i want to monitor “ps -ef | grep -i gmvuser” from remote machine, how to add entry for that in /usr/local/nagios/etc/nrpe.cfg file at remote server .