This tutorial discusses the installation of CentOS 7.1 in dual-boot with Windows 8.1 on UEFI Firmware machines that comes pre-installed with Windows Operating System.
However, if your machine has no Operating System installed by default and you still want to use the dual-boot, Windows alongside CentOS, it’s recommended that you first install Windows OS, create the necessary partitions during the Windows installation process and, then, install CentOS or any other Linux Operating System.
Prerequisites
One important thing needed to be mentioned is that in order to install a Linux system on machines that comes with UEFI firmware you must enter UEFI settings and disable the Secure Boot option (if your system supports this option, although it has been reported that CentOS can boot with Secure Boot enabled).
Also, be aware that booting your machine on UEFI mode and installing an Operating System in this mode implies that all your disks will be formatted in GPT partition layout (MBR partition style can be used in conjunction with Legacy Mode).
Also, if you want to install CentOS from a different media type than a DVD ISO image, such as a USB bootable drive, you must create a bootable CentOS USB drive using a utility such as Rufus, which can format your USB drive to be compatible with UEFI systems and GPT partition style.
To boot in UEFI/Legacy Mode please consult your machine motherboard manual for the specific boot function key (such as F2, F8, F12) or push a small button located on machine sideways, usually found on new Laptops.
However, if you can’t install or boot CentOS from UEFI mode, enter UEFI settings, switch to Legacy Mode (if supported) and use the traditional DVD/USB method to install the systems.
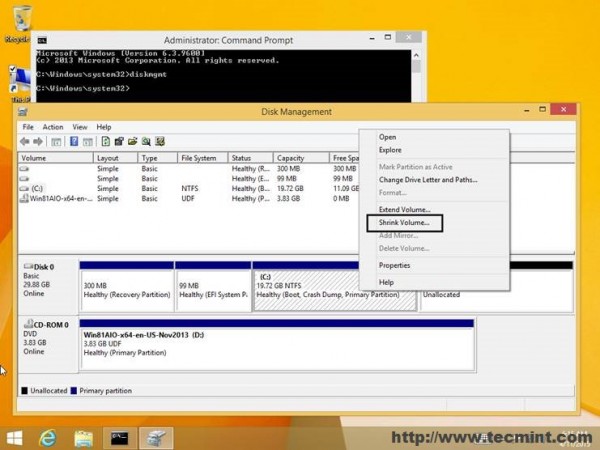
Another mention I would like to remind you stands for machines that comes pre-installed with Windows 8 or 8.1 Operating System and a single partition. In order to make some available disk space required for the CentOS installation, open Windows Command Prompt with Administrator privileges and run the diskmgmt command to open Disk Management system utility.
Once Disk Management console opens, go to C: partition and Shrink Volume in order to create available disk space for CentOS partitions.
Requirements
CentOS 7.1 Bootable DVD ISO Image http://centos.org/download/
Installation of CentOS 7.1 Dual Boot with Windows 8.1
1. Once you have burned CentOS DVD ISO image or prepared a bootbale USB drive using Unetbootin utility, place the DVD/USB image into your machine DVD drive or USB port, restart the computer and enter UEFI settings in order to instruct the machine to boot from the DVD/USB from UEFI firmware.
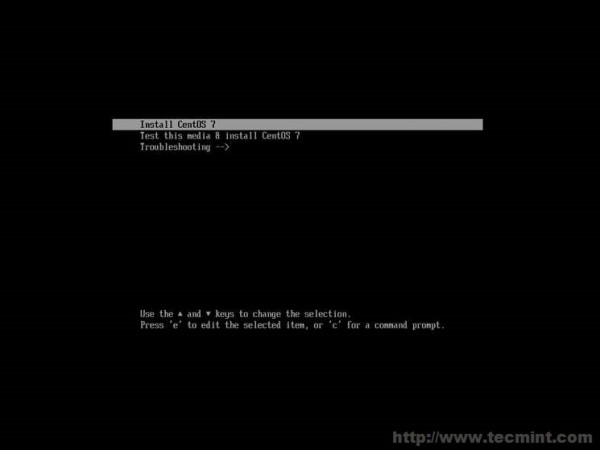
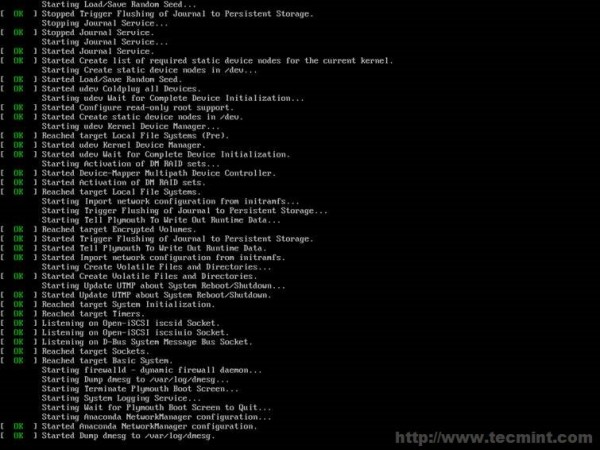
2. After the booting sequence a new screen should appear on your display. Choose the first option, Install CentOS 7, press Enter key and wait for the installer to load the kernel and all the required modules and services.
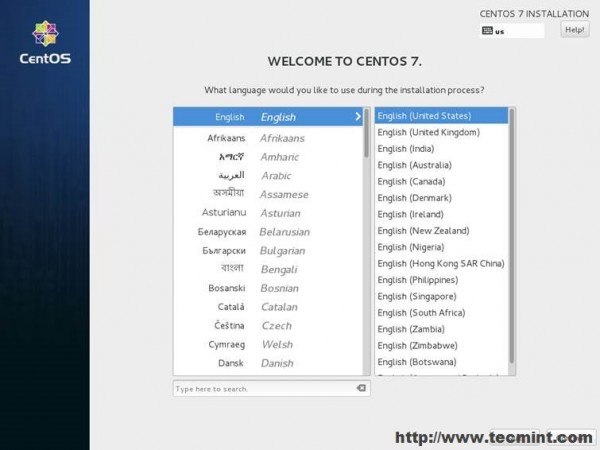
3. After the installer loads all the necessary programs, the Welcome screen should appear. Choose the language that will be used for the installation process and click the below Continue button to proceed further.
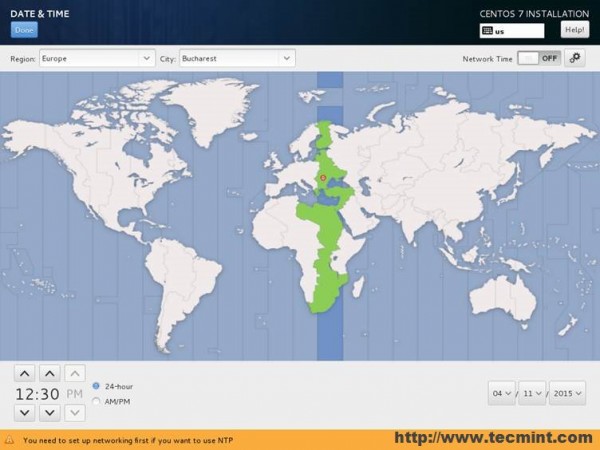
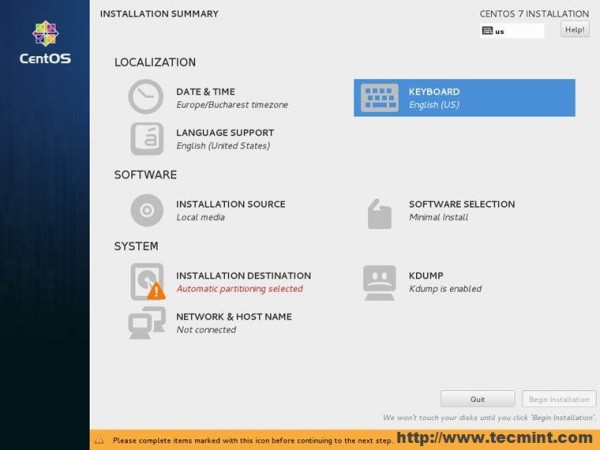
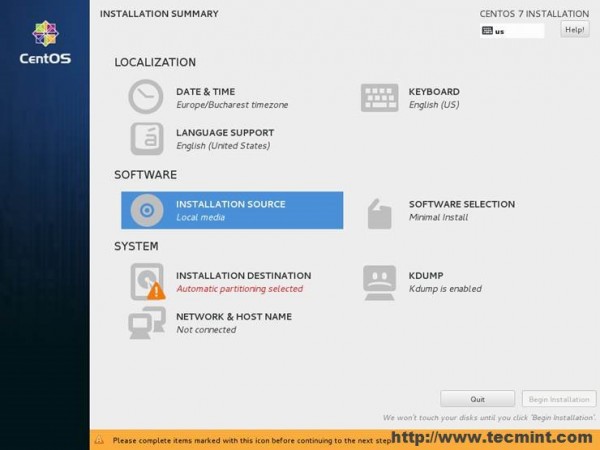
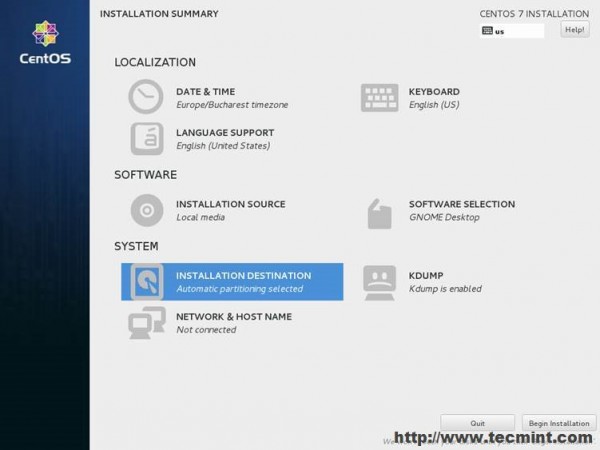
4. On the next step the Installation Summary screen should appear. This screen gathers almost all your system settings for the installation process. First start by setting up your system Date and Time. Hit the Date & Time menu, then select from the map your nearest physical location. Once the location is set hit the above Done button and you will be brought back to the initial settings screen.

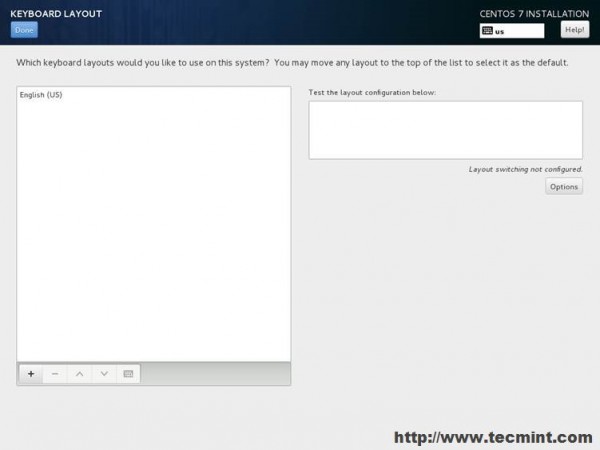
5. Next, hit the Keyboard menu and choose your keyboard input language. If you need to add extra keyboard languages support, hit the plus (+) button and add the language. When you’re done, hit the above Done button to go back to the main settings screen.
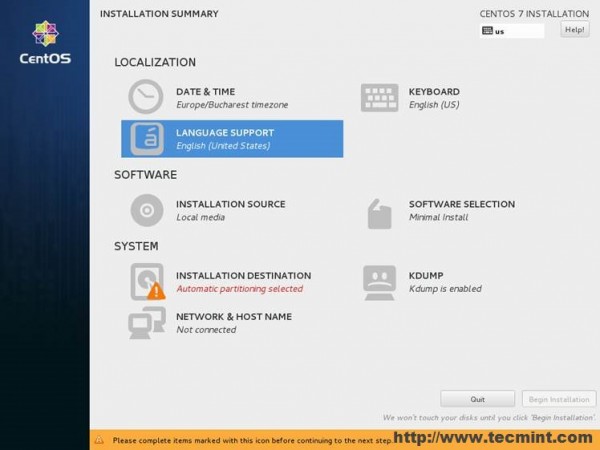
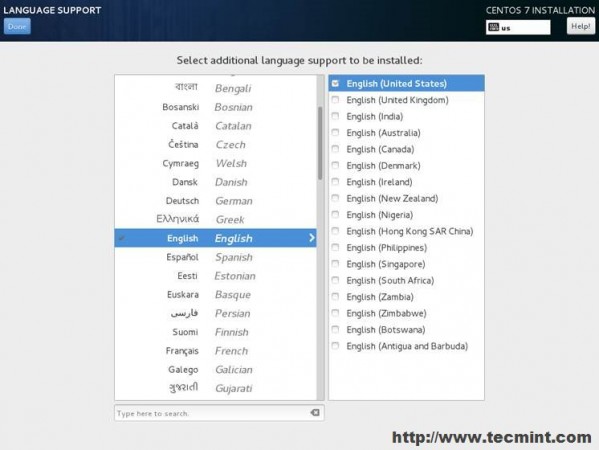
6. On the next step click the Language Support menu and configure your system Language. After you finish language settings, hit the Done button again to go back.
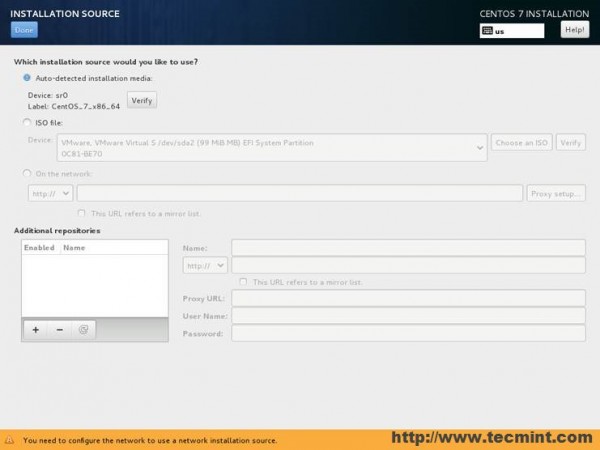
7. The next step is to configure your Installation Sources. If you are installing the system from a local DVD/USB media, then you can skip this step. This step is only required if your using as an network installation method from an PXE server or you have an extra storage on hard drive with an CentOS ISO image. The installation media DVD/USB should be automatically detected by the installer.
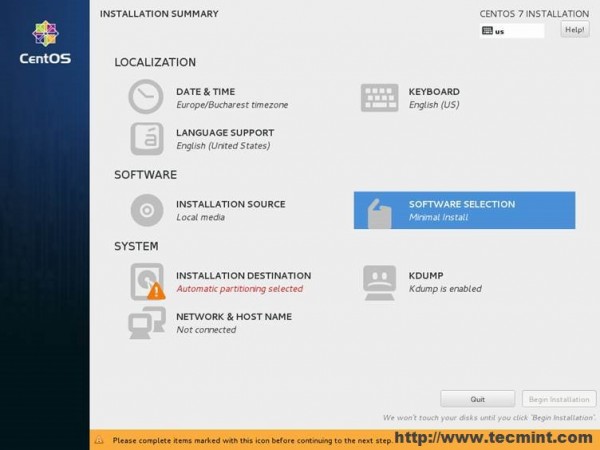
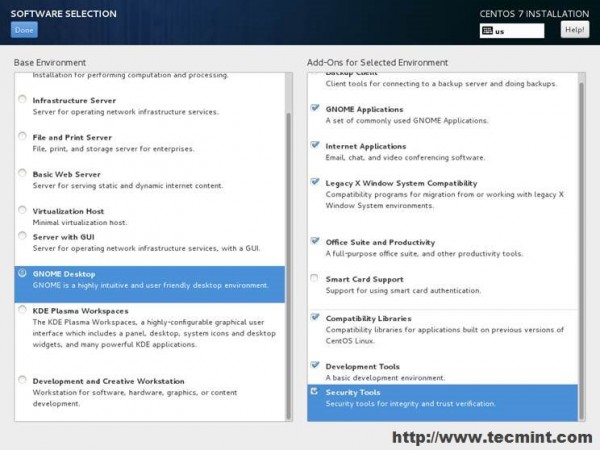
8. On the next step hit the Software Selection menu in order to choose your installation environment. Form here you can choose a minimal installation type (only command line) or a Graphical Installation with your favorite Desktop Environment.
If the machine is not destined to be a server (you can also optate for a server with GUI), then choose a complete Gnome Desktop Environment from the left filed with the following Add-Ons:
Gnome Applications, Internet Applications, Legacy X Window System Compatibility, Office Suite and Productivity, and Compatibility Libraries. If you want to develop applications and secure your system, then, also, check Development Tools and Security Tools.
The same Add-Ons also apply in case you want to use KDE Plasma Desktop Environment. Once you’re done with system environment hit Done button to move forward with the installation settings.
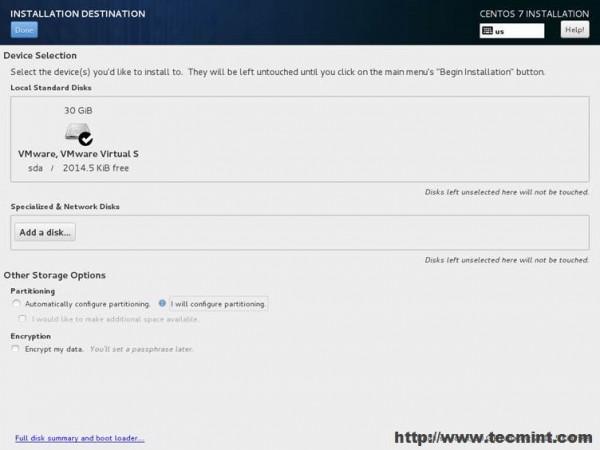
9. The next step is the most important one, because you will now configure your system partitions. Hit the Installation Destination menu, check your hard drive, choose the I will configure partitioning option, then hit Done to proceed further with the manual disk partition.


After the installation, CentOS can’t find Wi-Fi adapter. Can you please help?
@Nukool,
Please install drivers for you Wifi from Device Manager settings..
Thank you, it was my solution for make dual boot easy, but in my case I was needed to configure efi partition also, so you can update your tutorial and note this step.
I just have bought a new computer with Windows 10 and I’d like to have a dual boot between Windows and CentOS7.
What do you recommend?
Thanks
Create a new partition and install CentOS alongside Windows 10. Make sure you boot CentOS the same way Windows was installed. On a new hardware the firmware would be UEFI, so boot-up CentOS under UEFI mode.
Hi, I exactly followed the steps detailed. But at the “installing bootloader configuration” stage during installation it stuck for a while and throws error ‘”failed to write boot loader configuration” and asks whether to continue the installation.
I continued installation and is successful but after reboot, all i can see is grub prompt. I can boot to windows as normal though.
Can you tell what went wrong.
I’m used centos 7.1 iso and it was Windows 10 in my system.
In this guide, not shown very well, which is Windows partition , and which partition to use for CentOS installation . I have tried many times with no success for dual boot. I did it many times before with Fedora Installation
Great tutorial! In “Prerequisites” part I’ll offer to include that if WINDOWS disk is encrypted with BitLocker save the encryption key in external media like USB or as a text file for example in an email, in another way you are in big trouble!
Excellent article, it’s easy to follow for a noob that me, but I have the next problem: Windows has not appear on Grub Menu!!
What would you thing should I do?
UEFI settings -> Boot Options -> BBS Priorities. From there, on some UEFI machines, you can setup what OS should be loaded by default.
I have tried all flavors of Linux distros and without a doubt, Fedora25 is the easiest and most straightforward to install. Just for a laugh I tried to install SuSe again and gave up when it asked for all the details to set up my ISP connection, Fedora just needed my router password. SuSe seems to have gone backward.
I’ll second that and now have installed F26 with no problems on another desktop.
After completing all the steps indicated on both pages of this post, I reboot my system and never see a grub menu. My machine still boots straight into Windows 10. :(
Go to UEFI settings at machine start-up, modify boot order and BBS priorities.
Awesome article. Just what I needed. Will test tomorrow. Thank you !
There’s no need to format the partition with an FAT32 file system. Just create the partition and leave it unformatted or don’t even create the partition at all, leave it as unused space. CentOS 7 should recognize the unused space by default, but this should also be valid for Oracle Linux 7 as well.
Hello Admin,
Please help me..
I’m trying to dual boot windows 7 (already running Windows7) and oracle Linux 7 with bootable USB Stick. First I downloaded Oracle Linux Release 7 for x86_64 (64 Bit) V46135-01.iso from https://edelivery.oracle.com/osdc/faces/SearchSoftware.
Then I created a partition of 50 GB (FAT32) for Oracle Linux then I created a bootable USB Stick using Rufus 2.11.exe on windows OS. after that I started the installation from USB Stick but To choose where to install the Linux the partition of 50GB I made earlier is not listed.
Hi,
Thank you so much for this tutorial. I have a computer which has window7 already. I am trying to install dual operating system with CentOS7. I follow your instructions. After partitioned the disk when I click on “Done” button is located at top left, but could not get success. The error message is showing “No valid boot loader target device found. See below for details. For a UEFI installation, you must include an EFI System Partition on a GPT-formatted disk, mounted at /boot/efi.”, I have tried so many times, but getting the same error. Please help me to fix this problem.
You need to change partition table from MBR to GPT style. First of all backup all important data from HDD, boot-up with an Ubuntu Live media and run a disk utility such as Gparted from GUI or gdisk utility from CLI in order to change partition table format from MBR to GPT. My recommendation is to use gdisk to convert partition layout. After the changes are applied, reboot the machine into CentOS 7 and proceed with the installation. This method use it to in preserve data.
A second method, is to wipe out everything from your HDD and reinstall Windows 7 from scratch on your hard drive partitioned in GPT layout and subsequently install CentOS 7.
Thank you very much for reply, I appreciate this.
What you meant to say, I need to boot-up with Ubuntu live media, and change the partition table from MBR to GPT by using gdisk utility from CLI, after done this, boot again with CentOS USB and proceed the installation ?
Yes, that’s what I mean. But before that, backup important data. You can achieve this from CentOS 7 installer to by deleting all partitions and re-initialize the disk, but this method will destroy all data, including previous windows installations. Also, on UEFI system, the way you boot-up and install the system matters. If you boot-up the USB installer from UEFI make sure the CentOS bootable USB is created with a valid GPT scheme by using a tools such as https://rufus.akeo.ie/ . If you boot up from BIOS legacy no special requirements are needed for the bootable USB drive. Also, if the Windows installation in performed in UEFI, the hard disk will be automatically partitioned with GPT scheme style. So, subsequently installations of CentOS will need to be performed from UEFI too, with the bootable USB disk formatted with GPT valid scheme using Rufus utility.
The simplest solution would be to install both Windows and CentOS from BIOS legacy by changing the default behaviour from your machine BIOS/UEFI settings.
Hello,
I had previously installed Win7 system . After installing the Centos7 I can not see appear the Windows boot. One shows me that Centos at PC startup. I recall that I am a beginner in Linux..
Can you help me please
1.Install “ntfs-3g” package so Linux system can read the Windows partition.
sudo yum install ntfs-3g
2.Create the new Grub conf file
sudo grub2-mkconfig -o /boot/grub2/grub.cfg
Hello,
I am having an issue where the install will error out and repeat
dracut-initqueue timeout [435]
After 50 of those the next error is
could not boot
/dev/disk/by-label/centos-7-x8 does not exist
/dev/mapper/live-rw does not exist
It’s difficult to investigate the issue without additional info. Looks like you there’s a problem with disk from LVM configuration.
Steps 10-14: mine didn’t automatically recognize the Windows EFI partitiion so I did have to manually select it and add /boot/efi as a mount point. If you do as the error message can be interperted and add a /boot/efi under new Centos, mkconfig-grub2 will not see the Windows bootloader.
I still get an error message when I add the /boot/efi partition. No matter what I do, i get that error.
As a guess, try go to your machine BIOS settings and verify if Secure Boot and Fastboot are disabled. Then try to recreate the /boot/efi partition again.
Hello,i disabled them in bios,at the time it creates the efi partition an error popup: “an unknown error has occurred”
file usr/lib/pyton2.7/site-packages/blivet anaconda
i choose the automatic partitioning.
my drive is mbr.
thanks in advance
Boot with Parted Magic or any other Linux Live ISO, delete all partitions and initialize the disk with MBR. Afterwords boot CentOS iso and try to reinstall the system.
Thanks!
i did that earlier …created the dual machine…
but after sometime GRUB menu (showing 2 boot paths ,centos and windows)
showing only 1 boot path (i.e windows)
it seems to me …windows boot menu replaced GRUB ?? how this can be solved??
It means that you mess up the installation somehow! First install windows, then CentOS.Boot with a live CentOS CD and reinstall the grub.
Why i didn’t notify for the comments.?
– OK Let me start from First ( Now i have installed fedora 21 with GPT format on UEFI Mode & Secure boot is DISABLED )
– I have laptop with UEFI & secure boot is disable, & another option is Legacy mode,
– So i am going to format my HD with MBR format than Select Legacy mode and install window 8.1
is it OK ( going smooth for dual boot ) or need any other changes.
Than after Window installation I never changed bios moode (OK )
Through REFUS I make bootable USB of FEDRA 21, ( HD is MBR Formatted, & mode in LEgacy) than fedora installed or not
It gives you en error when booting from Legacy Mode because your HDD is partitioned in GPT style(Legacy Mode uses GPT partition scheme)
If non of the methods work…then wipe out your disk using a Linux Live distro, boot and install Windows 8.1 from Legacy Mode then install Fedora…or other Linux distro.
-Make a bootable USB stick with Rufus if you are planning on booting the USB from UEFI Firmware
-Make a bootable USB stick with UniversalUSBInstaller or any other utility if you are planning on booting the USB from UEFI Legacy
-Enter UEFI settings and disable Secure Boot option (if supported)
-Try to boot from DVD if USB method doesn’t work
– Consult your Laptop Manual
-Make sure you take a close look on Laptop’s sideways…usually some of them have a small hole from which you can boot from.
And what kind of Laptop/Model manufactor you own?
Dear Admin
I face same issue which is describe you but i cant find out any solution, First of All i would like to share my Laptop architecture., I buy New Laptop and Laptop comes with pre installed Window 8.1, and Bios mode ( Legacy & UEFI ), But I need to install dual boot fedora 21 with 8.1.
Problem is that when i select legacy mode than window run but fedora boot-able USB not run, IF i change mode into UEFI than window can’t run and bootlace USB boot, when when i select Disk for fedora installation they give me error and I am unable to complete install, So can you tell me how to dual boot ( Fedora 21 with Windows * )