Docker is a hugely popular containerization platform tool that allows users to develop, test and deploy applications in a smooth and efficient manner inside containers. A container is a lightweight and portable unit that runs in complete isolation from the underlying operating system. It packages the application’s source code, alongside its libraries, dependencies, and configuration.
Containers make it possible for developers to deploy applications consistently across multiple environments with the same consistency, and this is one of the reasons why the modern-day developer cannot choose to ignore Docker and other containerization platforms.
Docker comes in two main editions: Docker community edition (Docker CE) and Docker enterprise edition (Docker EE). The community edition is completely free and open-source, whilst the enterprise edition is a premium version.
Join us as we walk you through the installation of Docker CE on Rocky Linux and AlmaLinux.
Step 1: Add Docker Repository on Rocky Linux
Docker is not yet available on default repositories. Thankfully, an official repository has been provided by developers and we are going to add it first to the system.
On your terminal, run the following command to add the Docker repository
$ sudo dnf config-manager --add-repo=https://download.docker.com/linux/centos/docker-ce.repo

Step 2: Install Docker in Rocky Linux/AlmaLinux
Moving on, we are going to install the Docker community edition which is freely available for download and use. But first, update the packages.
$ sudo dnf update
Next, run the command below to install Docker CE, the command-line interface (CLI), and other essential tools and dependencies.
$ sudo dnf install -y docker-ce docker-ce-cli containerd.io
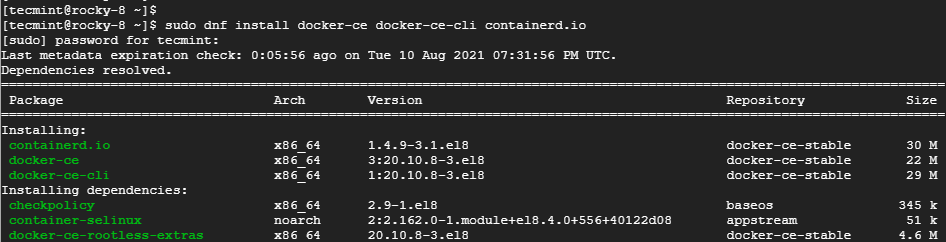
Once installed, confirm the version of Docker that you have installed as provided. The output shows that we have installed Docker 20.10.
$ docker --version

Docker version 20.10.8, build 3967b7d
Step 3: Start and Enable Docker
To begin using Docker, we need to start the Docker daemon. But first, let’s enable it to start on boot as shown.
$ sudo systemctl enable docker
Then start the Docker daemon.
$ sudo systemctl start docker
To confirm the running status of Docker, issue the command.
$ sudo systemctl status docker
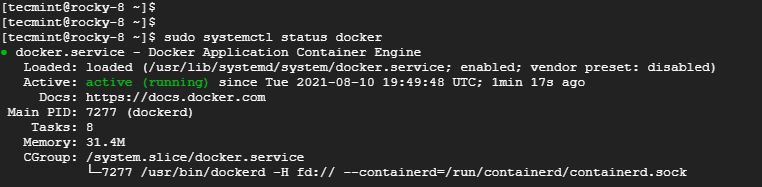
Perfect! Docker is running as expected.
Step 4: Add User to Docker Group
To use or run docker as a regular user, you need to add the user to the ‘docker‘ group which is automatically created during installation. Otherwise, you will keep on running into permission errors.
To achieve this, add the regular user to the ‘docker‘ group as follows where tecmint is the regular user using the usermod command.
$ sudo usermod -aG docker tecmint
Use the id command to verify the groups that the user belongs to.
$ id tecmint

Step 5: Testing Docker in Rocky Linux
Finally, to ensure Docker is working as expected, run the hello-world container as provided in the command below.
$ docker run hello-world
The command simply pulls the hello-world image from the Docker hub which is a repository for Docker container images. It then proceeds to create and run the container which prints the ‘Hello from Docker’ message on the terminal. This is iron-clad proof that Docker was successfully installed.

Let’s get more adventurous. We will pull a Ubuntu image, run and interact with the container.
Pull Ubuntu Docker Image
To pull the latest Ubuntu image, run:
$ docker pull ubuntu
Once the image is pulled, confirm the existing images as shown.
$ docker images

Run Ubuntu Docker Container
To access the shell of the Ubuntu container, execute the command.
$ docker run -it ubuntu
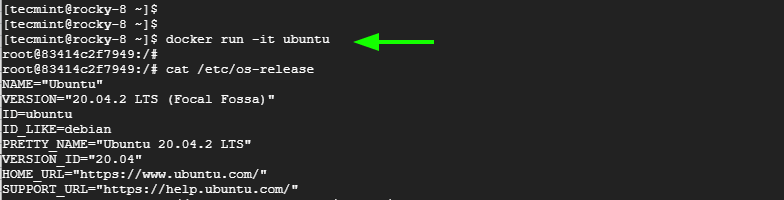
From here, you can run commands and perform package management and other system tasks inside the container. Once done, press ‘exit’ to exit the container and return to your OS environment.
Conclusion
And that’s it for this guide. We have demonstrated the installation of Docker on Rocky Linux and AlmaLinux and how you can get started with pulling images and running containers.


Thank you, TS for your kind words. I’m glad that the guide was beneficial to you.
This is well-written, concise, and easily understood. It is a rare treat in a sea of mediocrity. Thank you for your excellent content!