Written in Python, Fail2ban is a free and open-source Intrusion Prevention System (IPS) that protects the server against brute-force attacks.
After a specified number of incorrect password attempts, the client’s IP address is banned from accessing the system for a specified period or until the system administrator unblocks it. This way, the system is safeguarded from repeated brute-force attacks from a single host.
[ You might also like: How to Secure and Harden OpenSSH Server ]
Fail2ban is highly configurable and can be set up to secure a myriad of services such as SSH, vsftpd, Apache, and Webmin.
In this guide, we focus on how you can install and configure Fail2ban on Rocky Linux and AlmaLinux.
Step 1: Ensure Firewalld is Running
By default, Rocky comes with Firewalld running. However, if this is not the case on your system, start Firewalld by executing:
$ sudo systemctl start firewalld
Then enable it to start on boot time:
$ sudo systemctl enable firewalld
Then verify the status of Firewalld
$ sudo systemctl status firewalld

In addition, you can confirm all the Firewalld rules currently being enforced using the command:
$ sudo firewall-cmd --list-all

Step 2: Install EPEL in Rocky Linux
As a requirement for the installation of fail2ban and other requisite packages, you need to install the EPEL repository which provides additional high-quality packages for RHEL-based distributions.
$ sudo dnf install epel-release

Step 3: Install Fail2ban in Rocky Linux
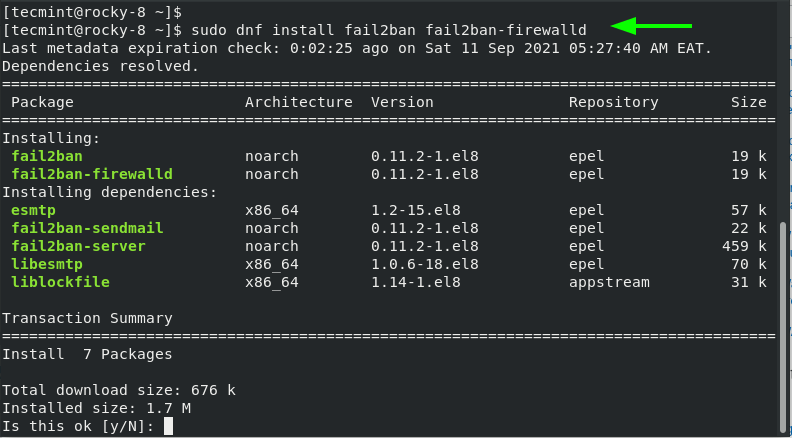
With EPEL installed, proceed and install fail2ban and the fail2ban-firewalld package.
$ sudo dnf install fail2ban fail2ban-firewalld
This installs the fail2ban server and the firewalld component along with other dependencies.
With the installation of fail2ban complete, start the fail2ban service.
$ sudo systemctl start fail2ban
And enable it to start on boot time.
$ sudo systemctl enable fail2ban
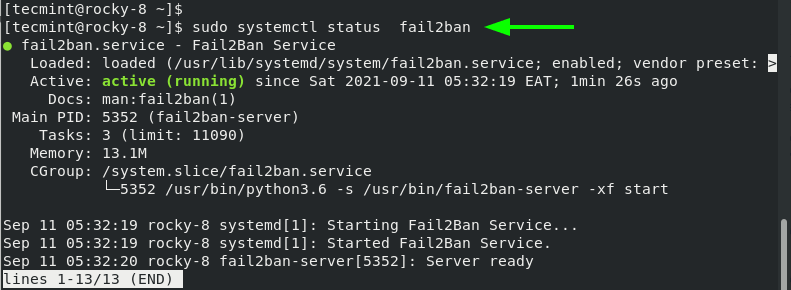
You can verify the status of the fail2ban service by running the command:
$ sudo systemctl status fail2ban
The output is a confirmation that Fail2ban is running as we would expect.
Step 4: Configuring Fail2ban in Rocky Linux
Moving on, we need to configure fail2ban for it to work as intended. Ideally, we would edit the main configuration file – /etc/fail2ban/jail.conf. However, this is discouraged. As a workaround will copy the contents of the jail.conf configuration file to jail.local file.
$ sudo cp /etc/fail2ban/jail.conf /etc/fail2ban/jail.local
Now, open the jail.local file using your preferred editor.
$ sudo vim /etc/fail2ban/jail.local
Under the [DEFAULT] section, ensure you have the following settings as they appear.
bantime = 1h
findtime = 1h
maxretry = 5
Let us define the attributes:
- The bantime directive specifies the duration of time that a client will be banned following failed authentication attempts.
- The findtime directive is the duration or period within which fail2ban will consider when considering repeated incorrect password attempts.
- The maxretry parameter is the maximum number of incorrect password attempts before the remote client is blocked from accessing the server. Here, the client will be locked out after 5 authentication failures.
By default, fail2ban works with iptables. However, this has been deprecated in favor of the firewalld. We need to configure fail2ban to work alongside firewalld instead of iptables.
So, run with the command:
$ sudo mv /etc/fail2ban/jail.d/00-firewalld.conf /etc/fail2ban/jail.d/00-firewalld.local
To apply the changes, restart fail2ban:
$ sudo systemctl restart fail2ban
Step 5: Securing SSH service with Fail2ban
By default, fail2ban does not block any remote host until you enable jail configuration for a service that you wish to secure. The jail configuration is specified in the /etc/fail2ban/jail.d path and will override the configuration specified in the jail.local file.
In this example, we will create a jail configuration file to protect the SSH service. Therefore, create the SSH jail file.
$ sudo vim /etc/fail2ban/jail.d/sshd.local
Next, paste the following lines:
[sshd]
enabled = true

# Override the default global configuration
# for specific jail sshd
bantime = 1d
maxretry = 3
In the configuration above, a remote host will be banned from accessing the system for 1 day after 3 failed SSH login attempts. Save the changes and restart the fail2ban service.
$ sudo systemctl restart fail2ban
Next, verify the jail configuration status using the fail2ban-client command-line utility.
$ sudo fail2ban-client status
From the output, we can see that we have 1 jail configured for a service called ‘sshd’.

In addition, you can confirm the maxretry value of the sshd jail using the get option.
$ sudo fail2ban-client get sshd maxretry

3
The value printed 3 should match what you specified in the sshd.local file.
Step 6: Testing Fail2ban Configuration
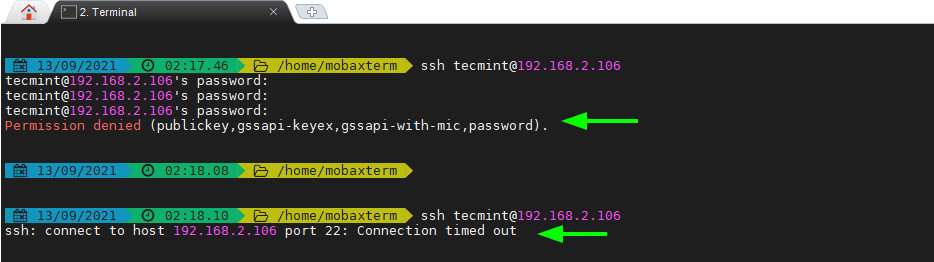
After setting up fail2ban and creating a jail configuration file for the SSH service, we are going to perform a test run and simulate 3 failed logins by specifying an incorrect password for each password prompt.
So head over to a remote Linux system and attempt to log in using the wrong password. After 3 failed attempts, the connection will be dropped and any subsequent attempt to reconnect will be blocked until the ban duration lapses.
To gather insights on the client systems blocked check the jail status.
$ sudo fail2ban-client status sshd
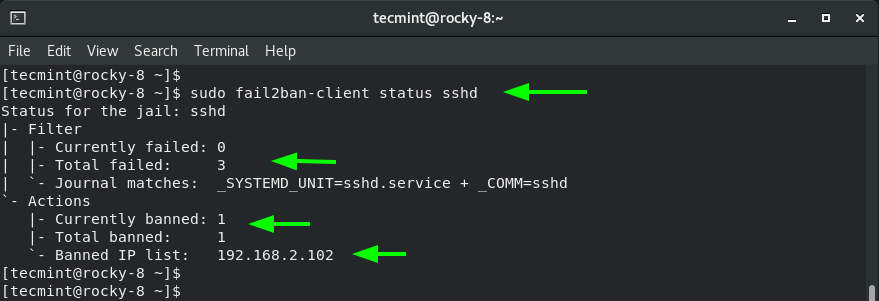
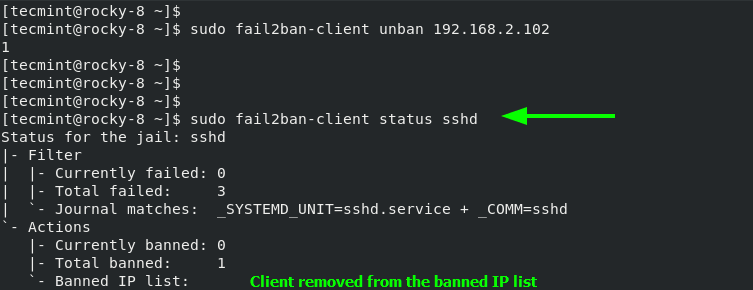
To unban or remove the client from the jail, execute the command:
$ sudo fail2ban-client unban 192.168.2.102
Once again, check the jail status to ensure that the client is not included in the banned IP list.
$ sudo fail2ban-client status sshd
As we have seen, Fail2ban is a very useful tool in warding off intruders seeking to breach your Linux system. It works in conjunction with Firewalld to ban client systems for a specified duration after a specific number of failed login attempts. In doing so, it provides an extra layer of protection for your Linux server.


