FTP (File Transfer Protocol) is a traditional and widely used standard tool for transferring files between a server and clients over a network, especially where no authentication is necessary (permits anonymous users to connect to a server). We must understand that FTP is unsecure by default, because it transmits user credentials and data without encryption.
In this guide, we will describe the steps to install, configure and secure a FTP server (VSFTPD stands for “Very Secure FTP Daemon“) in CentOS/RHEL 7 and Fedora distributions.
Note that all the commands in this guide will be run as root, in case you are not operating the server with the root account, use the sudo command to gain root privileges.
Step 1: Installing FTP Server
1. Installing vsftpd server is straight forward, just run the following command in the terminal.
# yum install vsftpd
2. After the installation completes, the service will be disabled at first, so we need to start it manually for the time being and enable it to start automatically from the next system boot as well:
# systemctl start vsftpd
# systemctl enable vsftpd
3. Next, in order to allow access to FTP services from external systems, we have to open port 21, where the FTP daemons are listening as follows:
# firewall-cmd --zone=public --permanent --add-port=21/tcp
# firewall-cmd --zone=public --permanent --add-service=ftp
# firewall-cmd --reload
Step 2: Configuring FTP Server
4. Now we will move over to perform a few configurations to setup and secure our FTP server, let us start by making a backup of the original config file /etc/vsftpd/vsftpd.conf:
# cp /etc/vsftpd/vsftpd.conf /etc/vsftpd/vsftpd.conf.orig
Next, open the config file above and set the following options with these corresponding values:
anonymous_enable=NO             # disable  anonymous login
local_enable=YES		# permit local logins
write_enable=YES		# enable FTP commands which change the filesystem
local_umask=022		        # value of umask for file creation for local users
dirmessage_enable=YES	        # enable showing of messages when users first enter a new directory
xferlog_enable=YES		# a log file will be maintained detailing uploads and downloads
connect_from_port_20=YES        # use port 20 (ftp-data) on the server machine for PORT style connections
xferlog_std_format=YES          # keep standard log file format
listen=NO   			# prevent vsftpd from running in standalone mode
listen_ipv6=YES		        # vsftpd will listen on an IPv6 socket instead of an IPv4 one
pam_service_name=vsftpd         # name of the PAM service vsftpd will use
userlist_enable=YES  	        # enable vsftpd to load a list of usernames
tcp_wrappers=YES  		# turn on tcp wrappers
5. Now configure FTP to allow/deny FTP access to users based on the user list file /etc/vsftpd.userlist.
By default, users listed in userlist_file=/etc/vsftpd.userlist are denied login access with userlist_deny option set to YES, if userlist_enable=YES.
However, userlist_deny=NO alters the setting, meaning that only users explicitly listed in userlist_file=/etc/vsftpd.userlist will be permitted to login.
userlist_enable=YES                   # vsftpd will load a list of usernames, from the filename given by userlist_file
userlist_file=/etc/vsftpd.userlist    # stores usernames.
userlist_deny=NO
That’s not all, when users login to the FTP server, they are placed in a chroot’ed jail, this is the local root directory which will act as their home directory for the FTP session only.
Next, we will look at two possible scenarios of how to chroot FTP users to Home directories (local root) directory for FTP users, as explained below.
6. Now add these two following options to restrict FTP users to their Home directories.
chroot_local_user=YES
allow_writeable_chroot=YES
chroot_local_user=YES means local users will be placed in a chroot jail, their home directory after login by default settings.
And also by default, vsftpd does not allow the chroot jail directory to be writable for security reasons, however, we can use the option allow_writeable_chroot=YES to override this setting.
Save the file and close it.
Securing FTP Server with SELinux
7. Now, let’s set the SELinux boolean below to allow FTP to read files in a user’s home directory. Note that this was initially done using the the command:
# setsebool -P ftp_home_dir on
However, the ftp_home_dir directive has been disabled by default as explained in this bug report: https://bugzilla.redhat.com/show_bug.cgi?id=1097775.
Now we will use semanage command to set SELinux rule to allow FTP to read/write user’s home directory.
# semanage boolean -m ftpd_full_access --on
At this point, we have to restart vsftpd to effect all the changes we made so far above:
# systemctl restart vsftpd
Step 4: Testing FTP Server
8. Now we will test FTP server by creating a FTP user with useradd command.
# useradd -m -c “Ravi Saive, CEO” -s /bin/bash ravi
# passwd ravi
Afterwards, we have to add the user ravi to the file /etc/vsftpd.userlist using the echo command as follows:
# echo "ravi" | tee -a /etc/vsftpd.userlist
# cat /etc/vsftpd.userlist
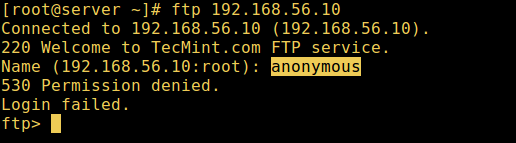
9. Now it’s time to test if our settings above are working correctly. Let’s start by testing anonymous logins, we can see from the screen shot below that anonymous logins are not permitted:
# ftp 192.168.56.10
Connected to 192.168.56.10  (192.168.56.10).
220 Welcome to TecMint.com FTP service.
Name (192.168.56.10:root) : anonymous
530 Permission denied.
Login failed.
ftp>
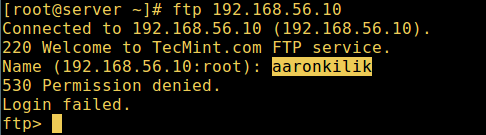
10. Let’s also test if a user not listed in the file /etc/vsftpd.userlist will be granted permission to login, which is not the case as in the screen shot below:
# ftp 192.168.56.10
Connected to 192.168.56.10  (192.168.56.10).
220 Welcome to TecMint.com FTP service.
Name (192.168.56.10:root) : aaronkilik
530 Permission denied.
Login failed.
ftp>
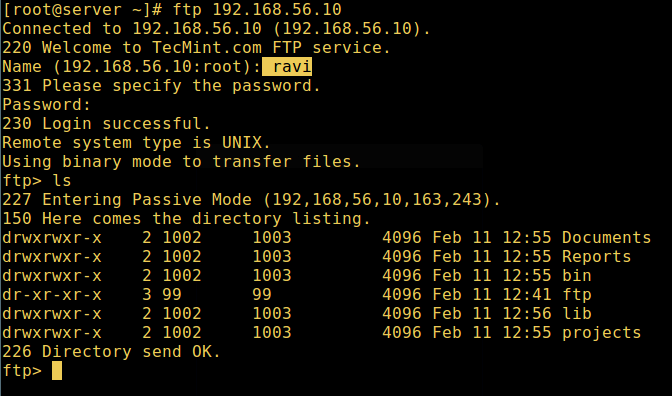
11. Now do a final check if a user listed in the file /etc/vsftpd.userlist, is actually placed in his/her home directory after login:
# ftp 192.168.56.10
Connected to 192.168.56.10  (192.168.56.10).
220 Welcome to TecMint.com FTP service.
Name (192.168.56.10:root) : ravi
331 Please specify the password.
Password:
230 Login successful.
Remote system type is UNIX.
Using binary mode to transfer files.
ftp> ls
allow_writeable_chroot=YES has certain security implications, especially if the users have upload permission, or shell access.
Only activate this option if you exactly know what you are doing. It’s important to note that these security implications arenot vsftpd specific, they apply to all FTP daemons which offer to put local users in chroot jails as well.
Therefore, we will look at a more secure way of setting a different non-writable local root directory in the next section.
Step 5: Configure Different FTP User Home Directories
12. Open the vsftpd configuration file again and start by commenting the unsecure option below:
#allow_writeable_chroot=YES
Then create the alternative local root directory for the user (ravi, yours is probably different) and remove write permissions to all users to this directory:
# mkdir /home/ravi/ftp
# chown nobody:nobody /home/ravi/ftp
# chmod a-w /home/ravi/ftp
13. Next, create a directory under the local root where the user will store his/her files:
# mkdir /home/ravi/ftp/files
# chown ravi:ravi  /home/ravi/ftp/files
# chmod 0700 /home/ravi/ftp/files/
Then add/modify the following options in the vsftpd config file with these values:
user_sub_token=$USER         # inserts the username in the local root directory
local_root=/home/$USER/ftp   # defines any users local root directory
Save the file and close it. Once again, let’s restart the service with the new settings:
# systemctl restart vsftpd
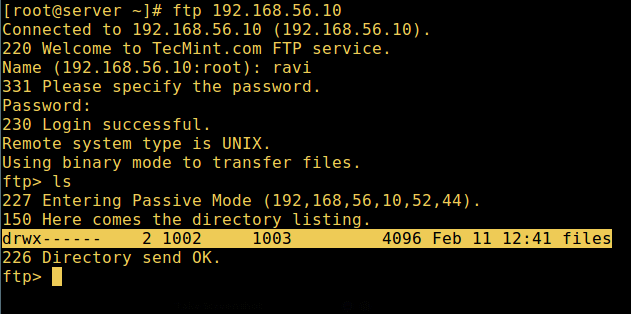
14. Now do a final test again and see that the users local root directory is the FTP directory we created in his home directory.
# ftp 192.168.56.10
Connected to 192.168.56.10  (192.168.56.10).
220 Welcome to TecMint.com FTP service.
Name (192.168.56.10:root) : ravi
331 Please specify the password.
Password:
230 Login successful.
Remote system type is UNIX.
Using binary mode to transfer files.
ftp> ls
That’s it! In this article, we described how to install, configure as well as secure a FTP server in CentOS 7, use the comment section below to write back to us concerning this guide/share any useful information about this topic.
Suggested Read: Install ProFTPD Server on RHEL/CentOS 7
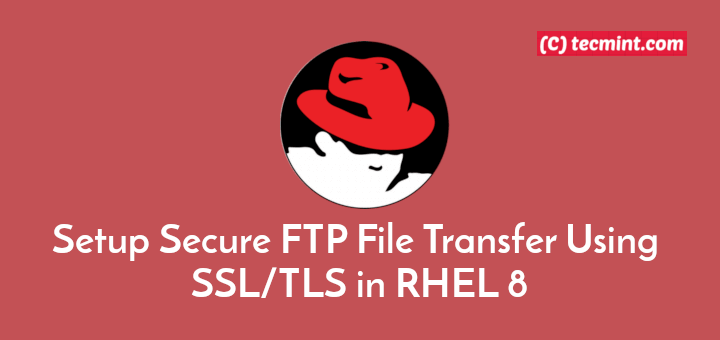
In the next article, we will also show you how to secure an FTP server using SSL/TLS connections in CentOS 7, until then, stay connected to TecMint.


Hi! I ended up with this and I cannot find any specific similar case in Goole. I’m using CentOS 8 between, is there any difference maybe?
(this is my CLI)
Any ideas? :(
Have you try to connect to FTP via internet browser?
Wonderful, Thanks!
Please fix mistake
userlist_file=/etc/vsftpd.userlist : userlist_file=/etc/vsftpd/userlistHi there, thanks for your article, everything was excellent. The only question I have is how do I do if inside the FTP shared folder need to have 2 folders, one for read-only and another one for write-read permission. That’s an issue I have. Thanks
@Doug
You can set sub-directory ownership and read-write permissions on an individual basis within a shared FTP directory. For example, if /home/ravi/ftp:
You can learn more about Linux permissions from this article: https://www.tecmint.com/manage-users-and-groups-in-linux/
Found this incredibly helpful and useful. Understanding chroot is a minefield, but you helped me solve my uploading problems simple by following the very precise instructions. Thanks you
@Neal
This’s wonderful! We are glad that this worked for you. Thanks for the feedback.
I am getting 2 error and they are below:
So what to do now?
In CentOS 7.6 the individual configuration file have changed from:
It is not clear in the article (at least to me) that you need to add this line.
in the /etc/vsftpd/vsftpd.conf file in order for it take affect.
Also if you want to ftp as the root user you must comment out or delete the root line in this file.
For example in my case it now looks like:
Hi Ravi,
I have followed the guide (trying to learn how to manage control etc) but I got stuck as soon as I got to step 4. I created a user account and it is showing, but whenever I try and run:
I get the following:
I am at a loss. I have searched on google and simply cannot fathom what is going wrong.
Any thoughts?
@Mac
Use this command instead:
Hope this works!
Hey Aaron,
Many thanks for that. I will try it with the next user I set up. I have been off ill so the learning stopped for a while.
One other thing, I forgot the password to the user I set up, so thought its simple to fix. Simply:
But no matter how much I changed it, it wouldn’t let me log into the ftp server where it previously it did. I restarted it and all sorts.
Any idea ?
I have given ftp home folder at /opt, users unable to delete files in they ftp folder.
I was follow this tutorial step by step until next tutorial with securing ftp server with tls/ssl. on my local server is working like charm but. when i try to remote with ftp client tool like filezilla its error with command unrouted and illegal port.
how to fix it?
my ftp server behind the NAT of mikrotik router. thanks in advanced
@orang
Ensure that the required port 990 (or the one you have configured for ftp with tls/ssl) is open in the firewall(possibly installed in the mikrotik router).
Hi Ravi
Thank for the nice writeup.
Does it make more sense to use firewall-cmds without “–zone=pubilc” so that it can be added to active and default zones ?
Regards,
Sai Prasad
@Sai,
Say thanks to our author Aaron, who create this easy to follow tutorial for users like you..
Yes, its not mandatory to add “–zone=pubilc” everytime with firewalld commands..
is not working out the box, it required seemange fcontext and other stuff including restorecon.
@tommi
Okay, we will do more research on this. Thanks for the heads up.
I am using FTP for sharing files between my Computer and Oppo device I was securing my FTP server by using the following thing that’s is Disable Standard FTP, strong encryption, using larger password, a correct antivirus installed on the computer, File & folder encryption etc.
This helps me you can also try this if you are using FTP between smartphone and Computer. If anyone has a Router’s issue and facing a problem with the Router’s network follow Linksys Support for a solution because it helps me to fix my server and IP address issue when I was using FTP through my Router’s network help.
@Linksys
Thanks a lot for sharing this useful information with us.
Worked like a charm! Thanks, Ravi!
@Dan,
That’s great to hear, but all credit goes to our author Aaron..:)
I get an error at step 1(2) – systemct1: command not found. Any thoughts?
@Belo
The command is systemctl not systemct1.
Please update your tutorial, its not compatible with latest version.
@Helwie,
Which latest version you talking about? could you mention so that we can udpate it.
You can test in Centos 7 and found out what different.
Hi Aaron. Thanks for the tips. It’s very helpful, but I have a problem in the Step 5. I did it like you wrote but when I connect in the FTP I continue to go in the folder “/home/$myuser”.
It is possible to access this secure ftp via sftp client, because i can able to access this sftp server through ftp client, but sftp client it just went to halt,i could not able to access, also it does not gave any information about connection.
@tilakraj
Check out this article: https://www.tecmint.com/secure-vsftpd-using-ssl-tls-on-centos/, it shows how to secure FTP server and access it via an FTP client.
Setsebool -P ftp_home_dir on Above centos7 Change to tftp_home_dir .
when i type ls command it show 425 failed to establish connection!!
@chenhleang
Try to use the appropriate passive ports, first ensure that no other services are listening on ports in the specified range.
Aaron. Thank you for writing such a comprehensive article.
Your article may have a problem in the following section:
In Step 3: Security FTP Server with SELinux
7. “…we will use semanage command…”
I am running CentOS 7.4.1708 and when I tried to run this command:
I received the following error:
My fresh install of CentOS did not have the necessary package to run this command.
I searched using Google and found out I did not have policycoreutils-python installed.
After I ran:
I was able to run “semanage”
Regards,
Paul Luciano, MCSE
@Paul
Many thanks for sharing this, we will update the article to include this important step for a fresh installation.
Aaron. Great article thank you. I have followed the instructions and seem to have some issues. I will say I’m a new to Linux. It appears that when you ftp in using filezilla the user has access to all directories.
This is what my config file looks like. What am I doing wrong?
anonymous_enable=NO
local_enable=YES
write_enable=YES
local_umask=022
dirmessage_enable=YES
xferlog_enable=YES
connect_from_port_20=YES
xferlog_std_format=YES
chroot_local_user=YES
listen=NO
listen_ipv6=YES
pam_service_name=vsftpd
userlist_enable=YES
userlist_file=/etc/vsftpd.userlist
tcp_wrappers=YES
userlist_deny=NO
allow_writeable_chroot=yes
user_sub_token=$USER
local_root=/home/$USER/ftp
@Brandon
If you intend to restrict a FTP user in a jail, then follow this guide: https://www.tecmint.com/restrict-sftp-user-home-directories-using-chroot/.
I hope this will help, if it doesn’t send us a feedback, we will help you out.
Thank you I got it figured out and working.
How do you make multiple users land in the same directory?
@Brandon
You can specify a shared directory, create your directory with appropriate permissions for all users and specify it in the directive:
local_root=/path/to/directory/
Can I setup ftp server on centos 6 by using these instructions? as this is for centos 7.
@gautam
Not really, some of the commands are only applicable to CentOS 7.
Hello Aaron, I get confused, I can’t find this file on my system.
would you like to help me. thanks dude
@devis
You can create it yourself.
Hi Aaron,
After following the instructions performance, error:
@QuocPham
Make sure your username or password is correct when trying to login.
Hi Aaron,
Thanks for this article,
I have the same error as QuocPham, 530 login or password incorrect, I made sure that username and password were correct, but still i have the same error.
please advise
@mike
If you have FileZilla installed, it could be the one causing the problem: listening to all connections on port 21. Try to stop it, then try accessing the FTP server once more.
After doing the SElinux part, I get this restarting vsftp
Jul 23 22:52:04 centos systemd[1]: Unit vsftpd.service entered failed state.
Jul 23 22:52:04 centos systemd[1]: vsftpd.service failed.
Jul 23 22:52:04 centos polkitd[688]: Unregistered Authentication Agent for unix-process:12504:94070 (system bus name :1.69, object path /org/freedesktop/PolicyK
@Alistair
Try to run the command:
#systemctl status vsftpd
to view the vsftpd service status, it can actually indicate what is wrong.
Alternatively, look through the system journal for any issues related to vsftpd and give us feedback.
#journalctl -u vsftpd
Hey Aaron, thanks a lot for helping out newbie like me. But i have tried that you mention above, i have got
every time i want to connect to ftp server and tried everything from selinux enforcing mode to disable,permissive nothing works.Hope you can help. Thanks
@hemat
Sorry for the late reply, i was trying to figure out possible cause of the problem. Ensure that you run the semanage command to set SELinux rule to allow FTP to read/write user’s home directory(remember this is after you restrict FTP users to their Home directories explained in step 6):
# semanage boolean -m ftpd_full_access –on
Then restart the ftpd service:
#systemctl restart vsftpd
Alternatively, try to perform the whole setup again, carefully following the steps in the guide. However, thanks for appreciating our work.