Hadoop is an open source programing framework developed by apache to process big data. It uses HDFS (Hadoop Distributed File System) to store the data across all the datanodes in the cluster in a distributive manner and mapreduce model to process the data.

Namenode (NN) is a master daemon which controls HDFS and Jobtracker (JT) is master daemon for mapreduce engine.
Requirements
In this tutorial I’m using two CentOS 6.3 VMs ‘master‘ and ‘node‘ viz. (master and node are my hostnames). The ‘master’ IP is 172.21.17.175 and node IP is ‘172.21.17.188‘. The following instructions also works on RHEL/CentOS 6.x versions.
On Master
[root@master ~]# hostname

master
[root@master ~]# ifconfig|grep 'inet addr'|head -1

inet addr:172.21.17.175  Bcast:172.21.19.255  Mask:255.255.252.0
On Node
[root@node ~]# hostname

node
[root@node ~]# ifconfig|grep 'inet addr'|head -1

inet addr:172.21.17.188  Bcast:172.21.19.255  Mask:255.255.252.0
First make sure that all the cluster hosts are there in ‘/etc/hosts‘ file (on each node), if you do not have DNS set up.
On Master
[root@master ~]# cat /etc/hosts

172.21.17.175 master
172.21.17.188 node
On Node
[root@node ~]# cat /etc/hosts

172.21.17.197 qabox
172.21.17.176 ansible-ground
Installing Hadoop Multinode Cluster in CentOS
We use official CDH repository to install CDH4 on all the hosts (Master and Node) in a cluster.
Step 1: Download Install CDH Repository
Go to official CDH download page and grab the CDH4 (i.e. 4.6) version or you can use following wget command to download the repository and install it.
On RHEL/CentOS 32-bit
# wget http://archive.cloudera.com/cdh4/one-click-install/redhat/6/i386/cloudera-cdh-4-0.i386.rpm
# yum --nogpgcheck localinstall cloudera-cdh-4-0.i386.rpm
On RHEL/CentOS 64-bit
# wget http://archive.cloudera.com/cdh4/one-click-install/redhat/6/x86_64/cloudera-cdh-4-0.x86_64.rpm
# yum --nogpgcheck localinstall cloudera-cdh-4-0.x86_64.rpm
Before installing Hadoop Multinode Cluster, add the Cloudera Public GPG Key to your repository by running one of the following command according to your system architecture.
## on 32-bit System ##

# rpm --import http://archive.cloudera.com/cdh4/redhat/6/i386/cdh/RPM-GPG-KEY-cloudera
## on 64-bit System ##

# rpm --import http://archive.cloudera.com/cdh4/redhat/6/x86_64/cdh/RPM-GPG-KEY-cloudera
Step 2: Setup JobTracker & NameNode
Next, run the following command to install and setup JobTracker and NameNode on Master server.
[root@master ~]# yum clean all
[root@master ~]# yum install hadoop-0.20-mapreduce-jobtracker
[root@master ~]# yum clean all
[root@master ~]# yum install hadoop-hdfs-namenode
Step 3: Setup Secondary Name Node
Again, run the following commands on the Master server to setup secondary name node.
[root@master ~]# yum clean all
[root@master ~]# yum install hadoop-hdfs-secondarynam
Step 4: Setup Tasktracker & Datanode
Next, setup tasktracker & datanode on all cluster hosts (Node) except the JobTracker, NameNode, and Secondary (or Standby) NameNode hosts ( on node in this case ).
[root@node ~]# yum clean all
[root@node ~]# yum install hadoop-0.20-mapreduce-tasktracker hadoop-hdfs-datanode
Step 5: Setup Hadoop Client
You can install Hadoop client on a separate machine ( in this case I have installed it on datanode you can install it on any machine).
[root@node ~]# yum install hadoop-client
Step 6: Deploy HDFS on Nodes
Now if we are done with above steps let’s move forward to deploy hdfs (to be done on all the nodes ).
Copy the default configuration to /etc/hadoop directory ( on each node in cluster ).
[root@master ~]# cp -r /etc/hadoop/conf.dist /etc/hadoop/conf.my_cluster
[root@node ~]# cp -r /etc/hadoop/conf.dist /etc/hadoop/conf.my_cluster
Use alternatives command to set your custom directory, as follows ( on each node in cluster ).
[root@master ~]# alternatives --verbose --install /etc/hadoop/conf hadoop-conf /etc/hadoop/conf.my_cluster 50
reading /var/lib/alternatives/hadoop-conf

[root@master ~]# alternatives --set hadoop-conf /etc/hadoop/conf.my_cluster
[root@node ~]# alternatives --verbose --install /etc/hadoop/conf hadoop-conf /etc/hadoop/conf.my_cluster 50
reading /var/lib/alternatives/hadoop-conf

[root@node ~]# alternatives --set hadoop-conf /etc/hadoop/conf.my_cluster
Step 7: Customizing Configuration Files
Now open ‘core-site.xml‘ file and update “fs.defaultFS” on each node in cluster.
[root@master conf]# cat /etc/hadoop/conf/core-site.xml
<?xml version="1.0"?>
<?xml-stylesheet type="text/xsl" href="configuration.xsl"?>
<configuration>
<property>
 <name>fs.defaultFS</name>
 <value>hdfs://master/</value>
</property>
</configuration>
[root@node conf]# cat /etc/hadoop/conf/core-site.xml
<?xml version="1.0"?>
<?xml-stylesheet type="text/xsl" href="configuration.xsl"?>
<configuration>
<property>
 <name>fs.defaultFS</name>
 <value>hdfs://master/</value>
</property>
</configuration>
Next update “dfs.permissions.superusergroup” in hdfs-site.xml on each node in cluster.
[root@master conf]# cat /etc/hadoop/conf/hdfs-site.xml
<?xml version="1.0"?>
<?xml-stylesheet type="text/xsl" href="configuration.xsl"?>
<configuration>
  <property>
     <name>dfs.name.dir</name>
     <value>/var/lib/hadoop-hdfs/cache/hdfs/dfs/name</value>
  </property>
  <property>
     <name>dfs.permissions.superusergroup</name>
     <value>hadoop</value>
  </property>
</configuration>
[root@node conf]# cat /etc/hadoop/conf/hdfs-site.xml
<?xml version="1.0"?>
<?xml-stylesheet type="text/xsl" href="configuration.xsl"?>
<configuration>
  <property>
     <name>dfs.name.dir</name>
     <value>/var/lib/hadoop-hdfs/cache/hdfs/dfs/name</value>
  </property>
  <property>
     <name>dfs.permissions.superusergroup</name>
     <value>hadoop</value>
  </property>
</configuration>
Note: Please make sure that, the above configuration is present on all the nodes (do on one node and run scp to copy on rest of the nodes ).
Step 8: Configuring Local Storage Directories
Update “dfs.name.dir or dfs.namenode.name.dir” in ‘hdfs-site.xml’ on the NameNode ( on Master and Node ). Please change the value as highlighted.
[root@master conf]# cat /etc/hadoop/conf/hdfs-site.xml
<property>
 <name>dfs.namenode.name.dir</name>
 <value>file:///data/1/dfs/nn,/nfsmount/dfs/nn</value>
</property>
[root@node conf]# cat /etc/hadoop/conf/hdfs-site.xml
<property>
 <name>dfs.datanode.data.dir</name>
 <value>file:///data/1/dfs/dn,/data/2/dfs/dn,/data/3/dfs/dn</value>
</property>
Step 9: Create Directories & Manage Permissions
Execute below commands to create directory structure & manage user permissions on Namenode (Master) and Datanode (Node) machine.
[root@master]# mkdir -p /data/1/dfs/nn /nfsmount/dfs/nn
[root@master]# chmod 700 /data/1/dfs/nn /nfsmount/dfs/nn
[root@node]#  mkdir -p /data/1/dfs/dn /data/2/dfs/dn /data/3/dfs/dn /data/4/dfs/dn
[root@node]#  chown -R hdfs:hdfs /data/1/dfs/nn /nfsmount/dfs/nn /data/1/dfs/dn /data/2/dfs/dn /data/3/dfs/dn /data/4/dfs/dn
Format the Namenode (on Master), by issuing following command.
[root@master conf]# sudo -u hdfs hdfs namenode -format
Step 10: Configuring the Secondary NameNode
Add the following property to the hdfs-site.xml file and replace value as shown on Master.
<property>
  <name>dfs.namenode.http-address</name>
  <value>172.21.17.175:50070</value>
  <description>
    The address and port on which the NameNode UI will listen.
  </description>
</property>
Note: In our case value should be ip address of master VM.
Now let’s deploy MRv1 ( Map-reduce version 1 ). Open ‘mapred-site.xml‘ file following values as shown.
[root@master conf]# cp hdfs-site.xml mapred-site.xml
[root@master conf]# vi mapred-site.xml
[root@master conf]# cat mapred-site.xml
<?xml version="1.0"?>
<?xml-stylesheet type="text/xsl" href="configuration.xsl"?>

<configuration>
<property>
 <name>mapred.job.tracker</name>
 <value>master:8021</value>
</property>
</configuration>
Next, copy ‘mapred-site.xml‘ file to node machine using the following scp command.
[root@master conf]# scp /etc/hadoop/conf/mapred-site.xml node:/etc/hadoop/conf/
mapred-site.xml                                                                      100%  200     0.2KB/s   00:00
Now configure local storage directories to use by MRv1 Daemons. Again open ‘mapred-site.xml‘ file and make changes as shown below for each TaskTracker.
<property> Â <name>mapred.local.dir</name> Â <value>/data/1/mapred/local,/data/2/mapred/local,/data/3/mapred/local</value> </property>
After specifying these directories in the ‘mapred-site.xml‘ file, you must create the directories and assign the correct file permissions to them on each node in your cluster.
mkdir -p /data/1/mapred/local /data/2/mapred/local /data/3/mapred/local /data/4/mapred/local
chown -R mapred:hadoop /data/1/mapred/local /data/2/mapred/local /data/3/mapred/local /data/4/mapred/local
Step 10 : Start HDFS
Now run the following command to start HDFS on every node in the cluster.
[root@master conf]# for x in `cd /etc/init.d ; ls hadoop-hdfs-*` ; do sudo service $x start ; done
[root@node conf]# for x in `cd /etc/init.d ; ls hadoop-hdfs-*` ; do sudo service $x start ; done
Step 11 : Create HDFS /tmp and MapReduce /var Directories
It is required to create /tmp with proper permissions exactly as mentioned below.
[root@master conf]# sudo -u hdfs hadoop fs -mkdir /tmp
[root@master conf]# sudo -u hdfs hadoop fs -chmod -R 1777 /tmp
[root@master conf]# sudo -u hdfs hadoop fs -mkdir -p /var/lib/hadoop-hdfs/cache/mapred/mapred/staging
[root@master conf]# sudo -u hdfs hadoop fs -chmod 1777 /var/lib/hadoop-hdfs/cache/mapred/mapred/staging
[root@master conf]# sudo -u hdfs hadoop fs -chown -R mapred /var/lib/hadoop-hdfs/cache/mapred
Now verify the HDFS File structure.
[root@node conf]# sudo -u hdfs hadoop fs -ls -R /

drwxrwxrwt   - hdfs hadoop          	0 2014-05-29 09:58 /tmp
drwxr-xr-x   	- hdfs hadoop          	0 2014-05-29 09:59 /var
drwxr-xr-x  	- hdfs hadoop          	0 2014-05-29 09:59 /var/lib
drwxr-xr-x   	- hdfs hadoop         	0 2014-05-29 09:59 /var/lib/hadoop-hdfs
drwxr-xr-x   	- hdfs hadoop          	0 2014-05-29 09:59 /var/lib/hadoop-hdfs/cache
drwxr-xr-x   	- mapred hadoop          0 2014-05-29 09:59 /var/lib/hadoop-hdfs/cache/mapred
drwxr-xr-x   	- mapred hadoop          0 2014-05-29 09:59 /var/lib/hadoop-hdfs/cache/mapred/mapred
drwxrwxrwt   - mapred hadoop          0 2014-05-29 09:59 /var/lib/hadoop-hdfs/cache/mapred/mapred/staging
After you start HDFS and create ‘/tmp‘, but before you start the JobTracker please create the HDFS directory specified by the ‘mapred.system.dir’ parameter (by default ${hadoop.tmp.dir}/mapred/system and change owner to mapred.
[root@master conf]# sudo -u hdfs hadoop fs -mkdir /tmp/mapred/system
[root@master conf]# sudo -u hdfs hadoop fs -chown mapred:hadoop /tmp/mapred/system
Step 12: Start MapReduce
To start MapReduce : please start the TT and JT services.
On each TaskTracker system
[root@node conf]# service hadoop-0.20-mapreduce-tasktracker start

Starting Tasktracker:                               [  OK  ]
starting tasktracker, logging to /var/log/hadoop-0.20-mapreduce/hadoop-hadoop-tasktracker-node.out
On the JobTracker system
[root@master conf]# service hadoop-0.20-mapreduce-jobtracker start

Starting Jobtracker:                                [  OK  ]

starting jobtracker, logging to /var/log/hadoop-0.20-mapreduce/hadoop-hadoop-jobtracker-master.out
Next, create a home directory for each hadoop user. it is recommended that you do this on NameNode; for example.
[root@master conf]# sudo -u hdfs hadoop fs -mkdir  /user/<user>
[root@master conf]# sudo -u hdfs hadoop fs -chown <user> /user/<user>
Note: where is the Linux username of each user.
Alternatively, you cancreate the home directory as follows.
[root@master conf]# sudo -u hdfs hadoop fs -mkdir /user/$USER
[root@master conf]# sudo -u hdfs hadoop fs -chown $USER /user/$USER
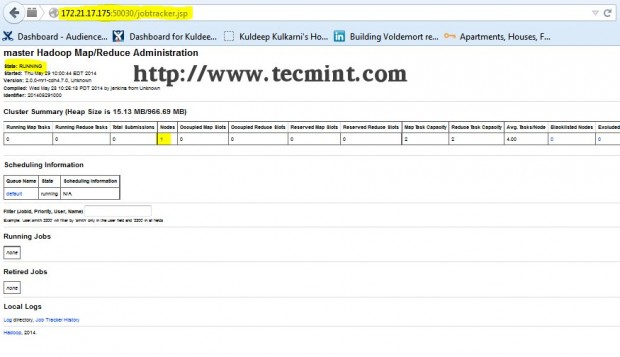
Step 13: Open JT, NN UI from Browser
Open your browser and type the url as http://ip_address_of_namenode:50070 to access Namenode.

Open another tab in your browser and type the url as http://ip_address_of_jobtracker:50030 to access JobTracker.
This procedure has been successfully tested on RHEL/CentOS 5.X/6.X. Please comment below if you face any issues with the installation, I will help you out with the solutions.