Hadoop is an open source programing framework developed by apache to process big data. It uses HDFS (Hadoop Distributed File System) to store the data across all the datanodes in the cluster in a distributive manner and mapreduce model to process the data.

Namenode (NN) is a master daemon which controls HDFS and Jobtracker (JT) is master daemon for mapreduce engine.
Requirements
In this tutorial I’m using two CentOS 6.3 VMs ‘master‘ and ‘node‘ viz. (master and node are my hostnames). The ‘master’ IP is 172.21.17.175 and node IP is ‘172.21.17.188‘. The following instructions also works on RHEL/CentOS 6.x versions.
On Master
[root@master ~]# hostname

master
[root@master ~]# ifconfig|grep 'inet addr'|head -1

inet addr:172.21.17.175  Bcast:172.21.19.255  Mask:255.255.252.0
On Node
[root@node ~]# hostname

node
[root@node ~]# ifconfig|grep 'inet addr'|head -1

inet addr:172.21.17.188  Bcast:172.21.19.255  Mask:255.255.252.0
First make sure that all the cluster hosts are there in ‘/etc/hosts‘ file (on each node), if you do not have DNS set up.
On Master
[root@master ~]# cat /etc/hosts

172.21.17.175 master
172.21.17.188 node
On Node
[root@node ~]# cat /etc/hosts

172.21.17.197 qabox
172.21.17.176 ansible-ground
Installing Hadoop Multinode Cluster in CentOS
We use official CDH repository to install CDH4 on all the hosts (Master and Node) in a cluster.
Step 1: Download Install CDH Repository
Go to official CDH download page and grab the CDH4 (i.e. 4.6) version or you can use following wget command to download the repository and install it.
On RHEL/CentOS 32-bit
# wget http://archive.cloudera.com/cdh4/one-click-install/redhat/6/i386/cloudera-cdh-4-0.i386.rpm
# yum --nogpgcheck localinstall cloudera-cdh-4-0.i386.rpm
On RHEL/CentOS 64-bit
# wget http://archive.cloudera.com/cdh4/one-click-install/redhat/6/x86_64/cloudera-cdh-4-0.x86_64.rpm
# yum --nogpgcheck localinstall cloudera-cdh-4-0.x86_64.rpm
Before installing Hadoop Multinode Cluster, add the Cloudera Public GPG Key to your repository by running one of the following command according to your system architecture.
## on 32-bit System ##

# rpm --import http://archive.cloudera.com/cdh4/redhat/6/i386/cdh/RPM-GPG-KEY-cloudera
## on 64-bit System ##

# rpm --import http://archive.cloudera.com/cdh4/redhat/6/x86_64/cdh/RPM-GPG-KEY-cloudera
Step 2: Setup JobTracker & NameNode
Next, run the following command to install and setup JobTracker and NameNode on Master server.
[root@master ~]# yum clean all
[root@master ~]# yum install hadoop-0.20-mapreduce-jobtracker
[root@master ~]# yum clean all
[root@master ~]# yum install hadoop-hdfs-namenode
Step 3: Setup Secondary Name Node
Again, run the following commands on the Master server to setup secondary name node.
[root@master ~]# yum clean all
[root@master ~]# yum install hadoop-hdfs-secondarynam
Step 4: Setup Tasktracker & Datanode
Next, setup tasktracker & datanode on all cluster hosts (Node) except the JobTracker, NameNode, and Secondary (or Standby) NameNode hosts ( on node in this case ).
[root@node ~]# yum clean all
[root@node ~]# yum install hadoop-0.20-mapreduce-tasktracker hadoop-hdfs-datanode
Step 5: Setup Hadoop Client
You can install Hadoop client on a separate machine ( in this case I have installed it on datanode you can install it on any machine).
[root@node ~]# yum install hadoop-client
Step 6: Deploy HDFS on Nodes
Now if we are done with above steps let’s move forward to deploy hdfs (to be done on all the nodes ).
Copy the default configuration to /etc/hadoop directory ( on each node in cluster ).
[root@master ~]# cp -r /etc/hadoop/conf.dist /etc/hadoop/conf.my_cluster
[root@node ~]# cp -r /etc/hadoop/conf.dist /etc/hadoop/conf.my_cluster
Use alternatives command to set your custom directory, as follows ( on each node in cluster ).
[root@master ~]# alternatives --verbose --install /etc/hadoop/conf hadoop-conf /etc/hadoop/conf.my_cluster 50
reading /var/lib/alternatives/hadoop-conf

[root@master ~]# alternatives --set hadoop-conf /etc/hadoop/conf.my_cluster
[root@node ~]# alternatives --verbose --install /etc/hadoop/conf hadoop-conf /etc/hadoop/conf.my_cluster 50
reading /var/lib/alternatives/hadoop-conf

[root@node ~]# alternatives --set hadoop-conf /etc/hadoop/conf.my_cluster
Step 7: Customizing Configuration Files
Now open ‘core-site.xml‘ file and update “fs.defaultFS” on each node in cluster.
[root@master conf]# cat /etc/hadoop/conf/core-site.xml
<?xml version="1.0"?>
<?xml-stylesheet type="text/xsl" href="configuration.xsl"?>
<configuration>
<property>
 <name>fs.defaultFS</name>
 <value>hdfs://master/</value>
</property>
</configuration>
[root@node conf]# cat /etc/hadoop/conf/core-site.xml
<?xml version="1.0"?>
<?xml-stylesheet type="text/xsl" href="configuration.xsl"?>

<configuration>
<property>
 <name>fs.defaultFS</name>
 <value>hdfs://master/</value>
</property>
</configuration>
Next update “dfs.permissions.superusergroup” in hdfs-site.xml on each node in cluster.
[root@master conf]# cat /etc/hadoop/conf/hdfs-site.xml
<?xml version="1.0"?>
<?xml-stylesheet type="text/xsl" href="configuration.xsl"?>
<configuration>
  <property>
     <name>dfs.name.dir</name>
     <value>/var/lib/hadoop-hdfs/cache/hdfs/dfs/name</value>
  </property>
  <property>
     <name>dfs.permissions.superusergroup</name>
     <value>hadoop</value>
  </property>
</configuration>
[root@node conf]# cat /etc/hadoop/conf/hdfs-site.xml
<?xml version="1.0"?>
<?xml-stylesheet type="text/xsl" href="configuration.xsl"?>
<configuration>
  <property>
     <name>dfs.name.dir</name>
     <value>/var/lib/hadoop-hdfs/cache/hdfs/dfs/name</value>
  </property>
  <property>
     <name>dfs.permissions.superusergroup</name>
     <value>hadoop</value>
  </property>
</configuration>
Note: Please make sure that, the above configuration is present on all the nodes (do on one node and run scp to copy on rest of the nodes ).
Step 8: Configuring Local Storage Directories
Update “dfs.name.dir or dfs.namenode.name.dir” in ‘hdfs-site.xml’ on the NameNode ( on Master and Node ). Please change the value as highlighted.
[root@master conf]# cat /etc/hadoop/conf/hdfs-site.xml
<property>
 <name>dfs.namenode.name.dir</name>
 <value>file:///data/1/dfs/nn,/nfsmount/dfs/nn</value>
</property>
[root@node conf]# cat /etc/hadoop/conf/hdfs-site.xml
<property>
 <name>dfs.datanode.data.dir</name>
 <value>file:///data/1/dfs/dn,/data/2/dfs/dn,/data/3/dfs/dn</value>
</property>
Step 9: Create Directories & Manage Permissions
Execute below commands to create directory structure & manage user permissions on Namenode (Master) and Datanode (Node) machine.
[root@master]# mkdir -p /data/1/dfs/nn /nfsmount/dfs/nn
[root@master]# chmod 700 /data/1/dfs/nn /nfsmount/dfs/nn
[root@node]#  mkdir -p /data/1/dfs/dn /data/2/dfs/dn /data/3/dfs/dn /data/4/dfs/dn
[root@node]#  chown -R hdfs:hdfs /data/1/dfs/nn /nfsmount/dfs/nn /data/1/dfs/dn /data/2/dfs/dn /data/3/dfs/dn /data/4/dfs/dn
Format the Namenode (on Master), by issuing following command.
[root@master conf]# sudo -u hdfs hdfs namenode -format
Step 10: Configuring the Secondary NameNode
Add the following property to the hdfs-site.xml file and replace value as shown on Master.
<property>
  <name>dfs.namenode.http-address</name>
  <value>172.21.17.175:50070</value>
  <description>
    The address and port on which the NameNode UI will listen.
  </description>
</property>
Note: In our case value should be ip address of master VM.
Now let’s deploy MRv1 ( Map-reduce version 1 ). Open ‘mapred-site.xml‘ file following values as shown.
[root@master conf]# cp hdfs-site.xml mapred-site.xml
[root@master conf]# vi mapred-site.xml
[root@master conf]# cat mapred-site.xml
<?xml version="1.0"?>
<?xml-stylesheet type="text/xsl" href="configuration.xsl"?>

<configuration>
<property>
 <name>mapred.job.tracker</name>
 <value>master:8021</value>
</property>
</configuration>
Next, copy ‘mapred-site.xml‘ file to node machine using the following scp command.
[root@master conf]# scp /etc/hadoop/conf/mapred-site.xml node:/etc/hadoop/conf/
mapred-site.xml                                                                      100%  200     0.2KB/s   00:00
Now configure local storage directories to use by MRv1 Daemons. Again open ‘mapred-site.xml‘ file and make changes as shown below for each TaskTracker.
<property> Â <name>mapred.local.dir</name> Â <value>/data/1/mapred/local,/data/2/mapred/local,/data/3/mapred/local</value> </property>
After specifying these directories in the ‘mapred-site.xml‘ file, you must create the directories and assign the correct file permissions to them on each node in your cluster.
mkdir -p /data/1/mapred/local /data/2/mapred/local /data/3/mapred/local /data/4/mapred/local
chown -R mapred:hadoop /data/1/mapred/local /data/2/mapred/local /data/3/mapred/local /data/4/mapred/local
Step 10 : Start HDFS
Now run the following command to start HDFS on every node in the cluster.
[root@master conf]# for x in `cd /etc/init.d ; ls hadoop-hdfs-*` ; do sudo service $x start ; done
[root@node conf]# for x in `cd /etc/init.d ; ls hadoop-hdfs-*` ; do sudo service $x start ; done
Step 11 : Create HDFS /tmp and MapReduce /var Directories
It is required to create /tmp with proper permissions exactly as mentioned below.
[root@master conf]# sudo -u hdfs hadoop fs -mkdir /tmp
[root@master conf]# sudo -u hdfs hadoop fs -chmod -R 1777 /tmp
[root@master conf]# sudo -u hdfs hadoop fs -mkdir -p /var/lib/hadoop-hdfs/cache/mapred/mapred/staging
[root@master conf]# sudo -u hdfs hadoop fs -chmod 1777 /var/lib/hadoop-hdfs/cache/mapred/mapred/staging
[root@master conf]# sudo -u hdfs hadoop fs -chown -R mapred /var/lib/hadoop-hdfs/cache/mapred
Now verify the HDFS File structure.
[root@node conf]# sudo -u hdfs hadoop fs -ls -R /

drwxrwxrwt   - hdfs hadoop          	0 2014-05-29 09:58 /tmp
drwxr-xr-x   	- hdfs hadoop          	0 2014-05-29 09:59 /var
drwxr-xr-x  	- hdfs hadoop          	0 2014-05-29 09:59 /var/lib
drwxr-xr-x   	- hdfs hadoop         	0 2014-05-29 09:59 /var/lib/hadoop-hdfs
drwxr-xr-x   	- hdfs hadoop          	0 2014-05-29 09:59 /var/lib/hadoop-hdfs/cache
drwxr-xr-x   	- mapred hadoop          0 2014-05-29 09:59 /var/lib/hadoop-hdfs/cache/mapred
drwxr-xr-x   	- mapred hadoop          0 2014-05-29 09:59 /var/lib/hadoop-hdfs/cache/mapred/mapred
drwxrwxrwt   - mapred hadoop          0 2014-05-29 09:59 /var/lib/hadoop-hdfs/cache/mapred/mapred/staging
After you start HDFS and create ‘/tmp‘, but before you start the JobTracker please create the HDFS directory specified by the ‘mapred.system.dir’ parameter (by default ${hadoop.tmp.dir}/mapred/system and change owner to mapred.
[root@master conf]# sudo -u hdfs hadoop fs -mkdir /tmp/mapred/system
[root@master conf]# sudo -u hdfs hadoop fs -chown mapred:hadoop /tmp/mapred/system
Step 12: Start MapReduce
To start MapReduce : please start the TT and JT services.
On each TaskTracker system
[root@node conf]# service hadoop-0.20-mapreduce-tasktracker start

Starting Tasktracker:                               [  OK  ]
starting tasktracker, logging to /var/log/hadoop-0.20-mapreduce/hadoop-hadoop-tasktracker-node.out
On the JobTracker system
[root@master conf]# service hadoop-0.20-mapreduce-jobtracker start

Starting Jobtracker:                                [  OK  ]

starting jobtracker, logging to /var/log/hadoop-0.20-mapreduce/hadoop-hadoop-jobtracker-master.out
Next, create a home directory for each hadoop user. it is recommended that you do this on NameNode; for example.
[root@master conf]# sudo -u hdfs hadoop fs -mkdir  /user/<user>
[root@master conf]# sudo -u hdfs hadoop fs -chown <user> /user/<user>
Note: where is the Linux username of each user.
Alternatively, you cancreate the home directory as follows.
[root@master conf]# sudo -u hdfs hadoop fs -mkdir /user/$USER
[root@master conf]# sudo -u hdfs hadoop fs -chown $USER /user/$USER
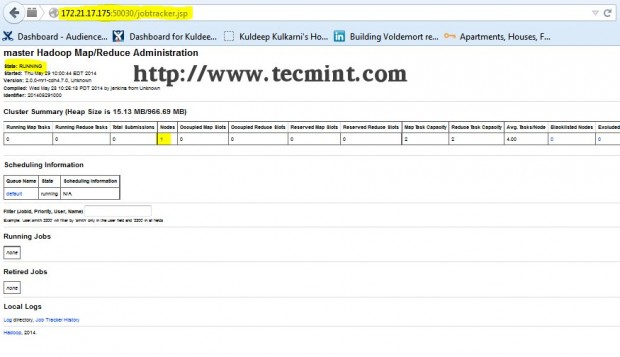
Step 13: Open JT, NN UI from Browser
Open your browser and type the url as http://ip_address_of_namenode:50070 to access Namenode.

Open another tab in your browser and type the url as http://ip_address_of_jobtracker:50030 to access JobTracker.
This procedure has been successfully tested on RHEL/CentOS 5.X/6.X. Please comment below if you face any issues with the installation, I will help you out with the solutions.


All the daemons started properly but slaves are not communicating with master one throwing an error port no 22 connection refused
how can resolve this problem
How about writing a blog on how to install pig using hadoop single node cluster
need tutorial using nosql and hadoop please
Getting Error in Step 11 : Create HDFS /tmp and MapReduce /var Directories
sudo -u hdfs hadoop fs -mkdir /tmp
Error is:-
mkdir: Call From master/192.168.56.101 to master:8020 failed on connection exception: java.net.ConnectException: Connection refused; For more details see: http://wiki.apache.org/hadoop/ConnectionRefused
The hdfs-site.xml is configured as:-
dfs.namenode.name.dir
file:///data/1/dfs/nn,/nfsmount/dfs/nn
dfs.permissions.superusergroup
hadoop
dfs.namenode.http-address
192.168.56.101:50070
The address and port on which the NameNode UI will listen.
Can you please assist me in understanding what I missed.
Telnet isn’t working as no process is listening on 8020 port.
Regards
Nitish
@Lyle Gilbert I have same issue as u had.Can u please help me fix it?
HI sir, can we also have this setup using Ansible.? please.
I apologize for my ignorance in advance, but when i follow your instructions i can get to
sudo -u hdfs hadoop fs -mkdir /tmp
and all i get is the following error
mkdir: Call From master/172.21.181.108 to master:8020 failed on connection exception: java.net.ConnectException: Connection refused; For more details see: http://wiki.apache.org/hadoop/ConnectionRefused
I do a netstat -tulpn and do not see anything listening on that port. what config should i modify?
I have found the issue, it was an error in my hdfs-site.xml
again thank you for this wonderful tutorial
Hello Lyle,
May you please give me further details about the modifications you brought to the HDFS-site.xml.
I am facing the same issue as you : connection refused in port 8020 and telnet / netstat commands don’t fetch any process listening in port 8020.
Thanks a lot in advance for your feedback, best regards
Helle Kuldeep,
Thanks for this article. I’m trying to install on Centos7, few of the commands are outdated :(
Do you have an video of making the cluster ?
Thanks
Ravi
hello Kuldeep.
Thanks for the instructions above. I am new in hadoop + linux world. It worked very well for me untill this step.
Next, copy ‘mapred-site.xml‘ file to node machine using the following scp command.
[root@master conf]# scp /etc/hadoop/conf/mapred-site.xml node:/etc/hadoop/conf/
mapred-site.xml 100% 200 0.2KB/s 00:00
I didnt have mapred-site.xml file and thus i created it using vi . I copied the xml you provided.
However when i am trying to SCP this file to the node: i get an error :
ssh: Could not resolve hostname node: name of service not known. Lost connection.
What should i do in order to fix this?
Thanks
Manish
Hi there, very nice tutorial, but I am stack at step 11, my system is not allowing me to create those files, what can I do?
I am using virtual box, with Cent OS 6.6 i686.
The services are all runing but I can not access the web interface.
Please help, I use this tutorial for my master degree project, please.
Best Regards,
Alin Sbarnaure
Hi kuldeep,
can you guide me for cloudera certification..??
yeah sure! there are two types of certifications for CDH.
one is for hadoop admin and other one is for hadoop dev. please let me know which type of certification are you interested in.
Hi Kuldeep, thanks for the great article.
Please let me know about cdh admin certification.
Please let me know if companies are currently using cdh 5 and which one we can start with.
Thanks
Mathan
Hi,
This post is very helpful for my Hadoop beginning , but my requirement is, How can use “Hadoop-fuse” for mount few servers. Please guide me.??
sure will get back to you
Hi Kuldeep, thanks for the very clear instruction.
I followed to this step:
> alternatives –verbose –install /etc/hadoop/conf hadoop-conf /etc/hadoop/conf.my_cluster 50 reading /var/lib/alternatives/hadoop-conf
and received this msg:
usage: alternatives –install
[–initscript ]…..
….
Is it the right syntax? THanks.
Hey LThai,
Can you please try “/usr/sbin/alternatives” ? in case you face issue again please paste the error here, I will help you.
thanks kuldeep. I have gone through the steps above the jobtracker and tasktracker successfully start but i cant view the JT on my browser. I have Apache running on my linux machine prior to the hadoop installation, could this affect JT or TT?
Yes it may affect because of port conflict. could you please try stopping apache and make sure that firewall and selinux is disabled.
Hey Matt,
Can you please try “/usr/sbin/alternatives” ? in case you face issue again please paste the error here, I will help you.
Hi, the alternatives command did not work for me, I guess its a syntax issue
Hi Debabrata Pattanaik,
Can you please let me know what services have u configured on slave ? only datanode and
tasktracker should be running on it. can you please check logs on new slave if both the services are running properly and master nodes(NN & JT) are ping’able from new slave ? also if services are running fine on slave and masters are reachable/pingable from new slave then can you please try dfsadmin -refreshnode command on namenode ?
Hi Kuldeep ,
I have configured hadoop cluster with one master and one slave . Now to add one more slave I just cloned existing slave and created a new one . I then configured ssh for new slave and updated slaves config file in master with slave dns names . I restarted everything but it’s not working for me and it only detects the old one not the new one . Please help me on this if I missed something to add a new slave to a existing cluster
i am a newbie and want to install cdh4 on a single node. what are the changes i have to make?
Its very easy on single node. Just do all above steps on only single machine and update configurations as per guideline. assume that master and node are same.
Awesome, @ Kuldeep Kulkarni do you have ansible config for above setup ?
Hi Babin,
Thank you! yes I have ansible config for above setup and I can help you with that if you are interested.
Hi Kuldeep
Great work man.It is very useful to all beginners.
I have a couple of doubts,
1.while using yum install its required internet.So any other way to install rpm packages.
2.How to find whether our code is running on the cluster, without using web UI.
Thanks in advance
Thanks Pravin :
here are answers to your questions :
1. Yes you can download rpm packages from PC/Laptop which has internet connection and then copy those rpm pkgs to required hosts using scp/rsync etc. and install them using rpm command
OR
You can configure your own repository server and install that perticular repo on hadoop boxes for yum to work without internet ( provided your repo server and hadoop nodes are in same network and reachable from each other )
2. If I got your question correctly then you need to check status of your running job without web UI? –> you can check status of hadoop jobs using below commands
you can run below commands from hadoop client machine :
hadoop job -list
above command will show all the running hadoop jobs
hadoop job -status $job_id
above command will show status of job for which job_id is provided
Please let me know if you have any further questions!
Thanks Kuldeep for such lucid explanation of multinode hadoop cluster setup.
Thanks Nitin!
Hi Kuldeep,
I followed the same steps that you have mentioned here but finally My jobtracker shows status as INITIALIZING and namenode doesnot show any live nodes.
could you please help me.
Thanks
Nishi
Please make sure set up the hostnames and /etc/hosts file on each machine to a FQDN. Please post NN/JT/DN logs here for a more thorough investigation.
Hi Kuldeep Kulkarni,
Thanks for your information. Iam new to hadoop. And my background is Linux and solaris. I would like to know step by step cloudera 4 instalation. What is difference in installation hadoop cloudera through cloudera manager and manual installation. Please help me.
suresh
Installation through Cloudera Manager pretty much takes care of all the inner details for performing an install. We need not worry about going to each machine in the cluster and deploy Hadoop; it also takes care of creating the configuration files automatically. You will have to only interact through the web UI, select the machines where you want to run various components of Hadoop and hit run!!!
Please send some guideline of Cloud certification .
Thks fort this article, and sorry for my english
I would like to perform a testing architecture for Hadoop
i only have 3 VMs with CentOS each could you help me to design it?
I was thinkg about :
1 VMs with the namenode & Jobtracker
1 VMs as a client
1 VMs as the datanode
But i am new to this concept and don’t know exactly where to start
Hi Ali,
I would recommend, you first setup hadoop cluster using 2 VMs. 1 for NN/JT and other for DN. Carefully follow my article for an installation, once you have done with it then (i.e. verified that all are working fine ) then you can setup hadoop client on 3rd VM ( steps are mentioned in this article for setting up hadoop client )
feel free to let me know in case of issues.
Best of luck! :)
Hi Kuldeep,
It is a great article and got useful information. We are waiting for your next article. We request you to please share issue that you are facing day to day hadoop administration.
Thanks a lot for this great article. :):):)
Thank you Medhansh! :)
This is really nice article. thanks for your efforts. I had to deploy hadoop multinode cluster for my organization and I could easily do it by following this. perfect!!
please share more knowledge on hadoop. we are waiting for it :)
Thanks Bhushan!
Glad to hear that this was useful to you :)
This is really awesome tutorial of hadoop.
Thanks kuldeep and keep it up…
Thanks Umesh! :)