Hadoop Cluster Building is a step by step process where the process starts from purchasing the required servers, mounting into the rack, cabling, etc. and placing in Datacentre. Then we need to install the OS, it can be done using kickstart in the real-time environment if the cluster size is big. Once OS installed, then we need to prepare the server for Hadoop Installation and we need to prepare the servers according to the Organization’s security policies.
Requirments
In this article, we will go through OS-level pre-requisites recommended by Cloudera. Also, we have highlighted some important Security Hardening tips according to the CIS Benchmark for Production servers. These security Hardening can be different according to the requirements.
Setting Up Cloudera Hadoop Pre-requisites
Here, we will discuss the OS-level pre-requisites recommended by Cloudera.
1. Disable Transparent Huge Page
By default, Transparent Huge Page (THP) is enabled in Linux machines which poorly interact with Hadoop workloads and it degrades the overall performance of Cluster. So we need to disable this in order to achieve optimal performance using the following echo command.
# echo never > /sys/kernel/mm/transparent_hugepage/enabled
# echo never > /sys/kernel/mm/transparent_hugepage/defrag

2. Change VM Swappiness
By default, the vm.swappiness value is 30 or 60 for most of the Linux machines.
# sysctl vm.swappiness

Having a higher value of swappiness is not recommended for Hadoop servers because it can cause lengthy Garbage collection pauses. And, with the higher swappiness value, data can be cached to swap memory even if we have enough memory. Lower the swappiness value can make physical memory to contain more memory pages.
# sysctl vm.swappiness=1
Or, you can open the file /etc/sysctl.conf and add "vm.swappiness=1" at the end.
vm.swappiness=1
3. Disable Firewall
Each Hadoop server will be having its own responsibility with multiple services (daemons) running on that. All the servers will be communicating with each other in a frequent manner for various purposes.
For Example, Datanode will send a heartbeat to Namenode for every 3 seconds so that Namenode will make sure that the Datanode is alive.
If all the communication happens between the daemons across different servers via the Firewall, it will be an extra burden to Hadoop. So it’s best practice to disable the firewall in the individual servers in Cluster.
# iptables-save > ~/firewall.rules
# systemctl stop firewalld
# systemctl disable firewall

4. Disable SELinux
If we keep the SELinux enabled, it will cause issues while installing Hadoop. As Hadoop is a cluster computing, Cloudera Manager will reach all the servers in the cluster to install Hadoop and its services and it will create necessary service directories wherever required.
If SELinux enabled, it will not let Cloudera Manager to rule the installation as it wants. So, enabling SELinux will be an obstacle to Hadoop and it will cause performance issues.
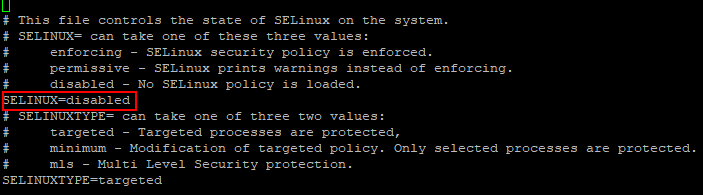
You can check the status of SELinux by using the below command.
# sestatus

Now, open the /etc/selinux/config file and disable SELINUX as shown.
SELinux=disabled
After disabling SELinux, you need to reboot the system to make it active.
# reboot
5. Install NTP Services
In Hadoop Cluster, all the servers should be Time Synchronised to avoid clock offset errors. The RHEL/CentOS 7 is having chronyd inbuilt for network clock/time synchronization, but Cloudera recommends to use NTP.
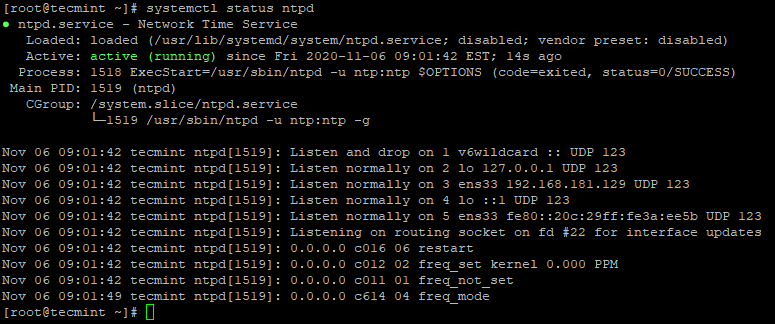
We need to install NTP and configure it. Once installed, stop ‘chronyd‘ and disable. Because, if a server having both ntpd and chronyd running, Cloudera Manager will consider chronyd for time synchronization, then it will throw an error even if we have time synchronized through ntp.
# yum -y install ntp
# systemctl start ntpd
# systemctl enable ntpd
# systemctl status ntpd
6. Disable Chronyd
As we mentioned above, we don’t need chronyd active as we are using ntpd. Check the status of chronyd, if it is running stop and disable. By default, chronyd is stopped unless until we start it after OS installation, just we need to disable for safer side.
# systemctl status chronyd
# systemctl disable chronyd

7. Set FQDN (Fully Qualified Domain Name)
We have to set the hostname with FQDN (Fully Qualified Domain Name). Each server should be having a unique Canonical name. To resolve the hostname, either we need to configure the DNS or /etc/hosts. Here, we are going to configure /etc/hosts.
IP address and FQDN of each server should be entered in /etc/hosts of all the servers. Then only Cloudera Manager can communicate all the servers with its hostname.
# hostnamectl set-hostname master1.tecmint.com
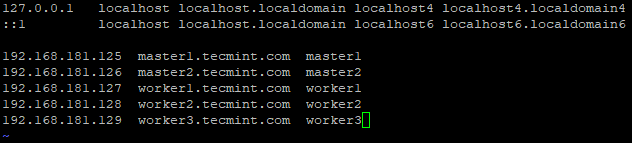
Next, configure /etc/hosts file. For Example: – If we have 5 node cluster with 2 masters and 3 workers, we can configure the /etc/hosts as below.
8. Installing a Java Development Kit (JDK)
As Hadoop is made up of Java, all the hosts should be having Java installed with the appropriate version. Here we are going to have OpenJDK. By default, Cloudera Manager will install OracleJDK but, Cloudera recommends having OpenJDK.
# yum -y install java-1.8.0-openjdk-devel
# java -version

Hadoop Security and Hardening
In this section, we will be going to Harden Hadoop environment security…
1. Disable Automounting
Automounting ‘autofs‘ allows automatic mounting of physical devices like USB, CD/DVD. User with physical access can attach their USB or any Storage medium to access of insert data. Use the below commands to verify whether it is disabled or not, if not disable it.
# systemctl disable autofs
# systemctl is-enabled autofs

2. Secure Boot Settings
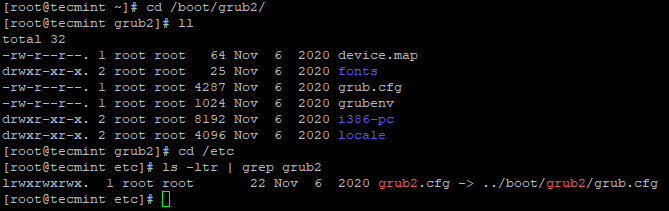
The grub configuration file contains critical information of boot settings and credentials to unlock boot options. The grub config file ‘grub.cfg‘ located at /boot/grub2 and it is been linked as /etc/grub2.conf and ensure grub.cfg is owned by root user.
# cd /boot/grub2
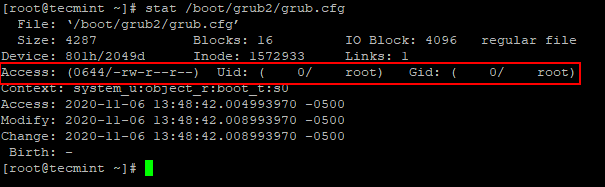
Use the below command to check Uid and Gid are both 0/root and ‘group’ or ‘other’ should not have any permission.
# stat /boot/grub2/grub.cfg
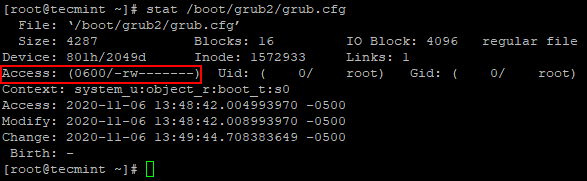
Use the below command to remove permissions from other and group.
# chmod og-rwx /boot/grub2/grub.cfg
3. Set the Bootloader Password
This setting avoids other un-authorized rebooting of the server. ie, It requires a password to reboot the server. If it is not set, unauthorized users can boot the server and can make changes to the boot partitions.
Use the below command to set the password.
# grub2-mkpasswd-pbkdf2

Add the above-created password in to /etc/grub.d/01_users file.

Next, re-generate the grub configuration file.
# grub2-mkconfig > /boot/grub2/grub.cfg

4. Remove Prelink Tool
Prelink is a software program that can increase vulnerability in a server if malicious users can compromise common libraries such as libc.
Use the below command to remove it.
# yum remove prelink
5. Disable Unwanted Services
We should consider disabling some services/protocols to avoid potential attacks.
# systemctl disable <service name>
- Disable Network Services – Ensure the network services – charges, daytime, discard, echo, time are not enabled. These Network services are for debugging and testing, it’s recommended to disable which can minimize the remote attack.
- Disable TFTP & FTP – Both the protocol will not support the confidentiality of the data or credentials. It is best practice not to have in the server unless it is required explicitly. Mostly these protocols are installed and enabled on Fileservers.
- Disable DHCP – DHCP is the protocol that will dynamically allocate the IP address. It’s recommended to disable unless it is a DHCP server to avoid potential attacks.
- Disable HTTP – HTTP is the protocol that can be used to host web content. Apart from Master/Management servers(where WebUI of services are to be configured like CM, Hue, etc), we can disable HTTP on other worker nodes which can avoid the potential attacks.
Summary
We have gone through the server preparation which consists of Cloudera Hadoop Pre-requisites and some security hardening. OS level pre-requisites defined by Cloudera are mandatory for the smooth installation of Hadoop. Usually, a hardening script will be prepared with the use of the CIS Benchmark and used to audit and remediate non-compliance in real-time.
In a minimal installation of CentOS/RHEL 7, only basic functionalities/software are installed, this will avoid unwanted risk and vulnerabilities. Even though it is Minimal Installation multiple iterations of security auditing will be done before installing Hadoop, even after building the cluster, before moving the Cluster into Operation/Production.


