Java is a fast, secure, reliable, and popular, general-purpose programming language and computing platform. Java is more than just a language, it is a technology platform with many interconnected capabilities.
To run Java-based applications on your RHEL 8 system or server, you need to have Java installed. You typically need the Java Runtime Environment (JRE), a bundle of software components used to run Java applications.
On the other hand, if you want to develop applications for Java, you need to install the Oracle Java Development Kit (JDK) which includes a complete JRE together with tools for developing, debugging and monitoring Java applications. It is Oracle’s supported Java SE (Standard Edition) version.
Note: If you are looking for free JDK versions, install the Oracle OpenJDK which offers the same features and performance as Oracle JDK under the GPL license.
In this article, we will show you how to install OpenJDK 8 and OpenJDK 11, the two supported versions of Java in RHEL 8. We will also show you how to install the latest version of Java OpenJDK 12 to develop and run Java applications.
Requirements
How to Install OpenJDK in RHEL 8
To install OpenJDK on RHEL 8, first update the system packages using dnf command as shown.
# dnf update
Next, install OpenJDK 8 and 11 using the following commands.
# dnf install java-1.8.0-openjdk-devel  	#install JDK 8
# dnf install java-11-openjdk-devel		#install JDK 11
Once the installation process is complete, you can check the Java version installed using the following command.
# java -version

The output of the above command shows that Java 8 is the default version.
How to Install OpenJDK 12 on RHEL 8
Unfortunately, RHEL 8 does not provide or support Java 12 by default. But you can download the production-ready OpenJDK 12 from here and install it as shown.
# cd opt
# wget -c https://download.java.net/java/GA/jdk12.0.2/e482c34c86bd4bf8b56c0b35558996b9/10/GPL/openjdk-12.0.2_linux-x64_bin.tar.gz
# tar -xvf openjdk-12.0.2_linux-x64_bin.tar.gz
To check the Java version, you have to use the full path to the binary as shown.
# ./opt/jdk-12.0.2/bin/java -version

Important: To use Java 12 as the default version, you have to specify it as the value of the JAVA_HOME environment variable as explained in the next section.
How to Set JAVA_HOME Environment Variable in RHEL 8
If you have many versions of Java installed on your system, you can select the version you want to use by default, by either using a command-line utility called alternatives or setting JAVA_HOME environment variable to select the JDK on a per-application basis.
Let’s look at bother cases as explained below.
Setting Default Java Version Using Alternatives
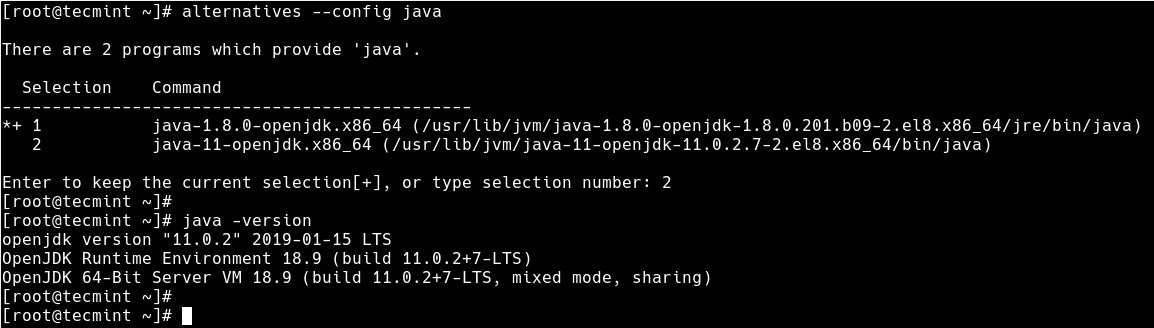
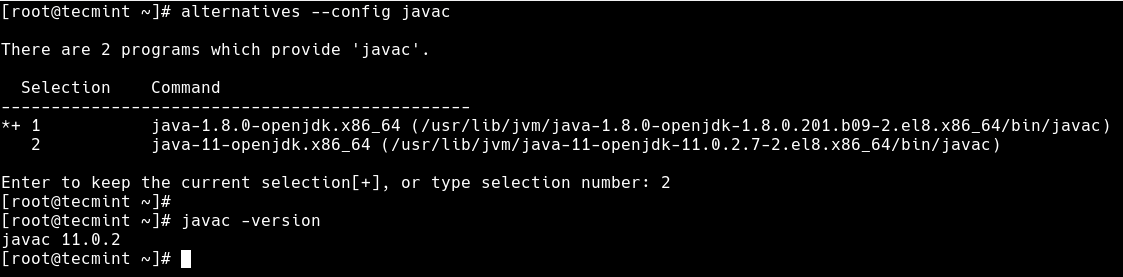
Using alternatives, you need to switch the version of java (which launches the Java application) and javac (which reads class and interface definitions and compiles them into class files) binaries globally as shown.
Start with java, choose the version you want using the selection number and press enter as shown in the screenshot. Then confirm that the default version has been switched to what you want.
# alternatives --config java
# java -version
Also, switch javac to the version of Java you want to use as shown.
# alternatives --config javac
# javac -version
Setting Java Version For Applications via JAVA_HOME Variable
The JAVA_HOME environment variable specifies the directory where the JRE is installed on your system. When set, different Java-based applications and other programs use it to find where Java is installed: the Java version specified is the one used to execute applications.
You can set it in the /etc/environment global shell start-up file as shown.
# vim /etc/environment
Then add the following line in the file (replace /opt/jdk-12.0.2/ with the full path to the installation directory of JVM 8 or JVM 11 as shown in the output of alternatives utility above).
export JAVA_HOME=/opt/jdk-12.0.2/
Save the file and close it. Then source it as follows.
# source /etc/environment
And now if you check the value of the JAVA_HOME environment variable, it should point to the installation directory of the JRE you want to use.
# echo $JAVA_HOME

Conclusion
You’ve come to the end of this tutorial. In this guide, you learned how to install Java in RHEL 8 and set the JAVA_HOME variable. If you have questions, additions or comments, please submit them via the feedback form below.