Building a secure collaborative environment on a private Linux server definitely sounds like a good idea. Especially if you have to interact with other people and work with them on important documents some of which might be confidential. In this case, you need a protected workplace with document editing and co-authoring features where you could set right the required access permissions for each collaborator.
In this article, you will learn how to install and configure ONLYOFFICE DocSpace, one of the best open-source collaborative platforms for Linux servers that will help you to streamline the way you collaborate with other users.
What is ONLYOFFICE DocSpace?
ONLYOFFICE DocSpace is a new software tool that became available for local deployment not too long ago. In a nutshell, it’s a web-based collaborative platform designed to allow teams and individual users to manage and collaborate on documents, spreadsheets, presentations, and electronic forms in customizable rooms.
The platform is equipped with ONLYOFFICE Docs, an online office suite, that provides a complete set of formatting and editing tools for different content, including e-books and PDF files.
Moreover, the integrated office suite offers various features for real-time document collaboration, such as two co-editing modes, document review, version history, chat, comments, and video/audio calls enabled by the Zoom and Jitsi plugins.
ONLYOFFICE DocSpace works well with a large number of file formats, including Microsoft’s OOXML (Word, Excel, and PowerPoint file extensions), OpenDocument, PDF, DJVu, and more. It’s also compatible with multimedia files as the built-in multimedia player lets you open and play audio files and videos.
Since ONLYOFFICE DocSpace is a room-based platform, all collaboration processes and user interaction take place in two types of rooms. The so-called collaboration rooms are meant to facilitate real-time document co-authoring, and custom rooms are spaces with flexible configurations that can be adapted to any purpose.
In DocSpace, all users have special access permissions that define the actions they can perform. For example, a DocSpace owner has full access to all settings and configuration options and can assign DocSpace admins and grant other access levels.
The latter has the right to manage the platform and all the rooms, but they can’t delete DocSpace. Also, there are room admins, power users, regular users, editors, viewers, commenters, reviewers, and form fillers. All categories have their own privileges and restrictions.

Prerequisites
Before you try to install ONLYOFFICEA DocSpace, take a look at the list of minimum requirements (of course, the more, the better):
- 4-core CPU
- 8 GB of RAM
- 40 GB of HDD
- 6 GB of swap space
- Modern AMD64 Linux distro (kernel v3.10+)
Download ONLYOFFICE DocSpace Installer
ONLYOFFICE DocSpace can be installed in two ways. However, the first step is common for both installation methods. You need to get the official installation script file first.
To do so, open the terminal and run the following wget command.
$ wget http://download.onlyoffice.com/docspace/docspace-install.sh
When the script file is downloaded, you can install ONLYOFFICE DocSpace itself either from the official DEB or RPM packages or using Docker.
Install ONLYOFFICE DocSpace on Linux
This method is simple and probably less time-consuming, you just need to enter and run the following command in the terminal (a root user account is required).
Installing ONLYOFFICE DocSpace from DEB/RPM Packages
To install ONLYOFFICE DocSpace Community using DEB/RPM packages, run the following command:
# bash docspace-install.sh package
This command will install the DocSpace platform and all the required components within a few minutes.
Installing ONLYOFFICE DocSpace Using Docker
The second installation method is safer because it allows you to run ONLYOFFICE DocSpace as a Docker container. At the same time, it might take longer and requires you to have a running Docker instance.
If you prefer this installation method but don’t have Docker installed, please read this Docker installation guide.
When your Docker instance is launched, open the terminal and enter this:
# bash docspace-install.sh docker
This command will install and run ONLYOFFICE DocSpace in a Docker container. Take your time, as the process is not quick.
Access ONLYOFFICE DocSpace from Browser
No matter the installation way, you need to open your web browser when the installation process is complete. In the address bar, enter the IP address that your computer has in your local network.
You can find our your IP address (IPv4 address) in the network settings of your OS. Alternatively, you can run ip command in the terminal:
# ip a
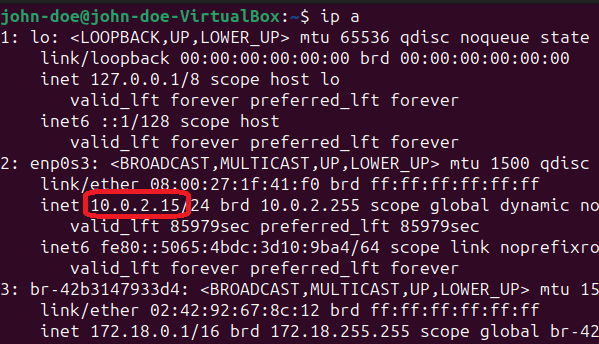
What you will see between “inet” and “scope global dynamic noprefixroute …” is the necessary IP address. Enter it in the address bar, and you will be redirected to the DocSpace registration page.
When you access the DocSpace registration page, you will need to fill in some fields in order to register yourself as the owner of your DocSpace platform.

First of all, enter your valid email address and password. For your convenience, there is an option to generate a random password automatically. After that, choose the interface language and the preferred time zone.
Make sure you agree with the terms of the ONLYOFFICE license agreement and click the Continue button to proceed with the next step. Don’t forget to check your email inbox and click on the activation link.
Now it’s time to configure your DocSpace. Click the menu next to your account in the lower left corner of the page and choose DocSpace settings.
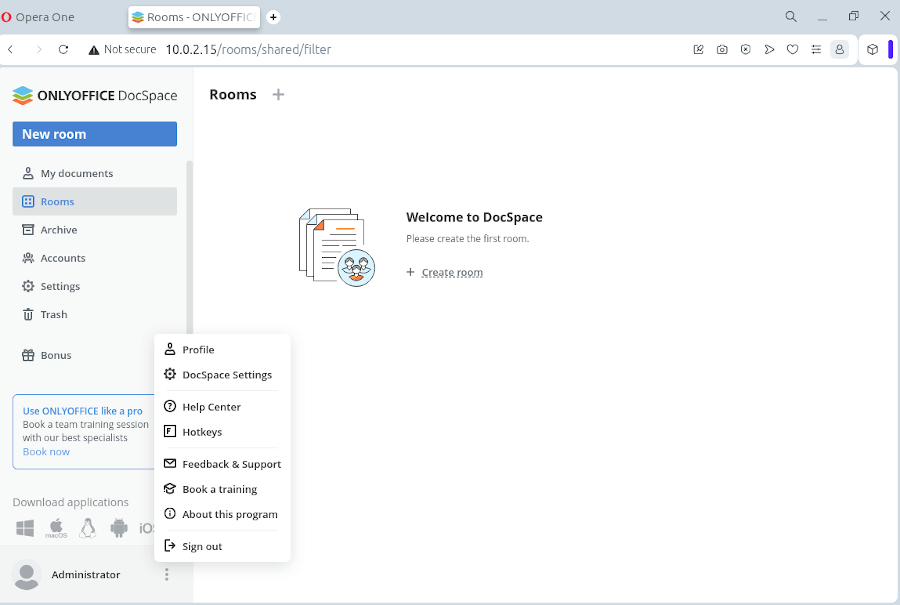
You will see all available sections. It’s recommended to start with the Security section to make your DocSpace as safe as possible. Check and configure each option depending on your preferences.
If you change anything, click Save. After that, you can customize the interface of the platform and enable data backup.

When you are done with the settings, you can start working with your DocSpace instance:
- Create and manage rooms.
- Invite other users for collaboration.
- Upload content in your rooms.
- Create and manage new office files.
- Create new accounts with different access permissions.
- Share documents and collaborate on them in real-time.
- Integrate third-party service and more.
Conclusion
Now that you know how to install and configure ONLYOFFICE DocSpace, you can use it as a collaboration hub for all the work you do. One of the biggest strengths of the platform is its ability to interact with external users in a flexible way.
You can invite anyone to your DocSpace and set up the required access levels to prevent data breaches. When the work is done, you can delete the users you don’t need anymore and archive the corresponding DocSpace rooms.
Have you already tried DocSpace? Let us know your impressions!


too bad not another word processor without the Wordstar programmer’s navigation.