OpenLDAP is an open-source implementation of the Lightweight Directory Access Protocol (LDAP), which provides a way to manage and access directory information, making it particularly useful for authentication and centralized data storage.
phpLDAPadmin is a web-based graphical user interface for managing OpenLDAP servers, which simplifies the administration of LDAP directories by providing an easy-to-use interface for common tasks such as user management, schema management, and search capabilities.
In this article, we will demonstrate how to install and configure an OpenLDAP server and manage it using phpLDAPadmin on Ubuntu and Debian-based distributions.
Step 1: Set the Hostname
Setting the hostname for your LDAP server is essential for identification, ease of access, security, and overall management.
sudo hostnamectl set-hostname ldap.tecmint.com
Next, add this hostname to your /etc/hosts file:
echo "192.168.122.100 ldap.tecmint.com" | sudo tee -a /etc/hosts
Replace 192.168.122.100 with your server’s IP address.

Step 2: Installation of OpenLDAP Server
By default, the OpenLDAP server is available in the repositories under the package name slapd, which can be easily installed using the apt package manager.
sudo apt update
sudo apt install slapd ldap-utils
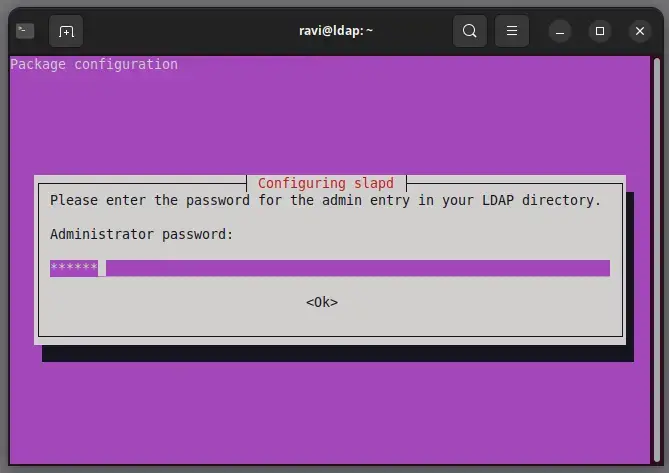
During the installation, you will be prompted to set an admin password for your OpenLDAP server. Make sure to remember this password, as you will need it later.
Once the installation is complete, you can configure the OpenLDAP server.
Step 3: Configure OpenLDAP Server
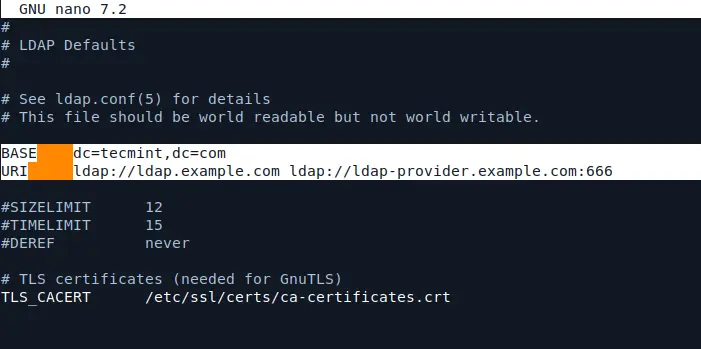
To configure the OpenLDAP server, edit the ldap.conf file, located in the /etc/ldap directory using your favourite text editor.
sudo nano /etc/ldap/ldap.conf
In the configuration file, you will see comments and example settings. Look for the lines that specify BASE and URI and uncomment them. Modify these lines with your own domain name and IP address.
For this example, we’ll use tecmint.com as the domain name.
BASE   dc=tecmint123,dc=com
URI    ldap://ldap.example.com ldap://ldap-master.example.com:666
After making the changes, save the file and run the following command to reconfigure the LDAP package:
sudo dpkg-reconfigure slapd
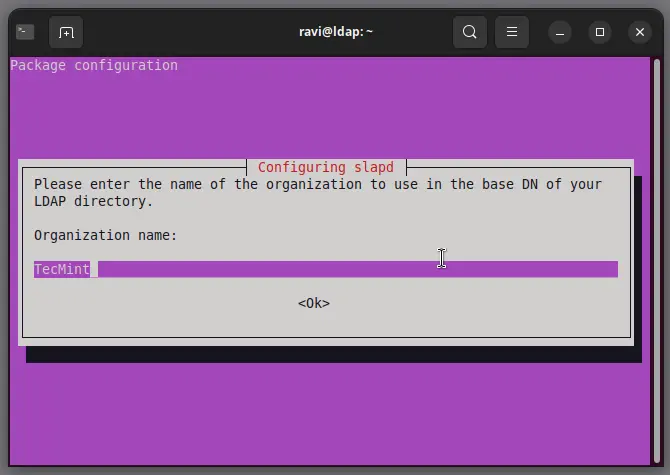
During the configuration of OpenLDAP using the dpkg-reconfigure slapd command, you will encounter several prompts that require specific inputs.
Here’s a brief explanation of each question and the recommended responses:
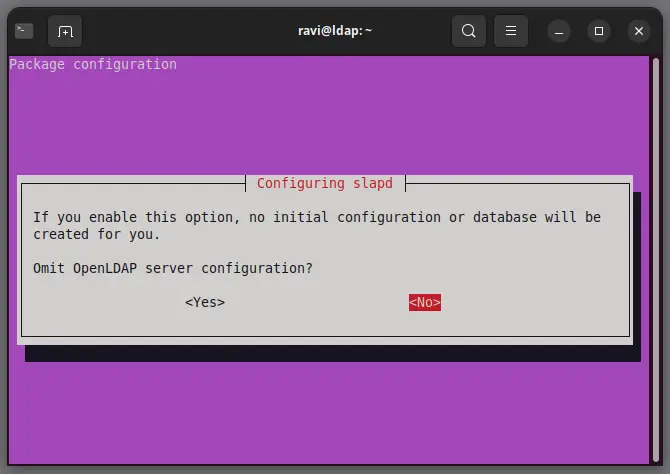
Omit OpenLDAP Server Configuration, which allows you to configure the server settings. Selecting “No” ensures that you can set up the LDAP server according to your requirements.
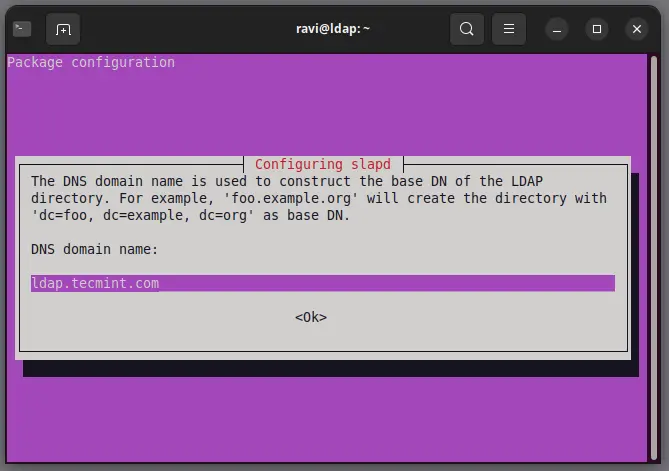
The DNS Domain Name is the domain name for your LDAP server, which forms part of the base DN (Distinguished Name), which is essential for structuring your LDAP directory and must be properly configured to ensure correct operation.
The Organization Name field is used to identify your organization within the LDAP directory, which is helpful in organizing entries and can be any name that represents your organization.
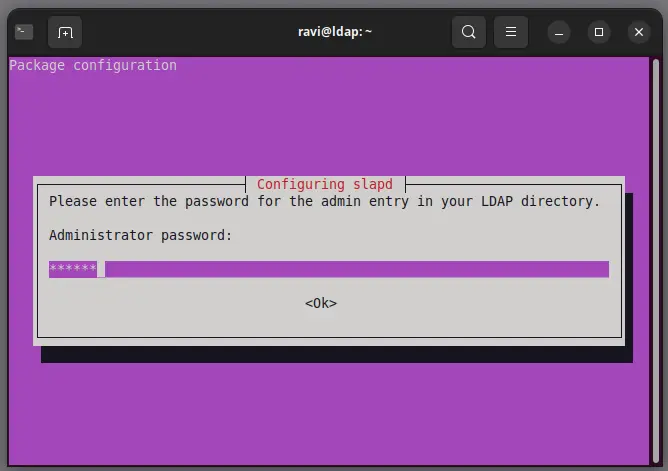
The Administrator Password is critical as it grants administrative access to the LDAP directory. Ensure that it is secure and memorable, as you will need it for future administrative tasks.
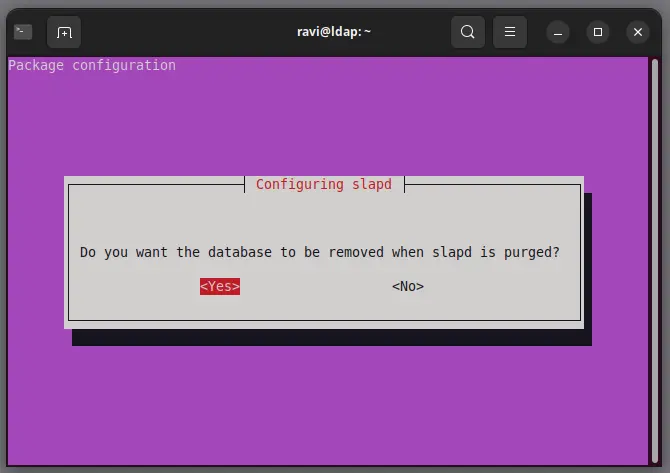
The option Remove database when slapd is purged means, your data will not be deleted automatically, which is useful if you plan to reinstall or upgrade without losing your existing directory data.
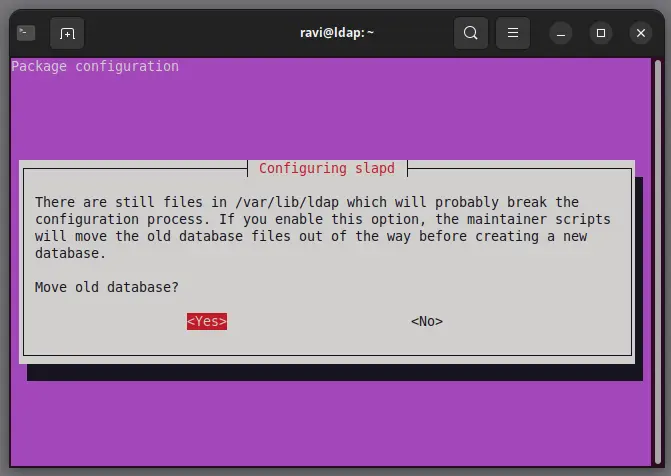
The Move old database option allows the installer to move any existing database files to a new location, ensuring a clean setup for your new configuration.
After completing these prompts, OpenLDAP will be configured.
Step 4: Install and Configure phpLDAPadmin
Now, install phpLDAPadmin, which provides a web interface to manage your OpenLDAP server.
sudo apt install phpldapadmin -y
After installing phpLDAPadmin, you need to configure it to connect to your OpenLDAP server.
sudo nano /etc/phpldapadmin/config.php
Find the following line and change it to your OpenLDAP server (usually localhost).
$servers->setValue('server','host','localhost');
Set the admin user by finding this line:
$servers->setValue('login','auth_type','cookie');
Change it to:
$servers->setValue('login','auth_type','session');
Set the base DN by finding the line that starts with:
$servers->setValue('base','dc=example,dc=com');
Replace it with your domain name:
$servers->setValue('base','dc=yourdomain,dc=com');
Step 5: Configure Apache for phpLDAPadmin
You need to configure Apache to serve phpLDAPadmin.
sudo nano /etc/apache2/conf-available/phpldapadmin.conf
Find the following line and make sure it is uncommented (remove the # at the beginning if present).
Alias /phpldapadmin /usr/share/phpldapadmin
Next, add the following lines to allow access to phpLDAPadmin:
<Directory /usr/share/phpldapadmin/htdocs/>
    Options Indexes FollowSymLinks
    AllowOverride All
    Require all granted
</Directory>
Enable the phpLDAPadmin configuration and restart Apache for the changes to take effect:
sudo a2enconf phpldapadmin
sudo systemctl restart apache2
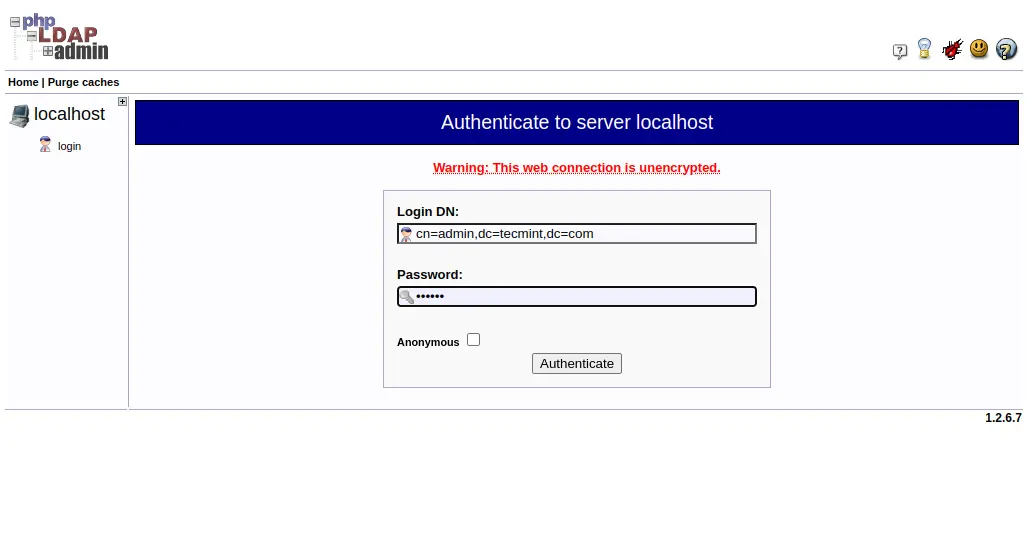
Now that everything is set up, you can access phpLDAPadmin through your web browser.
http://your-server-ip/phpldapadmin
You will be prompted to log in using the following credentials.
Login DN: cn=admin,dc=yourdomain,dc=com
Password: admin password
Conclusion
Congratulations! You have successfully installed OpenLDAP with phpLDAPadmin on Ubuntu. You can now manage your LDAP directory easily through the phpLDAPadmin web interface.
If you have any questions or encounter any issues, feel free to ask!


How about an update with TLS (self signed keys) and newer versions of Debian 10/Ubuntu 21.04, please? Would you be able to make it available?
@John,
Let me check and update the article with newer Debian and Ubuntu releases…
Any update on TLS/SSL, please?
I have configured ldap server on ubuntu 14.04, client also able to joining, but my intention was hide some built-in application and restrict 3rd party software’s but I am unable to do so, can you help me out from this please. it urgent.
@Tousif,
Use LDAP ACL for restricting applications to user specific. For more information read OPenLDAP documentation.
Hi Ravi,
We would like to install LDAP on Centos 7 and it should integration with windows 2012 R2 Active Directory OU’s please suggest to me how to configure it
@Sanjeevi,
Sorry not idea about Windows integration with LDAP, actually I never get chance to work on..
Hi,
could you please help me with I want a shell script that will lock a machine after certain idle time in the openLdap server.
Thank you
Hi Ravi Saive,
above ldap configuration is very good . but can you confirm how to login ldap user on ubuntu machine with GUI mode
I struggled with this piece. So to help future readers here is the fix that I had to apply to get the LDAP entries Sheldon, Leonard, Howard, and Rajesh to add.
Here is my Linux information…
Operating System Linux Mint 16 Cinnamon 64-bit
Cinnamon Version 2.0.14
Linux Kernal 3.11.0-12-generic
Here is the error message that I received when trying to add LDAP entries for the first time.
adding new entry “cn=Sheldon Cooper,ou=People,dc=homestead,dc=localdomain”
ldap_add: No such object (32)
matched DN: dc=homestead,dc=localdomain
(repeated three more times)
The fix is to add the missing and needed DN level for the “People”…
dn: ou=People,dc=homestead,dc=localdomain
objectClass: top
objectClass: organizationalUnit
ou: People
Save the above four lines, and put them into another separate LDIF file. Like the below example.
/ $ ldapadd -x -W -D “cn=admin,dc=homestead,dc=localdomain” -f ~/Add_DN_Level.ldif
Enter LDAP Password:
adding new entry “ou=People,dc=homestead,dc=localdomain”
With the DN level added the four People can now be added to LDAP.
LDAP installation & Configuration on CentOS 6.5
[root@dhakal ~]# yum -y install openldap-servers.x86_64 0:2.4.23-34.el6_5.1
[root@dhakal ~]# yum -y install openldap-clients.x86_64 0:2.4.23-34.el6_5.1
[root@dhakal ~]# yum -y install portreserve.x86_64 0:0.0.4-9.el6
Packages Installed: openldap-clients.x86_64 0:2.4.23-34.el6_5.1
openldap-servers.x86_64 0:2.4.23-34.el6_5.1
Dependency Installed: portreserve.x86_64 0:0.0.4-9.el6
[root@dhakal ~]# yum -y update
Updated: cpio.x86_64 0:2.10-12.el6_5
[root@dhakal ~]# slappasswd -s 123dhakal
[root@dhakal ~]# cd /etc/openldap/slapd.d/cn\=config/
[root@dhakal cn=config]# ll
[root@dhakal cn=config]# vi olcDatabase={1}monitor.ldif
[root@dhakal cn=config]# vi olcDatabase={2}bdb.ldif
[root@dhakal ~]# cp /usr/share/openldap-servers/slapd.conf.obsolete /etc/openldap/slapd.conf
[root@dhakal ~]# vi /etc/openldap/slapd.conf
[root@dhakal ~]# chkconfig slapd on
[root@dhakal run]# vi vastika.ldif
[root@dhakal run]# ldapadd -x -D “cn=Dhakal,dc=vastika,dc=com” -W -f vastika.ldif
[root@dhakal run]# ldapsearch -x -LLL -b dc=vastika,dc=com
[root@dhakal run]#
Complete!
Would be a nice tutorial if it actually would work. No luck with Linux Mint.
Hi Ravi,
I have installed openldap with phpldapadmin as you instructed on my ubuntu 12.0.4 box. But I can not login via phpldapadmin page. I can login there only as anonymous user.Could you please help me out?
Hi Amitesh!
I had the same problem with Linux Mint 17.
So the key is, when you configure the /etc/ldap/ldap.conf file you need to modify the URI row as well:
URI ldap://127.0.0.1:389
The phpldapadmin config file (/etc/phpldapadmin/config.php) needs to be fixed as well.
The base DNS should be the same as you entered after executed this command: “sudo dpkg-reconfigure slapd”.
Actually what you typed in at the second picture, that DNS needs to be typed into the phpldapadmin config file too.
eg.: $servers->setValue(‘server’,’base’,array(‘dc=test,dc=tecmint,dc=com’))
Restart the apache at the end:
sudo service apache2 restart
Good luck!
I am anable to find option or command to save phpldpapadmin config file
You can also try just using the IP for your ldap server in the URI
i.e.
URI ldap://192.168.1.10
Thanks for sharing this info! As to Soumitra’s error, entering the server into dns should resolve it, or at least enter it in the host table of the ldap server.
You get the error when you use ldapsearch x without the dash
ldapsearch -x should work
Well The error got resolved after restarting the slapd daemon.
Now how do we authenticate the client in ldap.
how to restarting the slapd daemon ??
is it true /etc/init.d/slapd restart ??
please help me, i’ve tried this but it didn’t work
Which OS you using?
I have done all the configuration and create object for contact sharing, when i tried to connect my LDAP with thunderbird is not sharing the contact from ldap.All running well .please get me back ASAP
ldap_sasl_interactive_bind_s: Can’t contact LDAP server (-1)
I confirm the problem in wheezy
Please change entry according to your domain in /etc/ldap/ldap.conf
my hostname is manoj-KVM.mint.local
$ sudo nano /etc/ldap/ldap.conf
BASE dc=mint,dc=local
URI ldap://manoj-KVM.mint.local ldap://manoj-KVM.mint.local:666
I’m getting same error as Soumitra. Ideas?
I haven’t received such error, let me check and give you proper solution to fix.
Please share the same for RHEL 6 / CENTOS 6 …..x86_64
And will be waiting for your post……………………………………
…………………………………………………………………….
………………………………………………………….
————————
————
——–
Very soon…
I am getting this error:
My hostname is ubuntults.com, I made the following changes in the .conf file
BASE dc=ubuntults,dc=com
URI ldap://ldap.ubuntults.com ldap://ldap-master.ubuntults.com:666
This is the error:
ldap_sasl_interactive_bind_s: Can’t contact LDAP server (-1)
ldap_sasl_interactive_bind_s: Can’t contact LDAP server (-1)
I had the same error on wheezy. If you recomment BASE and URI it should work.
Put it
URI ldap://127.0.0.1/
into /etc/openldap/ldap.conf.