Oracle database is one of the most widely used relational database management systems (RDBMS) in enterprise environments. Developed, maintained, and supported by Oracle Corporation, this RDBMS is often installed on top of a flavor of Enterprise Linux (RHEL, CentOS, or Scientific Linux). This makes for a very robust operating system – database choice.
In this article, we will explain how to install Oracle 12c Release 2 on a RHEL/CentOS 7 GUI server.
Attention: RHEL/CentOS 6 users can follow this guide to Install Oracle Database 12c on RHEL/CentOS 6.x
Let’s begin.
Prerequisites:
After installing Oracle 12c, the configuration will be performed through a graphical interface. That is the reason why we need a CentOS 7 server with the X Window System software group installed.
Read Also: Install GUI (Gnome) on RHEL/CentOS 7 Server
Additionally, please note that an Oracle account is required to download the Oracle Database 12c installation file (3.2 GB). Don’t worry about this, though, as you can create an account for free.
Finally, make sure your server has at least 2 GB of RAM and 30 GB of available disk space. These hardware requirements are safe for a testing environment such as ours, but will need to increase if you consider using Oracle in production.
Preparing for Oracle 12c Installation
1. To begin, make sure that all the packages currently installed on your RHEL/CentOS 7 system are updated to their latest versions.
# yum update -y
2. Next, installed all the required dependencies for the RDBMS, along with the zip and unzip packages.
# yum install -y binutils.x86_64 compat-libcap1.x86_64 gcc.x86_64 gcc-c++.x86_64 glibc.i686 glibc.x86_64 glibc-devel.i686 glibc-devel.x86_64 ksh compat-libstdc++-33 libaio.i686 libaio.x86_64 libaio-devel.i686 libaio-devel.x86_64 libgcc.i686 libgcc.x86_64 libstdc++.i686 libstdc++.x86_64 libstdc++-devel.i686 libstdc++-devel.x86_64 libXi.i686 libXi.x86_64 libXtst.i686 libXtst.x86_64 make.x86_64 sysstat.x86_64 zip unzip
3. Create the user account and groups for Oracle.
# groupadd oinstall
# groupadd dba
# useradd -g oinstall -G dba oracle
Finally, set a password for the newly created oracle account.
# passwd oracle
4. Add the following kernel parameters to /etc/sysctl.conf file.
fs.aio-max-nr = 1048576
fs.file-max = 6815744
kernel.shmall = 2097152
kernel.shmmax = 8329226240
kernel.shmmni = 4096
kernel.sem = 250 32000 100 128
net.ipv4.ip_local_port_range = 9000 65500
net.core.rmem_default = 262144
net.core.rmem_max = 4194304
net.core.wmem_default = 262144
net.core.wmem_max = 1048586
and apply them:
# sysctl -p
# sysctl -a
5. Set the limits for oracle in /etc/security/limits.conf file.
oracle soft nproc 2047
oracle hard nproc 16384
oracle soft nofile 1024
oracle hard nofile 65536
6. Create a directory named /stage and extract the zipped installation file.
# unzip linuxx64_12201_database.zip -d /stage/
Before proceeding, create other directories that will be used during the actual installation, and assign the necessary permissions.
# mkdir /u01
# mkdir /u02
# chown -R oracle:oinstall /u01
# chown -R oracle:oinstall /u02
# chmod -R 775 /u01
# chmod -R 775 /u02
# chmod g+s /u01
# chmod g+s /u02
We are now ready to run the installation script.
7. Open a GUI session in the RHEL/CentOS 7 server and launch the installation script.
/stage/database/runInstaller
and follow the steps presented by the installer.
Installing Oracle 12c on CentOS 7
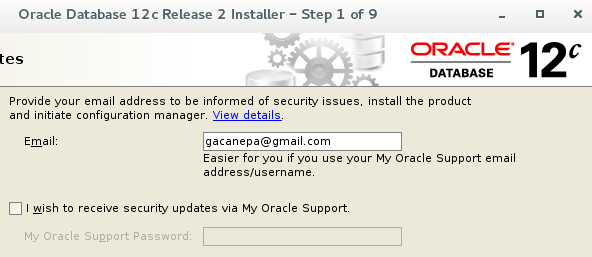
8. Enter the email address associated with your Oracle account (optional).
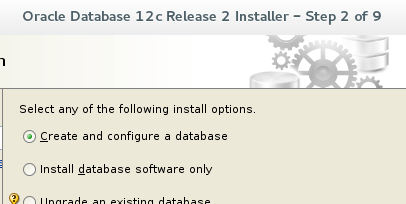
9. Choose Create and configure a database.
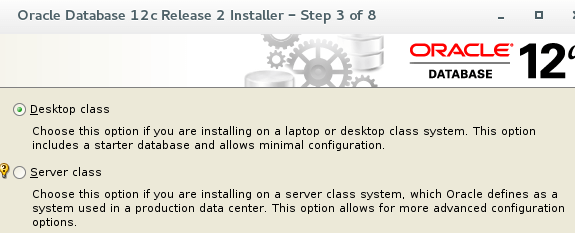
10. Select Desktop class since we are setting up a minimal configuration and a starter database.
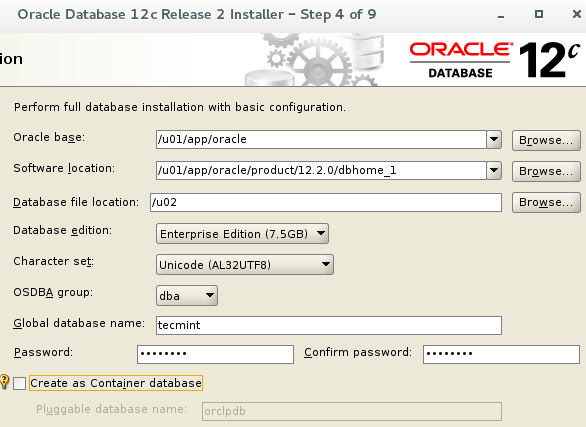
11. Select the following options for basic configuration.
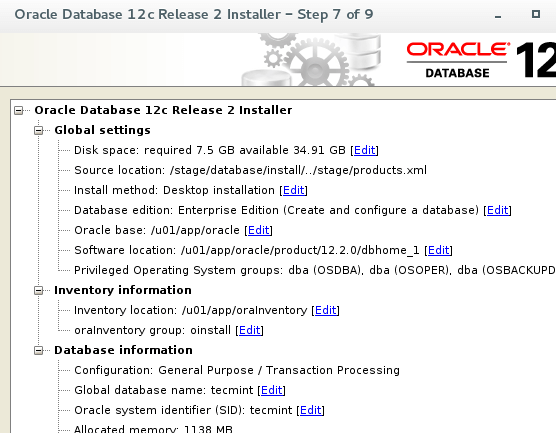
- Oracle base: /u01/app/oracle
- Software location: /u01/app/oracle/product/12.2.0/dbhome_1
- Database file location: /u01
- OSDBA group: dba
- Global database name: your choice. We chose tecmint here.
- Take note of the password, as you will be using it when you first connect to the database.
- Uncheck Create as Container database.
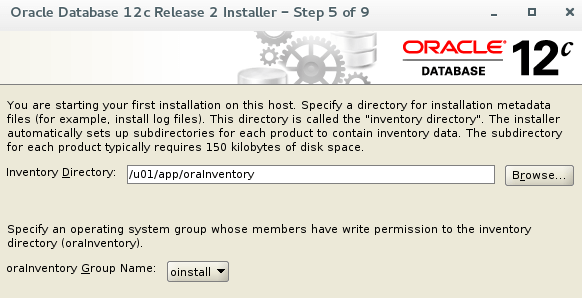
12. Leave the default Inventory Directory as /u01/app/oraInventory.
13. Verify that the installation pre-checks are completed without errors.
The installer will not let you past this point if any errors are found.
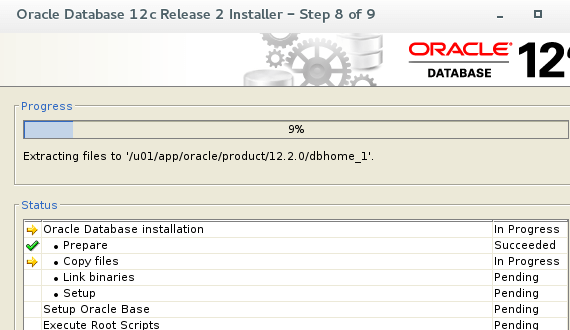
14. Wait until the Oracle 12c installation completes.
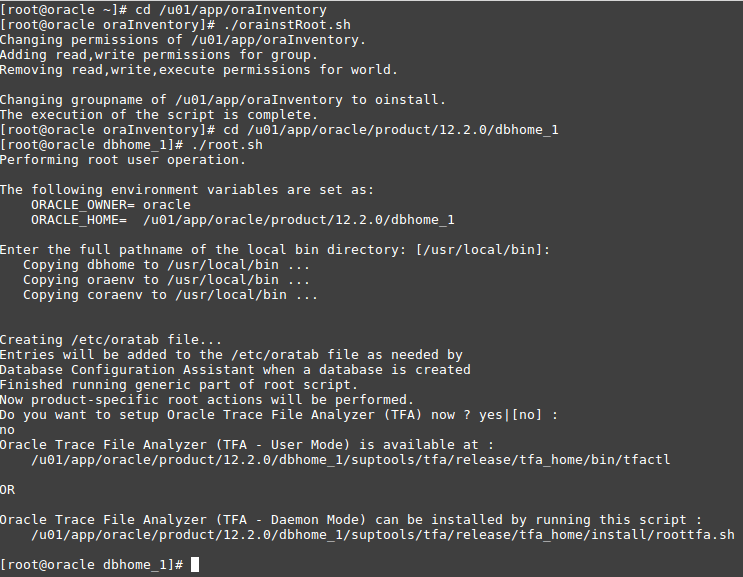
It is possible that at some point during the installation you will be asked to run a couple of scripts to set up further permissions or correct issues. This is illustrated here:

And here:
# cd /u01/app/oraInventory
# ./orainstRoot.sh
# cd /u01/app/oracle/product/12.2.0/dbhome_1
# ./root.sh
15. After that, you will need to return to the previous screen in the GUI session and click OK so that the installation can continue.
When it is finished, you will be presented with the following message indicating the URL of the Oracle Enterprise Manager:
https://localhost:5500/em
Oracle 12c Finishing Touches
16. To allow connections from outside the server, you will need to open the following ports:
1521/TCP
5500/TCP
5520/TCP
3938/TCP
As follows:
# firewall-cmd --zone=public --add-port=1521/tcp --add-port=5500/tcp --add-port=5520/tcp --add-port=3938/tcp --permanent
# firewall-cmd --reload
17. Next, login as oracle using the password that was chosen previously and add the following lines to .bash_profilefile.
TMPDIR=$TMP; export TMPDIR
ORACLE_BASE=/u01/app/oracle; export ORACLE_BASE
ORACLE_HOME=$ORACLE_BASE/product/12.2.0/dbhome_1; export ORACLE_HOME
ORACLE_SID=tecmint; export ORACLE_SID
PATH=$ORACLE_HOME/bin:$PATH; export PATH
LD_LIBRARY_PATH=$ORACLE_HOME/lib:/lib:/usr/lib:/usr/lib64; export LD_LIBRARY_PATH
CLASSPATH=$ORACLE_HOME/jlib:$ORACLE_HOME/rdbms/jlib; export CLASSPATH
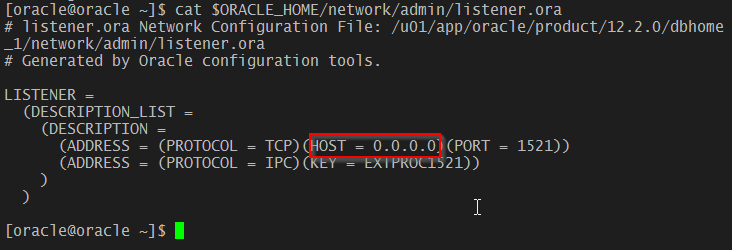
18. Finally, replace localhost with 0.0.0.0 on.
# vi $ORACLE_HOME/network/admin/listener.ora
19. The last step consists in reloading .bash_profile to apply the new settings.
# source .bash_profile
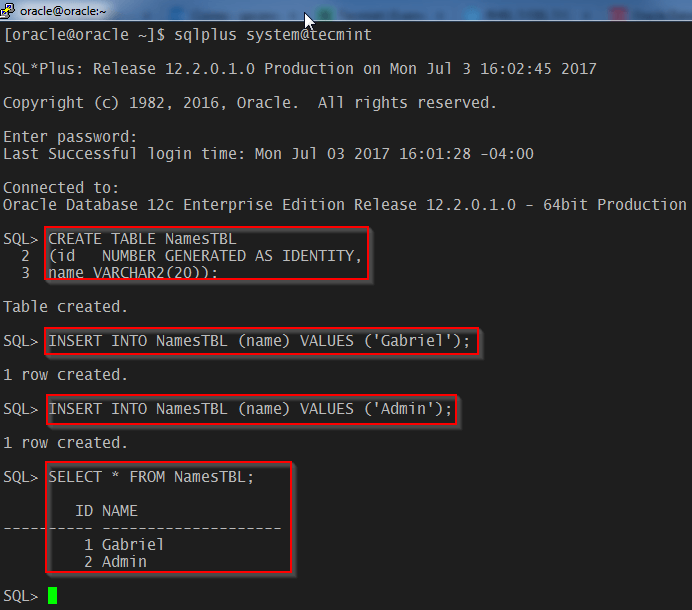
20. And then login to the database using the system account and the password chosen in Step 11 of the previous section.
# sqlplus system@tecmint
Optionally, let’s create a table inside the tecmint database where we will insert some sample records as follows.
SQL> CREATE TABLE NamesTBL
(id   NUMBER GENERATED AS IDENTITY,
name VARCHAR2(20));
Please note that IDENTITY columns were first introduced in Oracle 12c.
SQL> INSERT INTO NamesTBL (name) VALUES ('Gabriel');
SQL> INSERT INTO NamesTBL (name) VALUES ('Admin');
SQL> SELECT * FROM NamesTBL;
Enabling Oracle to Start on System Boot
21. To enable the database service to start automatically on boot, add the following lines to /etc/systemd/system/oracle-rdbms.service file.
# /etc/systemd/system/oracle-rdbms.service
# Invoking Oracle scripts to start/shutdown Instances defined in /etc/oratab
# and starts Listener

[Unit]
Description=Oracle Database(s) and Listener
Requires=network.target

[Service]
Type=forking
Restart=no
ExecStart=/u01/app/oracle/product/12.2.0/dbhome_1/bin/dbstart /u01/app/oracle/product/12.2.0/dbhome_1
ExecStop=/u01/app/oracle/product/12.2.0/dbhome_1/bin/dbshut /u01/app/oracle/product/12.2.0/dbhome_1
User=oracle

[Install]
WantedBy=multi-user.target
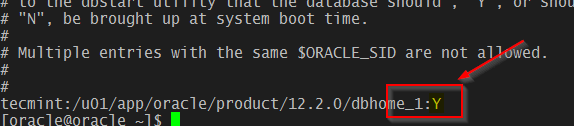
22. Finally, we need to indicate that the tecmint database should be brought up during boot in /etc/oratab (Y: Yes).
Summary
In this article, we have explained how to install Oracle 12c on RHEL/CentOS 7, how to create and configure a database, and how to create tables and insert rows of data.
Additionally, it is important to note that the database server should be up and running when the system boots, and our default database should be available at that point.
If you have any questions or comments about this article, feel free to drop us a line using the form below.

Hi,
Thanks for those steps, May I have your help what can cause oracle not to start after a system restart?
I noticed first that listener.ora point to /u02/ when it was working, after system restart listener.ora point to /u01/ … /listener.ora.
do we to change the path of the database ( as we install a database on directory /u02?
Thanks
Why did you create u02 directory and never used it?
Great article, thanks it helps a lot.
I installed Oracle 12c under centos 7.7 in VMWare machine as told by you. Still while connecting to sqlplus and I get the following error.
and also when I checked.
LSNRCTL for Linux: Version 12.2.0.1.0 – Production on 15-APR-2020 18:52:46
Copyright (c) 1991, 2016, Oracle. All rights reserved.
TNS-01106: Listener using listener name LISTENER has already been started
basically it seems oracle is not staring.
Where did you get the list of RPM packages?
Step 17 is wrong – has 12.1.0 where it should have 12.2.0.
@Chris,
Corrected in the article..
Thanks.
Hi, thanks for this good and valuable tutorial.
I’m getting this message when I try to connect :ORA-12514: TNS:listener does not currently know of service requested in connect.
Can you tell me please what I’m missing?
Thanks
The steps are detailed and easy to implement. Appreciate your help!
Having trouble with Step 18 :
@Mrinalini,
What’s your $ORACLE_HOME location?
The oracle file oracle-rdbms.service is not created.
it’s a fresh file that you create, it’s not created by the install.
Hi, thanks for the tutorial. I think that you have to execute:
after the /etc/systemd/system/oracle-rdbms.service creation.
If you are already logged as oracle user, changes in step 3 take effect only after log-out and log-in. Otherwise installer will not find proper ODSBA group and will suggest only oracle or wheel group.
1) Need to set stack size also for oracle in /etc/security/limits.conf
2) Typo 12.1.0 should be 12.2.0 in
Step 4, there is a typo:
should be:
@Jason,
Thanks for informing us, corrected the command in the article.
In my case an extra line was necessary in limits.conf to pass the pre-cheks: oracle soft stack 10240
And a question: is it safe to remove X Windows System and GNOME after successful installation?
But wow, Oracle 12 is still using Flash for Enterprise Manager ? I haven’t worked with Oracle since 10g, but thought by now they would have gotten rid of Flash by now..
Very nice step-by-step description to get Oracle 12 up and running.
One small remark, in step 18 after you change the listener.ora you will have to stop/start the listener to make the changes take effect. (lsnrctl stop / lsnrctl start).
Hi,
I would like to know how I can implement step 7.
Step 7. Open a GUI session in the RHEL/CentOS 7 server and launch the installation script.
I have IBM cloud server machine and am able to connect through Putty. I installed Java 8 through Putty. I don’t have GUI.
How do I do that?
Please answer.
Thanks’
@Kumar,
Try to launch the same installer script from the command-line and see, how it works? if it didn’t start, try to install GUI.
Hi, thank you so much for this great tutorial.
I have facing a problem when i run “runInstaller”.
“Can’t connect to X11 window server using ‘:0’ as the value of the DISPLAY variable.”
please help.
Run these commands to fix the error.
Thank you so much Santiago for all the detailed steps!!
Just one remark : to fully enable Oracle starting @ system boot use the following command.
It’s perfect!
To be continued…
Please check Step 17. You have a typo in the $ORACLE_HOME variable. You reference product 12.1.0, when it should be 12.2.0. Also, what are the credentials to login into the web interface?
Thanks I completed my first install because of your article.
You can login as system user using the password created on step 11