In this series we are discussing RHEV3.5 administration topics. RHEV is the RedHat Enterprise Virtualization solution, which is based on oVirt project [open-source Virtualization project].
Red Hat Enterprise Virtualization is a complete virtualization management solution for virtualized servers and desktops.
This series will discuss (How to) administration topics including the RHCVA exam objectives.
In our first article, we are discussing RHEV environment and basic deployment. RHEV consists of two main components, like Hypervisor and Management system.
RHEV-H is the Hypervisor of RHEV platform, it is a bare-metal hypervisor which used to host virtual machines. It’s also based on KVM and RHEL.
RHEVM is the management system of the environment which controls the environment hypervisors. It’s also used to create, migrate, modify and control virtual machines hosted by hypervisrors and a lot of other many tasks will be discussed later.
RHEV3.5 Features
- Open source solution based on the Red Hat Enterprise Linux kernel with the Kernel-based Virtual Machine (KVM) hypervisor technology.
- Supported limit of up to 160 logical CPUs and 4TB per host and up to 160 vCPU and 4TB vRAM per virtual machine.
- OpenStack integration.
- Supported Daily missions like offline migration, High availability, Clustering, etc..
For more features and details read: RedHat Enterprise Virtualization Guide
Prerequisites
During our series, we will work on two nodes ‘hypervisors’ and ‘hosts’ with one manager and one iscsi storage node. In the future we will add one IPA and DNS server to our environment.
For deployment scenarios we have two:
- Physical Deployment – Real environment, so you will need at least three or physical machines.
- Virtual deployment – Test labs/environment, so you will need one physical machine with high resources e.g. i3 or i5 processor with 8G or 12G ram. Additional to another virtualization software e.g. Vmware workstation.
In this series we are working on the second scenario:
Physical Host OS : Fedora 21 x86_64 with kernel 3.18.9-200
RHEV-M  machine OS : RHEL6.6 x86_64
RHEV-H  machines hypervisor : RHEV-H 6.6
Virtualization software : Vmware workstation 11
Virtual Network interface : vmnet3
Network : 11.0.0.0/24
Physical Host IP : 11.0.0.1
RHEV-M machine : 11.0.0.3

In the future articles, we will add additional components like storage nodes and IPA server so make your environment scalable as possible.
For RHEV-M machine take care about this prerequisites:
- RHEL/CentOS6.6 x86_64 new minimal installation [Clean installation].
- Make sure your system is up-to-date.
- Static IP for your network configuration.
- Your host-name something like machine.domain.com.
- Update your local /etc/hosts file with host-name and IP [Make sure the host-name is resolvable].
- The minimum requirement is 4G for memory and 25GB for hard disk.
- Mozilla Firefox 37 is recommended browser to access WUI.
Installation of RedHat Enterprise Virtualization Manager 3.5
1. To get access for RHEV packages and updates, you should get a free 60-day trial subscription from the redhat official site using co-prorate mail from here:
Note: After 60-day your environment will work fine, but without availability to update your system if there is new updates.
2. Then register your machine to redhat channels. Steps explained here.
3. Lets install rhevm package and its dependencies using yum command.
[root@rhevm ~]# yum install rhevm
4. Now its time to configure rhevm by runing “engine-setup” command, which will check the status of rhevm and any available updates with asking a series of questions.
We could summarize the questions in main sections :
- Product Options
- Packages
- Network Configuration
- DataBase Configuration
- oVirt Engine Configuration
- PKI Configuration
- Apache Configuration
- System Configuration
- Configuration Preview
Hint: Suggested configuration defaults are provided in square brackets; if the suggested value is acceptable for a given step, press Enter to accept that value.
To run the command:
[root@rhevm ~]# engine-setup
Product Options
First thing you will be asked about is to install and configure the engine on the same host. For our tutorial, keep the default value (Yes). If you want WebSocket Proxy to be configured on your machine, keep the default value (yes).

Packages
Script will check any updates are available for the packages linked to the Manager. No user input is required at this stage.

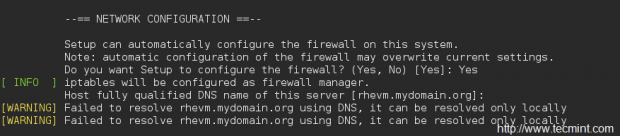
Network Configuration
Let script configures your iptables firewall automatically. For now we won’t use DNS, so make sure that your host-name is fully qualified name by updating /etc/hosts as we did previously.
Database Configuration
The default database for RHEV3.5 is PostgreSQL. You have the option to configure it on the same machine or remotely. For our tutorial will use the local one and let script to configure it automatically.

Ovirt Configuration
In this section you will provide the admin password and the application mode for you environment.

PKI Configuration
RHEVM uses certificates to communicate securely with its hosts. You provide the organization name for the certificate.

Apache Configuration
For RHEVM web user interface, manager needs Apache web-server to be installed and configured, lets make setup configure it automatically.

System configuration
RHEV environment has ISO library which you could store many OS ISO in. This ISO lib called also ISO domain, this domain is a network shared path, usually it shared by NFS. This domain/path will be on the same RHEVM machine so you could create it manually or let script configures it automatically.

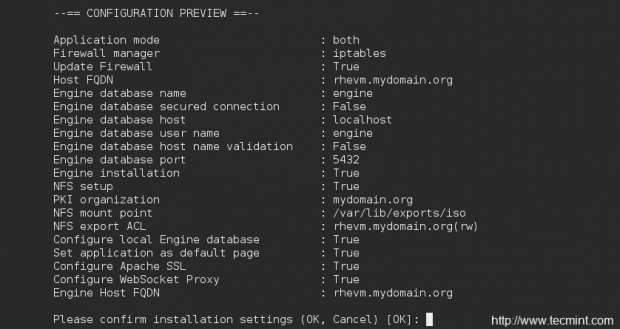
Configuration Review
In this section you will review all previous configuration and confirm if everything is OK.
Summery
This is the last stage which show additional information about how to access the admin panel and starting the services.
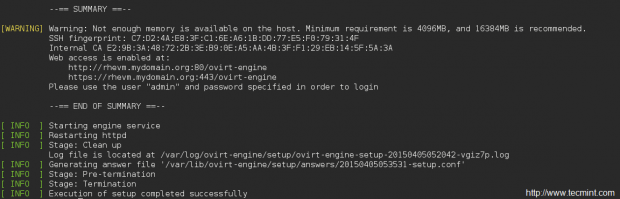
Hint: Warning may appears, if the memory used is low than the minimum requirement. For test-environment it’s not very important just keep on.
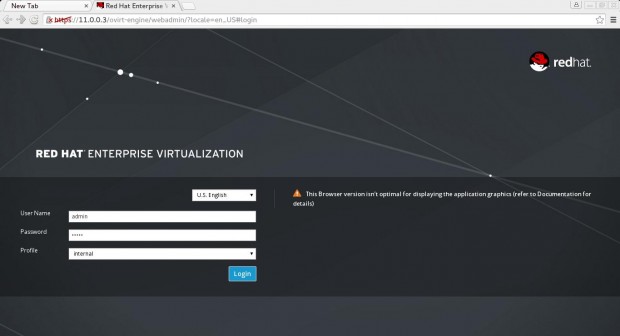
To access RHEVM web user interface:
http://$your-ip/ovirt-engine
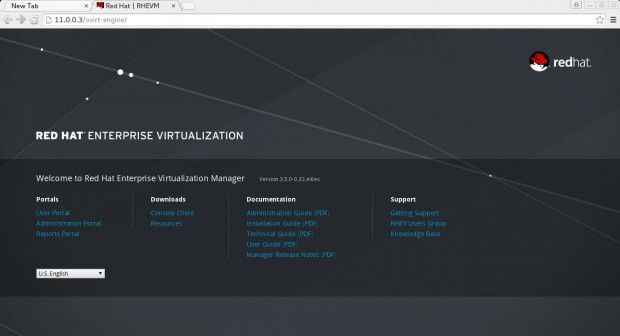
Then select Administrator Portal and provide your credentials Username:admin and the password you entered during the installation. Click Login.
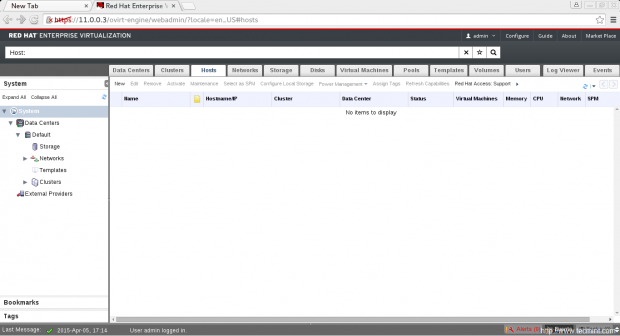
This is the administration portal which will be discussed later. You will notice that hosts tab is empty as we didn’t add any host/hypervisor to our environment yet.
Conclusion
This is first article in our RHEV3.5 administration series. We just introduce the solution, its features and its main components then we installed RHEV-M for our RHEV environment. In next article we will discuses RHEV-H installation and adding them to RHEV environment under RHEVM management.
Resources:


Excellent Tutorial
Have you installed Virtualization 4 yet? Wondering if you could add that to your blog. I have installed the M, and two hosts, and added the hosts to the Virtualziation Manager. But i don’t know how to further configure it for live migration. I am from the vmware world trying to cross over.
How can i register CentOS 6 with redhat to install rhevm? As you mention that you are using RHEL/CENTOS6 minimal install.
@Asim,
Please use the following our article that will guide you on how to register to RedHat subscription in order to install rhevm packages..
https://www.tecmint.com/enable-redhat-subscription-reposiories-and-updates-for-rhel-7/
Very exciting tutorials on your Website. May God bless you.
Waiting for the Part 5 to 9. :D
Hi,
Does it mean that it works by using, on the same physycal host, three VMs one for management , two for hosting RHEV-H ?
KVM Guests are then running on a already virtualized host ?
No performance issue ?
Thanks for hlep.
J.P. Ribeauville
You are right !!
For testing environment, there is no performance issue…..
Hello!
I right understand – RHEV is a proprietary system of red hat, and need buy it ?
Yup !!
It is a seprated RedHat product with custom license. Hoswever, the product itselfy you can got it free as i mentioned above for testing proposals….
Sir,
Really very nice post but what about the other posts as mentioned above are waiting for the other ones as mention above. Any way very nice presentation and easy to understand….
Been waiting for your other posts..
@Debasish,
The artifices are in process, we will soon publish second part of this article…
Thanks Mohammad for the tutorial. Very helpful so far. Awaiting next post
Dear, I just few days back installed RHEV 3.5 for our org. And that was the first time i installed RHEV.
I will like to give one damn advice .
> Dont connect your hypervisor to Manager until you are sure your networking is correct and all the bonding+vlans+bridging are correct.
Because hypervisor have this bug i guess that if you change the configuration after connecting to manager and restart the hypervisor , after restart the hypervisor will bring back the old configuration even though i used “Persist” command.
But i need to know one thing . Is it possible to add new Hypervisors in already existing Datacenters or do i have to create New DC and Clusters for each node ????
I still puzzled about why not to build the management into hyper visor it self?
why do we need 2 node setup? the actual server and a management node.
I understand that in multi node setup management is overhead, but it could be an option during an install to designate one server as Master and setup all management tools on it. it would than be possible per user choice, to include management tools on any and all servers in the cluster and replicate/share the configuration between them for redundancy. if master server is on the fritz just login on one of the standbys and continue as usual until master is back up and running. as this setup should use shared storage, all of it should be available fro many/all nodes and thus point to the same location. what is the fascination with separate consoles?
This is not a 2 node setup, this is a controller node and hundreds if not thousands of hypervisors it controls. HA and other advanced functionality is so much easier when you have an overlooking entity, instead of developing complex algorithms that would determine a quorum among themselves. Having said that, you can deploy the manager/engine/controller as a VM in the setup it controls, thus eliminating the requirement for an extra hardware host.
> I understand that in multi node setup management is overhead, but it could be an option during an install to designate one server as
> Master and setup all management tools on it
So you propose setting up every host in the cluster with all the extra software it takes to run the engine as well? How do you propose maintaining the database integrity when there are thousands of hosts? How do you avoid splitbrain? You need to understand, when you talk about one manager host and one hypervisor, it looks like a waste, but RHEV is designed to be a massive solution, where one engine controls hundreds to thousands of hosts and tens of thousands of VMs. With these proportions, having an extra server or two for the engine is neglectable.
> if master server is on the fritz just login on one of the standbys and continue as usual until master is back up and running
a recipe for splitbrain right there.
> as this setup should use shared storage, all of it should be available fro many/all nodes and thus point to the same location.
Under RHEV, only the hypervisors really need to have access to the storage, quite often not over IP, the engine can be a small machine or a VM, with access to nothing but the management network.
> what is the fascination with separate consoles?
please elaborate
Awesome post Mohammad. Instead of using VMware eats RAM so much, Better use Virtual-box to save more system resources.
Thank you for good presentation.
hi i have a workstation with dual booting (win7/rhel5.8) and dual graphic card Nvidia qudro 6000. My both graphic card is woring fine with windows7 with dual monitor but in linux one card is working and n one monitor display is coming. i have update the driver still same issue also i have in PCI list with command LSPCI but only one graphic card is showing there. So please can u help me to sort out is problem. I will be very thank full to you.
Thnx Mohammad for RHEV article.. waiting for next one & series..