SHOUTcast is proprietary software used to stream media over the Internet, especially used in music live streaming by the radio stations on Internet, and is developed by Nullsoft with versions for all major platforms, including Linux.
This tutorial will guide you on how you can install The SHOUTcast Distributed Network Audio Server in CentOS 8, with the help of which you can use media players, like Winamp or Mixxx to connect to the streaming services and broadcast your audio playlists to Internet listeners.
Although this tutorial only covers SHOUTcast server installation on a CentOS 8/7 machine, the same procedure can be applied to other Linux distributions such as RHEL, Fedora, Ubuntu, Debian, Linux Mint, etc. with the remark that you must adapt firewall commands to suit your Linux distribution.
Step 1: Download and Install SHOUTcast Server
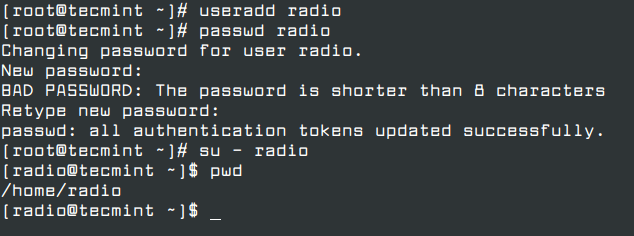
1. Before proceeding with the installation of the SHOUTcast server, create a local user from which you will run the server because running the server from the root account can impose serious security issues on your system.
So, log in on your system with the root account, create a new user, called radio, after you’re done log out from the root account, and, then, login with your newly created user. Here are the following required commands that need to be executed on the terminal.
# adduser radio
# passwd radio
# su - radio
$ pwd
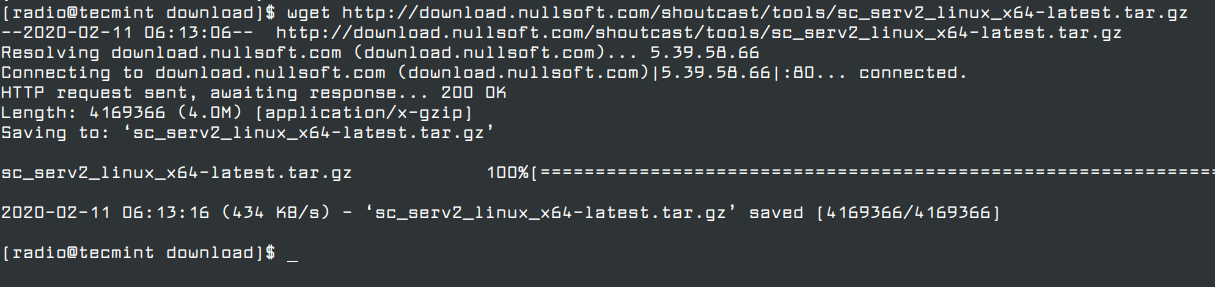
2. Once logged in on your system with the radio account, create two directories named download and server, then switch to download folder.
$ mkdir download
$ mkdir server
# cd download
3. Next, grab the last version of the SHOUTcast server archive for Linux, depending on your system architecture, by visiting the official Nullsot Download page.
Alternatively, use the following wget utility to download the archive from the command line.
--------------- On 64-bit ---------------
$ wget http://download.nullsoft.com/shoutcast/tools/sc_serv2_linux_x64-latest.tar.gz

--------------- On 32-bit ---------------
$ wget http://download.nullsoft.com/shoutcast/tools/sc_serv2_linux-latest.tar.gz
4. After the download completes, extract the archive file, list the directory to locate the sc_serv executable binary file, and copy it to the installation directory, located in the server folder, then move to the SHOUTcast installation path, by issuing the following commands.
$ tar xfz sc_serv2_linux_x64-latest.tar.gz
$ ls
$ cp  sc_serv  ../server/
$ cd  ../server/
$ ls

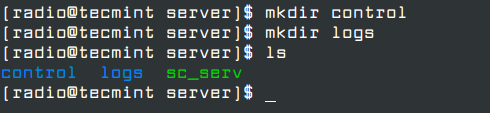
5. Now that you are located in the server installation path, create two directories named control and logs and you’re done with the actual installation process. List your directory content to verify if everything is in place using ls command.
$ mkdir control
$ mkdir logs
$ ls
Step 2: Create a SHOUTcast Configuration File
6. In order to run and operate the server, you need to create a configuration file for SHOUTcast. Open your favorite text editor and create a new file, named sc_serv.conf.
Make sure that this file is created in the same path as your sc_serv e executable binary files are created. Using pwd command should show you this absolute path – /home/radio/server).
$ cd /home/radio/server/
$ pwd
$ vi sc_serv.conf

Add the following statements to sc_serv.conf file (example configuration).
adminpassword=password
password=password1
requirestreamconfigs=1
streamadminpassword_1=password2
streamid_1=1
streampassword_1=password3
streampath_1=http://radio-server.lan:8000
logfile=logs/sc_serv.log
w3clog=logs/sc_w3c.log
banfile=control/sc_serv.ban
ripfile=control/sc_serv.rip
Some important settings that you should be aware of this file are password statements, which you must be changed accordingly:
- adminpassword – Admin password required to perform remote administration via the web interface to the server.
- streampassword_1 – Password required by the remote media player to connect and stream media content to the server.
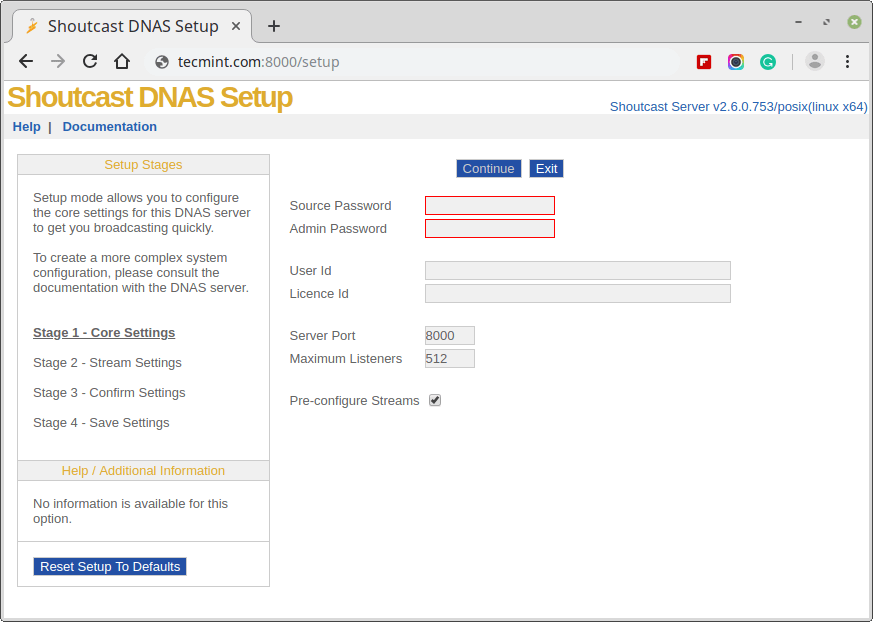
Alternatively, if you want to create a configuration file for the SHOUTcast server you can go to download directory and run builder.sh or setup.sh scripts.
$ cd ../download/
$ bash setup.sh
which will let you configure the server from a web interface that can be accessed from the following address.
http://localhost:8000
OR
http://ipaddress:8000
Once the configuration is created you can copy it to the server installation directory.
7. To start the server execute sc_serv the file from your current working directory, which must be the server directory, put it on background with & bash operator, and direct your browser to http://localhost-or-IP:8000 URL.
Also, use netstat command to see if the server is running and on what port numbers it listens.
$ chmod +x sc_serv
$ ./sc_serv &
$ netstat -tulpn | grep sc_serv

Step 3: Open Firewall Connections
8. Now the SHOUTcast server is up and running but it can’t be accessed yet from the outside world due to CentOS Firewall restrictions. To open the server to external connections login with root account and add the rule that will open port 8000 TCP.
After the rule has been added reload the Firewall to apply changes and logout from your root account.
$ su -
# firewall-cmd --add-port=8000/tcp --permanent
# firewall-cmd --reload
# exit
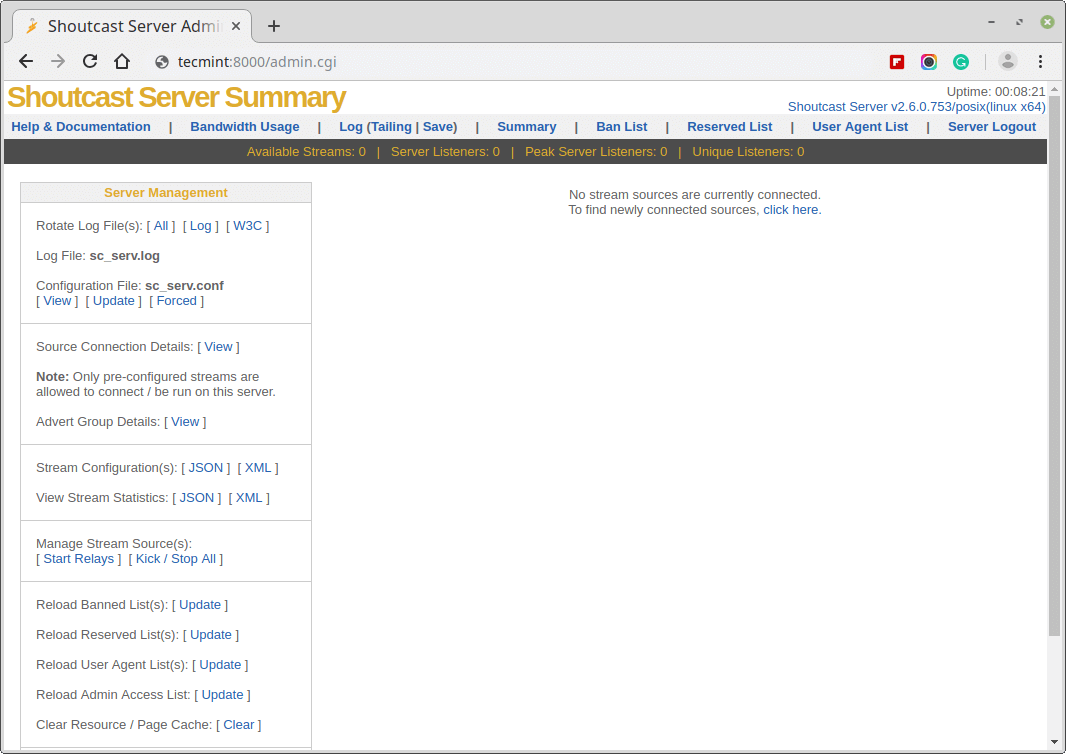
9. Then open a browser from a remote machine and type your server IP Address on port 8000 on URL filed – http://192.168.1.80:8000 – and the SHOUTcast web interface should appear like in the screenshot below, with no live streams available.
Step 4: Manage SHOUTcast Server and Create Daemon script
10. The command used to manage the SHOUTcast radio server is the binary file itself, which must be run from its installation path location in order to be
able to read the configuration file. To run the server as a daemon using the daemon command option.
You can also instruct the server to read its configurations from a different location by indicating where the configuration file resides, but be advised that using this option requires the creation of logs and control directories, which can be confusing in practice and can lead to server inability to start.
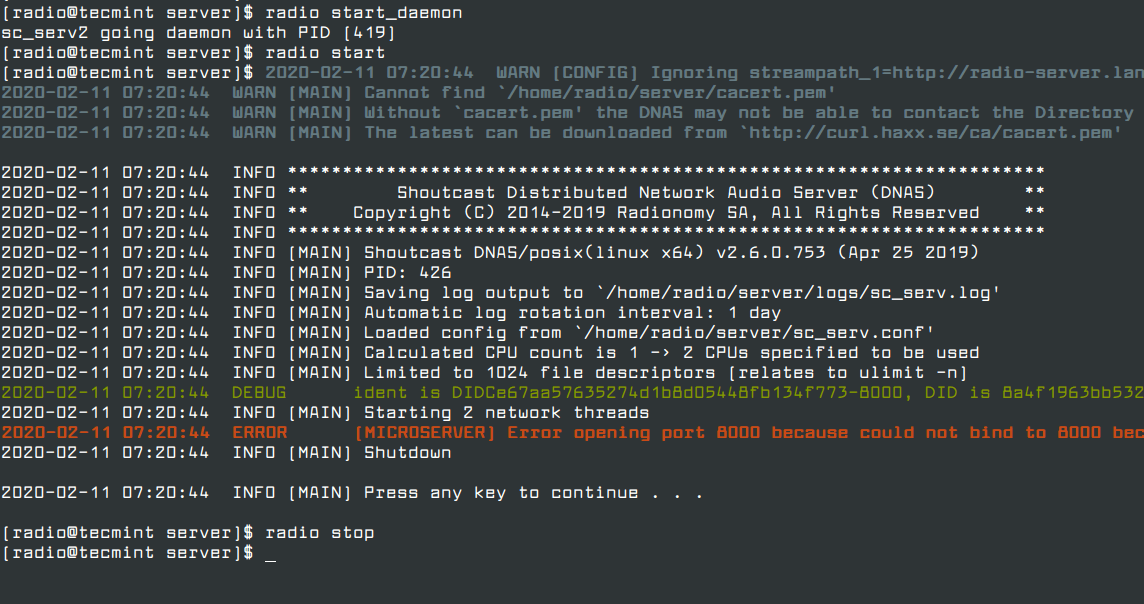
$ pwd  ## Assure that you are in the right installation directory - /home/radio/server

$ ./sc_serv   ## Start the server in foreground – Hit Ctrl + c to stop

$ ./sc_serv daemon  ## Start the server as a daemon

$ ps aux | grep sc_serv   ## Get Server PID

$ killall sc_serv  ## Stop server daemon
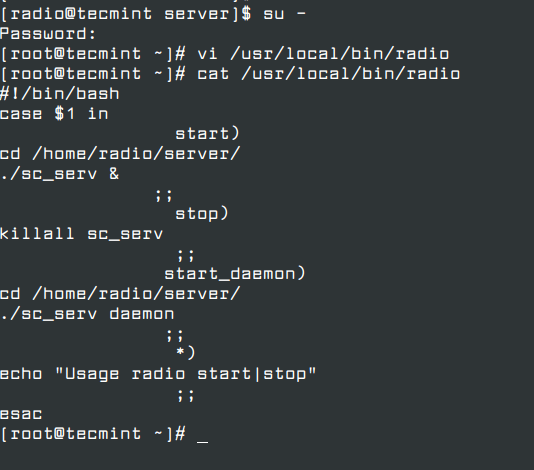
11. If you need a simplified command to start or stop SHOUTcast radio server, log in as root again and create the following executable script on /usr/local/bin/ path as in the example below.
$ su -
# vi /usr/local/bin/radio
Now add the following excerpt to the radio file.
#!/bin/bash
case $1 in
                start)
cd /home/radio/server/
./sc_serv &
              ;;
                stop)
killall sc_serv
                ;;
               start_daemon)
cd /home/radio/server/
./sc_serv daemon
               ;;
                *)
echo "Usage radio start|stop"
                ;;
esac
12. After the file was created, make it executable, exit root account, and a new command shout be available for your SHOUTcast radio server management.
# chmod +x /usr/local/bin/radio
# exit
13. To manage the server from now on, use radio command with the following switches.
$ radio start_daemon		## Starts SHOUTcast server as a daemon

$ radio start                   ## Starts SHOUTcast server in foreground

$ radio stop                    ## Stops SHOUTcast server
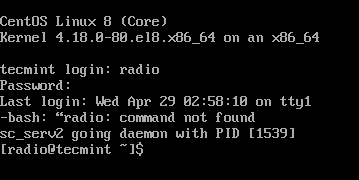
14. If you want to automatically start the server after reboot, but only on user login (in this case the server was installed on the local user named radio) issue the following command from radio account home path, then logout and login again to verify the functionality, as presented in the screenshot below.
$ whoami
$ echo “radio start_daemon” >> ~/.bashrc
That’s it! Now, the SHOUTcast server is ready to receive sound or playlists from remote media players such as Winamp from Windows and Mixxx from Linux and broadcast all of the received audio content over the Internet.

Hi, nice tutorial, compliments!
If I would like to change the port from 8000 to 8001 for example. how can I do it?
Thank you.
@Paolo,
To change the port number for your SHOUTcast Radio Server, you will need to add a port number in the configuration file (/path/to/sc_serv.conf) of the server.
After changing the port number, you will need to restart the SHOUTcast server for the changes to take effect.
Hi,
Thank you for this tutorial.
Will you tell me how to run Shoutcast after reboot, before login?
Thanks
@Sadegh,
Please check point 13 in the article, which shows how to start the Shoutcast service…
Thank you very much, I managed to do it with this great article!
wget http://download.nullsoft.com/shoutcast/tools/sc_serv2_linux_x64_09_09_2014.tar.gz
–2020-04-29 05:37:29– http://download.nullsoft.com/shoutcast/tools/sc_serv2_linux_x64_09_09_2014.tar.gz
Resolving download.nullsoft.com (download.nullsoft.com)… 5.39.58.66
Connecting to download.nullsoft.com (download.nullsoft.com)|5.39.58.66|:80… connected.
HTTP request sent, awaiting response… 404 Not Found
2020-04-29 05:37:30 ERROR 404: Not Found.
@Manoj,
I have updated the article with the latest version of ShoutCast.
How can we use shoutcast with https?
I too would like to know that.
@Manoj and @Vimal
Install Free Let’s Encrypt SSL on your domain that’s all..
https on Shoutcast v2 its Only Premium Shoutcast or free?
Hello, I want to merge shoutcast v1 and shoutcast V2 version, is it possible? How can I merge both features in a one version v3.
We have programs that we need to download on Ubuntu Server Linux. Can you help with this and how much does it cost?
What program is it?
Thanks for a nice tutorial. I have used it for some years now and it works great!! But I have one problem with it and this is probably a piece of cake if you know linux.
When there is i.e. a power loss and when the power returns I have to log on and make a manual radio start procedur.
How do I write a script to start the shoutcast automatically as soon as i.e. power returns to the linux computer without any manual commands??
Thanks
/Chris
Can someone tell me a standalone Linux computer ready to work?
Hello, i am using Sc_trans to AutoDJ, Can any one tell me how i can configure so whenever i want to connect with Sam Broadcaster it will disconnect automatic from Sc_trans and will be connect via sam broadcaster.
Thanks
I did it and works like a charm! No more S****fy and things like that LOL. Thanks so much for this guide, very useful and clear, imho.
One question: I’m using Winamp for now from my PC, but i want to make this all from the server side. Can you please give me some ideas? .
You are awesome! You deserve a ton of cookies.
I don’t understand what you’re trying to achieve.
Let me try to explain it:
I want to leave all the music on the server and make a playlist. Then try to let Shoutcast know that i want to hear that playlist.
Right now i’m using Winamp, and it’s ok and works pretty well, but i want to make the server do all the work.
Is there any suggestion you can give me?. Thanks for answer my question and have a great day!
Carlos
What a difficult process friend !!!
Hi! Thanks for the blog it was very useful!
I want to broadcast in my company’s LAN one or two radios from internet ( to reduce internet bandwidth consumption), what can i do about it?
Thanks in advice, regards.
– Augusto
And what this have to do with SHOUTCast Radio Server? If you want to reduce internet bandwidth consumption you should limit your internal users to access some internet resources. Squid proxy or some firewall should do the trick. Allow only one or two radio broadcast addresses in your LAN. Ban everything else. Sill, this wont stop users to consume your internet bandwidth if they all listen radio on each machine at the same time.
Hi Matei Cezar,
I tried to add this ‘playlistfile=playlists/playlist.lst’ to my sc_serv.conf file, and when i starting the daemon I am getting the following warning,
seems like its not working
can you guide me how to do the on demand streaming with shout cast?
Thanks
Use the following command to generate a playlist file: find /path/to/mp3/directory -type f -name “*.mp3” > playlist.lst
Then specify the playlist file relative path to shoutcast sc_serv directory or use the absolute path to be sure.
Ex: PlaylistFile=example.lst (example.lst must be located in the same directory as sc_serv binary.) Also, the name of the playlist is case-sensitive.
I followed this to a tee. All is good but one thing. My website that is on the same server is now not available. I intended to broadcast on this site. Is this not possible? Did I do something wrong? FYI I am a newbie at this stuff! Any help would be appreciated!
You have to restart the service using ssh – find the folder where you installed shoutcast the use command here is a sample : Configuration file location
/home/radio/server/sc_server.conf
How to stop/start service
Start service: radio start
Stop service: radio stop
What I understand from your comment is that you host a web server (website page) on the same system you’ve installed shoutcast. Make sure you’ve started the web server and verify in your firewall if ports 80/443 and 8000 are opened for incoming connections. It should be no issue with your web server as long as the shoutcast daemon is instructed to bind on a different port that your web server is listening to.
I did everyting and the server is running but mixx wont connect it keep saying check your user and password
Hi. I’ve followed your instructions, but I keep getting the following error whenever I start the server:
[CONFIG] Ignoring streampath_1=http://localhost:8000 as this will produce an invalid path.
I’ve tried a few variations on the path, including the actual URL I’m using and 127.0.0.1. I get the same error no matter what I put in there. Is this something I need to worry about, and how do I fix it?
Also, is it possible to play music directly from the server, or must it be relayed through the server from something like MIXX?
Verify if port 8000 is opened on firewall or there’s no other service that binds on that port.
Shoutcast has the ability to play music directory from a directory all you need to do is to specify a playlist on config file with the following statement: playlistfile=playlists/playlist.lst and populate the list with music from a specific directory:
find /path/to/music dir/ -type f -name “*.mp3” -exec ls -1 {} \; > /home/radio/server/playlists/playlist.lst
all installed, and I can edit the config file uing putty with my username and password, but I cannot log onto the web page with the same user name and the adminpassword that I set, what am I missing?
Double check the conf file and verify the adminpassword variable in order to log in to web interface.
After searching the web, I finally found that the user name should be admin, not the real user name for the account, that was not explained anywhere in the install instructions on any of the web pages that I found. Anyway, all working now.
Try to manually edit sc_serv.conf. Make sure you have the right permissions to edit this file.
Everything goes well until i try to get the config file to edit it. I am so close to make this happen, any suggestions why it wont let me pull the file
Hi Matei Cezar,
Can you post video tutorial on youtube..its more easy and help full everyone…
Hello, I am trying to setup an internet radio server. I have a system with CentOS 7 (1503). My knowledge of Linux is fundamental. Have followed your instructions step by step, with out changing a letter. When I got to step 2.7 and entered “netstat -tulpn | grep sc_serv’ at the terminal; the output I got from the system was: (Not all processes could be identified, non-owned process info
will not be shown, you would have to be root to see it all.)
Please help.
If you started the ./sc_serv process from your own unprivileged username , then netstat command should display only the process name PID/Program Name table executed from your user space. The output with “Not all processes could be identified, non-owned process info
will not be shown, you would have to be root to see it all” it’s kind of normal and informs you that your user does’nt have sufficient privileges to view all network processes, but only your own executed daemons.
Hi, I have it working perfect! But.. if I want the server to start on reboot without login? Sometimes my server is restarted and I have to manually start it, will be great if it starts by it self on reboot.
thanks!
Add the following entry to /etc/rc.local
su – radio -c “/usr/local/bin/radio”
su – radio -c “/usr/local/bin/radio start”
I’ve forgot about the switch!
Debian Jessie (8) not accepting this, correct secure way to start shoutcast on reboot as a user automatically:
su
crontab -e
@reboot /usr/local/bin/radio start_daemon
In step 7 to start the server execute sc_serv file from your current working directory
in the example you have write:
./sc_serv.conf &
the correct command is:
./sc_serv &
@Toni,
Thanks for pointing out that error, we’ve corrected in the article..
Got Error on step 2
[radio@stream download]$ cp sc_serv ../server/
[radio@stream download]$ cd ../server/
[radio@stream server]$ ls
sc_serv
[radio@stream server]$ mkdir control
[radio@stream server]$ mkdir logs
[radio@stream server]$ ls
control logs sc_serv
[radio@stream server]$ nano sc_serv.conf
[radio@stream server]$ ./sc_serv.conf &
[1] 1727
[radio@stream server]$ -bash: ./sc_serv.conf: Permission denied
I seem to be getting the same error as well? does anyone know the reason for this? thanks.
I managed to work out the problem when trying to start the server and getting a “permission denied” error (I found out why and how to fix it on the shoutcast website) here is what you need to do: enable the required access on the sc_serv file by doing ‘chmod a+x sc_serv’ after extracting it from the distribution file otherwise the OS is likely to not run it and will instead show the error message ‘./sc_serv: Permission denied’.
It instead now shows an error which say “./sc_serv: cannot execute binary file”? does anyone know why this is happening?
thanks.
You have to give permissions to the file
chmod +x sc_serv.conf
@Oscar,
Yes, you right, we must give execute permission before running script…
Set the execute permission on the file sc_serv.conf…
@Nomee: Read the second part for music streamming: https://www.tecmint.com/online-music-streaming-with-winamp-and-mixxx-using-shoutcast-in-linux/
how to perform online streaming, i mean how we can upload files for streaming?
That’s Good For My Server *** Cool !!!
I am in need of help with step 2.
@What help you looking for can you explain more, so that we can help you out..
Great and clean tutorial..
it helped me out…
Thanks!