Writing an Apache or WordPress introduction will do no good due to the fact that both of them, combined together, are one of the most used Open Source Web Servers on the Internet today, in fact, Apache runs on 36.9% world web servers and WordPress on one of every 6 websites – Apache with MYSQL and PHP providing the dynamic server gateway interface for WordPress Publishing Content Management.
This topic explains the steps needed to be processed in order to install the latest version of WordPress on top of LAMP, which stands for Linux, Apache, MySQL/MariaDB, PHP and PhpMyAdmin on Debian, Ubuntu and Linux Mint, with basic Apache Virtual Host configurations and MySQL database access through command-line or PhpMyAdmin Web Interface, but be aware that does not cover other important network service configurations, like an IP name mapping provided by DNS server and simply uses the rudimentary system hosts file for IP name transactions (DNS query).
Also, the forward settings are available on almost all Debian systems with slight differences (most of them regarding apache paths), which will be noted at the proper time.
Step 1: Server Basic Configurations
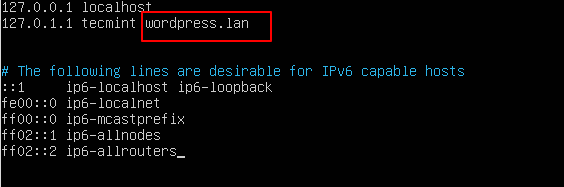
1. First of all, due to fact that there’s no authoritative DNS server on the network, and for this setup Apache Virtual Host is used. We need to map server IP to our virtual (fake) domain name to be able to access it like a real domain name from any browser.
To complete this job open and edit ‘/etc/hosts‘ on local server and your preferred domain name on the “127.0.0.1 localhost” line end. In my case, I’ve taken the domain name as ‘wordpress.lan‘.
$ sudo nano /etc/hosts
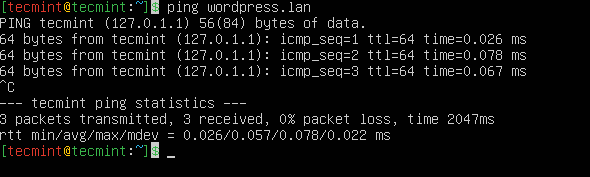
After your record has been added you can test it by issuing a ping command on your new domain name.
$ ping wordpress.lan
2. If your server is designed for production and runs only from the command line ( and it should ) and you need to access WordPress domain from a Windows station somewhere on your network then open and modify with a notepad that Windows hosts file located on ‘C:\Windows\System32\drivers\etc‘ path and on the last line add your Apache Server LAMP IP and your virtual domain name.
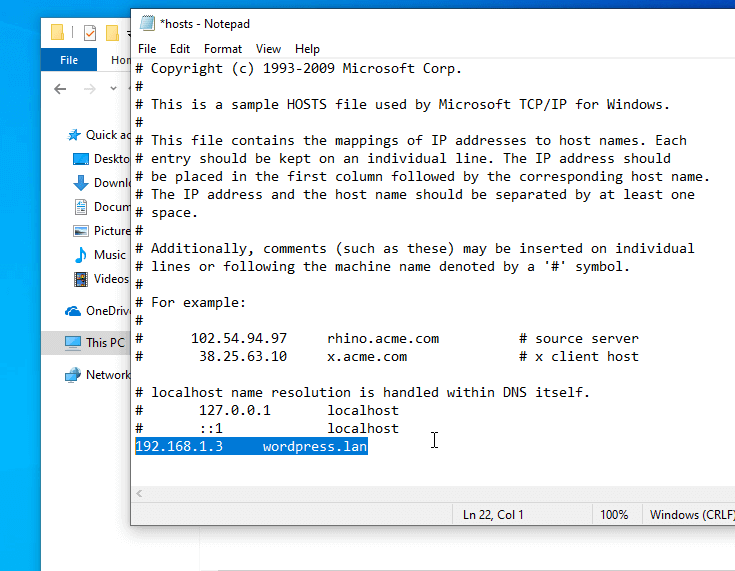
Again issue a ping command line against your WordPress domain name and the server should response back.
Installing LAMP Stack on Server
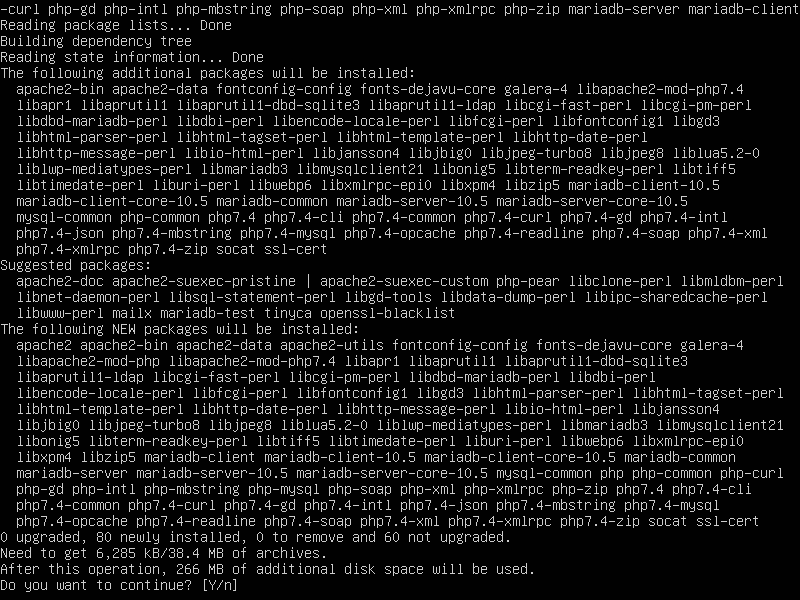
3. Now it’s time to install a LAMP stack, run the following ‘apt-get’ command to install Apache, MySQL, and PHP.
$ sudo apt-get install apache2 apache2-utils php libapache2-mod-php php-mysql php-curl php-gd php-intl php-mbstring php-soap php-xml php-xmlrpc php-zip mariadb-server mariadb-client
Installing the PhpMyAdmin Administration Tool
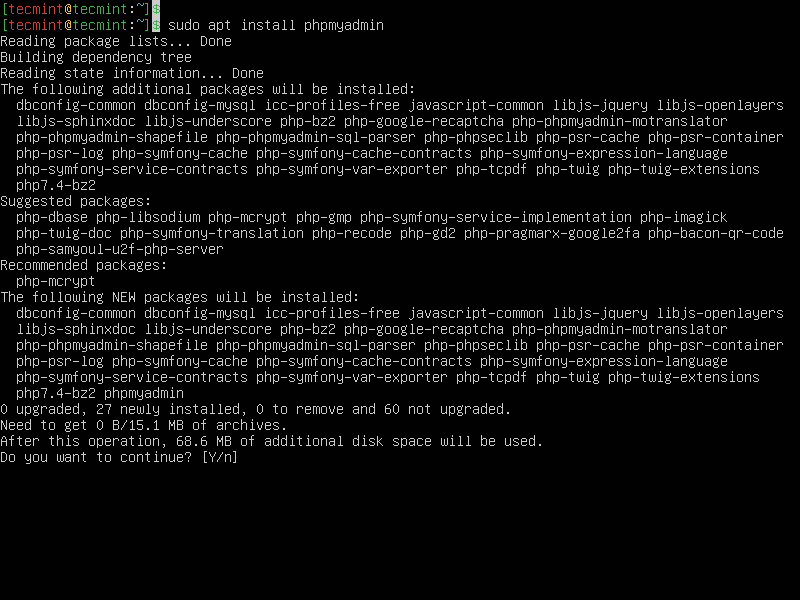
4. If you are good with MySQL command line you can skip this step, else install PhpMyAdmin Web Interface – A tool that can help you with administering MySQL databases.
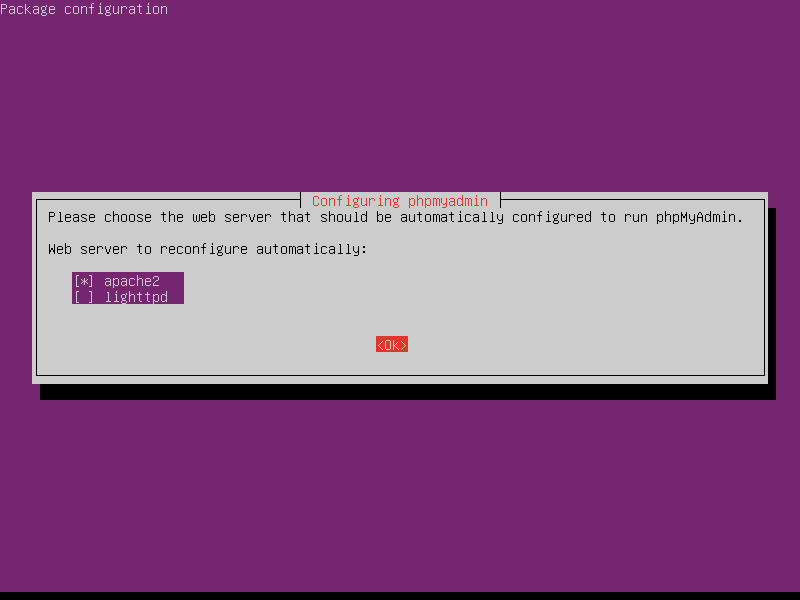
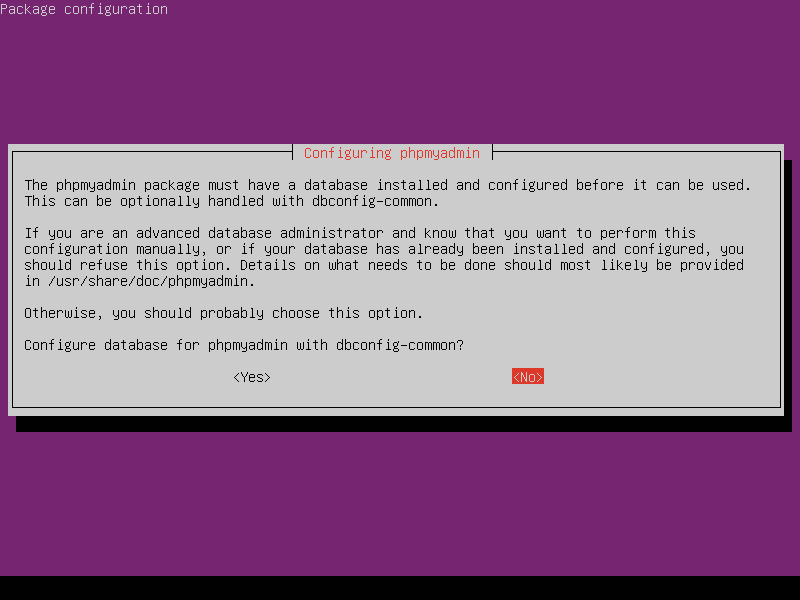
Run the following command line, select Apache web server and do not configure a database for PHPMyAdmin with dbconfig-common.
$ sudo apt-get install phpmyadmin
5. After PhpMyAdmin had been installed is time to make it accessible for web browsing and for that Apache web server needs to read its configurations file.
To enable PhpMyAdmin you must copy 'apache.conf' PhpMyAdmin configuration to 'conf-available' Apache path and enable the new configuration.
For this, run the following series of commands on Ubuntu and Linux Mint systems.
$ sudo cp /etc/phpmyadmin/apache.conf /etc/apache2/conf-available/
$ sudo mv /etc/apache2/conf-available/apache.conf /etc/apache2/conf-available/phpmyadmin.conf
$ sudo a2enconf phpmyadmin

On Debian systems, issue the following commands.
$ sudo cp /etc/phpmyadmin/apache.conf /etc/apache2/conf.d/
$ sudo mv /etc/apache2/conf.d/apache.conf /etc/apache2/conf.d/phpmyadmin.conf
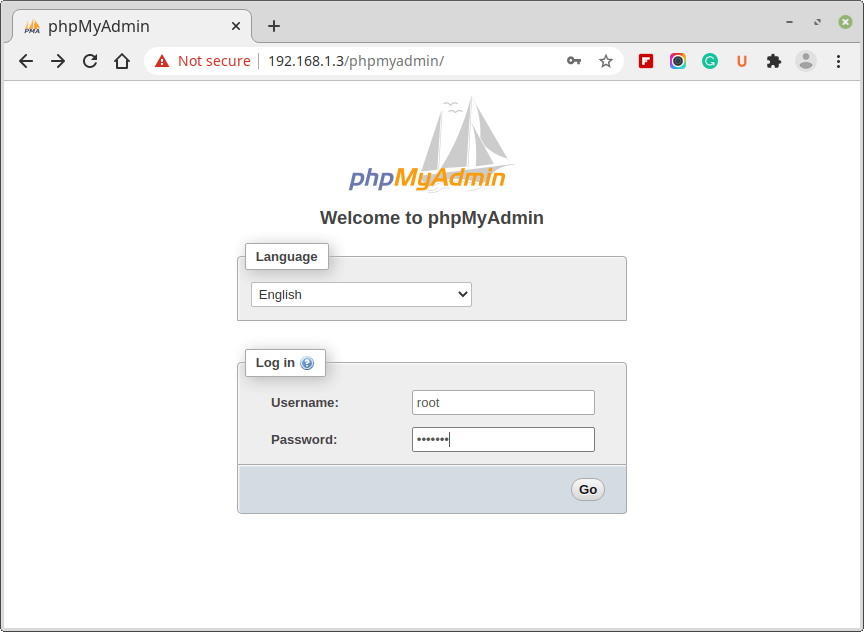
6. To access PhpMyAdmin, open a web browser, and navigate to the below address.
http://IP-Address-or-Domain/phpmyadmin/
Creating Apache Virtual Host for Domain
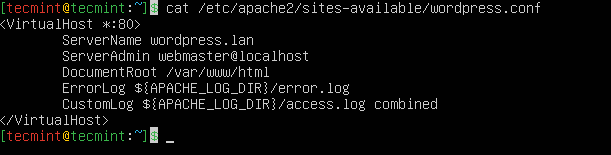
7. The next step is to create a Virtual Host on the Apache web server that will host the WordPress new domain. To create and activate a new Virtual Host, open a text editor and create a new file named, suggestive, 'wordpress.conf' on '/etc/apache2/sites-available/' path by running the following command.
$ sudo nano /etc/apache2/sites-available/wordpress.conf
Add the following directives at the bottom of the file. Save and Close the file.
<VirtualHost *:80>
        ServerName wordpress.lan
        ServerAdmin webmaster@localhost
        DocumentRoot /var/www/html
        ErrorLog ${APACHE_LOG_DIR}/error.log
        CustomLog ${APACHE_LOG_DIR}/access.log combined
</VirtualHost>
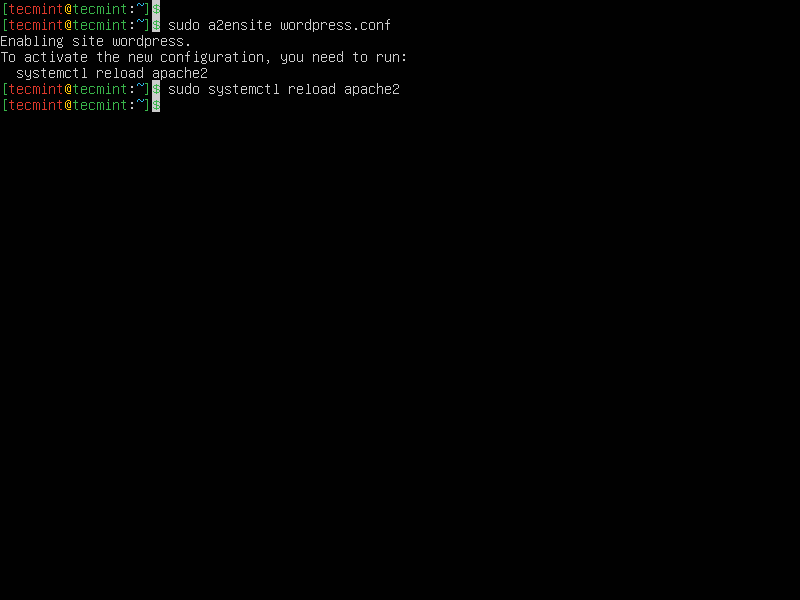
Then activate the new virtual host with this command.
$ sudo a2ensite wordpress.conf
$ sudo systemctl reload apache2
8. To avoid that future Apache error concerning, ServerName FQDN missing open main configuration file '/etc/apache2/apache2.conf', add the following line at the bottom of the file and restart service.
ServerName wordpress.lan
9. Restart the apache2 service.
$ sudo systemctl restart apache2
Creating WordPress Database for Domain
10. Now is time to create a new database and a new database user for WordPress. There are two ways of doing this, either through the MySQL command line, which is also the most secure way or by using the PhpMyAdmin web tool. On this topic, we cover a command-line way.
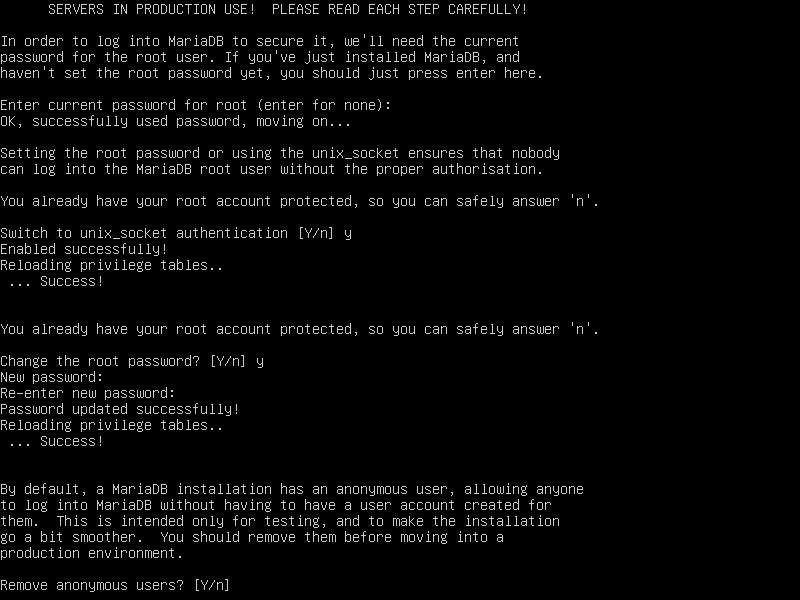
But first of all, you need to make your MySQL installation secure by running the following security script and answer YES on all questions to harden your SQL database security settings.
$ sudo mysql_secure_installation
11. Now is time to actually create a WordPress database by connecting to mysql shell as a root user.
$ sudo mysql -u root -p
MariaDB [(none)]> CREATE DATABASE mysite;
MariaDB [(none)]> GRANT ALL PRIVILEGES ON mysite.* TO 'mysiteadmin'@'localhost' IDENTIFIED BY  'SecureP@ssHere!';
MariaDB [(none)]> FLUSH PRIVILEGES;
MariaDB [(none)]> EXIT;
Installing WordPress on Domain
12. After all Apache nasty server configurations had been made and MySQL database and the administrative user had been created it’s now time to actually perform WordPress installation on our box.
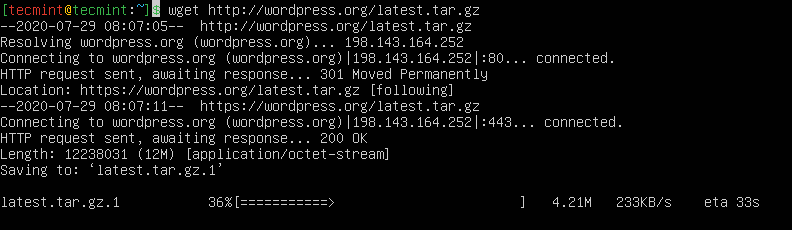
First of all download the latest WordPress archive by issuing the following wget command.
$ wget http://wordpress.org/latest.tar.gz
13. Next extract WordPress archive and copy all extracted files to Apache Virtual Host DocumentRoot, that will be '/var/www/html' on Ubuntu and Linux Mint systems.
$ sudo tar xvzf latest.tar.gz
$ sudo cp -r wordpress/*  /var/www/html
On Debian systems, run the following commands.
$ sudo tar xvzf latest.tar.gz
$ sudo mkdir -p  /var/www/html
$ sudo cp -r wordpress/*  /var/www/html
14. Before starting WordPress installer make sure that Apache and MySQL services are running and also run the following commands to avoid ‘wp-config.php‘ error file creation – we will revert changes afterward.
$ sudo service apache2 restart
$ sudo service mysql restart
$ sudo chown -R www-data  /var/www/html
$ sudo chmod -R 755  /var/www/html
15. Open a browser and enter your server’s IP or virtual domain name on URL using the HTTP protocol.
http://wordpress.lan/index.php
http://your_server_IP/index.php
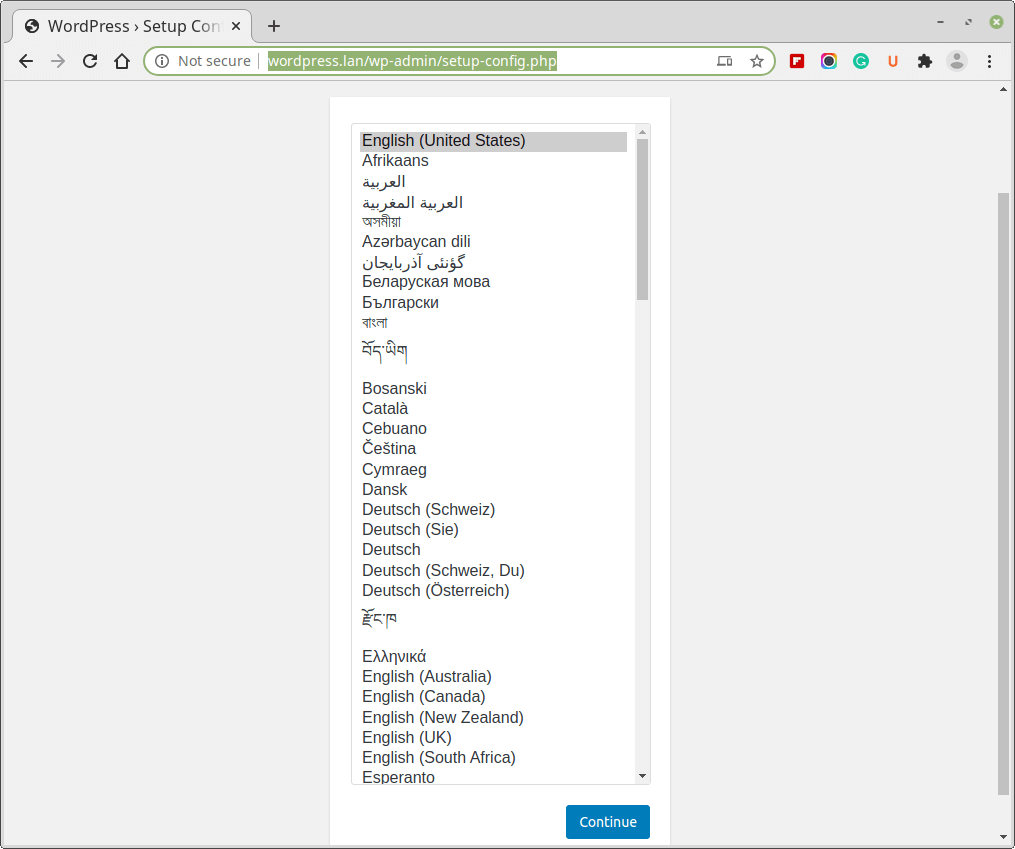
16. On the first prompt select your Language and hit Continue.
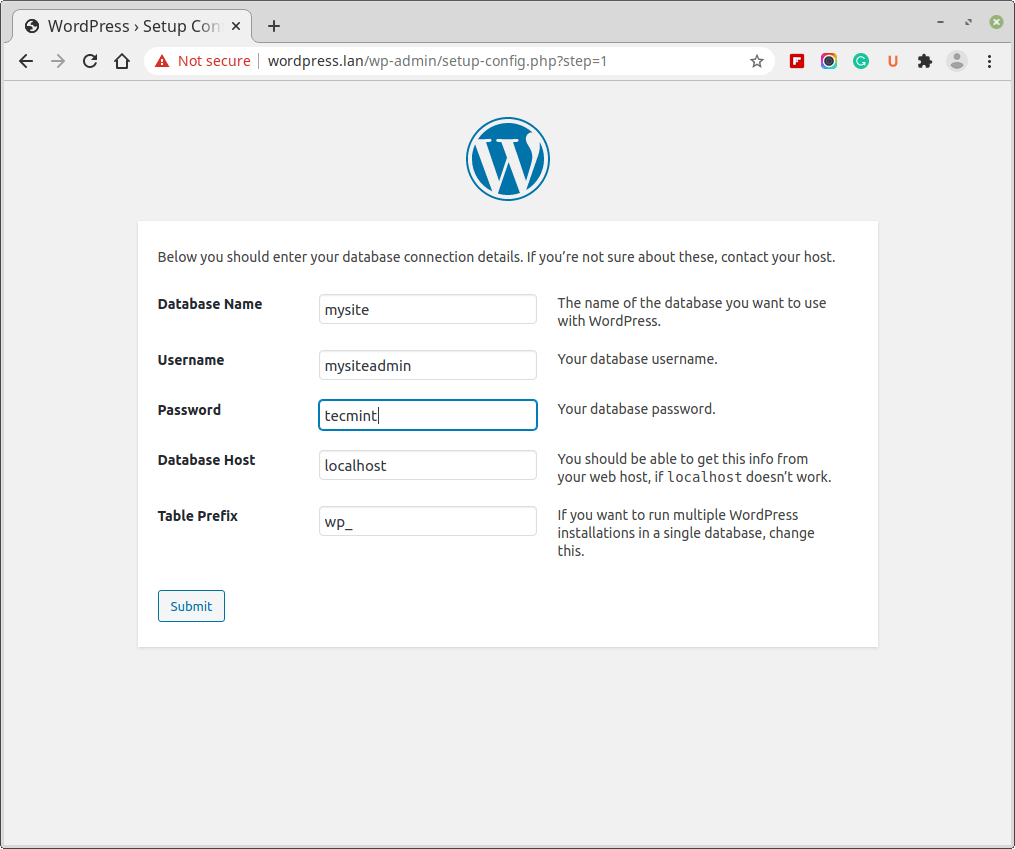
17. On the next screen enter your MySQL wordpress database name, user, password, and host, then hit on Submit.
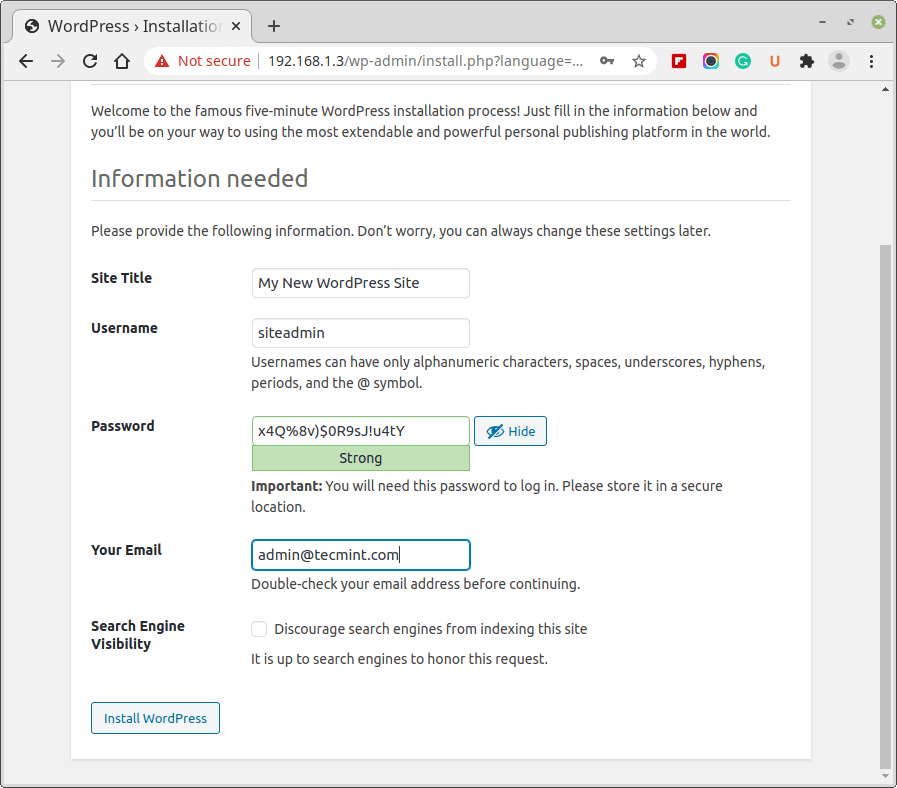
18. After the installer successfully connects to MySQL database and completes ‘wp-config.php‘ file creation hit ‘Run‘ the install button and provide WordPress installer with a Site Title, administrative username, and password for your blog, email address and finally click on Install WordPress.
19. After the installation completes you can login to your new WordPress website blog using your administrative credentials and starts to customize your blog from Dashboard or add new cool articles for millions of readers worldwide or just you!
20. One more last step is to revert changes made on '/var/www/html‘ directory and file permissions.
$ sudo chown -R root /var/www/html
That’s all the steps needed for a complete WordPress installation on Debian, Ubuntu, Linux Mint, and most of all Debian based Linux distributions using Apache web server, but still, this subject is so vast that only the basic part has been covered.
For a complete environment, you will also need to install and set up a DNS server, enable complex Apache ‘.htacccess‘ rules and, if security demands it, enforce SSL on a Web server.
Enable HTTPS on WordPress
21. If you want to enforce HTTPS on your WordPress website, you need to install a free SSL certificate from Let’s Encrypt as shown.
$ sudo apt-get update
$ sudo apt-get install software-properties-common
$ sudo add-apt-repository universe
$ sudo apt-get update
$ sudo apt-get install certbot python3-certbot-nginx
$ sudo certbot --apache
22. To verify that your WordPress site uses HTTPS, visit your website at https://yourwebsite.com/ and look for the lock icon in the URL bar. Alternatively, you can check your site’s HTTPS at https://www.ssllabs.com/ssltest/.


Keep getting the following error when I go to do the following in mysql;
GRANT ALL PRIVILEGES ON mysite.* TO ‘mysiteadmin’@’localhost’ IDENTIFIED BY ‘SecureP@ssHere!’;
The Error I get is;
ERROR 1064 (42000): You have an error in your SQL syntax; check the manual that corresponds to your MySQL server version for the right syntax to use near ‘IDENTIFIED BY ‘SecureP@ssHere!’;
this is on Mint Mate 20.2
So what is the issue and what is the fix so I can get this working as it ought to?
@David,
Try this commands.
Hi @Matei,
Thank you for the useful post. In [Enable HTTPS on WordPress], the described commands are not Apache case, but Nginx case, I think. Are these commands correct in the Apache case?
@Tak,
I have corrected the commands in the article, yes it should be for Apache…
Hello, my WordPress, folder doesn’t appear and i give the right access, if i move a website in the folder html it works … why ?
@Seth,
Check the Apache Document Root path for that website in apache configuration file and make changes as per your requirements..
just deleted index.HTML . And that’s all .
This guide is made-up for wordpress one site only. To configure wp multisite you must activate apache rewrite engine and use a .htaccess file with the required configuration. Please visit wordpress documentation to further configure wp multisite.
what is the differents in the installing process of WordPress on Ubuntu 14 and ubuntu 16 ? just the differents php7.0 … differents , anything)
It appears that installing this way doesn’t let me turn the site into a multisite later.
I have already edited the wp-config. php to set ‘(WP_ALLOW_MULTISITE’, true); but it doesn’t seem to make a difference. I get no Network Setup under option under Tools.
I followed your instructions up till the loading of phpmyadmin loading, all I got was the default Apache2 Debian Default Page.
How do I go about fixing this?
Thanks
I should mention I’m using Debian 8.2
An update, I entered the cli for mysql and downloaded wordpress, however when I try to bring up the index.php it does not load.
The path for this file is /var/www/html.
@Jon,
Does it throws any error on the screen while loading the index page? can u share the error or sceenshot so that we can better understand and give proper solution..
hello,
i installed WordPress using this guide but when i login in admin panel then i saw a error “Are you sure you want to do this?
Please try again.” why this comes please tell me about ceases of this error . at another server configuration i found increase max upload size in php.ini but i saw php.ini was not there . i created this file by help of dummy file and edit also after that also i couldn’t find solution .please guide me
Repeat the installation process, delete all wordpress files and MySQL database.
Thanks for the fantastic and straightforward tutorial! I’m going to give it a go :-)
Dear Frined,
Thank you for the useful manual. I successfully installed wordpress in my debian 7 server.
One confusion happened.
My old website in /var/www/mysite folder.
I set wordpress in /var/www/wp folder
In /etc/apache2/sites-available/wordpress.conf file port is 8000.
I want to disable my old site working in 80 port and change wordpress 8000 to 80.
How can I do it?
What are the steps to follow?
Then go to sites-available and reverse the ports from your websites configurations files and restart apache to apply changes!
Thanks. Very detailed tutorial. I had a problem with the WordPress package from Debian Jessie, so then i try to install it again, with the source provided by WordPress and it works pretty straight forward.
Noooo.
Do not use 127.0.0.1 for your “external” address. That is localhost address and it is not connectable from otjer other machines on your LAN or from Internet.
On a server Always change 127.0.1.1 to your real IPv4 address. 127.0.1.1 is a hack to make it more convenient for machines that change network connections and IPv4 addresses alot. A server should not change its public address.
And add the name in your server in your routers/DHCP/NAT and all your machines in your LAN will find your macine without manually configuration like you did. You could even give your server a permanent IPv4 address in the DHCP section of your router. Then you don’t need to use static address on your machine.
And with reverse NAT you could even use a DNS name to your routers global IPv4 address, which then send that to your webserver.
You might use IPv6 to get lots of real public adresses and not a private IPv4 address that is of no use for servers. Look into gogoc for easy set up of an IPv6 tunnel if you don’t have IPv6 yet. Easy to get one IPv6 address for surfing and some registering of user and editing a file to turn your machine into a IPv6 router for your LAN.
Another could be tunnelbroker.net, a bit harder to set up, but cheaper.
Awesome guide! Works like a charm but is there a way to add multiple wordpress sites? e.g. “domain/html” and “domain/uf”
@Albin,
Same instructions also works to host multiple WordPress websites on specific directory..
Thanks Ravi! I did not think about the virtualhost.
Good job bro, you save my life !
It should be chown insted of chgrp , after installation revert changes : chown -R root .
The second method with chgrp shoud be chmod 775 , then revert changes : chmod 755.
Amazing tutorial! Well detailed, even though wp-config.php is yet tricky even after
$ sudo chgrp -R www-data /var/www/html
$ sudo chmod -R 755 /var/www/html
It still asks to enter the file manually.
The first command is:
sudo chown -R www-data /var/www/html
And not
sudo chgrp -R www-data /var/www/html
It seems you´ve changed the group, not the owner of the files.