PHP (Hypertext Preprocessor) is a widely-used server-side scripting language known for its efficiency in web development. However, as web applications grow in complexity, performance optimization becomes crucial.
One of the most effective ways to enhance PHP performance is by using Opcache, which caches the compiled bytecode of PHP scripts, reducing the overhead of loading and parsing scripts on each request.
This article will guide you through installing and configuring Opcache to accelerate and optimize PHP performance on a Linux system.
What is Opcache?
Opcache is a built-in opcode caching mechanism for PHP that stores the compiled bytecode of PHP scripts in shared memory.
When a PHP script is executed, Opcache checks if a compiled version is available in memory. If it is, Opcache bypasses the parsing and compilation steps, resulting in faster script execution.
This significantly improves response times and reduces the server load, making it an essential tool for optimizing PHP applications.
Installing Opcache in Linux
Before installation, it’s a good practice to update your package repository to ensure you have the latest package information.
sudo apt update  [On Debian/Ubuntu]
sudo dnf update  [On RHEL/CentOS]
If you’re using a Debian-based system like Ubuntu, you can install Opcache via the php-opcache package.
sudo apt install php-opcache
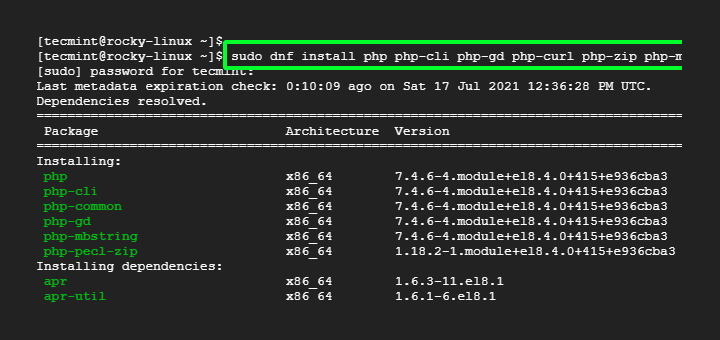
If you’re on a Red Hat-based system like CentOS, you can install Opcache using the following command:
sudo yum install php-opcache
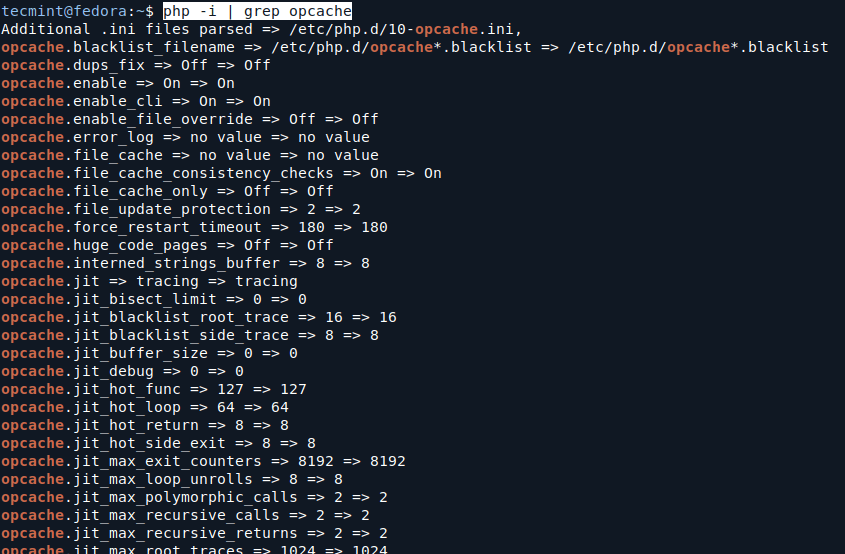
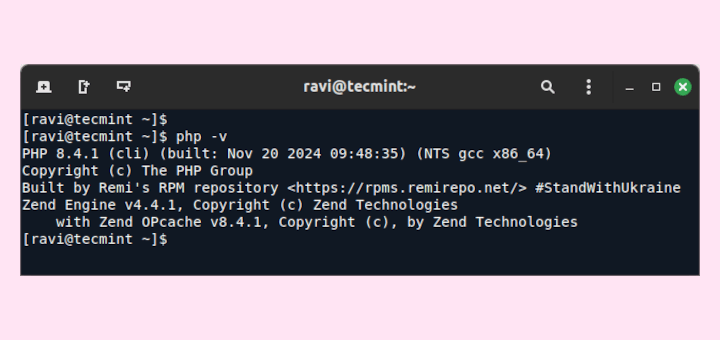
After installing Opcache, you can verify its installation by running:
php -m | grep opcache
OR
php -i | grep opcache
If you see opcache in the output, it means Opcache is installed successfully.
Configuring Opcache in Linux
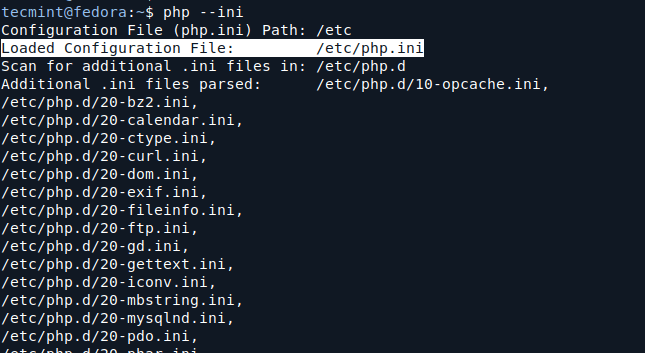
Once Opcache is installed, you need to configure it in the PHP configuration file (php.ini) at the following locations, depending on your installation.
You can find the location of your php.ini file by running:
php --ini
To edit the configuration file, use a text editor (e.g., Nano or vim):
sudo vi /etc/php.ini
Add or modify the following Opcache settings:
; Enable Opcache
opcache.enable=1

; Set the memory size for the Opcache (e.g., 128MB)
opcache.memory_consumption=128

; Set the maximum number of scripts to cache
opcache.max_accelerated_files=10000

; Set the cache validity time in seconds
opcache.revalidate_freq=2

; Enable file validation for updated scripts
opcache.validate_timestamps=1

; Set the timeout for a request before it is terminated
opcache.max_file_size=2M

; Enable opcache for the CLI
opcache.enable_cli=1
Explanation of Settings:
opcache.memory_consumption: The amount of memory allocated for the Opcache. You can adjust this based on your server’s RAM.opcache.max_accelerated_files: The maximum number of PHP scripts that Opcache will cache.opcache.revalidate_freq: The frequency (in seconds) at which Opcache checks for script updates.opcache.validate_timestamps: If enabled, Opcache checks for changes in scripts and invalidates cached scripts if they have changed.opcache.enable_cli: Enables Opcache for the command-line interface.
After making the changes, save the file and restart your Apache web server for the changes to take effect.
sudo systemctl restart apache2
OR
sudo systemctl restart httpd
If you are using Nginx, use:
sudo systemctl restart nginx
Testing Opcache in Linux
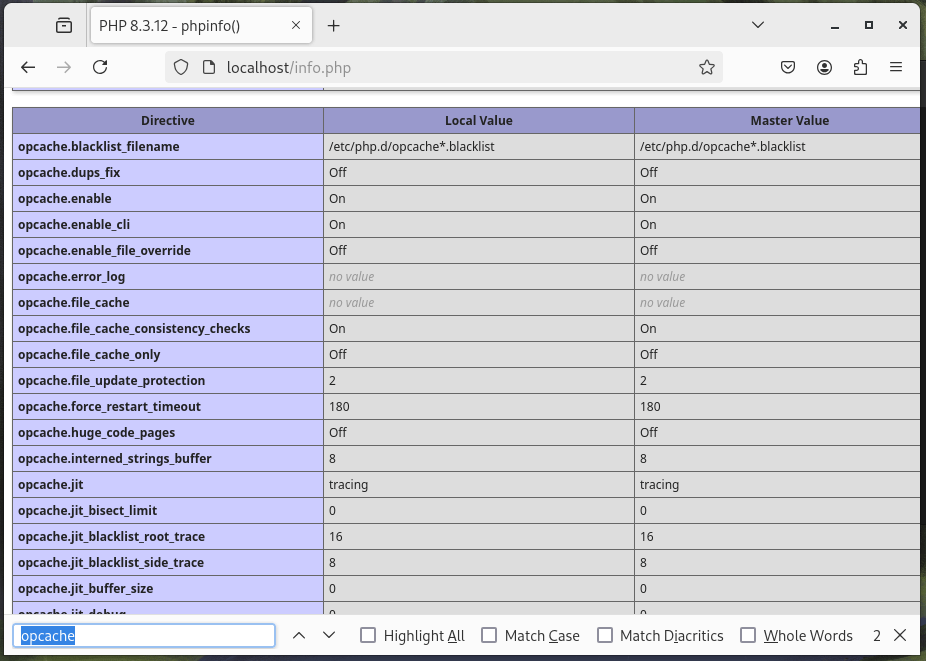
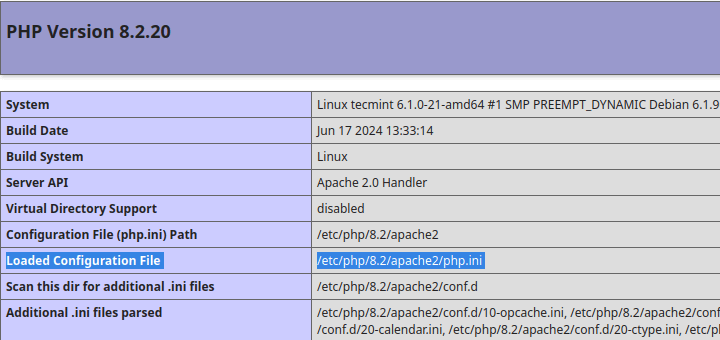
To ensure that Opcache is working correctly, you can create a PHP file (info.php) with the following content in your web server’s document root (e.g., /var/www/html/).
<?php
phpinfo();
?>
Access the file through your web browser:
http://your_server_ip/info.php
Look for the “Opcode Caching” section in the output. If Opcache is installed and configured correctly, you should see information about the Opcache settings.
Monitoring Opcache in Linux
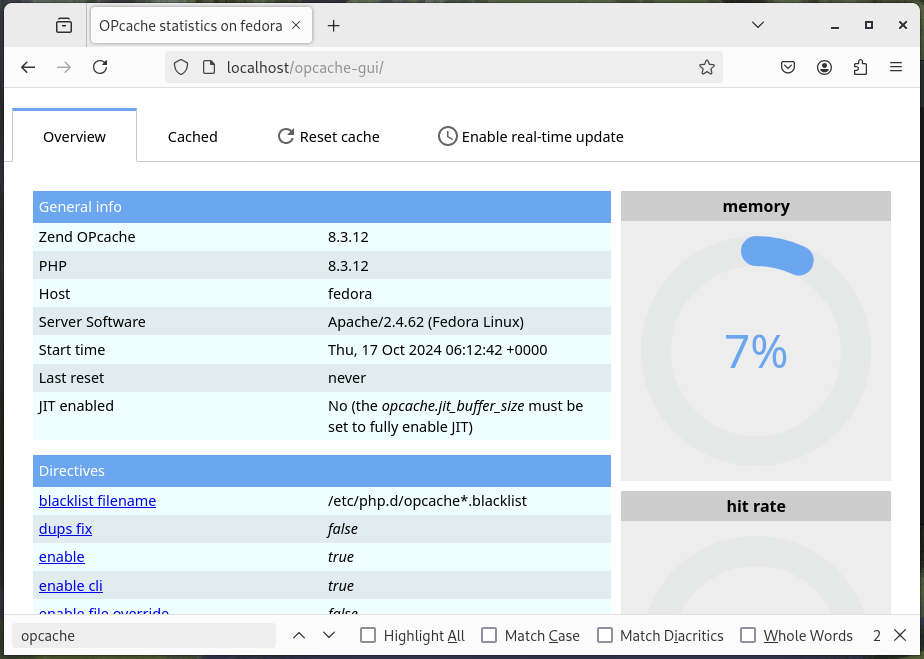
To monitor Opcache performance, you can use various tools, such as the opcache-gui, to visualize cache statistics.
git clone https://github.com/amnuts/opcache-gui.git
sudo mv opcache-gui /var/www/html/
Access the GUI in your browser:
http://your-server-ip/opcache-gui
Alternatively, you can also use command-line tools to get detailed information about cache performance. For example, to see the Opcache status from the command line, you can use the following command:
php -i | grep opcache
This command will display Opcache-related information, including memory usage and cache hit rates.
Conclusion
Installing and setting up Opcache is an easy process that can greatly improve your PHP applications by reducing the overhead of script execution and allowing your web server to handle more requests efficiently, resulting in faster response times and an improved user experience.


hi
i already installed xcache with litespeed web server.
but after 1 or 2 weeks , i see the wordpress sites give 500 internal server error.
so i unistalled that :( .
hi, I am using centos 5.6 with pleask 12 which has multiple version of php. above tutorial places the xcache with php 5.3 but how to put it on php 5.6 running as one more version on plesk. thanks in advanced.
@Shamrat,
then you need to compile XCache for the Php version you want to have..
Hi, thanks for this tutorial, i was install it on my LEMP server on centos 6 and i was configuration like this tutorial for access xcache admin panel but when every time iam login, the login box still appear,,, i was restart my nginx and php-fpm but still not work.
@shafira,
Have you checked logs for any errors..and also have you generated and added correct md5 password to Xcache.ini file?
Hello Ravi, great guide on installing XCache but I am having a problem. When I run the command to install the xcache that is yum install php-xcache xcache-admin I get the error No package available.
What could be the problem?
@Victor,
May I know on which version of Linux distro you’ve tried.
Hi Ravi,
thx for your instructions on installing Xcache. I am wondering about the multi site use case: I have a Virtualmin setup on a VPS with a handful of users with individual web folders running mod_fcgid.
Do I have to take any precautions here?
Another thing: I wonder a bit about the admin setup. I have made a symlink from one of the web folders to /usr/share/xcache and can see the stats for that particular website. Is that the way to to – is there no way of getting a look at the whole picture ie. all web site cache statistics in the same admin screen?
Best regards,
Ben
@Ben,
1. No need to take any precautions, as Xcache is just for caching PHP files and accelerating site performance.
2. No idea about this..but I think you can get it by doing little trick to xcache configuration file..
@Ravi,
When i tried to install php-xcache xcache-admin it by default installing php,php-common and php-cli dependencies (5.3 version), which i don’t need.
It there is way through which i can use PHP 5.5.6 with xcache or apc?
Which OS and PHP version you currently using?
Hi Ravi,
I have installed PHP 5.5.6 from source including pthread. But when i installed XCache from yum, I am unable to view XCache details in phpinfo nor in by executing php -v command.
OS :- CentOS 6.5
Can you please help me out.
Thanks in advance.
@Kalim,
Have you install php-xcache package? or you restarted Apache after installing XCache?
Hi i get the following error when i try to install xcache, can you help with suggestion on how to fix and install properly.Thanks
Error: Package: xcache-admin-3.0.4-1.el6.noarch (epel)
Requires: php-xcache = 3.0.4-1.el6
Available: php-xcache-3.0.0-2.el6.remi.1.x86_64 (mt_dv_extras)
php-xcache = 3.0.0-2.el6.remi.1
Installing: php-xcache-3.0.1-1.el6.remi.x86_64 (mt_dv_extras)
php-xcache = 3.0.1-1.el6.remi
Error: Package: php-xcache-3.0.1-1.el6.remi.x86_64 (mt_dv_extras)
Requires: php(zend-abi) = 20100525-x86-64
Installed: php-common-5.4.13-1.el6.remi.x86_64 (installed)
php(zend-abi) = 20100525-x86-64
Available: php-common-5.4.10-1.el6.remi.x86_64 (mt_dv_extras)
php(zend-abi) = 20100525-x86-64
Available: php-common-5.4.11-1.el6.remi.x86_64 (mt_dv_extras)
php(zend-abi) = 20100525-x86-64
Available: php-common-5.4.12-1.el6.remi.x86_64 (mt_dv_extras)
php(zend-abi) = 20100525-x86-64
Error: Package: php-xcache-3.0.1-1.el6.remi.x86_64 (mt_dv_extras)
Requires: php(api) = 20100412-x86-64
Installed: php-common-5.4.13-1.el6.remi.x86_64 (installed)
php(api) = 20100412-x86-64
Available: php-common-5.4.10-1.el6.remi.x86_64 (mt_dv_extras)
php(api) = 20100412-x86-64
Available: php-common-5.4.11-1.el6.remi.x86_64 (mt_dv_extras)
php(api) = 20100412-x86-64
Available: php-common-5.4.12-1.el6.remi.x86_64 (mt_dv_extras)
php(api) = 20100412-x86-64
You could try using –skip-broken to work around the problem
You could try running: rpm -Va –nofiles –nodigest
Seems your old packages are conflicting with new ones. So, fix such errors you must remove older version of php-xcache and php-common.
And then try to install it again.
Dependencies Resolved
============================================================================================================================================================================================================================================
Package Arch Version Repository Size
============================================================================================================================================================================================================================================
Removing:
php-common x86_64 5.4.13-1.el6.remi installed 6.2 M
Removing for dependencies:
SSHTerm noarch 0.2.2-10.11092910 installed 4.9 M
cs-gs x86_64 2.0.0-cos6.build110120608.16 installed 845 k
php x86_64 5.4.13-1.el6.remi installed 9.1 M
php-cli x86_64 5.4.13-1.el6.remi installed 7.7 M
php-devel x86_64 5.4.13-1.el6.remi installed 12 M
php-gd x86_64 5.4.13-1.el6.remi installed 665 k
php-imap x86_64 5.4.13-1.el6.remi installed 199 k
php-ldap x86_64 5.4.13-1.el6.remi installed 109 k
php-mbstring x86_64 5.4.13-1.el6.remi installed 2.5 M
php-mcrypt x86_64 5.4.13-1.el6.remi installed 86 k
php-mysql x86_64 5.4.13-1.el6.remi installed 447 k
php-odbc x86_64 5.4.13-1.el6.remi installed 178 k
php-pdo x86_64 5.4.13-1.el6.remi installed 348 k
php-pear noarch 1:1.9.4-12.el6.remi.1 installed 2.2 M
php-snmp x86_64 5.4.13-1.el6.remi installed 107 k
php-xml x86_64 5.4.13-1.el6.remi installed 622 k
php-xmlrpc x86_64 5.4.13-1.el6.remi installed 153 k
plesk-core x86_64 11.0.9-cos6.build110120608.16 installed 79 M
plesk-l10n noarch 11.0.9-cos6.build110120827.16 installed 21 M
pp-sitebuilder noarch 11.0.10-38713.12081600 @SITEBUILDER_11_0_10-dist 181 M
psa x86_64 11.0.9-cos6.build110120608.16 installed 473 k
psa-atmail noarch 1:1.05-cos6.build110120606.19 installed 13 M
psa-backup-manager x86_64 11.0.9-cos6.build110120608.16 installed 8.5 M
psa-backup-manager-vz x86_64 11.0.0-cos6.build110120123.10 installed 1.6 k
psa-fileserver x86_64 11.0.9-cos6.build110120608.16 installed 367 k
psa-firewall x86_64 11.0.9-cos6.build110120608.16 installed 540 k
psa-horde noarch 3.3.13-cos6.build110120606.19 installed 20 M
psa-imp noarch 4.3.11-cos6.build110120606.19 installed 12 M
psa-ingo noarch 1.2.6-cos6.build110120606.19 installed 5.1 M
psa-kronolith noarch 2.3.6-cos6.build110120606.19 installed 6.3 M
psa-libxml-proxy x86_64 2.7.8-0.301910 installed 1.2 M
psa-migration-agents x86_64 11.0.9-cos6.build110120608.16 installed 169 k
psa-migration-manager x86_64 11.0.9-cos6.build110120608.16 installed 1.0 M
psa-mimp noarch 1.1.4-cos6.build110120418.19 installed 2.9 M
psa-miva x86_64 1:5.06-cos6.build110120606.19 installed 4.5 M
psa-mnemo noarch 2.2.5-cos6.build110120606.19 installed 4.1 M
psa-passwd noarch 3.1.3-cos6.build110120606.19 installed 3.7 M
psa-php5-configurator x86_64 1.6.2-cos6.build110120608.16 installed 6.4 k
psa-spamassassin x86_64 11.0.9-cos6.build110120608.16 installed 159 k
psa-turba noarch 2.3.6-cos6.build110120606.19 installed 6.1 M
psa-updates noarch 11.0.9-cos6.build110120704.10 installed 0.0
psa-vhost noarch 11.0.9-cos6.build110120606.19 installed 159 k
psa-vpn x86_64 11.0.9-cos6.build110120608.16 installed 1.9 M
psa-watchdog x86_64 11.0.9-cos6.build110120608.16 installed 2.9 M
Transaction Summary
============================================================================================================================================================================================================================================
Remove 45 Package(s)
Installed size: 425 M
Is this ok [y/N]: n
sorry for the long post just want to make sure that i am doing the right thing, alot of sites on the server. This is what i get when i run yum remove php-xcache php-common, I believe clicking y will remove just the php-common and not affect anything else? Thanks.
It will not affect anything just updates to latest versions, go ahead..
Hi i clicked yes and it seems it screwed up my server?
NO! it will not harm your server at all..
Remove 45 Package(s)
Installed size: 425 M
hhahahaaa OMG removing 425mb? LOL .. isn’t it like 20% of all CentOS ? :D hahahaa… I would’ve NEVER blindly accept such removal, before I know what each package is used for…
Ravi, I really like your blog and happy I found it. I trust your experience.
But can you explain what was that process of removing 45 packages, and how come it was safe actually? it will remove them and automatically reinstall new package versions or something?
Thanks :)
It seems you are using older version of OS and lot’s of packages need to be upgraded to install latest Xcache on the system.
thanks but i have two questions in mind
1- The latest xcache version is 3.0.3 how we can update to it
2-when trying to access xcache admin panel i am getting error
Forbidden
You don’t have permission to access /xcache on this server.
i have checked permissions and they are ok
To get latest 3.0.3 version you need to compile it from source and for permission issue, open the xcache.conf file under /etc/httpd/conf.d/ directory and add Allow from all.
on Debian it can be the folder xcache/admin/ not only xcache/
http://www.domain.de/xcache/admin
or you setup your virtualhost to
/var/www/xcache/admin/
have fun!
Hi Ravi,
The reference URL for configuration given on step 2 is giving 503.
Can you please elaborate the configuration or can you give other reference URL?
Thanks
The Configuration URL is working fine. Can you check again..
Just want to verify if my intuitions is correct that xcache can also be installed or be configured as part of lampp?..
Yes! It can be installed and configured as part of LAMP based environments.
oh thank you for affirming my query.
Does this automaticaly caches the compiled php script? Or we need to tell it what scripts it should cache?
Yes, it automatically caches all php scripts.
I am getting below error :
Error: php-xcache conflicts with php-pecl-apc-3.1.9-2.el6.x86_64
plz help
First, remove existing apc package with the help of following yum command and then try again.
I hope it will not disturb existing setup which run on php?
Not it will not impact any existing setup.