Patching a XenServer install is a crucial task to ensure security updates are applied to vulnerable XenServer installs. While in theory the hypervisor is secure from the virtual machines it supports, there are still some potential issues that could happen and Citrix, as well as the rest of the open source community, do their best to provide code updates for these vulnerabilities as they are discovered.
Update: In May 2016, Citrix released the new version of the XenServer 7 platform. For installation follow: Fresh Installation of XenServer 7.
That being said, these updates aren’t applied automatically by default and require administrator interaction. Patches also aren’t always security issues. Many times patches will provide increased functionality to the virtual machines hosted on the XenServer. Applying these updates is typically very easy and straight forward and can be done remotely or with local media (local to the XenServer).
While this article is going to walk through applying patches to one XenServer, it is important to note that in the event that multiple pooled XenServers need updated, tools exist to allow the pool master to push the updates out to all of the other XenServers in the pool!
Let’s begin the process of updating a single XenServer by means of local media. Local in this instance means that the administrator has put the update files onto a CD/DVD/USB or similar device and will physically connect this media to the XenServer needing updated.
The first step in this whole process is to obtain the patches. Publicly available patches can be obtained from the following URL:
This guide is going to walk through installing the XenServer 6.5 SP1 patch both using local media as well as remotely sending the update files to the server and then updating remotely.
The patch files are located here: http://support.citrix.com/article/CTX142355
This supplemental pack contains a lot of the patches already put out for XenServer 6.5. It is important to note Citrix’s notes about any patch as many patches require other patches be installed BEFORE! The only prerequisite for this patch is that XenServer 6.5 be installed (which should be covered already).
The file can be downloaded via http or via the wget tool.
# wget -c http://downloadns.citrix.com.edgesuite.net/10340/XS65ESP1.zip
Installing Patches with Local Media
Once the file is downloaded, the contents of the zip file need to be extracted. This can be accomplished with gui tools or via the command line using the ‘unzip‘ tool.
# unzip XS65ESP1.zip
Upon successful completion, two files should now exist in the current working directory. The one of importance will be the file with the extension ‘.xsupdate‘.

Now the file ‘XS54ESP1.xsupdate‘ needs to be copied to the installation media. Once the file has been transferred to the media, connect the media to the XenServer in need of the patch.
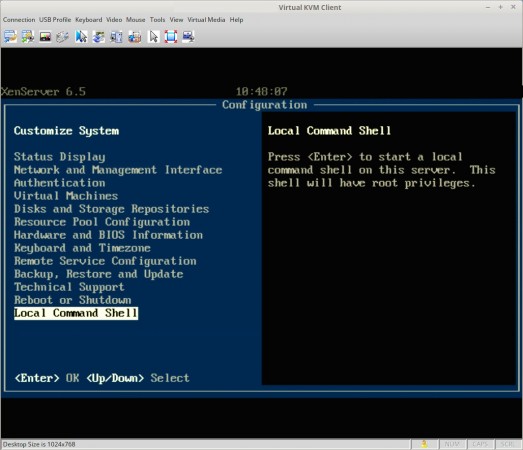
At this point a monitor and keyboard connected to the server will be needed to complete the update process. Upon connecting a monitor to the XenServer, the XenServer control panel page should be visible. Scroll down to the ‘Local Command Shell‘ selection and hit enter.
This will prompt the user for the XenServer root user password and upon successfully entering that password, the user will be in a command prompt within the XenServer. At this point, the local media will need to be mounted to be accessible to XenServer. In order to do this, the name of the block device needs to be determined using the ‘fdisk‘ utility.
# fdisk -l
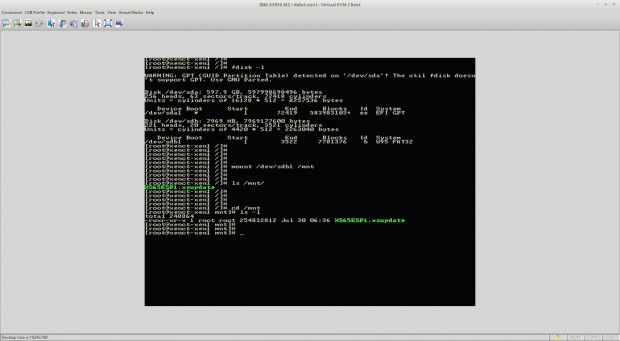
From this output the device name of the USB device plugged into the XenServer can be determined as ‘/dev/sdb1‘ and this is what will need to be mounted in order to access the update file. Mounting this device can be accomplished using the ‘mount‘ utility.
# mount /dev/sdb1 /mnt

Assuming that the system didn’t throw out any errors, the USB device should now be mounted to the ‘/mnt‘ directory. Change to this directory and make sure that the update file is indeed showing up in this directory.
# cd /mnt
# ls

At this point, the update file is accessible to the server and ready to be installed using the ‘xe‘ command. The first thing to do is prepare the patch file and obtain the UUID of the patch file with the ‘xe patch-upload‘ command. This step is important and must be done!
# xe patch-upload file-name=XS65ESP1.xsupdate

The box in red above is the output from the above command and will be needed when ready to actually install the patch to the XenServer system. Now the UUID of the XenServer itself is needed and can be determined again by passing arguments to the ‘xe‘ command.
# xe host-list

Again the box in red is the UUID value that will be needed in order to apply the patch to this particular XenServer. At this point all of the necessary commands have been run and the UUID’s determine.
Once more using the ‘xe‘ command with different arguments, XenServer will be instructed to install the supplemental pack to this local system.
# xe patch-apply uuid=7f2e4a3a-4098-4a71-84ff-b0ba919723c7 host-uuid=be0eeb41-7f50-447d-8561-343edde9fad2

At this point, the system will begin installing the update but will show nothing more than a flashing cursor until the process is completed. Once the system returns to a command prompt, the system can be checked to confirm that the patch was indeed installed again using the ‘xe’ command with different arguments.
# xe patch-list | grep -i sp1
This command will list all patches applied and then pipe that output into grep which will search for the string ‘sp1‘ regardless of case. If nothing is returned, then the patch likely did not install successfully.

If the command returns output similar to the above screen-shot, then the supplemental pack was installed successfully!

Thanks for the part 2. Help post the part 3 soon. Thanks again
You’re quite welcome! The networking portion should be done here soon.
Great post.
Or you could simply use the XenCenter, where you can install all updates via GUI.
XenCenter isn’t available on Linux operating systems and isn’t scriptable. But yes XenCenter is another option that will be covered later in this guide.
@Prasanth kumar
use alternate method “yum” to install the packages, to work on this you need to create repositories.
All the best for your career
Hi Tecmint ,
This is Prasanth kumar i am searching in linuxjob . i have some doubts in Linux , main doubt is rpm, suppose rpm is corrupted .
So, how to build rpm how rebuild that. Please give me any idea is that …
Prasanth,
I’m not exactly sure what you are asking? This article is about installing/patching citrix xenserver. It is strongly advised that you do not use yum or rpm on a xenserver but rather only install patches approved/obtained from Citrix.