In this part of the Samba4 AD DC infrastructure series we will talk on how join a Windows 10 machine into a Samba4 realm and how to administer the domain from a Windows 10 workstation.
Once a Windows 10 system has been joined to Samba4 AD DC we can create, remove or disable domain users and groups, we can create new Organizational Units, we can create, edit and manage domain policy or we can manage Samba4 domain DNS service.
All of the above functions and other complex tasks concerning domain administration can be achieved via any modern Windows platform with the help of RSAT – Microsoft Remote Server Administration Tools.
Requirements
- Create an AD Infrastructure with Samba4 on Ubuntu 16.04 – Part 1
- Manage Samba4 AD Infrastructure from Linux Command Line – Part 2
- Manage Samba4 AD Domain Controller DNS and Group Policy from Windows – Part 4
Step 1: Configure Domain Time Synchronization
1. Before starting to administer Samba4 ADDC from Windows 10 with the help of RSAT tools, we need to know and take care of a crucial piece of service required for an Active Directory and this service refers to accurate time synchronization.
Time synchronization can be offered by NTP daemon in most of the Linux distributions. The default maximum time period discrepancy an AD can support is about 5 minutes.
If the divergence time period is greater than 5 minutes you should start experience various errors, most important concerning AD users, joined machines or share access.
To install Network Time Protocol daemon and NTP client utility in Ubuntu, execute the below command.
$ sudo apt-get install ntp ntpdate

2. Next, open and edit NTP configuration file and replace the default NTP pool server list with a new list of NTP servers which are geographically located near your current physical equipment location.
The list of NTP servers can be obtained by visiting official NTP Pool Project webpage http://www.pool.ntp.org/en/.
$ sudo nano /etc/ntp.conf
Comment the default server list by adding a # in front of each pool line and add the below pool lines with your proper NTP servers as illustrated on the below screenshot.
pool 0.ro.pool.ntp.org iburst
pool 1.ro.pool.ntp.org iburst
pool 2.ro.pool.ntp.org iburst

# Use Ubuntu's ntp server as a fallback.
pool 3.ro.pool.ntp.org
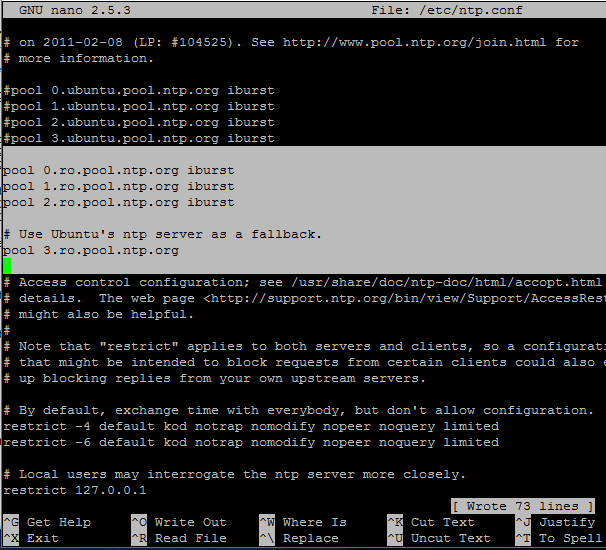
3. Now, don’t close the file yet. Move to the top at the file and add the below line after the driftfile statement. This setup allows the clients to query the server using AD signed NTP requests.
ntpsigndsocket /var/lib/samba/ntp_signd/

4. Finally, move to the bottom of the file and add the below line, as illustrated on the below screenshot, which will allow network clients only to query the time on the server.
restrict default kod nomodify notrap nopeer mssntp

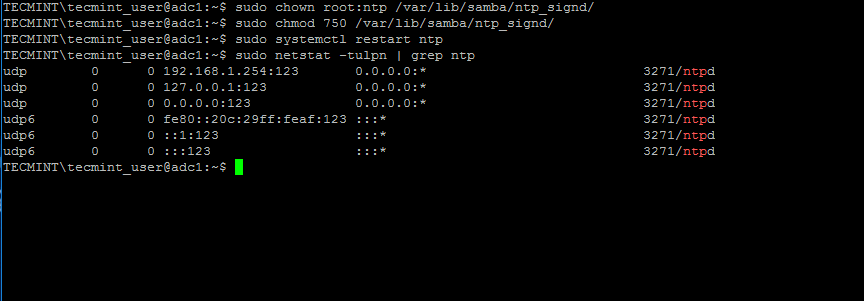
5. When finished, save and close the NTP configuration file and grant NTP service with the proper permissions in order to read the ntp_signed directory.
This is the system path where Samba NTP socket is located. Afterwards, restart NTP daemon to apply changes and verify if NTP has open sockets in your system network table using netstat command combined with grep filter.
$ sudo chown root:ntp /var/lib/samba/ntp_signd/
$ sudo chmod 750 /var/lib/samba/ntp_signd/
$ sudo systemctl restart ntp
$ sudo netstat –tulpn | grep ntp
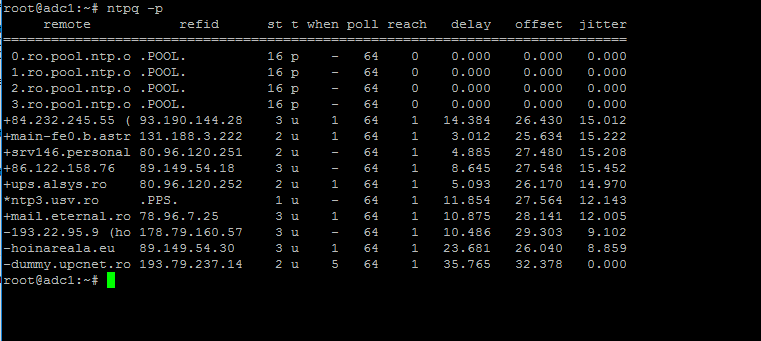
Use the ntpq command line utility to monitor NTP daemon along with the -p flag in order to print a summary of peers state.
$ ntpq -p
Step 2: Troubleshoot NTP Time Issues
6. Sometimes the NTP daemon gets stuck in calculations while trying to synchronize time with an upstream ntp server peer, resulting the following error messages when manually trying to force time synchronization by running ntpdate utility on a client side:
# ntpdate -qu adc1
ntpdate[4472]: no server suitable for synchronization found

when using ntpdate command with -d flag.
# ntpdate -d adc1.tecmint.lan
Server dropped: Leap not in sync

7. To circumvent this issue, use the following trick to solve the problem: On the server, stop the NTP service and use the ntpdate client utility to manually force time synchronization with an external peer using the -b flag as shown below:
# systemctl stop ntp.service
# ntpdate -b 2.ro.pool.ntp.org  [your_ntp_peer]
# systemctl start ntp.service
# systemctl status ntp.service
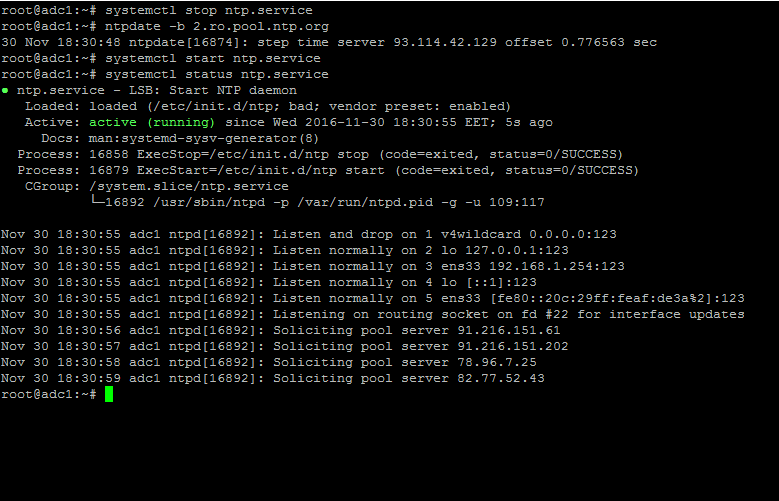
8. After the time has been accurately synchronized, start the NTP daemon on the server and verify from the client side if the service is ready to serve time for local clients by issuing the following command:
# ntpdate -du adc1.tecmint.lan [your_adc_server]
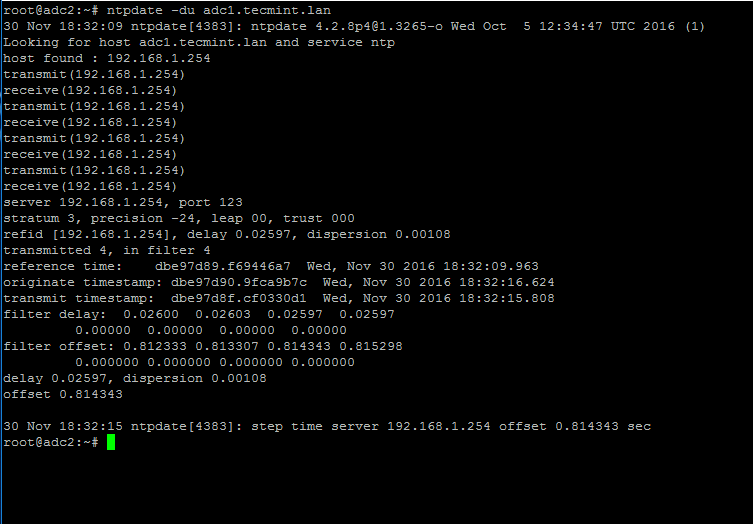
By now, NTP server should work as expected.
Step 3: Join Windows 10 into Realm
9. As we saw in our previous tutorial, Samba4 Active Directory can be managed from command line using samba-tool utility interface which can be accessed directly from server’s VTY console or remotely connected through SSH.
Other, more intuitively and flexible alternative, would be to manage our Samba4 AD Domain Controller via Microsoft Remote Server Administration Tools (RSAT) from a Windows workstation integrated into the domain. These tools are available in almost all modern Windows systems.
The process of joining Windows 10 or older versions of Microsoft OS into Samba4 AD DC is very simple. First, make sure that your Windows 10 workstation has the correct Samba4 DNS IP address configured in order to query the proper realm resolver.
Open Control panel -> Network and Internet -> Network and Sharing Center -> Ethernet card -> Properties -> IPv4 -> Properties -> Use the following DNS server addresses and manually place Samba4 AD IP Address to the network interface as illustrated in the below screenshots.


Here, 192.168.1.254 is the IP Address of Samba4 AD Domain Controller responsible for DNS resolution. Replace the IP Address accordingly.
10. Next, apply the network settings by hitting on OK button, open a Command Prompt and issue a ping against the generic domain name and Samba4 host FQDN in order to test if the realm is reachable through DNS resolution.
ping tecmint.lan
ping adc1.tecmint.lan

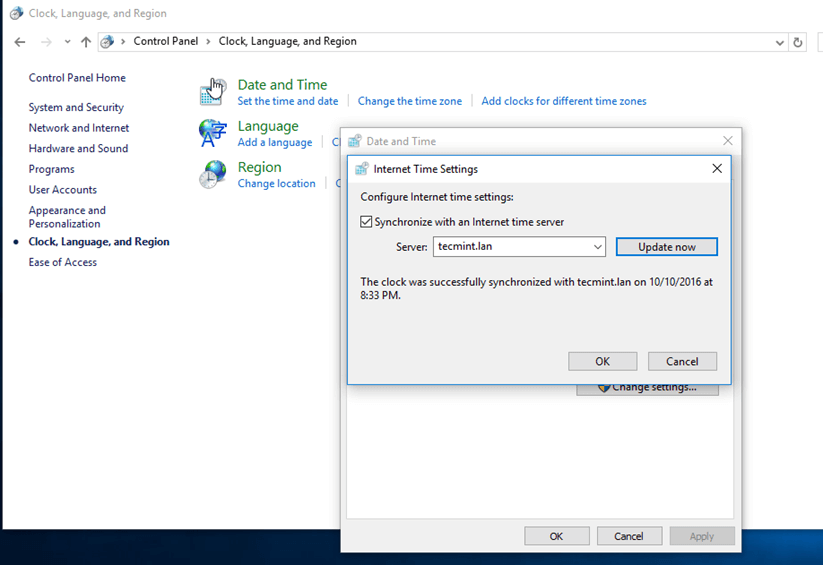
11. If the resolver correctly responds to Windows client DNS queries, then, you need to assure that the time is accurately synchronized with the realm.
Open Control Panel -> Clock, Language and Region -> Set Time and Date -> Internet Time tab -> Change Settings and write your domain name on Synchronize with and Internet time server field.
Hit on Update Now button to force time synchronization with the realm and hit OK to close the window.
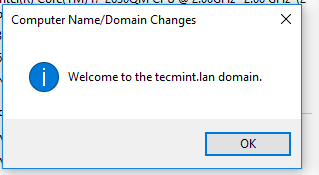
12. Finally, join the domain by opening System Properties -> Change -> Member of Domain, write your domain name, hit OK, enter your domain administrative account credentials and hit OK again.
A new pop-up window should open informing you’re a member of the domain. Hit OK to close the pop-up window and reboot the machine in order to apply domain changes.
The below screenshot will illustrate these steps.


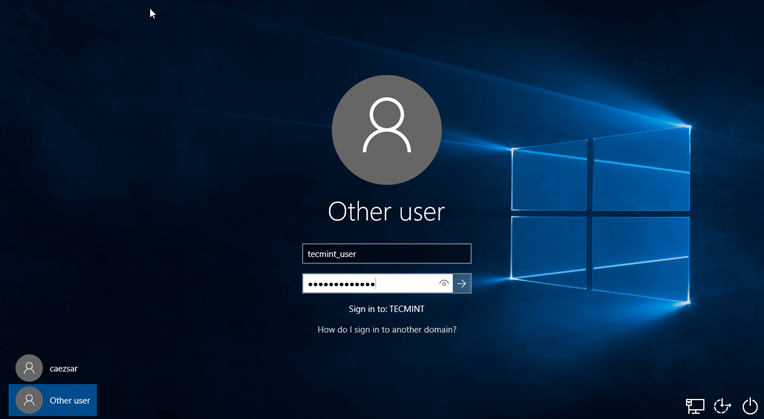
13. After restart, hit on Other user and logon to Windows with a Samba4 domain account with administrative privileges and you should be ready to move to the next step.
Step 4: Administer Samba4 AD DC with RSAT
14. Microsoft Remote Server Administration Tools (RSAT), which will be further used to administer Samba4 Active Directory, can be downloaded from the following links, depending on your Windows version:
- Windows 10: https://www.microsoft.com/en-us/download/details.aspx?id=45520
- Windows 8.1: http://www.microsoft.com/en-us/download/details.aspx?id=39296
- Windows 8: http://www.microsoft.com/en-us/download/details.aspx?id=28972
- Windows 7: http://www.microsoft.com/en-us/download/details.aspx?id=7887
Once the update standalone installer package for Windows 10 has been downloaded on your system, run the installer, wait for the installation to finish and restart the machine to apply all updates.
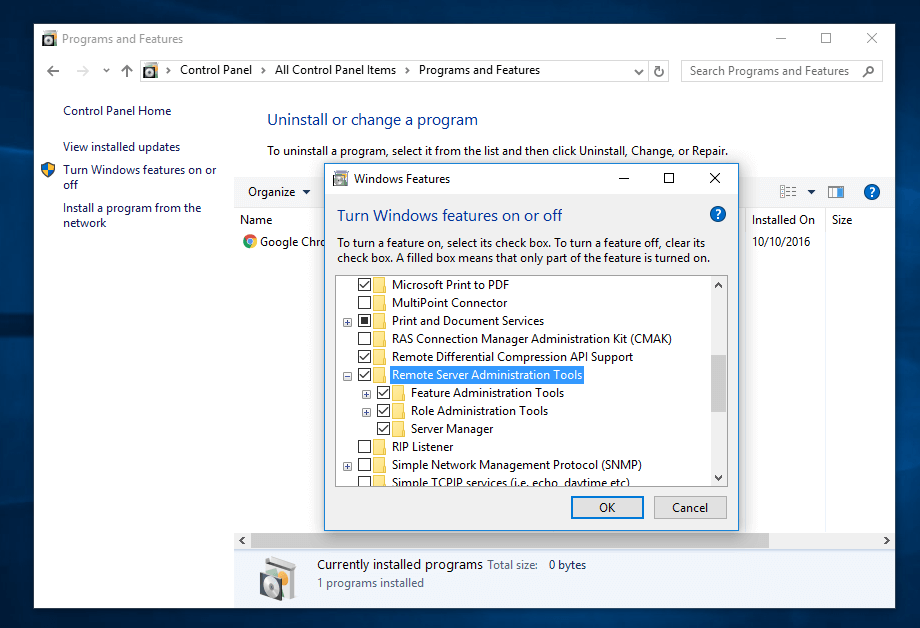
After reboot, open Control Panel -> Programs (Uninstall a Program) -> Turn Windows features on or off and check all Remote Server Administration Tools.
Click OK to start the installation and after the installation process finishes, restart the system.
15. To access RSAT tools go to Control Panel -> System and Security -> Administrative Tools.
The tools can also be found in the Administrative tools menu from start menu. Alternatively, you can open Windows MMC and add Snap-ins using the File -> Add/Remove Snap-in menu.

The most used tools, such as AD UC, DNS and Group Policy Management can be launched directly from Desktop by creating shortcuts using Send to feature from menu.
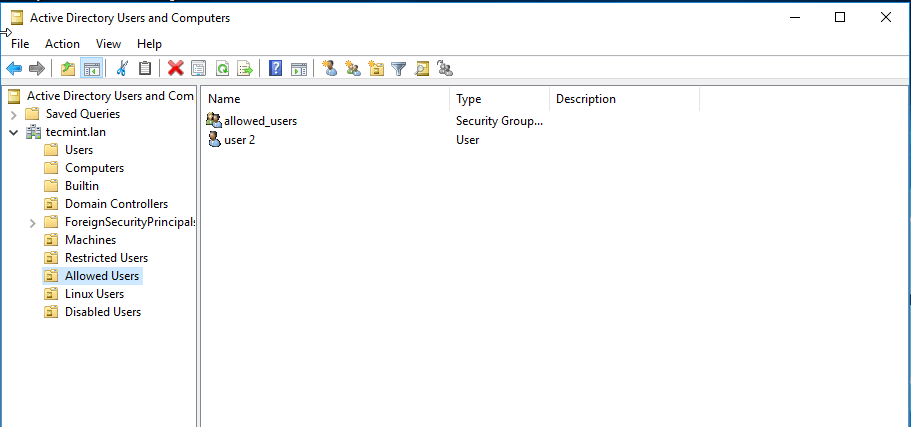
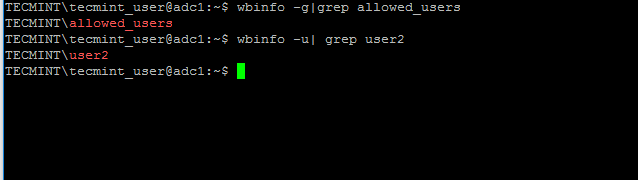
16. You can verify RSAT functionality by opening AD UC and list domain Computers (newly joined windows machine should appear in the list), create a new Organizational Unit or a new user or group.
Verify if the users or groups had been properly created by issuing wbinfo command from Samba4 server side.

That’s it! On the next part of this topic we will cover other important aspects of a Samba4 Active Directory which can be administered via RSAT, such as, how to manage DNS server, add DNS records and create a reverse DNS lookup zone, how to manage and apply domain policy and how to create an interactive logon banner for your domain users.