In our last article which is part of our NGINX traffic management series, we discussed how to limit the number of connections in NGINX. In this guide, we will look at how to limit the rate of requests in NGINX.
Rate limiting is a traffic management technique used to restrict the number of HTTP requests a client can make in a given period of time – rate limits are calculated in Requests Per Second (or RPS).
An example of a request is a GET request for the log-in page of an application or a POST request on a log-in form or a POST on an API endpoint.
There are many reasons to limit the rate of requests to your web applications or API services, one being security: protecting against abusive rapid requests.
Limiting Rate of Connections in NGINX
Start by defining the parameters for rate-limiting using the limit_req_zone directive. The required parameters are a key for identifying clients, a shared memory zone that will store the state of the key and how often it has accessed a request-restricted URL, and the rate.
The limit_req_zone directive is valid within the HTTP context.
limit_req_zone $binary_remote_addr zone=limitreqsbyaddr:20m rate=10r/s;
Also, set a response status code that is returned to rejected requests, using the limit_req_status directive which is valid within the HTTP, sever, and location contexts.
limit_req_status 429;
Now you can use the limint_conn directive to enable request rate-limiting within the HTTP, sever, and location contexts. It takes a memory zone as a parameter and other optional parameters.
limit_req zone=limitreqsbyaddr;
The following configuration example shows limiting the rate of request to a web application API. The shared memory size is 20 MB and the request rate limit is 10 requests per second.
upstream api_service {
    server 127.0.0.1:9051;
    server 10.1.1.77:9052;
}
limit_req_zone $binary_remote_addr zone=limitreqsbyaddr:20m rate=10r/s;
limit_req_status 429;

server {
    listen 80;
    server_name testapp.tecmint.com;
    root /var/www/html/testapp.tecmint.com/build;
    index index.html;

    #include snippets/error_pages.conf;
    proxy_read_timeout 600;
    proxy_connect_timeout 600;
    proxy_send_timeout 600;
    location / {
        try_files $uri $uri/ /index.html =404 =403 =500;
    }
    location /api {
        limit_req zone=limitreqsbyaddr;
        proxy_pass http://api_service;

        proxy_set_header X-Real-IP $remote_addr;
        proxy_set_header Host $host;
        proxy_set_header X-Forwarded-For $proxy_add_x_forwarded_for;

        proxy_http_version 1.1;
        proxy_set_header Upgrade $http_upgrade;
        proxy_set_header Connection "upgrade";


   }
}
Save your configuration file and close it.
Then check if the NGINX configuration syntax is correct using the following command:
$ sudo nginx -t
After that, reload the NGINX service apply the latest changes:
$ sudo systemctl reload nginx
Once the rate limit of 10 requests per second is exceeded by a single client accessing /api/, NGINX returns a “429 Too many requests” error to the client.
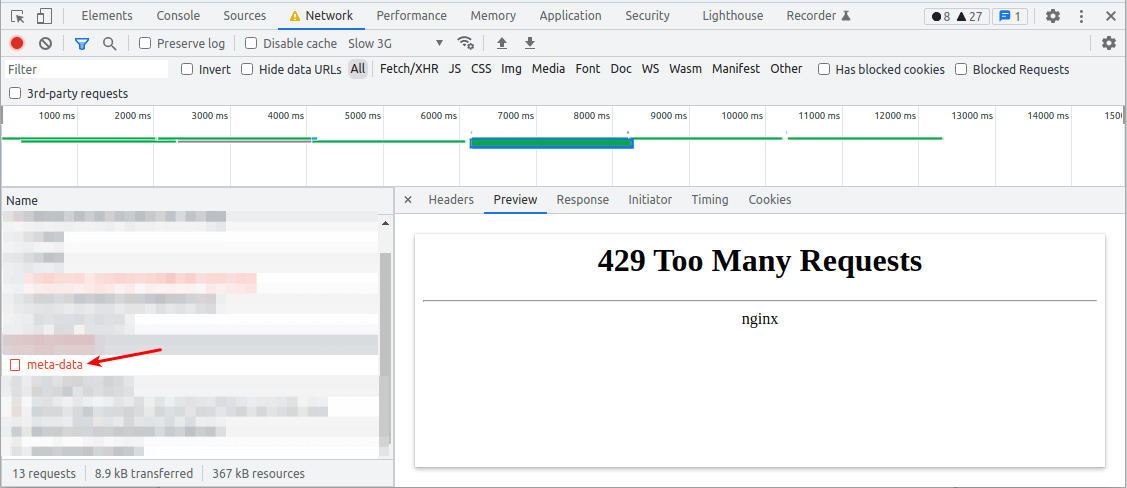
It also logs the incident in the error log.
2022/04/29 00:30:38 [error] 3145846#0: *131039 limiting requests, excess: 0.990 by zone "limitreqsbyaddr", client: 192.168.1.10, server: testapp.tecmint.com, request: "GET /api/v1/app/meta-data HTTP/1.1", host: "testapp.tecmint.com", referrer: "https://testapp.tecmint.com/"

Sometimes depending on the nature of your application or API, a client will need to make many requests all at once, and then reduce its rate for a period of time before making more. NGINX can also buffer any excess requests in a queue and process them promptly.
You can enable this behavior in rate-limiting using the burst parameter with the limit_req directive. To enable queueing with no delay, add the nodelay parameter.
limit_req zone=limitreqsbyaddr burst=20 nodelay;
There is a snag with rate limiting based on a client’s IP, particularly for users accessing your application from the same network and operating behind a NAT. In this case, all their requests will originate from the same IP address. In such a scenario, you can use other variables to identify clients such as a session cookie.
For more information on limiting the rate of requests, check out this NGINX rate limiting on the NGINX website. Next, we shall cover how to limit bandwidth usage in NGINX.


There is an unfortunate little mistake in the configs. In
"location /api"the zone name should belimit_req zone=limitreqsbyaddr;not
limit_req zone=limitregsbyaddr;(regs => reqs)
Hello,
There’s a type in the example config
should be
limitre'Q'sbyaddr.Thanks for sharing!
@Alejandro,
Thanks, corrected the command in the article…