NGINX ships with various modules to allow users to control traffic to their websites, web applications, as well as other web resources. One of the key reasons for limiting traffic or access is to prevent abuses or attacks of certain kinds such as DoS (Denial of Service) attacks.
There are three major ways of limiting use or traffic in NGINX:
- Limiting the number of connections (requests).
- Limiting the rate of requests.
- Limiting bandwidth.
The above NGINX traffic management approaches, depending on the use case can be configured to limit based on a defined key, the most common being a client’s IP address. NGINX also supports other variables such as a session cookie and many more.
In this first part of our three-part series, we will discuss how to limit the number of connections in NGINX to safeguard your websites/applications.
- How To Limit Number of Connections (Requests) in NGINX – Part 1
- How To Limit Rate of Connections (Requests) in NGINX – Part 2
- How To Limit Bandwidth Usage in NGINX – Part 3
Keep in mind that NGINX will consider a connection for limiting only if it has a request being processed by the server and the whole request header has already been read. Therefore, not all client connections are counted.
Limiting Number of Connections in NGINX
First, you need to define a shared memory zone that stores connection metrics for various keys, using the limit_conn_zone directive. As mentioned before, a key can be a text, a variable such as a client’s remote IP address, or a combination of the two.
This directive which is valid within the HTTP context takes two parameters: the key and the zone (in the format zone_name:size).
limit_conn_zone $binary_remote_addr zone=limitconnbyaddr:20m;
To set a response status code that is returned to rejected requests, use the limit_conn_status directive which takes an HTTP status code as a parameter. It is valid within the HTTP, server, and location contexts.
limit_conn_status 429;
To limit connections, use the limint_conn directive to set the memory zone to be used and the maximum number of allowed connections as shown in the following configuration snippet. This directive is valid within the HTTP, server, and location contexts.
limit_conn limitconnbyaddr 50;
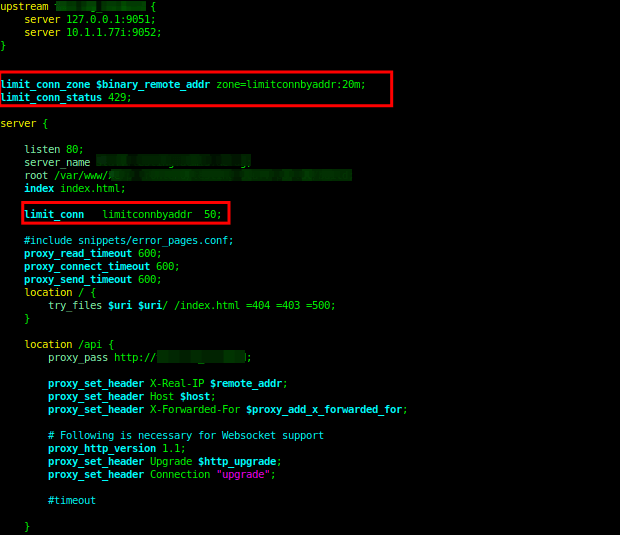
Here is the complete configuration:
upstream api_service {
    server 127.0.0.1:9051;
    server 10.1.1.77:9052;
}
limit_conn_zone $binary_remote_addr zone=limitconnbyaddr:20m;
limit_conn_status 429;

server {
    listen 80;
    server_name testapp.tecmint.com;
    root /var/www/html/testapp.tecmint.com/build;
    index index.html;

    limit_conn   limitconnbyaddr  50;

    #include snippets/error_pages.conf;
    proxy_read_timeout 600;
    proxy_connect_timeout 600;
    proxy_send_timeout 600;
    location / {
        try_files $uri $uri/ /index.html =404 =403 =500;
    }
    location /api {
        proxy_pass http://api_service;

        proxy_set_header X-Real-IP $remote_addr;
        proxy_set_header Host $host;
        proxy_set_header X-Forwarded-For $proxy_add_x_forwarded_for;

        proxy_http_version 1.1;
        proxy_set_header Upgrade $http_upgrade;
        proxy_set_header Connection "upgrade";
   }
}
Save the file and close it.
Then check if the NGINX configuration is fine by running the following command:
$ sudo nginx -t
Next, reload the NGINX service to effect the recent changes:
$ sudo systemctl reload nginx
Checking Nginx Connection Limit
When a client exceeds the maximum number of allowed connections, NGINX returns a “429 Too many requests” error to the client and registers an entry such as the one below in the error log file:
2022/03/15 00:14:00 [error] 597443#0: *127 limiting connections by zone "limitconnbyaddr", client: x.x.x.x, server: testapp.tecmimt.com, request: "GET /static/css/main.63fdefff.chunk.css.map HTTP/1.1", host: "testapp.tecmimt.com"

Limiting Nginx Number of Connections to Application
You can also limit the number of connections for a given server is by using the $server_name variable:
upstream api_service {
    server 127.0.0.1:9051;
    server 10.1.1.77:9052;
}
limit_conn_zone $server_name zone=limitbyservers:10m;
limit_conn_status 429;

server {
    listen 80;
    server_name testapp.tecmint.com;
    root /var/www/html/testapp.tecmint.com/build;
    index index.html;

     limit_conn  limitbyservers  2000;

    #include snippets/error_pages.conf;
    proxy_read_timeout 600;
    proxy_connect_timeout 600;
    proxy_send_timeout 600;
    location / {
        try_files $uri $uri/ /index.html =404 =403 =500;
    }
    location /api {
        proxy_pass http://api_service;

        proxy_set_header X-Real-IP $remote_addr;
        proxy_set_header Host $host;
        proxy_set_header X-Forwarded-For $proxy_add_x_forwarded_for;

        proxy_http_version 1.1;
        proxy_set_header Upgrade $http_upgrade;
        proxy_set_header Connection "upgrade";
   }
}
This configuration enables NGINX to limit the total number of connections to the virtual server powering the application testapp.tecmint.com, to 2000 connections.
Note: Limiting connections based on a client’s IP has a downside. You might end up restricting connections for more than just one user, especially if many users accessing your application are on the same network and operating behind a NAT – all their connections will originate from the same IP address.
In such a scenario, you can employ one or more variables available in NGINX that can identify a client at the application level, an example is a session cookie.
You might also like the following Nginx related articles:
- How to Create Custom 404 Error Page in NGINX
- How To Control Access Based on Client IP Address in NGINX
- How to Cache Content in NGINX
- How to Enable HTTP/2.0 in Nginx
- How to Use Nginx as an HTTP Load Balancer in Linux
That’s it for now! In the next part of this series, we will discuss another useful traffic management technique in NGINX – limiting the rate of requests. Until then, stay with us.