Ping is a simple, widely used, cross-platform networking utility for testing if a host is reachable on an Internet Protocol (IP) network. It works by sending a series of Internet Control Message Protocol (ICMP) ECHO_REQUEST messages to the target host and waiting for an ICMP echo reply (or ECHO_RESPONSE).
You can run a ping test in order to establish if your computer can communicate with another computer (target host); it helps you determine:
- Whether the target host is reachable (active) or not.
- To measure the amount of time it takes for packets to get to the target host and back to your computer (the round-trip time (rtt) in communicating with the target host) and
- The packet loss is expressed as a percentage.
Its output is a list of replies from the target host along with the time taken for the last packet to reach the target host and back to your computer.
It also shows a statistical summary of the test, typically including the number of packets transmitted and those received, the percentage of packet loss; the minimum, maximum, the mean round-trip times, and the standard deviation of the mean (mdev). In case a ping test fails, you will see error messages as output.
Ping Command Examples in Linux
In this article, we will explain 12 practical ping command examples for testing the reachability of a host on a network.
Table of Contents
1. Ping Domain or IP Address
You can run a simple ping test to see whether the target host www.google.com is reachable or not. You can also use an IP address instead of the domain name as shown.
$ ping www.google.com
OR
$ ping 172.217.27.196
Sample Output:
ping www.google.com
PING www.google.com (172.217.27.196) 56(84) bytes of data.
64 bytes from bom07s15-in-f4.1e100.net (172.217.27.196): icmp_seq=1 ttl=111 time=5.01 ms
64 bytes from bom07s15-in-f4.1e100.net (172.217.27.196): icmp_seq=2 ttl=111 time=4.75 ms
64 bytes from bom07s15-in-f4.1e100.net (172.217.27.196): icmp_seq=3 ttl=111 time=5.37 ms
64 bytes from bom07s15-in-f4.1e100.net (172.217.27.196): icmp_seq=4 ttl=111 time=4.99 ms
^C
--- www.google.com ping statistics ---
4 packets transmitted, 4 received, 0% packet loss, time 3004ms
rtt min/avg/max/mdev = 4.751/5.030/5.373/0.222 ms
...
From the results of the above command, the ping was successful and there were no packets lost. One important thing to take note of, in a ping test output is the time at the end of each ping reply.
Assuming you are carrying out ping testing on your servers, then the value here matters a lot, depending on the type of application you are running on a server.
If, for example, you have a web application where a single user request results in so many queries to a database(s) to generate results on the UI, then a lower ping time to that particular server implies more data is being transmitted without a delay and the opposite is true.
2. Ping Echo Request
You can specify the number of ECHO_REQUESTs to be sent after which ping exits, using the -c flag as shown (in this case the ping test will stop after sending 5 packets).
$ ping -c 5 www.google.com

PING www.google.com (172.217.27.196) 56(84) bytes of data.
64 bytes from bom07s15-in-f4.1e100.net (172.217.27.196): icmp_seq=1 ttl=111 time=4.31 ms
64 bytes from bom07s15-in-f4.1e100.net (172.217.27.196): icmp_seq=2 ttl=111 time=4.35 ms
64 bytes from bom07s15-in-f4.1e100.net (172.217.27.196): icmp_seq=3 ttl=111 time=4.06 ms
64 bytes from bom07s15-in-f4.1e100.net (172.217.27.196): icmp_seq=4 ttl=111 time=5.20 ms
64 bytes from bom07s15-in-f4.1e100.net (172.217.27.196): icmp_seq=5 ttl=111 time=4.41 ms

--- www.google.com ping statistics ---
5 packets transmitted, 5 received, 0% packet loss, time 4006ms
rtt min/avg/max/mdev = 4.064/4.464/5.195/0.383 ms
3. Set Ping Interval Timeout
The -i flag allows you to set intervals in seconds between sending each packet, the default value is one second.
$ ping -i 3 -c 5 www.google.com

PING www.google.com (172.217.27.196) 56(84) bytes of data.
64 bytes from bom07s15-in-f4.1e100.net (172.217.27.196): icmp_seq=1 ttl=111 time=5.71 ms
64 bytes from bom07s15-in-f4.1e100.net (172.217.27.196): icmp_seq=2 ttl=111 time=6.19 ms
64 bytes from bom07s15-in-f4.1e100.net (172.217.27.196): icmp_seq=3 ttl=111 time=5.39 ms
64 bytes from bom07s15-in-f4.1e100.net (172.217.27.196): icmp_seq=4 ttl=111 time=7.34 ms
64 bytes from bom07s15-in-f4.1e100.net (172.217.27.196): icmp_seq=5 ttl=111 time=4.77 ms

--- www.google.com ping statistics ---
5 packets transmitted, 5 received, 0% packet loss, time 12014ms
rtt min/avg/max/mdev = 4.768/5.879/7.341/0.863 ms
4. DoS Attack with Ping Flooding aka Ping of Death
To determine the response of your network under high-load conditions, you can run a “flood ping” which sends requests as fast as possible, using the -f switch. Only the root can use this option, otherwise, use the sudo command to gain root privileges.
$ sudo ping -f www.google.com
OR
$ sudo ping -f -i 3 www.google.com	#specify interval between requests

PING www.google.com (172.217.163.36) 56(84) bytes of data.
.......................................................................................................................................................................................^C
--- www.google.com ping statistics ---
2331 packets transmitted, 2084 received, 10% packet loss, time 34095ms
rtt min/avg/max/mdev = 29.096/29.530/61.474/1.417 ms, pipe 4, ipg/ewma 14.633/29.341 ms
5. Ping Broadcast of a LAN
You can enable pinging a broadcast using the -b option, which will get a response from all IP addresses connected to your LAN network.
$ ping -b 192.168.0.0
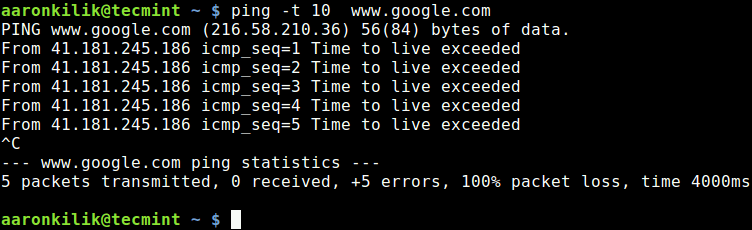
6. Set Ping TTL Value
To limit the number of network hops (TTL – Time-to-live) that probes traverse, use the -t flag. You can set any value between 1 and 255; different operating systems set different defaults.
Each router that receives the packet subtracts at least 1 from the count and if the count is still greater than 0, the router forwards the packet to the next hop, otherwise, it discards it and sends an ICMP response back to your computer.
In this example, the TTL has been exceeded and the ping test has failed, as shown in the screenshot.
$ ping -t 10 www.google.com
7. Set Ping Packet Size
The default packet size should be sufficient for a ping test, however, you can change it to meet your specific testing needs. You can specify the size of the payload, in the number of bytes using the -s option, which will result in a total packet size of the value provided plus 8 extra bytes for the ICMP header.
$ ping -s 1000 www.google.com
8. Set Ping Preload
If preload is added, ping sends that many packets not waiting for a reply. Note that only the root may select a preload of more than 3, otherwise, use the sudo command to gain root privileges.
$ sudo ping -l 5 www.google.com
9. Set Ping Timeout
It is also possible to set the time to wait for a response, in seconds, using the -W option as shown.
$ ping -W 10 www.google.com
10. Set Ping Timeout in Seconds
To set a timeout in seconds, before ping exits regardless of how many packets have been sent or received, use the -w flag.
$ ping -w 5 www.google.com
11. Ping Debug ICMP Packets
The -d option allows you to enable the debug IP packet detail as shown.
$ ping -d www.google.com
12. Ping Verbose Output
You can enable verbose output using the -v flag, as follows.
$ ping -v www.google.com
Note: Ping may not necessarily be used for testing networking connectivity, it simply tells you whether an IP address is active or inactive.
It is normally used together with the traceroute program, but, MTR – a modern network diagnostic tool combines the functionality of ping and traceroute and offers many additional features.
For a comprehensive list of networking tools, check out: Linux Network Management, Troubleshooting, and Debugging
Summary
Ping is a very common method for troubleshooting the accessibility of hosts on a network. In this article, we’ve explained 12 practical ping command examples for testing the reachability of a networked device. Share your thoughts with us via the comment form below.


Please explain what is the command for an update and what is the command for a patch.
@Nelson,
The command for a system update or patch is done by apt or yum command.
Thank you for the helpful information, Ravi.
Which Linux Foundation course details X11 forwarding & ssh tunneling? If not, what are the CLIs for X11 forwarding & ssh tunneling?
@Nelson,
Read this article to know more about SSH forwarding and tunneling – How to Create SSH Tunneling or Port Forwarding in Linux
What is the appropriate e-book or course that details the entire list of Linux ping commands?
@Nelson,
No idea, but you can use
man pingto get detailed documentation of ping command usage and options…I just received a new Raspberry Pi Zero and can not ping or ssh to it. I am using the latest versions of Buster Lite and Buster Desktop (not at the same time).
I have used the default DHCP ip address and also set a static ip address. I have connected it to my Ubuntu laptop via USB cable and also connected a Raspberry power supply. The nmap -sn does not show the ip address for this Raspi.
Any suggestions on how I can connect to this machine headless? Do you think that connecting it to the monitor would provide me with any info about it? I currently do not have a mini-HTML cable so will have to get one.
Thanks
Any particular reason why?
contains both flood and interval options? :)
Thanks Aaron
@coudu
Welcome, thanks for the feedback.