We all know the feeling of looking for a file and not finding it, even in the trash. The trauma that comes with file and data loss should end thanks to the TestDisk – is a free, open-source software that was initially designed for recovering memory partitions and making non-bootable disks bootable again. It is useful for recovering data from partitions that are caused by human errors or viruses.
In this article, we will show you how to recover deleted files in Linux using the TestDisk data recovery tool. To use testdisk, you must have TestDisk installed on your Linux system using our article: How to Install and Use TestDisk Data Recovery Tool in Linux.
Once you’ve TestDisk installed on your Linux, you can verify the version of testdisk using the command.
# testdisk --version
Sample Output
TestDisk 7.0, Data Recovery Utility, April 2015
Christophe GRENIER <[email protected]>
http://www.cgsecurity.org

Version: 7.0
Compiler: GCC 7.2
ext2fs lib: 1.44.1, ntfs lib: libntfs-3g, reiserfs lib: none, ewf lib: none, curses lib: ncurses 6.0
OS: Linux, kernel 4.15.0-55-generic (#60-Ubuntu SMP Tue Jul 2 18:22:20 UTC 2019) x86_64
Great! This confirms that we have successfully installed testdisk. Now proceed further to learn how to recover deleted files in Linux.
Step 1: Creating TestDisk Data Log File
To recover deleted files, first you need to create a testdisk.log file, as this log data is essential as it contains useful information for recovering your data later.
# testdisk
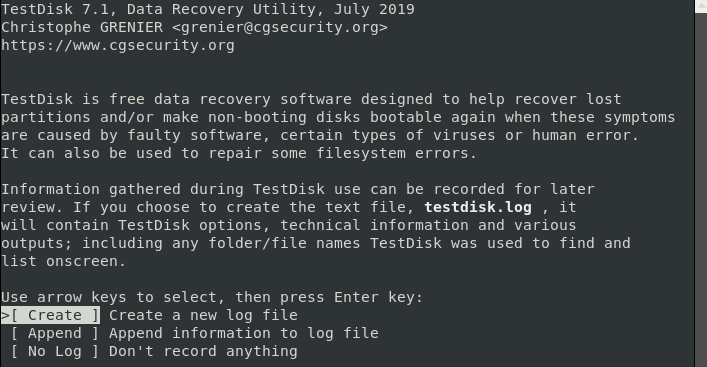
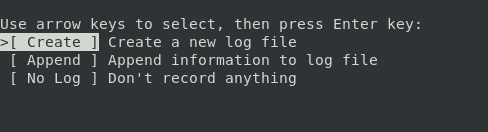
The utility description screen has three options mentioned in detail below:
Create
-
- – the “
create
- ” option allows you to create a new log file.
- Append – the option enables you to add extra information to the report from the previous sessions.
- No log – choose the option when you don’t want to record logs for later use.
Note: The Testdisk utility tool is beginner-friendly; it offers suggestions to the options on each screen. Choose the recommended options (highlighted). Press up and arrow keys to switch between the different options.
Select the ‘Create’ option as we need to create a new log file. Depending on the system security, the computer might prompt for sudo password to proceed with the recovery.
Step 2: Choose Your Recovery Drive
Testdisk will then display the disks attached to your system. The system displays each drive’s total storage space and its free space. Choose the drive where your file is stored then use the right and left arrow keys to navigate and select ‘Proceed‘. Next, press the ENTER button. In this case, the drive is an external flash drive labelled /dev/sdb.
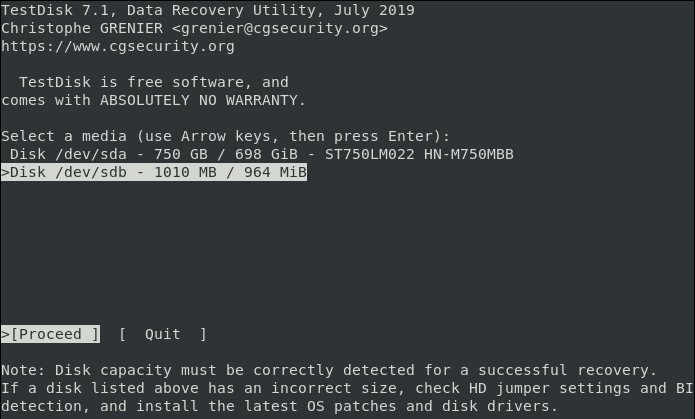
Depending on the security permissions, your system may not display some drives. For such cases, click the “Sudo option”, which is beside the Proceed and Quit options.
Open the Sudo and enter your password. After successful password verification, the system will display all attached drives with their specs.
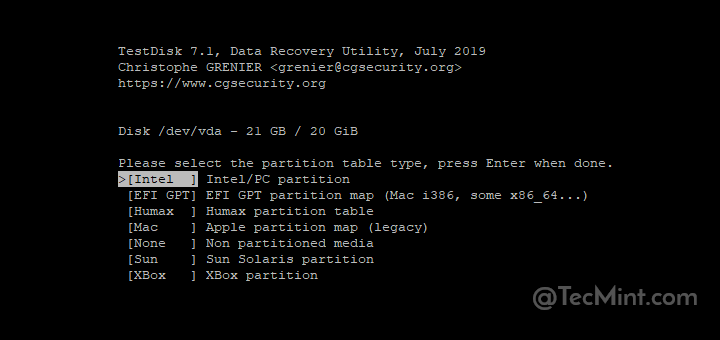
Step 3: Selecting the Partition Table Type
After selecting your drive, the next task is to identify the correct partition table. For beginners, it can be hard to identify the correct partition table type but you need not worry about this. The system will automatically predict and highlight the best choice.
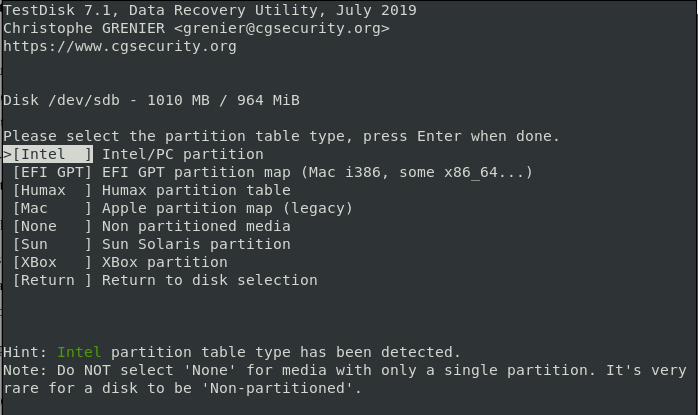
Next, click ‘ENTER‘ to continue.
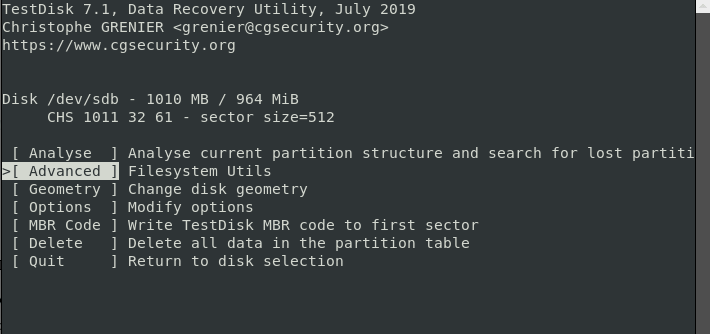
After indicating the correct drive and the partition type, the next screen window displays a list of recovery options. You can select any of the options from the screen depending on your preferences. Because we are recovering a deleted file, we will select the ‘Advanced’ option.
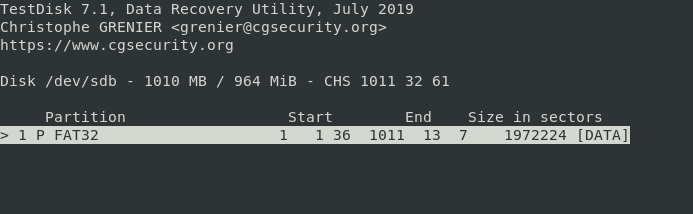
Step 4: Select the Deleted File Source Drive Partition
The screen in our picture allows you to choose the partition if your computer has many. Select your choice and hit ‘ENTER‘ to proceed. In this case, I’m using a removable flash drive with only 1 FAT32 partition.
Step 5: Check the Deleted File Source Directory
After the utility displays the system directories for all partitions, navigate to the specific directory you lost or deleted your file. For instance, if your file was saved in the “Documents” file, navigate to the Documents tab.
Tip: use the “back” arrow to navigate back to where you lost your files.
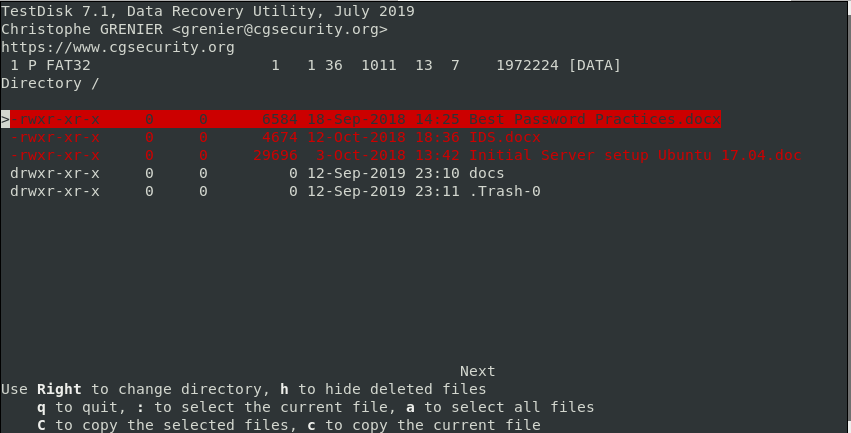
After navigating to the source directory, you will find the deleted files highlighted in red. Browse your file from the drop-down list and highlight or check it.
Step 6: Restore Deleted File in Linux
Copy the file you want to restore by pressing the letter c on your keyboard. In the previous image, the deleted file that I want to restore is called Best Password Practices.docx.
To copy the file, simply press the letter c on the keyboard.
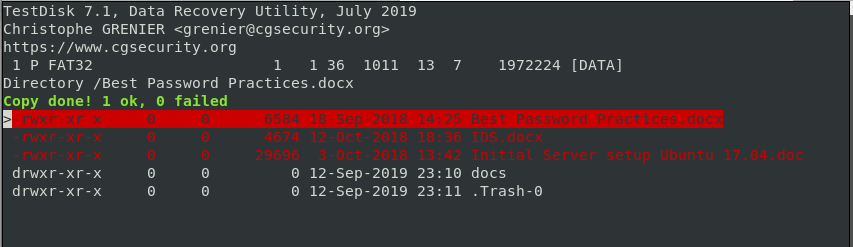
Step 7: Paste the Recovered File to Directory
Testdisk utility will then display a list of locations that you can paste your copied file in order to recover it. Again, select the destination by scrolling and just like before, press C to paste it. In this case, the file is copied into the Public directory.

If all went well, you should get a notification below that the files were successfully copied.
To exit from Testdisk utility, select Quit, and press ENTER. This will take you back to the previous screen. Select Quit and press ENTER. Again, this takes you back and just like before, select Quit and press ENTER to exit completely from TestDisk.
And that’s how you can recover a deleted file in Linux using the testdisk utility tool. If you ever accidentally delete a file on your system, don’t panic, testdisk will come to your rescue.
This application works only when the file is available in the trash of rhel when we delete files from trash, we can not recover files, I don’t know what is the use of this application if it recovers files from trash only, that we can do manually too.
It worked just fine! thank you very much, James. You used testdisk version 7.1.
Hi, I managed to accidentally delete 4 months of my drawings and then empty the trash. I followed the steps and used testdisk to copy the deleted folder to another destination, but none of the files which had been inside been listed, either in the original location or the location where the folder was restored to. The folder is empty.
Anything I’m missing?
Hey,
I ran all of the steps and the file is restored, but it is empty, all the content has been deleted…
do you know why?
thanks
Matti
I have a micro 16gb sd drive. Testdisk displays >Disk /dev/sda 524 / 512 kib (RO) – Multi Flash Reader.
Why does it not show as 16gb drive? The drive was formatted in Fat32 and has a raspbian OS installed. Gparted shows the drive as 512kib and filesystem and partition as unallocated. Can any files still be recovered somehow?
Thanks for the post here. I tried to recover a text file that I accidentally deleted. However, the recovered file is not in plain text format. I ran a ‘file‘ command on it and it shows it as a JPEG format. Can you please help further? Thanks in advance.
PhotoRec will recovers JPEG and other image files.
Good Afternoon,
Everything goes exactly as you describe, except my files do not return. I even get the ‘Copy done! 6 ok, 0 failed” message. However, my files are not there when I go to look for them. I tried several different folders, and “ls -al” when listing the contents. my files are not there. Any advice or help would be GREATLY appreciated.
Thank you
Check your log file. The name(s) may be listed in there.
Check the recovered file directory. Files may be in there but under different names.
I have used PhotoRec to bulk recover thousands of deleted/lost picture files. PhotoRec and TestDisk have been written by the same author and perform a similar functions.
The PhotoRec program worked great. HOWEVER, it assigned its own names to the recovered files. All the files had the correct extension (.JPEG, .GIF, .PNG, etc) but the names started with a lower case alpha character, followed by 9 digits. I had to rename each image to a meaningful name based on its content.
You may have encountered the same problem.
Sir,
Can I recover a particular folder from a particular drive?
Thanks
just one thing: I-LOVE-YOU!!
(i mean nothing more than my full appreciation on your explanation and work)
but really, thank you 3000.
By the way, I suppose that some things must be learned by oneself, but I used testdisk 7.1, not 7.0 so I was afraid as f* that by mistake delete permanently my files.
My problem was that I have a LOT of music, so with photorec, I was just recovering files without the original name.
So, my only observation on your tutorial is that you were focused on files, but a little parenthesis on how to recover folders would have helped me so much more, but as I said before, somethings must be learned by oneself.
Again, THANK YOU
Thanks a bunch, Omar! I’m glad that this article was immensely helpful to you. Kepp it Tecmint.
PhotoRec uses its own naming convention. You have to rename the files to meaningful names based on their content. I know it is a time-consuming chore. I recovered thousands of image files and am trying to identify them. Unfortunately, at this point, I do not remember where or why I took a particular picture so it is hard to properly name them.
Ok, James, I tried another one of my notebook computers, running Mint 18. I deleted a couple of files and when I ran Testdisk, it did not show the deleted files (nothing highlighted in red) in the directory I deleted the files from.
I was logged on as an Administrator and gave the password when asked for the SUDO password.
I will seek help at our local Linux meeting next month. Thanks!
Ok James, I think I finally figured out that after clicking on the Advanced option, I then had to select the proper partition of the hard drive, then choose the directory of the partition, where the deleted file was located.
As part of my test, I did delete a file, but when I go to the directory where that deleted file was located, Testdisk does not show the deleted file and no file is highlighted in red.
Any ideas on what I am doing wrong, here? Thanks.
Hey Bill, that’s quite strange. The deleted file should appear highlighted in red. Do you have the required permissions to access the directory where the file was deleted ? Give it another shot.
In Step 3, when I choose the Advanced option, the next screen only has an option the create an Image. There are no other options to recover a file from any directory.
This problem occurs on both of my notebook computers. One has Mint 18 and dual boots with Windows and the other computer has Mint 18 and dual boots with Windows.
Any idea what I am doing wrong?
Thanks!
Hey Bill, Have you tried Steps 1 and 2 successfully? If yes, Kindly paste the output you are getting upon pressing the ‘Advanced‘ option. Basically, pressing the ‘Advanced‘ option should take you to the drive you want to recover the file from.
For the note, in case if someone will stuck on the similar issue:
– it occurs that the program suggests us some additional options at the bottom.
We can navigate between them using right and left arrows.
– at the step where we pick Advanced, we should also choose “List” at the bottom options (it’s on create Image by default)
“It is useful for recovering data from partitions that are caused by human errors or viruses.”
Partitions are not caused by human errors or viruses. They are set up by humans for a purpose. Shouldn’t that rather read “…deleted by…”?
According to the Recovered Deleted File screen, the copy failed. The resulting bit is “0”, not “1”.